一.用户认证Authorticatons
1.源码解析
第一步. 找入口
 def dispatch(self, request, *args, **kwargs):
        # 1.首先我们进入的是APIView类多的dispatch()方法中 执行任务的分发

        """
        `.dispatch()` is pretty much the same as Django‘s regular dispatch,
        but with extra hooks for startup, finalize, and exception handling.
        """
        self.args = args
        self.kwargs = kwargs

        # 请求源码模块 二次封装request django 生命周期的起源
        request = self.initialize_request(request, *args, **kwargs)
        self.request = request
        # 响应模块
        self.headers = self.default_response_headers  # deprecate?
        # 这里就是三大认证的入口初始化
        try:# 三大 认证authortications 权限permissions  频率throttle 入口
            self.initial(request, *args, **kwargs)

            # Get the appropriate handler method
            if request.method.lower() in self.http_method_names:
                handler = getattr(self, request.method.lower(),
                                  self.http_method_not_allowed)
            else:
                handler = self.http_method_not_allowed

            response = handler(request, *args, **kwargs)
第二.进行初始化
 def initial(self, request, *args, **kwargs):
        """
        Runs anything that needs to occur prior to calling the method handler.
        """
        self.format_kwarg = self.get_format_suffix(**kwargs)

        # Perform content negotiation and store the accepted info on the request
        neg = self.perform_content_negotiation(request)
        request.accepted_renderer, request.accepted_media_type = neg

        # Determine the API version, if versioning is in use.
        version, scheme = self.determine_version(request, *args, **kwargs)
        request.version, request.versioning_scheme = version, scheme

        # Ensure that the incoming request is permitted
        # (1)perform——authtication 执行认证 (用户的身份进行认证)
        self.perform_authentication(request)
        # (2)检查权限 >>> 权限认证
        self.check_permissions(request)
        # (3)检查频率 >>> 频率认证
        self.check_throttles(request)
步骤三
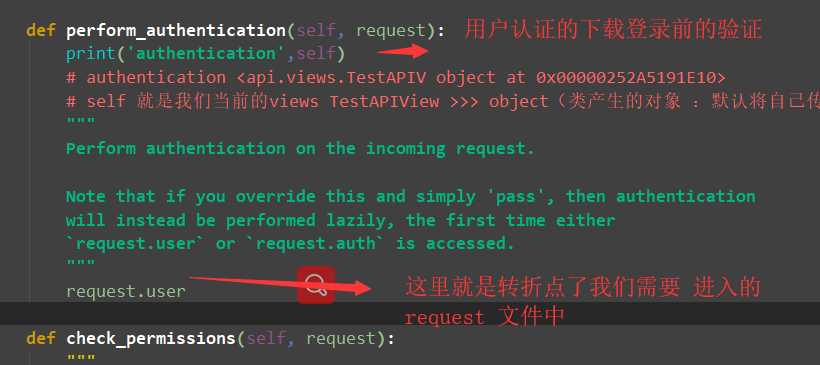
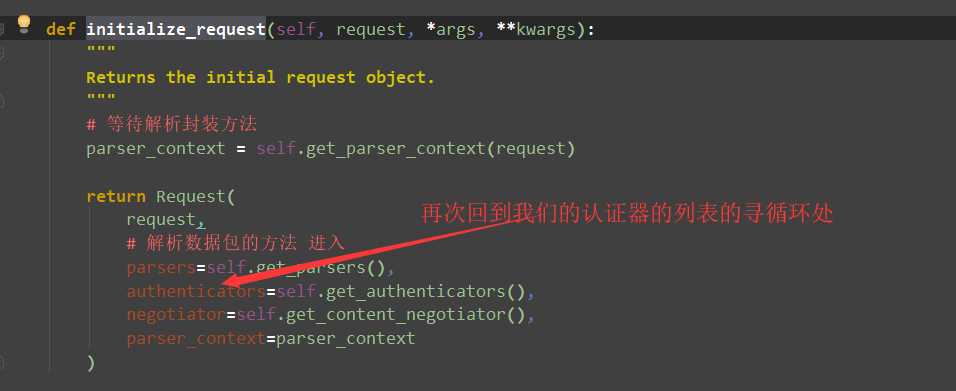
request 的入口处
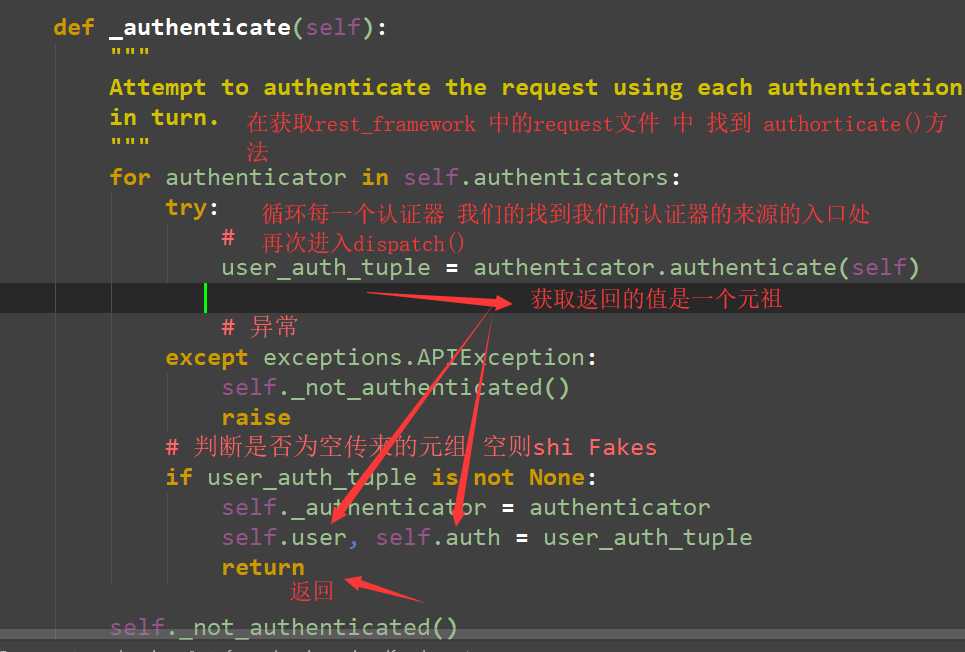
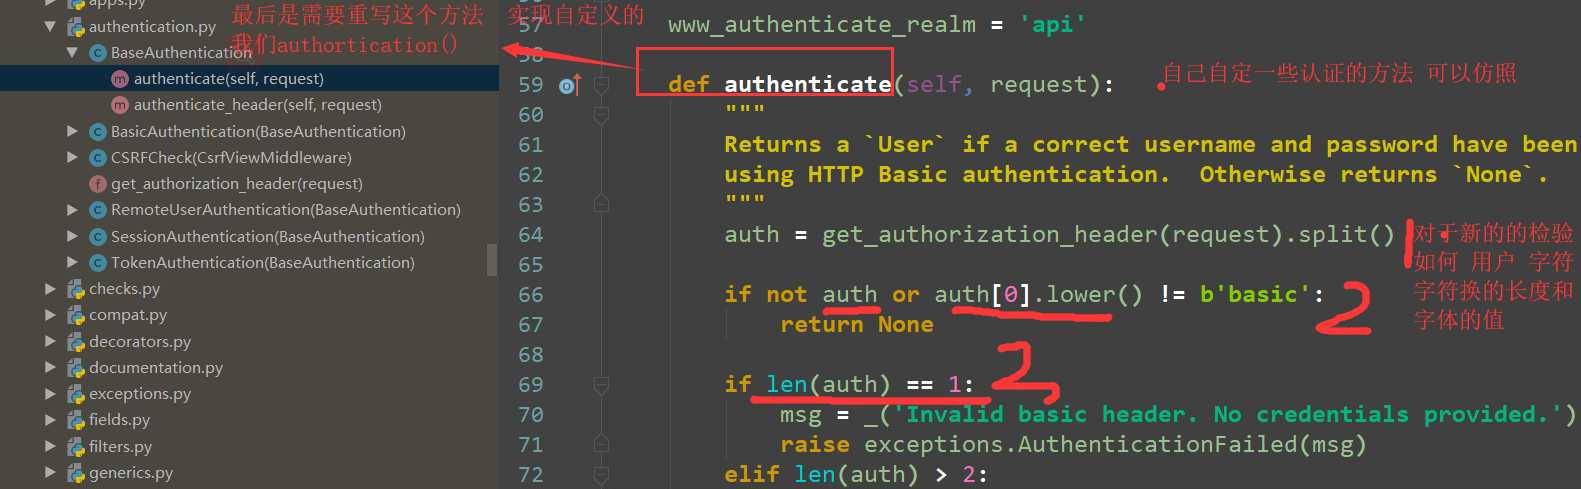
重写我们authorticate()方法 需要注意的的是自己的思路 关于 检验的方法 检验的数据 是怎么进行检验的
Settings 的全局配置和局部配置
# 配置自定义的异常文件的全局的配置
# 自定义drf配置爱-全局响应配置
REST_FRAMEWORK = {
    # drf提供的渲染类
    ‘DEFAULT_RENDERER_CLASSES‘: [
        ‘rest_framework.renderers.JSONRenderer‘,
        ‘rest_framework.renderers.BrowsableAPIRenderer‘,
    ],

    # drf提供类解析的数据包的格式  请求格式 再取全局进行配置 全局 进而进行局部的的设置
    ‘DEFAULT_PARSER_CLASSES‘: [
        ‘rest_framework.parsers.JSONParser‘,
        ‘rest_framework.parsers.FormParser‘,
        ‘rest_framework.parsers.MultiPartParser‘,
    ],
    # 报错异常的全局文件的配置
    ‘EXCEPTION_HANDLER‘: ‘utils.exception.exception_handler‘,


    # 三大认证
‘DEFAULT_AUTHENTICATION_CLASSES‘: [
        # ‘rest_framework.authentication.SessionAuthentication‘,
        # ‘rest_framework.authentication.BasicAuthentication‘
    ],
    ‘DEFAULT_THROTTLE_RATES‘: {
        ‘user‘: ‘3/min‘,
        ‘anon‘: None,
        ‘sms‘:‘3/min‘
    },
}
2.自定义用户认证
viewd视图代码
from utils.reponse import APIResponse

# Create your views here.
from rest_framework.views import APIView
from utils.authentications import MyAuthentication
from api import models
from utils.throttle import MyRateThrottle


class TestAPIView(APIView):
    authentication_classes = [MyAuthentication] # 一般局部还是全局就要看自己的业务需求取匹配 比如全局都需要进行用户检验的旧匹配在全局的seetings中 如果是单个功能模块要进行验证的我们当然是配置在局部
    def get(self, request, *args, **kwargs):
        # 我们需要自定义三大认证而且 在全局配置三大认证的 类 优先走我们自己定义的认证方法
        # 首先我们需要创建三个认证文件
        # 源码解析 运行原理

        print(request.user)

        return APIResponse(1, ‘from get ok‘)

    def post(self, request, *args, **kwargs):
        request_data = request.data
        print(request_data)
        user_obj = models.User.objects.create_user(username=‘koko‘, password=‘123‘)
        print(user_obj),

        return APIResponse(‘OK‘)
# 项目的三大认证(1)用户认证
# 入口 APIView

"""

1) 创建继承BaseAuthentication的认证类
2) 实现authenticate方法
3) 实现体根据认证规则 确定游客、非法用户、合法用户
4) 进行全局或局部配置

认证规则
i.没有认证信息返回None(游客)
ii.有认证信息认证失败抛异常(非法用户)
iii.有认证信息认证成功返回用户与认证信息元组(合法用户)
"""
# (1) 继承BaseAuthentication 类
# (2) 重写authenticate(self,request) 方法 自定义认证规则
# (3) 认证股则基于的条件
"""
主要分三种情况
  1. 啥都没有发生直接返回None(游客)
  2.有认证信息认证失败报异常(不合法用户)
  3.有认证信息认证成功返回用户与认证信息 元组的格式(合法用户)
"""
# (4) 上面的步骤完成我去全局(settings文件中)或局部文件进行配置

from api import models
from rest_framework.authentication import BaseAuthentication
from rest_framework.exceptions import AuthenticationFailed


class MyAuthentication(BaseAuthentication):
    # 重新写我们自定义的认证方法
    def authenticate(self, request):
        # 返回认证信息
        """
        # 前台在请求头携带认证信息,
        #       且默认规范用 Authorization 字段携带认证信息,
        #       后台固定在请求对象的META字段中 HTTP_AUTHORIZATION 获取

        """
        auth = request.META.get(‘HTTP_AUTHORIZATION‘, None)
        # (1)处理游客登陆
        if auth is None:
            return None

        # (2) 我们自己设置一下认证小规则(分两部分:): “ auth 要认证的字符串”
        auth_list = auth.split()
        # print(auth_list,333) [‘auth‘, ‘aaa.123.yyy‘] 333

        # 检验是合法用户还是非法用户  auth_list 信息

        if not (len(auth_list) == 2 and auth_list[0].lower() == ‘auth‘):
            # 自动抛出异常
            print(auth,123123)
            raise AuthenticationFailed(‘认证信息有误 判定为不合法用户‘)

         # 内容的检验

        if auth_list[1] != ‘aaa.123.yyy‘:  # 内容符合 判定 检验失败
            raise AuthenticationFailed(‘内容不匹配,非法用户‘)

        #
        # 合法的用户还需要从auth_list[1]中解析出来
        # 注:假设一种情况,信息为abc.123.xyz,就可以解析出admin用户;实际开发,该逻辑一定是校验用户的正常逻辑

        # else 获取用户

        user = models.User.objects.filter(username=‘admin‘).first()

        if not user:
            raise AuthenticationFailed(‘数据有误,非法用户‘)
        # print(request.user,555)
        return (user, None)


"""
# 家庭作业
# 1) 可以采用脚本基于auth组件创建三个普通用户:models.User.objects.create_user()
#         注:直接写出注册接口更好
# 2) 自定义session表:id,u_id,token,为每个用户配置一个固定人认证字符串,可以直接操作数据库
#         注:在注册接口中实现更好
# 3) 自定义认证类,不同的token可以校验出不同的登陆用户
"""
#
permissions 代码 权限 ISauthorticate 判断用户是否登录 的时候进行权限的校验
# permission 用户权限认证

from rest_framework.permissions import BasePermission
from django.contrib.auth.models import Group


class MyPermission(BasePermission):
    def has_permission(self, request, view):
        # 只读接口判断
        r1 = request.method in (‘GET‘, ‘HEAD‘, ‘OPTIONS‘)
        # group为有权限的分组
        group = Group.objects.filter(name=‘管理员‘).first()
        # groups为当前用户所属的所有分组
        print(group)
        groups = request.user.groups.all()
        print(groups)
        r2 = group and groups
        r3 = group in groups
        # 读接口大家都有权限,写接口必须为指定分组下的登陆用户
        return r1 or (r2 and r3)
View 视图]
class TestAuthenticatedAPIView(APIView):
    permission_classes = [IsAuthenticated]  # 用户是否登录进行权限校验

    def get(self, request, *args, **kwargs):
        return APIResponse(0, ‘登陆才能访问的接口 ok‘)


# 游客只读 登陆无限制
from rest_framework.permissions import IsAuthenticatedOrReadOnly


class TestAuthenticatedOrReadonlyAPIView(APIView):
    permission_classes = [IsAuthenticatedOrReadOnly]

    def get(self, request, *args, **kwargs):
        return APIResponse(1, ‘只读 ok‘)

    def post(self, request, *args, **kwargs):
        return APIResponse(0, ‘只读 ok‘)


# 游客只读, 登陆用户只读,只有登陆用户属于发管理员 分组 才可以进行增删改


from utils.permissoins import MyPermission


class TestAdminOrderOnlyAPView(APIView):
    permission_classes = [MyPermission]

    def get(self, *args, **kwargs):
        return APIResponse(0, ‘自定义读 ko‘)

    def post(selfs, *argsk, **kwargs):
        return APIResponse(0, ‘自定义写 oko‘)
2.自定义权限认证
# 只有登路后才能访问 权限认证
from rest_framework.permissions import IsAuthenticated


class TestAuthenticatedAPIView(APIView):
    permission_classes = [IsAuthenticated]

    def get(self, request, *args, **kwargs):
        return APIResponse(0, ‘登陆才能访问的接口 ok‘)


# 游客只读 登陆无限制
from rest_framework.permissions import IsAuthenticatedOrReadOnly


class TestAuthenticatedOrReadonlyAPIView(APIView):
    permission_classes = [IsAuthenticatedOrReadOnly]

    def get(self, request, *args, **kwargs):
        return APIResponse(1, ‘只读 ok‘)

    def post(self, request, *args, **kwargs):
        return APIResponse(0, ‘只读 ok‘)


# 游客只读, 登陆用户只读,只有登陆用户属于发管理员 分组 才可以进行增删改


from utils.permissoins import MyPermission


class TestAdminOrderOnlyAPView(APIView):
    permission_classes = [MyPermission]

    def get(self, *args, **kwargs):
        return APIResponse(0, ‘自定义读 ko‘)

    def post(selfs, *argsk, **kwargs):
        return APIResponse(0, ‘自定义写 oko‘)
三.频率认证
thorttle 文件代码
导入模块 方法常用记得 多看看看看源代码的
# 导入throttle  继承simpleRateThrottle

from rest_framework.throttling import SimpleRateThrottle

# 自定义类重写 get_cache_key 验证 方法


class MyRateThrottle(SimpleRateThrottle):
    scope = ‘sms‘   # 先定义‘3/min‘
    def get_cache_key(self, request, view):
        # 自定义rate

        # 获取我们的前端信息
        mobile = request.query_params.get(‘mobile‘) or request.data.get(‘mobile‘)
        if not mobile :
            return None
        else:
            # 返回刻有动态获变化 手机的验证 次数 切不重复的字符串 作为缓存的key

            return ‘throttle_%(scope)s_%(ident)s‘ %{‘scope‘:self.scope, ‘ident‘:mobile}

"""

  >>>1  def get_cache_key(self, request, view):
        if request.user.is_authenticated:
            ident = request.user.pk
        else:
            ident = self.get_ident(request)

        return self.cache_format % {
            ‘scope‘: self.scope,
            ‘ident‘: ident
        }


"""
"""

        def check_throttles(self, request):

        Check if request should be throttled.
        Raises an appropriate exception if the request is throttled.

            throttle_durations = []
            for throttle in self.get_throttles():
                if not throttle.allow_request(request, self):
"""
View视图文件的代码
class TestRateThrottle(APIView):
    throttle_classes = [MyRateThrottle]

    def get(self, request, *args, **kwargs):
        return APIResponse(1,‘ from get ok ‘)

    def post(self, request, *args, **kwargs):
        return APIResponse(1,‘from post ok ‘)
四.Jwt 的使用
1.首先Jwt >>> Json Web Token
Jwt 是一个实现 集群分步式开发的插件 Django >>> drf rest_frammeword可以帮我们实现前后端分离 Vue +Drf 项目
JWT 是基于DRf的插件 主要是我们可以进行分步式集群开发 >>> Nginx (IP url 等方式进行服务器的部署分发 )>>>缓解数据库的压力 >>> Token 的生成 hasa 256 将字符串返回 浏览器进行保存是不需要进行存储的 请求时进行校验 即可
这样一来岂不是完美的存在 ? 暂时还没有学到 后期作为补充
优点:
(1)服务器不需要进行存储token, token 交给每一个客户daunt自己进行存储, 减少服务器压力
(2)服务器存储的是签发(生成) 和检验token l两段算法(代码) 签发认证的效率高
(3)算法完成个集群服务器同步成本低, 路由项目完成集群部署(适应高并发)
JWT格式:
(1)jwt token 采用的是三段式: 头部 .载荷.签名
(2)每一部分都是一个json 字典加密行成的字符串
(3)头部和载荷采用的是base64可逆加密(前后都可以进行解密)
(4)签名采用hash256不可逆加密(后台验证采用碰撞校验)
(5)各部分字字典的内容:
头部:基础信息 -- 公司信息 -项目组信息\可逆加密的算法
载荷:有用单非私密的信息 - 用户公开信息\ 过期时间(重要)
签名:头部+载荷+秘钥 不可逆加密后的结果
注:服务器Jwt签名加秘钥 一定不能泄露
签发token ; 固定的头部信息加密,当前的登录用户与国期时间加密 , 头部 + 载荷 + 秘钥生成不可逆加密
检验token:头部可校验也可以不校验,载荷校验出用户与过期时间, 头部+载荷+秘钥完成碰撞检测token是否被篡改
2. 前后端的分里的生命请求周期
3.如何使用:
1.导包 不需要进行注册 因为没有数据库 也没有model 及导包 导入模块即可
drf -jwt插件
下载>>>官网:https://github.com/jpadilla/django-rest-framework-jwt
安装 >>>Jwt : pip install djangorestframework-jwt
出现了一点意外 说我的pip 包没有进行更新 执行以下更新就就好了
You are using pip version 9.0.1, however version 19.3.1 is available.
You should consider upgrading via the ‘python -m pip install --upgrade pip‘ command.
配置:
源码只有post 请求 还是的写serializer 序列化组件
    def post(self, request, *args, **kwargs):
        serializer = self.get_serializer(data=request.data)

        if serializer.is_valid():
            user = serializer.object.get(‘user‘) or request.user
            token = serializer.object.get(‘token‘)
            response_data = jwt_response_payload_handler(token, user, request)
            response = Response(response_data)
            if api_settings.JWT_AUTH_COOKIE:
                expiration = (datetime.utcnow() +
                              api_settings.JWT_EXPIRATION_DELTA)
                response.set_cookie(api_settings.JWT_AUTH_COOKIE,
                                    token,
                                    expires=expiration,
                                    httponly=True)
            return response

        return Response(serializer.errors, status=status.HTTP_400_BAD_REQUEST)
如何使用 :
自定义Jwt的内部方法
原文:https://www.cnblogs.com/mofujin/p/11717421.html