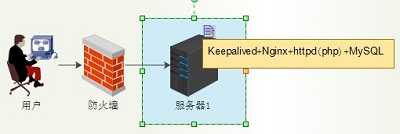
假设:公司初期只有一台web服务器,搭建Web服务器的脚本如下:

 1 #检查环境
 2 setenforce 0 &> /dev/null
 3 sed -i s/=enforcing/=disabled/g /etc/selinux/config
 4 systemctl restart firewalld
 5 #使用CentOS系统原始源下载相关软件
 6 yum -y remove maria*
 7 echo ‘[mysql57-community]
 8 name=MySQL 5.7 Community Server
 9 baseurl=http://repo.mysql.com/yum/mysql-5.7-community/el/7/$basearch/
10 enabled=1
11 gpgcheck=0
12 ‘ > /etc/yum.repos.d/mysql57-community.repo
13 yum clean all && yum makecache -q
14 yum -y install epel-release -q
15 yum -y install vim bash-com* net-tools unzip nginx httpd php php-mysql mysql-com*server -q
16 #使用nginx实现动静分离,搭建网站
17 sed -i ‘42s/80/81/g‘ /etc/httpd/conf/httpd.conf
18 sed -i ‘38,$‘c} /etc/nginx/nginx.conf
19 echo " server {
20     listen    80;
21     server_name    3344.com;
22     location ~*\.php$ {
23     proxy_pass    http://127.0.0.1:81;
24     }
25     location / {
26     root    /var/www/html;
27     }
28 }" > /etc/nginx/conf.d/3344.conf
29 systemctl restart httpd nginx
30 systemctl enable httpd nginx -q
31 firewall-cmd --add-port=80/tcp
32 firewall-cmd --add-port=80/tcp --permanent -q
33 #配置mysql数据库,开启二进制日志,创建数据库及用户
34 sed -i 4a"server-id=1\nlog-bin=binlog" /etc/my.cnf
35 systemctl restart mysqld
36 systemctl enable mysqld
37 PW=`cat /var/log/mysqld.log | grep password |head -n 1 |awk ‘{print $NF}‘`
38 mysql -p$PW --connect-expired-password -e "alter user ‘root‘@‘localhost‘ identified by ‘Ryz0304/1‘;"
39 echo "[client]
40 user=root
41 password=‘Ryz0304/1‘" > /root/.my.cnf #将数据库的用户密码写入配置文件中,方便登录
42 mysql -e "create database wordpress;"
43 mysql -e "grant all on wordpress.* to ‘wordpress‘@‘localhost‘ identified by ‘W0rdpress.‘;"
44 mysql -e "flush privileges;"
45 rm -rf /var/www/html/*
46 chmod -R 777 /var/www/html
47 #上传代码至nginx的工作目录/var/www/html(自定义的)
48 #浏览器访问即可
问题:
1、
2、
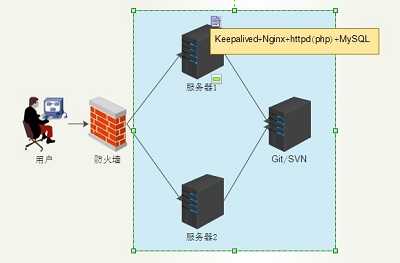
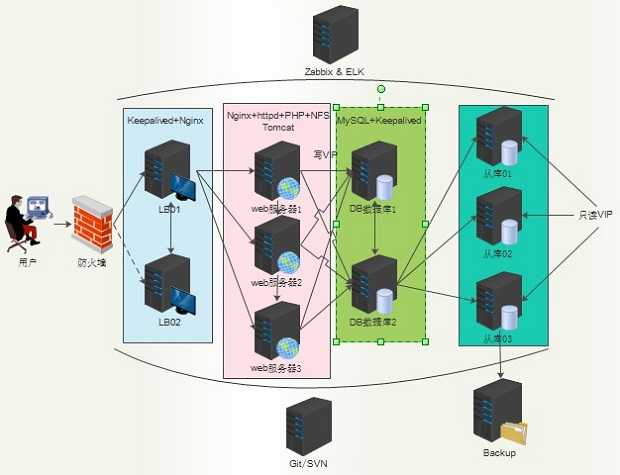
为防止一台服务器发生故障,需要动态添加一台新的服务器,使其成为主备关系,在第一台服务器宕机的情况下,web服务还可以正常运作:
  1 #完成2台服务器的同时搭建
  2
  3 #各服务器的密码
  4 MM=0304
  5
  6 #检查环境
  7 setenforce 0 &> /dev/null
  8 sed -i s/=enforcing/=disabled/g /etc/selinux/config
  9 systemctl restart firewalld
 10 systemctl enable firewalld &> /dev/null
 11
 12 echo "10.0.0.11 s1
 13 10.0.0.12 s2" >>/etc/hosts
 14
 15 ssh-keygen -t rsa -P "" -f /root/.ssh/id_rsa &> /dev/null
 16 cp /root/.ssh/id_rsa.pub /root/.ssh/authorized_keys
 17 sed -i 35c‘StrictHostKeyChecking no‘ /etc/ssh/ssh_config
 18
 19 #配置yum源:使用原始CentOS系统的原始源,安装epel源,配置mysql源,安装服务
 20 for a in s{1..2}
 21 do
 22 sshpass -p $MM scp -r /root/.ssh $a:/root
 23 ssh $a "yum -y remove maria*"
 24 ssh $a "echo ‘[mysql57-community]
 25 name=MySQL 5.7 Community Server
 26 baseurl=http://repo.mysql.com/yum/mysql-5.7-community/el/7/\$basearch/
 27 enabled=1
 28 gpgcheck=0
 29 ‘ > /etc/yum.repos.d/mysql57-community.repo
 30 yum clean all -q && yum makecache -q
 31 yum -y install epel-release -q
 32 yum -y install vim bash-com* net-tools unzip nginx httpd php php-mysql mysql-com*server -q"
 33 done
 34
 35 #配置nginx+httpd+php动静分离
 36 for b in s{1..2}
 37 do
 38 ssh $b "sed -i ‘42s/80/81/g‘ /etc/httpd/conf/httpd.conf"
 39 ssh $b "sed -i ‘38,$‘c} /etc/nginx/nginx.conf"
 40 ssh $b "echo \" server {
 41     listen    80;
 42     server_name    3344.com;
 43     location ~*\.php\$ {
 44     proxy_pass    http://127.0.0.1:81;
 45     }
 46     location / {
 47     root    /var/www/html;
 48     }
 49 }\" > /etc/nginx/conf.d/3344.conf"
 50 ssh $b "systemctl restart httpd nginx
 51 systemctl enable httpd nginx -q
 52 firewall-cmd --add-port=80/tcp
 53 firewall-cmd --add-port=80/tcp --permanent -q"
 54 done
 55
 56 #配置nginx+keepalived实现负载均衡和高可用
 57 for c in s{1..2}
 58 do
 59 ssh $c "cat >/etc/nginx/conf.d/3344.conf <<EOF
 60  server {
 61     listen    80;
 62     location ~*\.php\$ {
 63     proxy_pass    http://127.0.0.1:81;
 64     }
 65     location / {
 66     root    /var/www/html;
 67     }
 68     location / {
 69     proxy_pass http://3344.com;
 70     }
 71 }
 72 upstream 3344.com {
 73     server 10.0.0.11;
 74     server 10.0.0.12;
 75 }
 76 EOF
 77 "
 78 ssh $c "cat > /etc/keepalived/keepalived.conf<<EOF
 79 ! Configuration File for keepalived
 80
 81 vrrp_instance VI_1 {
 82     state MASTER
 83     interface ens33
 84     virtual_router_id 51
 85     priority 100
 86     advert_int 1
 87     authentication {
 88         auth_type PASS
 89         auth_pass 1111
 90     }
 91     virtual_ipaddress {
 92         10.0.0.100
 93     }
 94 }
 95 EOF
 96 "
 97
 98 ssh $c "firewall-cmd --add-port=80/tcp --permanent"
 99 ssh $c "firewall-cmd --direct --permanent --add-rule ipv4 filter INPUT 0 --protocol vrrp -j ACCEPT"
100 ssh $c "firewall-cmd --reload"
101 ssh $c "systemctl enable keepalived" $> /dev/null
102 ssh $c "systemctl restart nginx keepalived"
103 done
104
105 ssh s2 "sed -i s/MASTER/BACKUP/g /etc/keepalived/keepalived.conf"
106 ssh s2 "sed -i s/100/90/g /etc/keepalived/keepalived.conf"
107 ssh s2 "systemctl restart keepalived"
108
109 #mysql5.7配置一
110 sed -i 4a‘server-id=1\nlog-bin=log‘ /etc/my.cnf
111 firewall-cmd --add-port=3306/tcp --permanent
112 firewall-cmd --reload
113 systemctl enable mysqld
114 systemctl restart mysqld
115
116 PWD1=`cat /var/log/mysqld.log |grep pass |head -n 1|awk ‘{print $NF}‘`
117 cat > ~/.my.cnf <<EOF
118 [mysql]
119 user=root
120 password=‘$PWD1‘
121 EOF
122
123 mysql --connect-expired-password -e "alter user ‘root‘@‘localhost‘ identified by ‘Ryz0304.‘;"
124 cat > ~/.my.cnf <<EOF
125 [mysql]
126 user=root
127 password=‘Ryz0304.‘
128 EOF
129
130 mysql -e "grant  REPLICATION SLAVE  on *.* to ‘repl‘@‘10.0.0.%‘ identified by ‘Repl432/1‘;"
131 mysql -e "create database wordpress;"
132 mysql -e "grant all on wordpress.* to ‘wordpress‘@‘s1‘ identified by ‘W0rdpress/1‘;"
133 mysql -e "grant all on wordpress.* to ‘wordpress‘@‘s2‘ identified by ‘W0rdpress/1‘;"
134 mysql -e "flush privileges;"
135
136 #mysql5.7配置二
137 ssh s2 "sed -i 4a‘server-id=2\nlog-bin=log‘ /etc/my.cnf"
138 ssh s2  "firewall-cmd --add-port=3306/tcp --permanent"
139 ssh s2  "firewall-cmd --reload"
140 ssh s2  "systemctl enable mysqld"
141 ssh s2  "systemctl restart mysqld"
142
143 PWD2=`ssh s2 "cat /var/log/mysqld.log" |grep pass |head -n 1|awk ‘{print $NF}‘`
144 ssh s6 "cat > ~/.my.cnf <<EOF
145 [mysql]
146 user=root
147 password=‘$PWD2‘
148 EOF"
149
150 ssh s2 "mysql --connect-expired-password -e \"alter user ‘root‘@‘localhost‘ identified by ‘Ryz0304.‘;\""
151 ssh s2 "cat > ~/.my.cnf <<EOF
152 [mysql]
153 user=root
154 password=‘Abc1234/1‘
155 EOF"
156
157 ssh s2 "mysql -e \"grant  REPLICATION SLAVE  on *.* to ‘repl‘@‘10.0.0.%‘ identified by ‘Repl432/1‘;\""
158 ssh s2 "mysql -e \"grant all on wordpress.* to ‘wordpress‘@‘s1‘ identified by ‘W0rdpress/1‘;\""
159 ssh s2 "mysql -e \"grant all on wordpress.* to ‘wordpress‘@‘s2‘ identified by ‘W0rdpress/1‘;\""
160 ssh s2 "mysql -e \"flush privileges;\""
161
162 #主主
163 FILE1=`mysql -e "show master status\G"|grep File |awk ‘{print $2}‘`
164 POSI1=`mysql -e "show master status\G"|grep Posit |awk ‘{print $2}‘`
165 FILE2=`ssh s2 "mysql -e \"show master status\G\""|grep File |awk ‘{print $2}‘`
166 POSI2=`ssh s2 "mysql -e \"show master status\G\""|grep Posit |awk ‘{print $2}‘`
167 mysql -e "change master to master_host=‘s5‘,master_user=‘repl‘,master_password=‘Repl432/1‘,master_port=3306,master_log_file=‘$FILE1‘,master_log_pos=$POSI1;"
168 mysql -e "start slave;"
169 ssh s2 "mysql -e \"change master to master_host=‘s6‘,master_user=‘repl‘,master_password=‘Repl432/1‘,master_port=3306,master_log_file=‘$FILE2‘,master_log_pos=$POSI2;\""
170 ssh s2 "mysql -e \"start slave;\""
问题:
四、第四阶段
五、第五阶段
原文:https://www.cnblogs.com/renyz/p/11823150.html
