1.搭建项目admin-service
1.1引入相关jar包:
<dependencies>

    <!--表示为web工程-->
    <dependency>
        <groupId>org.springframework.boot</groupId>

        <artifactId>spring-boot-starter-web</artifactId>
    </dependency>
    <dependency>
        <groupId>org.springframework.boot</groupId>

        <artifactId>spring-boot-starter-test</artifactId>
    </dependency>
    <!-- 安全认证 -->
    <dependency>
        <groupId>org.springframework.boot</groupId>

        <artifactId>spring-boot-starter-security</artifactId>
    </dependency>
    <!--暴露各种指标-->
    <dependency>
        <groupId>org.springframework.boot</groupId>

        <artifactId>spring-boot-starter-actuator</artifactId>
    </dependency>
    <dependency>
        <groupId>org.springframework.cloud</groupId>

        <artifactId>spring-cloud-starter-netflix-eureka-client</artifactId>

        <version>2.1.3.RELEASE</version>
    </dependency>
    <!-- 监控中心管理页面 -->
    <dependency>
        <groupId>de.codecentric</groupId>

        <artifactId>spring-boot-admin-starter-server</artifactId>

        <version>2.1.6</version>
    </dependency>
    <dependency>
        <groupId>de.codecentric</groupId>

        <artifactId>spring-boot-admin-server-ui</artifactId>
        <version>2.1.6</version>
    </dependency>
    <dependency>
        <groupId>org.springframework.boot</groupId>

        <artifactId>spring-boot-starter-webflux</artifactId>
    </dependency>
    <dependency>
        <groupId>org.jolokia</groupId>

        <artifactId>jolokia-core</artifactId>
    </dependency>
    <dependency>
        <groupId>org.projectlombok</groupId>

        <artifactId>lombok</artifactId>
    </dependency>
</dependencies>

<dependencyManagement>
    <dependencies>
        <dependency>
            <groupId>org.springframework.cloud</groupId>
            <artifactId>spring-cloud-dependencies</artifactId>
            <version>${spring-cloud.version}</version>
            <type>pom</type>
            <scope>import</scope>
        </dependency>
        <dependency>
            <groupId>org.springframework.boot</groupId>
            <artifactId>spring-boot-dependencies</artifactId>
            <version>${spring-boot.version}</version>
            <type>pom</type>
            <scope>import</scope>
        </dependency>
    </dependencies>
1.2.启动类加
@SpringBootApplication
@EnableAdminServer
@EnableDiscoveryClient
和
@Configuration
public static class SecuritySecureConfig extends WebSecurityConfigurerAdapter {
private final String adminContextPath;
public SecuritySecureConfig(AdminServerProperties adminServerProperties) {
    this.adminContextPath = adminServerProperties.getContextPath();
}
@Override
protected void configure(HttpSecurity http) throws Exception {
    http.headers().frameOptions().disable();
}
}
1.3.Bootstrap.yml配置文件
spring:
boot:
admin:
ui:
title: "服务监控系统"
brand: "![]() 服务监控系统"
服务监控系统"
client:
prefer-ip: true
application:
name: admin-service
server:
port: 2046
eureka:
instance:
leaseRenewalIntervalInSeconds: 10
health-check-url-path: /actuator/health
#使用ip替代实例名
prefer-ip-address: true
client:
#加快从eureka服务器注册表中获取注册信息的时间间隔
registryFetchIntervalSeconds: 5
serviceUrl:
defaultZone: http://mrkin:mrkin@192.168.1.133:2000/eureka/
management:
health:
redis:
enabled: false
endpoint:
health:
show-details: always
#可以关闭指定的端点
shutdown:
enabled: false
endpoints:
enabled-by-default: true
web:
# 设置是否暴露端点 默认只有health和info可见
exposure:
# 包括所有端点
include: "*" # 注意需要添加引号
# 排除端点
exclude: shutdown
2.被监控的服务添加
2.1引入 actuator 依赖
2.2增加如下配置
management:
health:
redis:
enabled: false//忽略对Redis监控(Springbootadmin默认是对Redis监控的)
endpoint:
health:
show-details: always
endpoints:
web:
exposure:
include: "*"
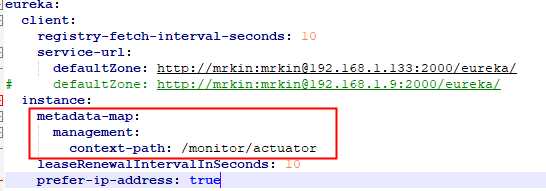
2.3注意:
如果配置了如下配置
server:
servlet:
context-path: "/monitor"
则需给注册中心要加下图红色框的内容
3.功能介绍
spring-boot-admin是在Spring Boot Actuator的基础上提供简洁的可视化WEB UI,是用来管理 Spring Boot 应用程序的一个简单的界面,提供如下功能:
显示 name/id 和版本号
显示在线状态
Logging日志级别管理
JMX beans管理
Threads会话和线程管理
Trace应用请求跟踪
应用运行参数信息,如:
Java?系统属性
Java 环境变量属性
内存信息
Spring 环境属性
4.自定义页面
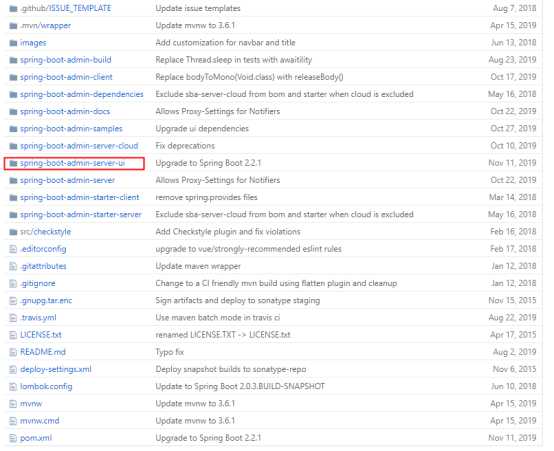
4.1下载官方demo,把下图中红框中的项目用可以编辑vue的工具打开
4.2修改对应页面功能及样式。
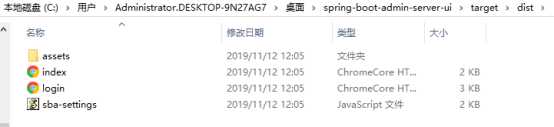
4.3用npm run build对4.1图中红框内的项目打包,打包成功会看到如下
4.4找到自己项目的maven仓库中的jar包
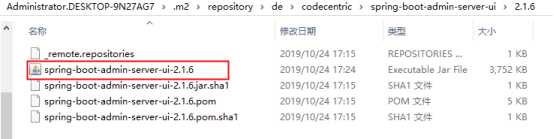
用解压工具打开

用4.3中打包好的替换这里的所有文件,然后重新启动admin-service项目就可以看到效果
原文:https://www.cnblogs.com/wzy1994/p/11850555.html