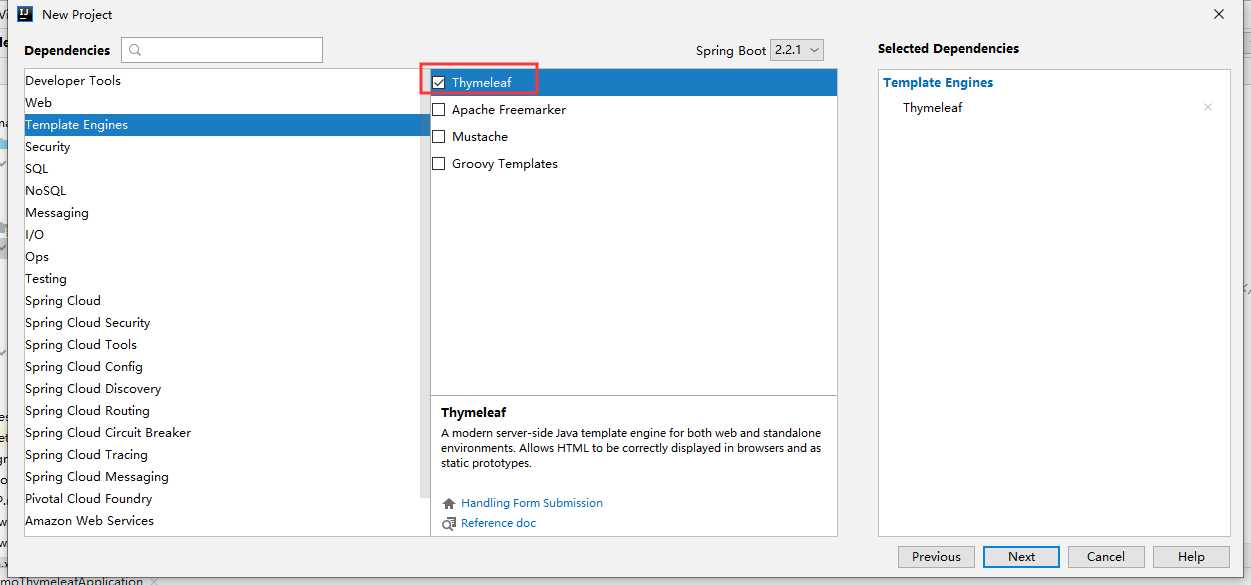
第一步:创建Spring Boot项目,勾选Thymeleaf
第二步:创建JavaBean,包含带参数和不带参数的构造方法
public class Person {

    private String name;
    private Integer age;

    public Person() {
        super();
    }

    public Person(String name, Integer age) {
        super();
        this.name = name;
        this.age = age;
    }

    public String getName() {
        return name;
    }

    public void setName(String name) {
        this.name = name;
    }

    public Integer getAge() {
        return age;
    }

    public void setAge(Integer age) {
        this.age = age;
    }
}
第三步:创建脚本样式静态文件和演示页面index.html:

<html xmlns:th="http://www.thymeleaf.org">
<head>
    <meta content="text/html;charset=UTF-8"/>
    <meta http-equiv="X-UA-Compatible" content="IE=edge"/>
    <meta name="viewport" content="width=device-width,initial-scale=1"/>
    <link th:href="@{bootstrap/css/bootstrap.min.css}" rel="stylesheet"/>
    <link th:href="@{bootstrap/css/bootstrap-theme.min.css}" rel="stylesheet"/>
    <title>测试页</title>
</head>
<body>

<div class="panel panel-primary">
    <div class="panel-heading">
        <h3 class="panel-title">
            访问model
        </h3>
    </div>
    <div class="panel-body">
            <span th:text="${singlePerson.name}">
            </span>
    </div>
</div>
<div th:if="${not #lists.isEmpty(people)}">
    <div class="panel panel-primary">
        <div class="panel-heading">
            <h3 class="panel-title">列表</h3>
        </div>
        <div class="panel-body">
            <ul class="list-group">
                <li class="list-group-item" th:each="person:${people}">
                    <span th:text="${person.getName()}"></span>
                    <span th:text="${person.age}"></span>

                    <button class="btn" th:onclick="getName([[${person.name}]]);">获得名字</button>
<!--                    <button class="btn" th:onclick="‘javascript:getName(\‘‘ + ${person.name} + ‘\‘);‘">获得名字</button>-->
                </li>
            </ul>
        </div>
    </div>

</div>

<script th:src="@{jquery.min.js}" type="text/javascript"></script>
<script th:src="@{bootstrap/js/bootstrap.min.js}"></script>
<script th:inline="javascript">
    var single = [[${singlePerson}]];
    console.log(single.name + "/" + single.age);

    function getName(name) {
        console.log(name);
    }
 </script>

</body>
</html>
第四步:数据准备:
import org.springframework.boot.SpringApplication;
import org.springframework.boot.autoconfigure.SpringBootApplication;
import org.springframework.stereotype.Controller;
import org.springframework.ui.Model;
import org.springframework.web.bind.annotation.RequestMapping;

import java.util.ArrayList;
import java.util.List;

@Controller
@SpringBootApplication
public class DemoThymeleafApplication {

    @RequestMapping("/")
    public String index(Model model) {
        Person single = new Person("大王", 11);
        List<Person> people = new ArrayList<Person>();
        Person p1 = new Person("张三", 22);
        Person p2 = new Person("李四", 33);
        Person p3 = new Person("赵六", 44);
        people.add(p1);
        people.add(p2);
        people.add(p3);

        model.addAttribute("singlePerson", single);
        model.addAttribute("people", people);

        return "index";
    }

    public static void main(String[] args) {
        SpringApplication.run(DemoThymeleafApplication.class, args);
    }

}
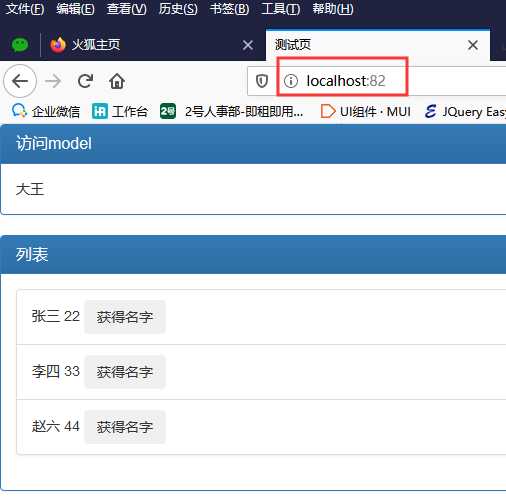
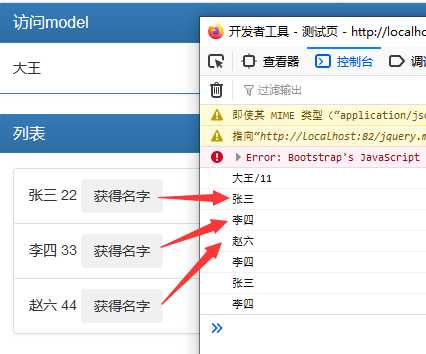
第五步:运行效果:点击‘获得名字’按钮时控制台显示获取到的名字
第六步:SpringBoot2与SpringBoot1.5区别:
页面使用button的onclick事件带参数时写法不同
SpringBoot2版本:<button class="btn" th:onclick="getName([[${person.name}]]);">获得名字</button>
SpringBoot1.5版本:
<button class="btn" th:onclick="‘javascript:getName(\‘‘ + ${person.name} + ‘\‘);‘">获得名字</button>
SpringBoot2实战训练demo之Thymeleaf模板引擎
原文:https://www.cnblogs.com/lijl/p/11897166.html