master node1 node2 client
192.168.1.31 master
192.168.1.29 node1
192.168.1.156 node2
192.168.1.98 client
yum install wget vim epel-release
配置阿里云的centos7镜像和ceph.repo库
[root@master ceph]# cat /etc/yum.repos.d/ceph.repo
[Ceph]
name=Ceph packages for $basearch
baseurl=https://mirrors.tuna.tsinghua.edu.cn/ceph/rpm-jewel/el7/$basearch
enabled=1
gpgcheck=1
type=rpm-md
gpgkey=https://mirrors.tuna.tsinghua.edu.cn/ceph/keys/release.asc
priority=1
[Ceph-noarch]
name=Ceph noarch packages
baseurl=https://mirrors.tuna.tsinghua.edu.cn/ceph/rpm-jewel/el7/noarch
enabled=1
gpgcheck=1
type=rpm-md
gpgkey=https://mirrors.tuna.tsinghua.edu.cn/ceph/keys/release.asc
priority=1
[ceph-source]
name=Ceph source packages
baseurl=https://mirrors.tuna.tsinghua.edu.cn/ceph/rpm-jewel/el7/SRPMS
enabled=1
gpgcheck=1
type=rpm-md
gpgkey=https://mirrors.tuna.tsinghua.edu.cn/ceph/keys/release.asc
priority=1
#关闭所有节点防火墙和SELINUX
yum install yum-utils ceph ceph-deploy #安装ceph主程序和管理工具
master节点:将ssh公钥导入其他节点方便调用时输入密码
ceph-deploy new node1 node2 初始化节点
cat /etc/ceph/ceph.conf #插入
osd pool default size = 2
ceph-deploy install node1 node2 #安装ceph
ceph-deploy mon create-initial ##初始化mon节点
------------------------------------------------------------
node1:fdisk -l
fdisk /dev/sdb
mkfs.xfs /dev/sdb1
mkdir /dev/local/osd1
vim /etc/fstab
/dev/sdb1 /dev/local/osd1 xfs defaults 0 0
chown ceph:ceph /dev/local/osd1
node2:fdisk -l
fdisk /dev/sdb
mkfs.xfs /dev/sdb1
mkdir /dev/local/osd1
vim /etc/fstab
/dev/sdb1 /dev/local/osd1 xfs defaults 0 0
chown ceph:ceph /dev/local/osd1
ceph-deploy osd prepare node1:/dev/local/osd1 node2:/dev/local/osd1
chmod +r /etc/ceph/ceph.client.admin.keyring
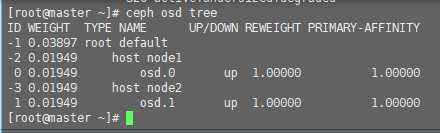
ceph-deploy osd activate node1:/dev/local/osd1 node2:/dev/local/osd1
ceph quorum_status --format json-pretty ##查看Ceph群集详细信息
ceph health
HEALTH_OK
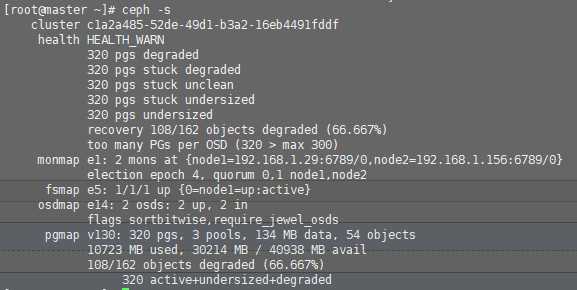
#这里有一个警告 可以不用太在意
client测试
ceph-deploy install ceph-client ##提示输入密码
ceph-deploy admin ceph-client
chmod +r /etc/ceph/ceph.client.admin.keyring
master: ceph osd pool create cephfs_data 128 ##数据存储池
pool ‘cephfs_data‘ created
master: ceph osd pool create cephfs_metadata 128 ##元数据存储池
pool ‘cephfs_metadata‘ created
master: ceph fs new cephfs cephfs_data cephfs_metadata ##创建文件系统
new fs with metadata pool 1 and data pool 2

挂载
[root@ceph-client ~]# mkdir /mnt/ceph
[root@ceph-client ~]# grep key /etc/ceph/ceph.client.admin.keyring |awk ‘{print $3}‘ >>/etc/ceph/admin.secret
[root@ceph-client ~]# cat /etc/ceph/admin.secret
AQCd/x9bsMqKFBAAZRNXpU5QstsPlfe1/FvPtQ==
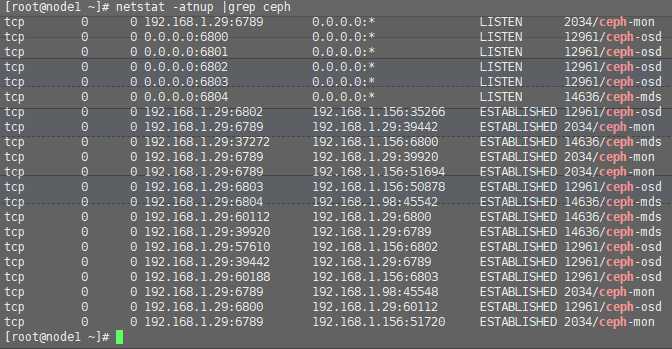
mount -t ceph 192.168.1.29:6789:/ /mnt/ceph/ -v -o name=admin,secretfile=/etc/ceph/admin.secret
mount -t ceph 192.168.1.156:6789:/ /mnt/ceph1/ -v -o name=admin,secretfile=/etc/ceph/admin.secret
dd if=/dev/zero of=/mnt/ceph/1.file bs=1G count=1

原文:https://www.cnblogs.com/AnyChen/p/12053638.html