一 安装
pip install Selenium
二 安装驱动
chrome驱动文件:点击下载chromedriver (yueyu下载)
三 配置chromedrive的路径(仅添加环境变量即可)
我的电脑–>属性–>系统设置–>高级–>环境变量–>系统变量–>Path,将“F:\GeckoDriver”目录添加到Path的值中。比如:Path字段;F:\GeckoDriver
四 selenium定位操作
- find_element_by_id() #通过id查找获取
- find_element_by_name() #通过name属性查找
- find_element_by_class_name() #通过class属性查找
- find_element_by_tag_name() #通过标签名字查抄
- find_element_by_link_text() #通过浏览器中可点击的文本查找
- find_element_by_xpath() #通过xpath表达式查找
- find_element_by_css_selector() #通过css选择器查找

driver=webdriver.Chrome() #实例化一个浏览器

driver.get(‘https://www.baidu.com‘) #浏览器访问百度

input_tag=driver.find_element_by_id(‘kw‘) #获取输入框

input_tag.send_keys(‘赵丽颖‘)#输入框中输入‘赵丽颖

driver.find_element_by_id(‘su‘).click() #找到’百度一下‘按钮,并点击,开始搜索

driver.find_element_by_link_text(‘知道‘).click() #点击页面上的 ’知道‘
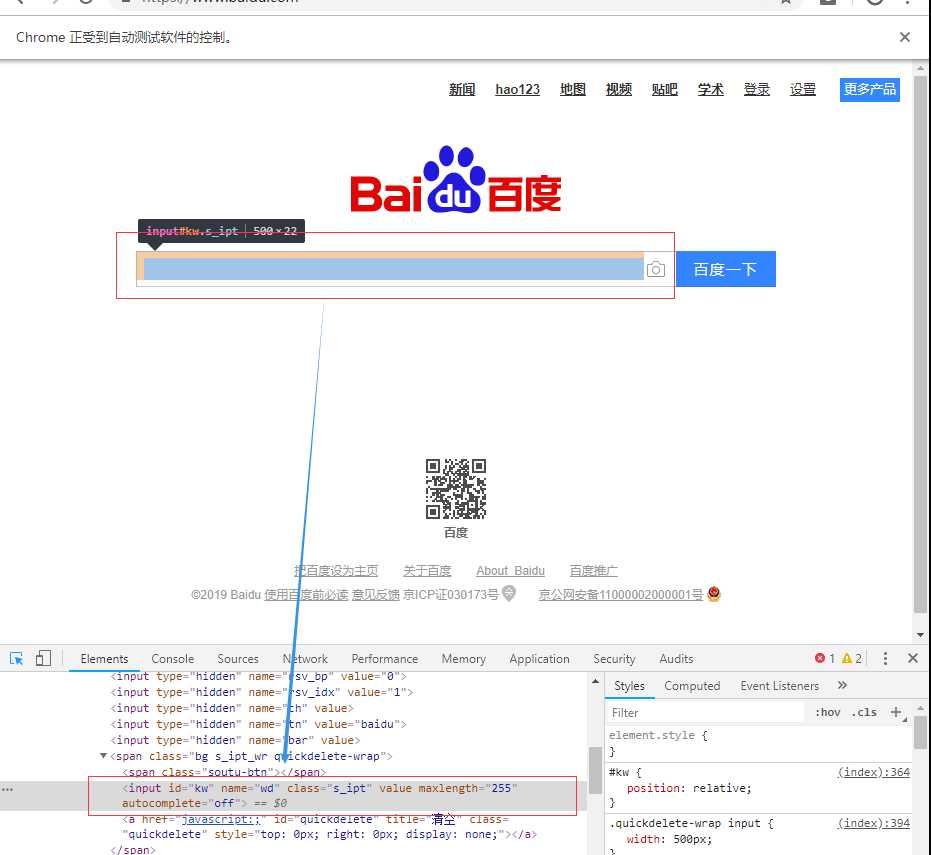
find_element_by_id(‘kw‘):
find_element_by_link_text(‘知道‘)

五 浏览器控制相关操作函数
- 设置浏览器窗口大小:driver.set_window_size(480, 800)
- 回退到上一个访问页面:driver.back()
- 前进到下一个访问页面:driver.forward()
#设置浏览器显示窗口大小 driver.set_window_size(480,800)driver.get(
‘https://www.zhihu.com‘) #访问知乎 driver.back() #回退到上一个访问页面 driver.forward() #前进到下一个访问过的页面
drive.quit() #退出浏览器
六 webdriver常用的方法
- 点击和输入
- click() 点击
- send_keys(value) 输入值
- clear() 清空输入
driver=webdriver.Chrome() #实例化一个浏览器

driver.get(‘https://www.baidu.com‘) #浏览器访问百度

input_tag.send_keys(‘赵丽颖‘)#输入框中输入‘赵丽颖

driver.find_element_by_id(‘kw‘).clear() #清空输入框

driver.find_element_by_id(‘kw‘).send_keys(‘周杰伦‘) #输入查询 ’周杰伦‘

driver.find_element_by_id("su").click() #点击百度一下
- size 元素对应的大小
- text 获取对应元素的文字
# 属性 size和文本
driver.get(‘http://www.baidu.com‘)
driver.find_element_by_id(‘kw‘).size #获取搜索的元素的尺寸{‘height‘: 22, ‘width‘: 395}
driver.find_element_by_id("cp").text #获取指定标签的文本值

driver.quit()
七 鼠标事件/ActionChains(动作链)
在 WebDriver 中, 将这些关于鼠标操作的方法封装在 ActionChains 类提供。
- perform():执行所有ActionChains中存储的所有行为
- context_click():右击
- double_click():双击
- drag_and_drop():拖动
- move_to_element():悬浮
- click_and_hold():鼠标按住不松手
- move_to_lelment():拖动到某元素
- move_by_offset(xoffset=50,yoffset=60):按坐标移动
执行流程
- 1 定位到响应元素
- 2 ActionChains(实例化的浏览器).鼠标操作(带操作的元素).perform() 使用(什么浏览器),用什么鼠标操作功能,操作(什么元素),perform()提交给浏览器执行响应的行为
#引入 ActionChains类 from selenium.webdriver.common.action_chains import ActionChainsdriver
=webdriver.Chrome() driver.get("https://www.baidu.cn") #鼠标定位到需要悬浮的元素 above=driver.find_element_by_link_text(‘设置‘) ditu=driver.find_element_by_link_text(‘地图‘) #对定位的元素执行鼠标操作 ActionChains(driver).move_to_element(above).perform() ActionChains(driver).double_click(above).perform() #鼠标右击 driver.quit() #退出
拖拽滑块移动小实例
from selenium import webdriver
from selenium.webdriver import ActionChains #导入动作链
import time
browser = webdriver.Chrome()
url = ‘http://www.runoob.com/try/try.php?filename=jqueryui-api-droppable‘
browser.get(url)
#必须转内部网页(html套html格式),否则拿不到数据
browser.switch_to.frame(‘iframeResult‘)
#获取被拖动的物体,和拖动到的目标元素
source = browser.find_element_by_css_selector(‘#draggable‘)
target = browser.find_element_by_css_selector(‘#droppable‘)
#实例动作链对象
actions = ActionChains(browser)
#执行一系列动作
# actions.drag_and_drop(source, target)
actions.click_and_hold(source).perform() #鼠标选取并按住元素source,不松手
time.sleep(1)
actions.move_to_element(target).perform() #拖动元素到target的位置
time.sleep(1)
actions.move_by_offset(xoffset=50,yoffset=0).perform() #在目标位置进行偏移拖动

actions.release() #释放动作链
八 键盘事件
- 1 引入Keys 模块: from selenium.webdriver.common.keys import Keys
- 2 通过send_keys()发送信息
- 3 组合形式 Keys.BACK_SPACE 删除键
  Keys.SPACE 空格键
  Keys.F1 键盘F1键
  Keys.CONTROL,‘a‘ 全选  contrl表示contrl键
#引入Keys模块 from selenium.webdriver.common.keys import Keysdriver
=webdriver.Chrome() driver.get(‘https://www.baidu.com‘) #输入一个内容 input=driver.find_element_by_id(‘kw‘) input.send_keys(‘seleniumGG‘) #删除多余的GG input.send_keys(Keys.BACKSPACE) input.send_keys(Keys.BACKSPACE) #继续输入 input.send_keys(‘教程‘) #全选输入框的内容,一次性删除 input.send_keys(Keys.CONTROL,‘a‘) input.send_keys(Keys.BACKSPACE) #输入周杰伦,通过回车键来代替点击‘百度一下‘ input.send_keys(‘周杰伦‘) input.send_keys(Keys.ENTER)driver.quit()
九 断言信息
掌握三个属性
- title:用于获得当前页面的标题。
- current_url:用户获得当前页面的URL。
- text:获取搜索条目的文本信息。
- tag_name:获取标签名
- get_attribute(‘id‘) :获取id的属性值
#调用方式
driver.title  #返回当前页面的标题

driver.current_url #返回当前页面的url

user = driver.find_element_by_class_name(‘nums‘).text #获取某元素的文本信息
十 定位一组元素
- find_elements_by_id()
- find_elements_by_name()
- find_elements_by_class_name()
- find_elements_by_tag_name()
- find_elements_by_link_text()
- find_elements_by_partial_link_text()
- find_elements_by_xpath()
- find_elements_by_css_selector()
a_list=driver.find_elements_by_xpath(‘//div[@id="u1"]/a‘)
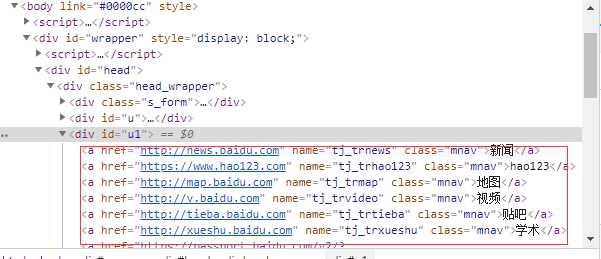
#获取图片中的a标签文本信息from time import sleep
driver = webdriver.Chrome() driver.get("https://www.baidu.com")
a_list=driver.find_elements_by_xpath(‘//div[@id="u1"]/a‘)
for a in a_list: print(a.text)
driver.quit()
十一 多表单切换(人人网登录)
from selenium import webdriver driver = webdriver.Chrome() driver.get("http://www.renren.com/") #输入账户密码 driver.find_element_by_id(‘email‘).send_keys(‘183708131(账号)‘) #换成自己的账号 driver.find_element_by_id(‘password‘).send_keys(‘QWERT*IO(密码)‘) #换成自己的密码#点击登录 driver.find_element_by_id(‘login‘).click()
driver.quit()
十二 多窗口切换
- driver.switch_to_window(某窗口)
driver = webdriver.Chrome() driver.implicitly_wait(10) driver.get("http://www.baidu.com") #获取百度搜索窗口句柄 search_windows=driver.current_window_handledriver.find_element_by_link_text(
‘登录‘).click() driver.find_element_by_link_text(‘立即注册‘).click() #获取当前窗口句柄 register_windows=driver.current_window_handledriver.switch_to_window(search_windows)
#浏览器跳转记录的窗口
十三 警告框的处理 (****)
- 1 获取警告框 dialog=driver.switch_to_alert
- 2 dialog.accept() 或者 dialog.send_keys(1) text:返回 alert/confirm/prompt 中的文字信息。
- 基本方法
- accept():接受现有警告框。
- dismiss():解散现有警告框。
- send_keys(keysToSend):发送文本至警告框。keysToSend:将文本发送至警告框。
from selenium import webdriver from selenium.webdriver.common.action_chains import ActionChains import timedriver
= webdriver.Chrome() driver.implicitly_wait(10) driver.get(‘http://www.baidu.com‘) # 鼠标悬停至“设置”链接 link = driver.find_element_by_link_text(‘设置‘) ActionChains(driver).move_to_element(link).perform() # 打开搜索设置 driver.find_element_by_link_text("搜索设置").click() # 保存设置 driver.find_element_by_class_name("prefpanelgo").click() time.sleep(2) #获取警告框对象 dialog=driver.switch_to_alert()dialog.text
#获取警告框的内容 dialog.accept() #接受结果,确认 driver.quit()
十四 下拉框选择
#核心代码
from selenium.webdriver.support.select import Select
#搜索结果显示条数设置
sel=driver.find_element_by_xpath(‘//*[@id="nr"]‘)
Select(sel).select_by_value(‘10‘)
#第一步导包 from selenium import webdriver from selenium.webdriver.support.select import Select from time import sleep #驱动网页 driver = webdriver.Chrome() driver.implicitly_wait(10) driver.get(‘http://www.baidu.com‘) # 鼠标悬停至“设置”链接 driver.find_element_by_link_text(‘设置‘).click() sleep(1) # 打开搜索设置 driver.find_element_by_link_text("搜索设置").click() sleep(2) #搜索结果显示条数设置 sel=driver.find_element_by_xpath(‘//*[@id="nr"]‘) Select(sel).select_by_value(‘10‘) #保存并关闭 driver.find_element_by_class_name(‘prefpanelgo‘).click() #处理警告框 #1 获取警告框对象 dialog=driver.switch_to_alert() #2 打印文本值 print(dialog.text) #已经记录下您的使用偏好 #3 接受 dialog.accept()driver.quit()
十五 文件上传
- 定位上传按钮,添加本地文件 -driver.find_element_by_name("file").send_keys(‘D:\upload_file.txt‘)
十六 cookie操作
- get_cookies(): 获得所有cookie信息。
- get_cookie(name): 返回字典的key为“name”的cookie信息。
- add_cookie(cookie_dict) : 添加cookie。“cookie_dict”指字典对象,必须有name 和value 值。
- delete_cookie(name,optionsString):删除cookie信息。“name”是要删除的cookie的名称,“optionsString”是该cookie的选项,目前支持的选项包括“路径”,“域”。
-
delete_all_cookies(): 删除所有cookie信息。
实际使用cookie
= driver.get_cookies() #获取cookie driver.add_cookie({‘name‘: ‘key-aaaaaaa‘, ‘value‘: ‘value-bbbbbb‘}) #添加cookie
十七 调用JavaScript代码
-
window.scrollTo(0,450); #滑动条往下滑动450
-
执行方式 js="window.scrollTo(100,450);"
driver.execute_script(js)
js=‘window.scrollTo(0,document.body.scrollHeight)‘ #下滑到底部
driver.execute_script(js)
十八 窗口截图
- 截取当前窗口,并指定截图图片的保存位置
- driver.get_screenshot_as_file("D:\baidu_img.jpg")
十九 关闭浏览器
-
close() 关闭单个窗口
-
quit() 关闭所有窗口
二十 显示等待与隐式等待
在Selenium中,get()方法会在网页框架加载结束后结束执行,此时如果获取page_source,可能并不是浏览器完全加载完成的页面,如果某些页面有额外的Ajax请求,我们在网页源代码中也不一定能成功获取到。所以,这里需要延时等待一定时间,确保节点已经加载出来。这里等待的方式有两种:一种是隐式等待,一种是显式等待。
- 隐式等待:
当使用隐式等待执行测试的时候,如果Selenium没有在DOM中找到节点,将继续等待,超出设定时间后,则抛出找不到节点的异常。
from selenium import webdriver from selenium.webdriver import ActionChains from selenium.webdriver.common.by import By #按照什么方式查找,By.ID,By.CSS_SELECTOR from selenium.webdriver.common.keys import Keys #键盘按键操作 from selenium.webdriver.support import expected_conditions as EC from selenium.webdriver.support.wait import WebDriverWait #等待页面加载某些元素 browser=webdriver.Chrome() #隐式等待:在查找所有元素时,如果尚未被加载,则等10秒 browser.implicitly_wait(10)browser.get(
‘https://www.baidu.com‘) input_tag=browser.find_element_by_id(‘kw‘) input_tag.send_keys(‘美女‘) input_tag.send_keys(Keys.ENTER)contents
=browser.find_element_by_id(‘content_left‘) #没有等待环节而直接查找,找不到则会报错 print(contents)browser.close()
- 显示等待
隐式等待的效果其实并没有那么好,因为我们只规定了一个固定时间,而页面的加载时间会受到网络条件的影响。这里还有一种更合适的显式等待方法,它指定要查找的节点,然后指定一个最长等待时间。如果在规定时间内加载出来了这个节点,就返回查找的节点;如果到了规定时间依然没有加载出该节点,则抛出超时异常。
from selenium import webdriver from selenium.webdriver import ActionChains from selenium.webdriver.common.by import By #按照什么方式查找,By.ID,By.CSS_SELECTOR from selenium.webdriver.common.keys import Keys #键盘按键操作 from selenium.webdriver.support import expected_conditions as EC from selenium.webdriver.support.wait import WebDriverWait #等待页面加载某些元素 browser=webdriver.Chrome() browser.get(‘https://www.baidu.com‘)input_tag
=browser.find_element_by_id(‘kw‘) input_tag.send_keys(‘美女‘) input_tag.send_keys(Keys.ENTER) #显式等待:显式地等待某个元素被加载 wait=WebDriverWait(browser,10) wait.until(EC.presence_of_element_located((By.ID,‘content_left‘)))contents
=browser.find_element(By.CSS_SELECTOR,‘#content_left‘) print(contents)browser.close()
二十一 cookies操作
使用Selenium,还可以方便地对Cookies进行操作,例如获取、添加、删除Cookies等。示例如下:
from selenium import webdriver

browser = webdriver.Chrome()
browser.get(‘https://www.zhihu.com/explore‘)
print(browser.get_cookies())
browser.add_cookie({‘name‘: ‘name‘, ‘domain‘: ‘www.zhihu.com‘, ‘value‘: ‘germey‘}) #添加cookie
print(browser.get_cookies()) #获取cookies
browser.delete_all_cookies() #删除所有的cookies
print(browser.get_cookies()) #获取cookies
二十二 异常处理
from selenium import webdriver
from selenium.common.exceptions import TimeoutException,NoSuchElementException,NoSuchFrameException
#三个异常:超时,没有这个元素,使用switch_to_frame出现的没有这个子html错误
try:
browser=webdriver.Chrome()
browser.get(‘http://www.runoob.com/try/try.php?filename=jqueryui-api-droppable‘)
browser.switch_to.frame(‘iframssseResult‘)
except TimeoutException as e:
print(e)
except NoSuchFrameException as e:
print(e)
finally:
browser.close()
二十三 获取网页源码(****)
- driver.page_source
#互动到页面底部js
window.scrollTo(0,document.body.scrollHeight)
二十四 phantotomJs
无界面驱动浏览器执行爬虫程序
‘‘‘ selenium:基于浏览器自动化操作的模块.可以通过代码制定一些浏览器自动化的行为动作,然后将该行为动作作用到浏览器中 1.pip install selenium 2.导包:from selenium import webdriver 3.下载浏览器的驱动程序 下载地址:http://chromedriver.storage.googleapis.com/index.html 版本的映射关系表:https://blog.csdn.net/huilan_same/article/details/51896672 4.实例化一个浏览器对象(驱动程序) 5.通过代码指定行为动作 ‘‘‘ ‘‘‘ 什么是phantomJs:无界面的浏览器 ‘‘‘ from selenium import webdriver from time import sleep bro = webdriver.PhantomJS(executable_path=‘./phantomjs-2.1.1-windows/bin/phantomjs.exe‘) sleep(2) bro.get(url=‘https://www.baidu.com/‘) sleep(3) text_input = bro.find_element_by_id(‘kw‘) text_input.send_keys(‘周杰伦‘) sleep(2) btn = bro.find_element_by_id(‘su‘) btn.click() sleep(3)#浏览器执行js代码 js
= ‘window.scrollTo(0,document.body.scrollHeight)‘ bro.execute_script(js) sleep(3) #截屏 bro.save_screenshot(‘./ppppppp.png‘) #获取当前浏览器显示的页面数据 page_text = bro.page_source #页面数据也包含动态加载出来的数据 print(page_text)bro.quit()
实例
-
selenium+phantomjs 就是爬虫终极解决方案
有些网站上的内容信息是通过动态加载js形成的,所以使用普通爬虫程序无法回去动态加载的js内容。例如豆瓣电影中的电影信息是通过下拉操作动态加载更多的电影信息。
from selenium import webdriver from time import sleep import time if name == ‘main‘: url = ‘https://movie.douban.com/typerank?type_name=%E6%81%90%E6%80%96&type=20&interval_id=100:90&action=‘ # 发起请求前,可以让url表示的页面动态加载出更多的数据 path = r‘C:\Users\Administrator\Desktop\爬虫授课\day05\ziliao\phantomjs-2.1.1-windows\bin\phantomjs.exe‘ # 创建无界面的浏览器对象 bro = webdriver.PhantomJS(path) # 发起url请求 bro.get(url) time.sleep(3) # 截图 bro.save_screenshot(‘1.png‘)</span><span style="color: #008000;">#</span><span style="color: #008000;"> 执行js代码(让滚动条向下偏移n个像素(作用:动态加载了更多的电影信息))</span> js = <span style="color: #800000;">‘</span><span style="color: #800000;">window.scrollTo(0,document.body.scrollHeight)</span><span style="color: #800000;">‘</span><span style="color: #000000;"> bro.execute_script(js) </span><span style="color: #008000;">#</span><span style="color: #008000;"> 该函数可以执行一组字符串形式的js代码</span> time.sleep(2<span style="color: #000000;">) bro.execute_script(js) </span><span style="color: #008000;">#</span><span style="color: #008000;"> 该函数可以执行一组字符串形式的js代码</span> time.sleep(2<span style="color: #000000;">) bro.save_screenshot(</span><span style="color: #800000;">‘</span><span style="color: #800000;">2.png</span><span style="color: #800000;">‘</span><span style="color: #000000;">) time.sleep(</span>2<span style="color: #000000;">) </span><span style="color: #008000;">#</span><span style="color: #008000;"> 使用爬虫程序爬去当前url中的内容 </span> html_source = bro.page_source <span style="color: #008000;">#</span><span style="color: #008000;"> 该属性可以获取当前浏览器的当前页的源码(html) </span> with open(<span style="color: #800000;">‘</span><span style="color: #800000;">./source.html</span><span style="color: #800000;">‘</span>, <span style="color: #800000;">‘</span><span style="color: #800000;">w</span><span style="color: #800000;">‘</span>, encoding=<span style="color: #800000;">‘</span><span style="color: #800000;">utf-8</span><span style="color: #800000;">‘</span><span style="color: #000000;">) as fp: fp.write(html_source) bro.quit()</span></pre>
注意:不能直接打开爬取出来的html文件,文件中存在js语句,阻止本地打开,渲染数据。
-
破解滑动验证码
from selenium import webdriver from selenium.webdriver.support.ui import WebDriverWait # 等待元素加载的 from selenium.webdriver.common.action_chains import ActionChains #拖拽 from selenium.webdriver.support import expected_conditions as EC from selenium.common.exceptions import TimeoutException, NoSuchElementException from selenium.webdriver.common.by import By from PIL import Image import requests import re import random from io import BytesIO import time def merge_image(image_file,location_list): " 拼接图片 " im = Image.open(image_file) im.save(‘code.jpg‘) new_im = Image.new(‘RGB‘,(260,116)) # 把无序的图片 切成52张小图片 im_list_upper = [] im_list_down = [] # print(location_list) for location in location_list: # print(location[‘y‘]) if location[‘y‘] == -58: # 上半边 im_list_upper.append(im.crop((abs(location[‘x‘]),58,abs(location[‘x‘])+10,116))) if location[‘y‘] == 0: # 下半边 im_list_down.append(im.crop((abs(location[‘x‘]),0,abs(location[‘x‘])+10,58)))def get_image(driver,div_path): ‘‘‘ 下载无序的图片 然后进行拼接 获得完整的图片 :param driver: :param div_path: :return: ‘‘‘ background_images = driver.find_elements_by_xpath(div_path) location_list = [] for background_image in background_images: location = result = re.findall(‘background-image: url("(.?)"); background-position: (.?)px (.*?)px;‘,background_image.get_attribute(‘style‘)) # print(result) location[‘x‘] = int(result[0][1]) location[‘y‘] = int(result[0][2])x_offset </span>=<span style="color: #000000;"> 0 </span><span style="color: #0000ff;">for</span> im <span style="color: #0000ff;">in</span><span style="color: #000000;"> im_list_upper: new_im.paste(im,(x_offset,0)) </span><span style="color: #008000;">#</span><span style="color: #008000;"> 把小图片放到 新的空白图片上</span> x_offset +=<span style="color: #000000;"> im.size[0] x_offset </span>=<span style="color: #000000;"> 0 </span><span style="color: #0000ff;">for</span> im <span style="color: #0000ff;">in</span><span style="color: #000000;"> im_list_down: new_im.paste(im,(x_offset,</span>58<span style="color: #000000;">)) x_offset </span>+=<span style="color: #000000;"> im.size[0] </span><span style="color: #008000;">#</span><span style="color: #008000;">new_im.show()</span> <span style="color: #0000ff;">return</span><span style="color: #000000;"> new_imdef get_track(distance):image_url </span>=<span style="color: #000000;"> result[0][0] location_list.append(location) image_url </span>= image_url.replace(<span style="color: #800000;">‘</span><span style="color: #800000;">webp</span><span style="color: #800000;">‘</span>,<span style="color: #800000;">‘</span><span style="color: #800000;">jpg</span><span style="color: #800000;">‘</span><span style="color: #000000;">) </span><span style="color: #008000;">#</span><span style="color: #008000;"> ‘替换url http://static.geetest.com/pictures/gt/579066de6/579066de6.webp‘</span> image_result =<span style="color: #000000;"> requests.get(image_url).content image_file </span>= BytesIO(image_result) <span style="color: #008000;">#</span><span style="color: #008000;"> 是一张无序的图片</span> image =<span style="color: #000000;"> merge_image(image_file,location_list) </span><span style="color: #0000ff;">return</span><span style="color: #000000;"> imagetracks_back.append(distance-current) tracks_back.extend([-2,-5,-8,])</span><span style="color: #008000;">#</span><span style="color: #008000;"> 初速度</span> v=<span style="color: #000000;">0 </span><span style="color: #008000;">#</span><span style="color: #008000;"> 单位时间为0.2s来统计轨迹,轨迹即0.2内的位移</span> t=0.2 <span style="color: #008000;">#</span><span style="color: #008000;"> 位移/轨迹列表,列表内的一个元素代表0.2s的位移</span> tracks=<span style="color: #000000;">[] tracks_back</span>=<span style="color: #000000;">[] </span><span style="color: #008000;">#</span><span style="color: #008000;"> 当前的位移</span> current=<span style="color: #000000;">0 </span><span style="color: #008000;">#</span><span style="color: #008000;"> 到达mid值开始减速</span> mid=distance * 7/8 <span style="color: #0000ff;">print</span>(<span style="color: #800000;">"</span><span style="color: #800000;">distance</span><span style="color: #800000;">"</span><span style="color: #000000;">,distance) </span><span style="color: #0000ff;">global</span><span style="color: #000000;"> random_int random_int</span>=8<span style="color: #000000;"> distance </span>+= random_int <span style="color: #008000;">#</span><span style="color: #008000;"> 先滑过一点,最后再反着滑动回来</span> <span style="color: #0000ff;">while</span> current <<span style="color: #000000;"> distance: </span><span style="color: #0000ff;">if</span> current <<span style="color: #000000;"> mid: </span><span style="color: #008000;">#</span><span style="color: #008000;"> 加速度越小,单位时间的位移越小,模拟的轨迹就越多越详细</span> a = random.randint(2,5) <span style="color: #008000;">#</span><span style="color: #008000;"> 加速运动</span> <span style="color: #0000ff;">else</span><span style="color: #000000;">: a </span>= -random.randint(2,5) <span style="color: #008000;">#</span><span style="color: #008000;"> 减速运动</span> <span style="color: #008000;">#</span><span style="color: #008000;"> 初速度</span> v0 =<span style="color: #000000;"> v </span><span style="color: #008000;">#</span><span style="color: #008000;"> 0.2秒时间内的位移</span> s = v0*t+0.5*a*(t**2<span style="color: #000000;">) </span><span style="color: #008000;">#</span><span style="color: #008000;"> 当前的位置</span> current +=<span style="color: #000000;"> s </span><span style="color: #008000;">#</span><span style="color: #008000;"> 添加到轨迹列表</span> <span style="color: #0000ff;">if</span> round(s)><span style="color: #000000;">0: tracks.append(round(s)) </span><span style="color: #0000ff;">else</span><span style="color: #000000;">: tracks_back.append(round(s)) </span><span style="color: #008000;">#</span><span style="color: #008000;"> 速度已经达到v,该速度作为下次的初速度</span> v= v0+a*<span style="color: #000000;">t </span><span style="color: #0000ff;">print</span>(<span style="color: #800000;">"</span><span style="color: #800000;">tracks:</span><span style="color: #800000;">"</span><span style="color: #000000;">,tracks) </span><span style="color: #0000ff;">print</span>(<span style="color: #800000;">"</span><span style="color: #800000;">tracks_back:</span><span style="color: #800000;">"</span><span style="color: #000000;">,tracks_back) </span><span style="color: #0000ff;">print</span>(<span style="color: #800000;">"</span><span style="color: #800000;">current:</span><span style="color: #800000;">"</span><span style="color: #000000;">,current) </span><span style="color: #008000;">#</span><span style="color: #008000;"> 反着滑动到大概准确位置</span>def get_distance(image1,image2): ‘‘‘ 拿到滑动验证码需要移动的距离 :param image1:没有缺口的图片对象 :param image2:带缺口的图片对象 :return:需要移动的距离 ‘‘‘ # print(‘size‘, image1.size) threshold = 50 for i in range(0,image1.size[0]): # 260 for j in range(0,image1.size[1]): # 160 pixel1 = image1.getpixel((i,j)) pixel2 = image2.getpixel((i,j)) res_R = abs(pixel1[0]-pixel2[0]) # 计算RGB差 res_G = abs(pixel1[1] - pixel2[1]) # 计算RGB差 res_B = abs(pixel1[2] - pixel2[2]) # 计算RGB差 if res_R > threshold and res_G > threshold and res_B > threshold: return i # 需要移动的距离</span><span style="color: #0000ff;">return</span><span style="color: #000000;"> tracks,tracks_backdef main_check_code(driver,element): " 拖动识别验证码 :param driver: :param element: :return: "
def main_check_slider(driver): " 检查滑动按钮是否加载 :param driver: :return: " while True: try : driver.get(‘https://www.huxiu.com/‘) element = WebDriverWait(driver, 30, 0.5).until(EC.element_to_be_clickable((By.CLASS_NAME, ‘js-login‘))) if element: return element except TimeoutException as e: print(‘超时错误,继续‘) time.sleep(5) if name == ‘main‘:login_btn </span>= driver.find_element_by_class_name(<span style="color: #800000;">‘</span><span style="color: #800000;">js-login</span><span style="color: #800000;">‘</span><span style="color: #000000;">) login_btn.click() element </span>= WebDriverWait(driver, 30, 0.5).until(EC.element_to_be_clickable((By.CLASS_NAME, <span style="color: #800000;">‘</span><span style="color: #800000;">gt_guide_tip</span><span style="color: #800000;">‘</span><span style="color: #000000;">))) slide_btn </span>= driver.find_element_by_class_name(<span style="color: #800000;">‘</span><span style="color: #800000;">gt_guide_tip</span><span style="color: #800000;">‘</span><span style="color: #000000;">) slide_btn.click() image1 </span>= get_image(driver, <span style="color: #800000;">‘</span><span style="color: #800000;">//div[@class="gt_cut_bg gt_show"]/div</span><span style="color: #800000;">‘</span><span style="color: #000000;">) image2 </span>= get_image(driver, <span style="color: #800000;">‘</span><span style="color: #800000;">//div[@class="gt_cut_fullbg gt_show"]/div</span><span style="color: #800000;">‘</span><span style="color: #000000;">) </span><span style="color: #008000;">#</span><span style="color: #008000;"> 图片上 缺口的位置的x坐标</span> <span style="color: #008000;">#</span><span style="color: #008000;"> 2 对比两张图片的所有RBG像素点,得到不一样像素点的x值,即要移动的距离</span> l =<span style="color: #000000;"> get_distance(image1, image2) </span><span style="color: #0000ff;">print</span>(<span style="color: #800000;">‘</span><span style="color: #800000;">l=</span><span style="color: #800000;">‘</span><span style="color: #000000;">,l) </span><span style="color: #008000;">#</span><span style="color: #008000;"> 3 获得移动轨迹</span> track_list =<span style="color: #000000;"> get_track(l) </span><span style="color: #0000ff;">print</span>(<span style="color: #800000;">‘</span><span style="color: #800000;">第一步,点击滑动按钮</span><span style="color: #800000;">‘</span><span style="color: #000000;">) element </span>= WebDriverWait(driver, 30, 0.5).until(EC.element_to_be_clickable((By.CLASS_NAME, <span style="color: #800000;">‘</span><span style="color: #800000;">gt_slider_knob</span><span style="color: #800000;">‘</span><span style="color: #000000;">))) ActionChains(driver).click_and_hold(on_element</span>=element).perform() <span style="color: #008000;">#</span><span style="color: #008000;"> 点击鼠标左键,按住不放</span> <span style="color: #0000ff;">import</span><span style="color: #000000;"> time time.sleep(</span>0.4<span style="color: #000000;">) </span><span style="color: #0000ff;">print</span>(<span style="color: #800000;">‘</span><span style="color: #800000;">第二步,拖动元素</span><span style="color: #800000;">‘</span><span style="color: #000000;">) </span><span style="color: #0000ff;">for</span> track <span style="color: #0000ff;">in</span><span style="color: #000000;"> track_list[0]: ActionChains(driver).move_by_offset(xoffset</span>=track, yoffset=0).perform() <span style="color: #008000;">#</span><span style="color: #008000;"> 鼠标移动到距离当前位置(x,y)</span> <span style="color: #008000;">#</span><span style="color: #008000;">time.sleep(0.4)</span> <span style="color: #0000ff;">for</span> track <span style="color: #0000ff;">in</span> track_list[1<span style="color: #000000;">]: ActionChains(driver).move_by_offset(xoffset</span>=track, yoffset=0).perform() <span style="color: #008000;">#</span><span style="color: #008000;"> 鼠标移动到距离当前位置(x,y)</span> time.sleep(0.1<span style="color: #000000;">) </span><span style="color: #0000ff;">import</span><span style="color: #000000;"> time time.sleep(</span>0.6<span style="color: #000000;">) </span><span style="color: #008000;">#</span><span style="color: #008000;"> ActionChains(driver).move_by_offset(xoffset=2, yoffset=0).perform() # 鼠标移动到距离当前位置(x,y)</span> <span style="color: #008000;">#</span><span style="color: #008000;"> ActionChains(driver).move_by_offset(xoffset=8, yoffset=0).perform() # 鼠标移动到距离当前位置(x,y)</span> <span style="color: #008000;">#</span><span style="color: #008000;"> ActionChains(driver).move_by_offset(xoffset=2, yoffset=0).perform() # 鼠标移动到距离当前位置(x,y)</span> <span style="color: #0000ff;">print</span>(<span style="color: #800000;">‘</span><span style="color: #800000;">第三步,释放鼠标</span><span style="color: #800000;">‘</span><span style="color: #000000;">) ActionChains(driver).release(on_element</span>=<span style="color: #000000;">element).perform() time.sleep(</span>1<span style="color: #000000;">)</span><span style="color: #0000ff;">try</span><span style="color: #000000;">: count </span>= 3 <span style="color: #008000;">#</span><span style="color: #008000;"> 最多识别3次</span> driver =<span style="color: #000000;"> webdriver.Chrome() </span><span style="color: #0000ff;">while</span> count ><span style="color: #000000;"> 0: </span><span style="color: #008000;">#</span><span style="color: #008000;"> 等待滑动按钮加载完成</span> element =<span style="color: #000000;"> main_check_slider(driver) main_check_code(driver,element) </span><span style="color: #0000ff;">try</span><span style="color: #000000;">: success_element </span>= (By.CSS_SELECTOR, <span style="color: #800000;">‘</span><span style="color: #800000;">.gt_success</span><span style="color: #800000;">‘</span><span style="color: #000000;">) </span><span style="color: #008000;">#</span><span style="color: #008000;"> 得到成功标志</span> success_images = WebDriverWait(driver,3<span style="color: #000000;">).until(EC.presence_of_element_located(success_element)) </span><span style="color: #0000ff;">if</span><span style="color: #000000;"> success_images: </span><span style="color: #0000ff;">print</span>(<span style="color: #800000;">‘</span><span style="color: #800000;">成功识别!!!!!!</span><span style="color: #800000;">‘</span><span style="color: #000000;">) count </span>=<span style="color: #000000;"> 0 </span><span style="color: #0000ff;">import</span><span style="color: #000000;"> sys sys.exit() </span><span style="color: #0000ff;">except</span><span style="color: #000000;"> Exception as e: </span><span style="color: #0000ff;">print</span>(<span style="color: #800000;">‘</span><span style="color: #800000;">识别错误,继续</span><span style="color: #800000;">‘</span><span style="color: #000000;">) count </span>-= 1<span style="color: #000000;"> time.sleep(</span>1<span style="color: #000000;">) </span><span style="color: #0000ff;">else</span><span style="color: #000000;">: </span><span style="color: #0000ff;">print</span>(<span style="color: #800000;">‘</span><span style="color: #800000;">too many attempt check code </span><span style="color: #800000;">‘</span><span style="color: #000000;">) exit(</span><span style="color: #800000;">‘</span><span style="color: #800000;">退出程序</span><span style="color: #800000;">‘</span><span style="color: #000000;">) </span><span style="color: #0000ff;">finally</span><span style="color: #000000;">: driver.close()</span></pre>
本文推荐
****slenium官网:http://www.selenium.org.cn/1598.html
快速入门:http://www.testclass.net/selenium_python/