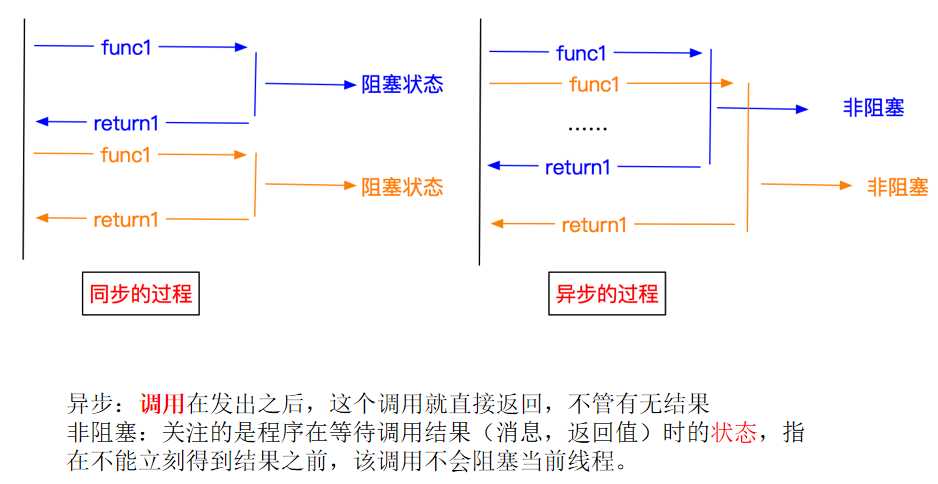
Scrapy是一个为了爬取网站数据,提取结构性数据而编写的应用框架,非常出名,非常强悍。所谓的框架就是一个已经被集成了各种功能(高性能异步下载,队列,分布式,解析,持久化等)的具有很强通用性的项目模板。对于框架的学习,重点是要学习其框架的特性、各个功能的用法即可。
    Linux:

       pip3 install scrapy

   Windows:

       a. pip3 install wheel
 ?
       b. 下载twisted http://www.lfd.uci.edu/~gohlke/pythonlibs/#twisted
 ?
       c. 进入下载目录,执行 pip3 install Twisted?17.1.0?cp35?cp35m?win_amd64.whl
 ?
       d. pip3 install pywin32
 ?
       e. pip3 install scrapy
python的内置日志记录定义了5个不同的级别,以指示给定日志消息的严重性。以下是标准的,按降序排列:
logging.CRITICAL -对于严重错误(严重性最高)logging.ERROR -对于常规错误logging.WARNING -用于警告消息logging.INFO -以获取信息性消息logging.DEBUG -用于调试消息(最低严重性)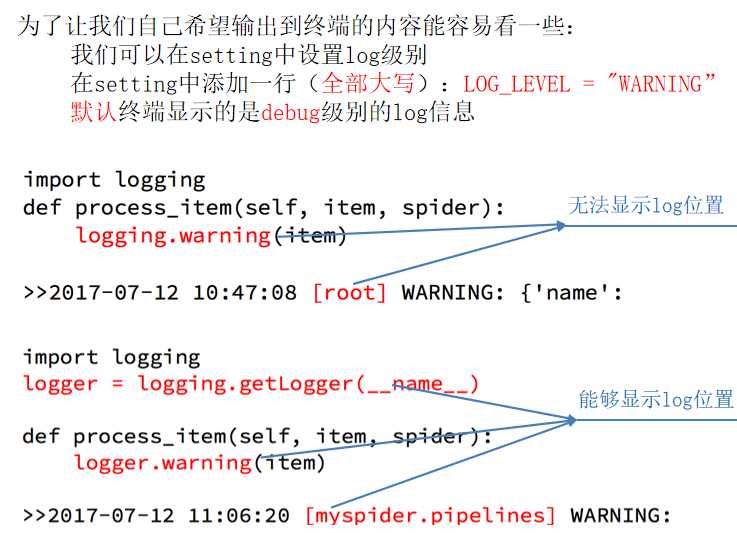
import logging

#设置日志的输出样式
logging.basicConfig(level=logging.INFO,
                    format=‘%(levelname)s [%(filename)s:%(lineno)d] ‘
                           ‘:  %(message)s‘
                           ‘ - %(asctime)s‘, datefmt=‘[%d/%b/%Y %H:%M:%S]‘,
                    )
# 您可以使用不同的记录器,只需将其名称 logging.getLogger 功能
# 最后,通过使用 __name__ 变量,用当前模块的路径填充
logger = logging.getLogger(__name__)

if __name__ == ‘__main__‘:
    logger.info("this is a info log")
    logger.info("this is  info log 1")
from log_a import logger  # 导入logger


if __name__ == ‘__main__‘:
    logger.warning("this is log b 1")
    logger.warning("this is log b 2")
settings中设置LOG_LEVEL=“WARNING”
settings中设置LOG_FILE="./a.log" #设置日志保存的位置,设置会后终端不会显示日志内容
import logging,实例化logger的方式在任何文件中使用logger输出内容
普通项目中
import logging
logging.basicConfig(...) #设置日志输出的样式,格式
实例化一个logger=logging.getLogger(__name__)


import scrapy
from tencent.items import TencentItem
class HrSpider(scrapy.Spider):
name = ‘hr‘
allowed_domains = [‘tencent.com‘]
start_urls = [‘http://hr.tencent.com/position.php‘]
def parse(self, response):
tr_list = response.xpath("//table[@class=‘tablelist‘]/tr")[1:-1]
for tr in tr_list:
item = TencentItem()
item["title"] = tr.xpath("./td[1]/a/text()").extract_first()
item["position"] = tr.xpath("./td[2]/text()").extract_first()
item["publish_date"] = tr.xpath("./td[5]/text()").extract_first()
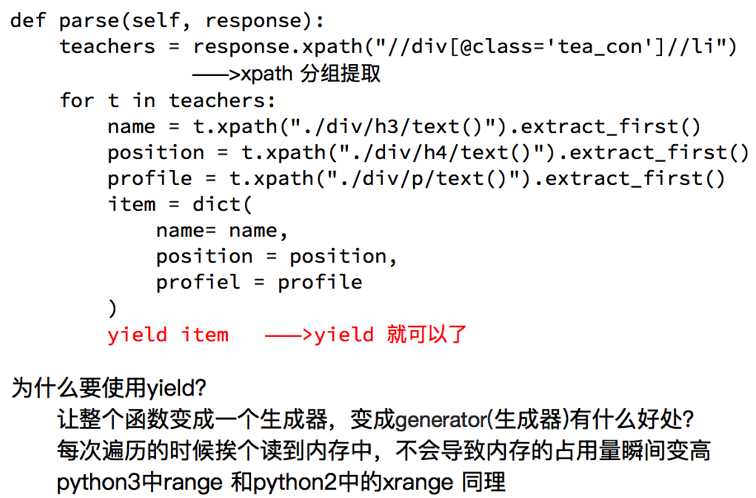
yield item
#找到下一页的url地址
next_url = response.xpath("//a[@id=‘next‘]/@href").extract_first()
# 最后一页的href为javascript:;
if next_url != "javascript:;":
next_url = "http://hr.tencent.com/" +next_url
# 发送请求
yield scrapy.Request(
next_url,
# 当前的url对应的响应交给谁处理
# 下一页的处理方式和这一页的处理方式是一样的
# 如果处理方式不一样,单独写一个方法来处理
callback=self.parse,
# 实现itme在不同的方法中传递(传递数据)
# mata是字典的形式
# meta = {"item":item}
)
# def parse1(self,response):
# response.meta["item"]
import scrapy


class TencentItem(scrapy.Item):
    # define the fields for your item here like:
    title = scrapy.Field()
    position = scrapy.Field()
    publish_date = scrapy.Field()
from pymongo import MongoClient
from tencent.items import TencentItem

client = MongoClient()
collection = client["tencent"]["hr"]

class TencentPipeline(object):
    def process_item(self, item, spider):
        if isinstance(item,TencentItem):
            print(item)
            collection.insert(dict(item))
        return item
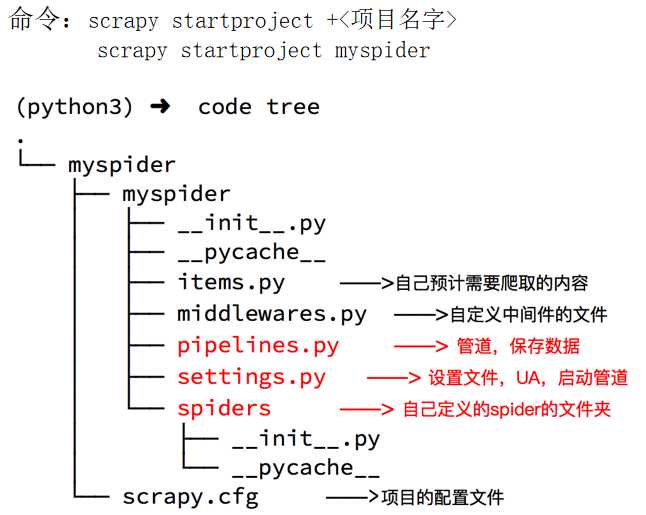
1.创建项目:scrapy startproject 项目名称
?
#C:\Users\yangzaigang>scrapy startproject pachong
#New Scrapy project ‘pachong‘, using template directory ‘c:\users\yangzaigang\appdata\local\programs\python\python37\lib\site-packages\scrapy\templates\project‘, created in:
#C:\Users\yangzaigang\pachong
?
?
项目结构:
project_name/
scrap
project_name/
__init__.py
items.py
pipelines.py
settings.py
spiders/
__init__.py
?
scrapy.cfg 项目的主配置信息。(真正爬虫相关的配置信息在settings.py文件中)
items.py 设置数据存储模板,用于结构化数据,如:Django的Model
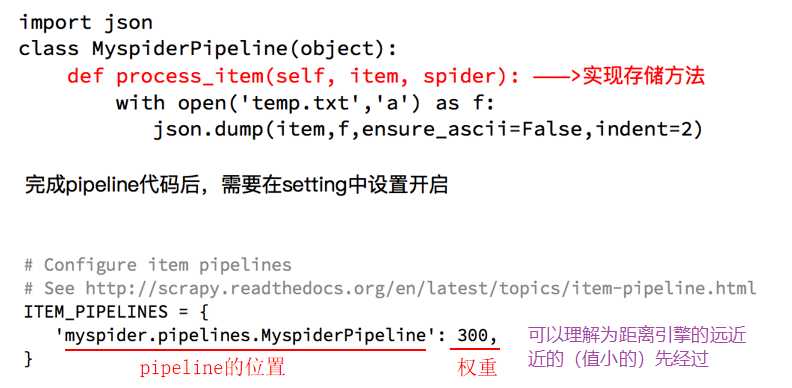
pipelines 数据持久化处理
settings.py 配置文件,如:递归的层数、并发数,延迟下载等
spiders 爬虫目录,如:创建文件,编写爬虫解析规则
?
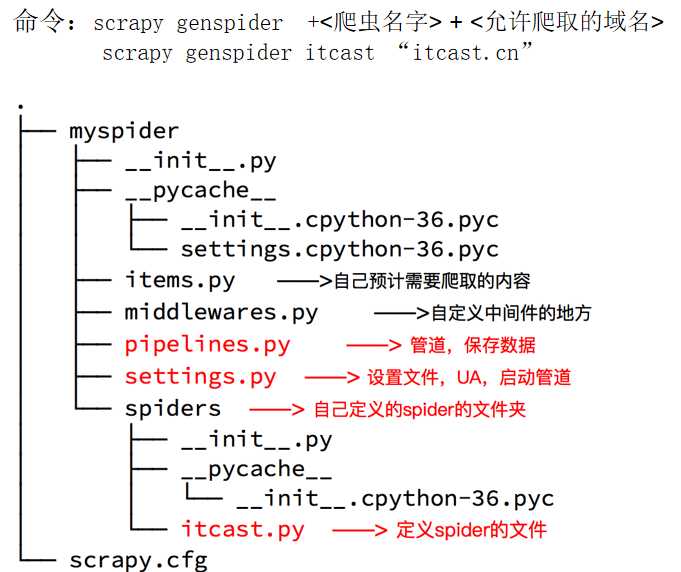
2.创建爬虫应用程序:
?
cd project_name(进入项目目录)
# gen(消息) spider(蜘蛛)
scrapy genspider 应用名称 爬取网页的起始url (例如:scrapy genspider qiubai www.qiushibaike.com)
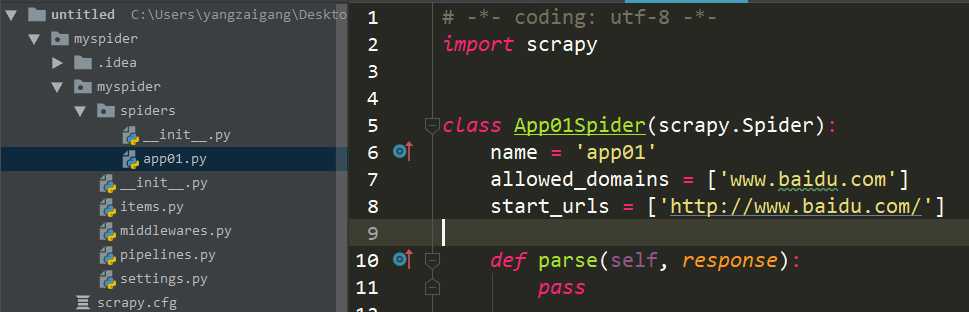
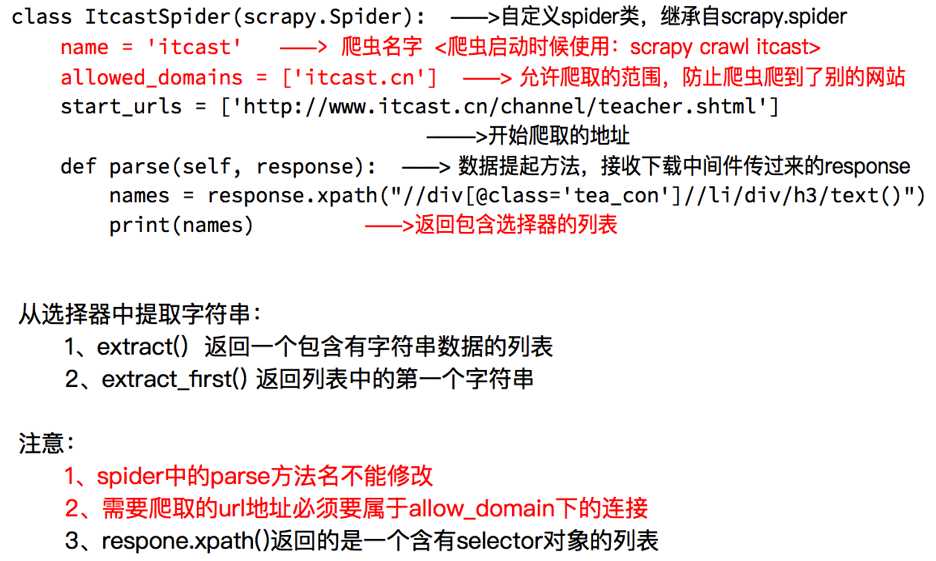
3.编写爬虫文件:在步骤2执行完毕后,会在项目的spiders中生成一个应用名的py爬虫文件,文件源码如下:
?
# 爬虫文件的核心就是数据的爬取和解析
import scrapy
?
class QiubaiSpider(scrapy.Spider):
# 根据名称定位到爬虫文件
name = ‘qiubai‘
# 允许爬取的域名(如果遇到非该域名的url则爬取不到数据)
# 一般把这个注释掉
allowed_domains = [‘https://www.qiushibaike.com/‘]
# 起始爬取的url列表,列表,可以多个url
start_urls = [‘https://www.qiushibaike.com/‘]
?
# 问起始URL并获取结果后的回调函数,该函数的response参数就是向起始的url发送请求后,获取的响应对象.该函数返回值必须为可迭代对象或者NUll
# response就是url对应的响应对象
def parse(self, response):
print(response.text) # 获取字符串类型的响应内容
print(response.body) # 获取字节类型的相应内容
4.设置修改settings.py配置文件相关配置:
?
修改内容及其结果如下:
19行:USER_AGENT = ‘Mozilla/5.0 (Macintosh; Intel Mac OS X 10_12_0) AppleWebKit/537.36 (KHTML, like Gecko) Chrome/68.0.3440.106 Safari/537.36‘ #伪装请求载体身份
?
22行:ROBOTSTXT_OBEY = False # 可以忽略或者不遵守robots协议
?
# 执行爬虫文件,整个工程就执行了
5.执行爬虫程序:scrapy crawl 应用名称
4. 将糗百首页中段子的内容和标题进行爬取
import scrapy
?
# Spider 父类
class QiubaiSpider(scrapy.Spider):
name = ‘qiubai‘
allowed_domains = [‘https://www.qiushibaike.com/‘]
start_urls = [‘https://www.qiushibaike.com/‘]
?
def parse(self, response):
#xpath为response中的方法,可以将xpath表达式直接作用于该函数中
odiv = response.xpath(‘//div[@id="content-left"]/div‘)
content_list = [] #用于存储解析到的数据
for div in odiv:
#xpath函数返回的为列表,列表中存放的数据为Selector类型的数据。我们解析到的内容被封装在了Selector对象中,需要调用extract()函数将解析的内容从Selecor中取出。
author = div.xpath(‘.//div[@class="author clearfix"]/a/h2/text()‘)[0].extract()
content=div.xpath(‘.//div[@class="content"]/span/text()‘)[0].extract()
?
#将解析到的内容封装到字典中
dic={
‘作者‘:author,
‘内容‘:content
}
#将数据存储到content_list这个列表中
content_list.append(dic)
?
return content_list
?
执行爬虫程序:
?
scrapy crawl 爬虫名称 # 该种执行形式会显示执行的日志信息
scrapy crawl 爬虫名称 --nolog # 该种执行形式不会显示执行的日志信息
原文:https://www.cnblogs.com/yzg-14/p/12203833.html