Navigation是指允许用户在应用程序中浏览、进入和退出不同内容的Fragment 。Navigation能够实现从简单的按钮单击到更复杂的模式,如应用程序栏和导航抽屉。导航组件还通过遵循一套既定的原则来确保一致和可预测的用户体验。
Navigation的原则:
Navigation有三个主要的部分:
首先新建新建两个Fragment,HomeFragment和DetailFragment
在其对应生成的xml文件中添加一些控件
frament_home.xml
 1 <?xml version="1.0" encoding="utf-8"?>
 2 <FrameLayout xmlns:android="http://schemas.android.com/apk/res/android"
 3     xmlns:app="http://schemas.android.com/apk/res-auto"
 4     xmlns:tools="http://schemas.android.com/tools"
 5     android:layout_width="match_parent"
 6     android:layout_height="match_parent"
 7     tools:context=".HomeFragment">
 8
 9     <androidx.constraintlayout.widget.ConstraintLayout
10         android:layout_width="match_parent"
11         android:layout_height="match_parent">
12
13         <androidx.constraintlayout.widget.Guideline
14             android:id="@+id/guideline"
15             android:layout_width="wrap_content"
16             android:layout_height="wrap_content"
17             android:orientation="horizontal"
18             app:layout_constraintGuide_begin="335dp"
19             app:layout_constraintGuide_percent="0.5" />
20
21         <TextView
22             android:id="@+id/textView"
23             android:layout_width="wrap_content"
24             android:layout_height="wrap_content"
25             android:layout_marginStart="8dp"
26             android:layout_marginTop="8dp"
27             android:layout_marginEnd="8dp"
28             android:layout_marginBottom="8dp"
29             android:text="Home"
30             android:textSize="36sp"
31             app:layout_constraintBottom_toTopOf="@+id/guideline"
32             app:layout_constraintEnd_toEndOf="parent"
33             app:layout_constraintStart_toStartOf="parent"
34             app:layout_constraintTop_toTopOf="parent"
35             app:layout_constraintVertical_bias="0.8" />
36
37         <Button
38             android:id="@+id/button"
39             android:layout_width="wrap_content"
40             android:layout_height="wrap_content"
41             android:layout_marginStart="8dp"
42             android:layout_marginTop="8dp"
43             android:layout_marginEnd="8dp"
44             android:layout_marginBottom="8dp"
45             android:text="Button"
46             app:layout_constraintBottom_toBottomOf="parent"
47             app:layout_constraintEnd_toEndOf="parent"
48             app:layout_constraintStart_toStartOf="parent"
49             app:layout_constraintTop_toTopOf="@+id/guideline"
50             app:layout_constraintVertical_bias="0.2" />
51     </androidx.constraintlayout.widget.ConstraintLayout>
52 </FrameLayout>
fragment_detail.xml
 1 <?xml version="1.0" encoding="utf-8"?>
 2 <FrameLayout xmlns:android="http://schemas.android.com/apk/res/android"
 3     xmlns:app="http://schemas.android.com/apk/res-auto"
 4     xmlns:tools="http://schemas.android.com/tools"
 5     android:layout_width="match_parent"
 6     android:layout_height="match_parent"
 7     tools:context=".DetailFragment">
 8
 9     <androidx.constraintlayout.widget.ConstraintLayout
10         android:layout_width="match_parent"
11         android:layout_height="match_parent">
12
13         <androidx.constraintlayout.widget.Guideline
14             android:id="@+id/guideline2"
15             android:layout_width="wrap_content"
16             android:layout_height="wrap_content"
17             android:orientation="horizontal"
18             app:layout_constraintGuide_begin="348dp"
19             app:layout_constraintGuide_percent="0.5" />
20
21         <TextView
22             android:id="@+id/textView2"
23             android:layout_width="wrap_content"
24             android:layout_height="wrap_content"
25             android:layout_marginStart="8dp"
26             android:layout_marginTop="8dp"
27             android:layout_marginEnd="8dp"
28             android:layout_marginBottom="8dp"
29             android:text="Detail"
30             android:textSize="36sp"
31             app:layout_constraintBottom_toTopOf="@+id/guideline2"
32             app:layout_constraintEnd_toEndOf="parent"
33             app:layout_constraintStart_toStartOf="parent"
34             app:layout_constraintTop_toTopOf="parent"
35             app:layout_constraintVertical_bias="0.8" />
36
37         <Button
38             android:id="@+id/button2"
39             android:layout_width="wrap_content"
40             android:layout_height="wrap_content"
41             android:layout_marginStart="8dp"
42             android:layout_marginTop="8dp"
43             android:layout_marginEnd="8dp"
44             android:layout_marginBottom="8dp"
45             android:text="Button"
46             app:layout_constraintBottom_toBottomOf="parent"
47             app:layout_constraintEnd_toEndOf="parent"
48             app:layout_constraintStart_toStartOf="parent"
49             app:layout_constraintTop_toTopOf="@+id/guideline2"
50             app:layout_constraintVertical_bias="0.2" />
51     </androidx.constraintlayout.widget.ConstraintLayout>
52 </FrameLayout>
接着在activity_main中为Fragment添加NavHost容器
 1 <?xml version="1.0" encoding="utf-8"?>
 2 <androidx.constraintlayout.widget.ConstraintLayout xmlns:android="http://schemas.android.com/apk/res/android"
 3     xmlns:app="http://schemas.android.com/apk/res-auto"
 4     xmlns:tools="http://schemas.android.com/tools"
 5     android:layout_width="match_parent"
 6     android:layout_height="match_parent"
 7     tools:context=".MainActivity">
 8
 9     <fragment
10         android:id="@+id/fragment"
11         android:name="androidx.navigation.fragment.NavHostFragment"
12         android:layout_width="409dp"
13         android:layout_height="729dp"
14         app:defaultNavHost="true"
15         app:layout_constraintBottom_toBottomOf="parent"
16         app:layout_constraintEnd_toEndOf="parent"
17         app:layout_constraintStart_toStartOf="parent"
18         app:layout_constraintTop_toTopOf="parent"
19         app:navGraph="@navigation/my_nav_graph" />
20 </androidx.constraintlayout.widget.ConstraintLayout>
再新建navigation文件夹新建my_nav_graph,添加Fragment到其中
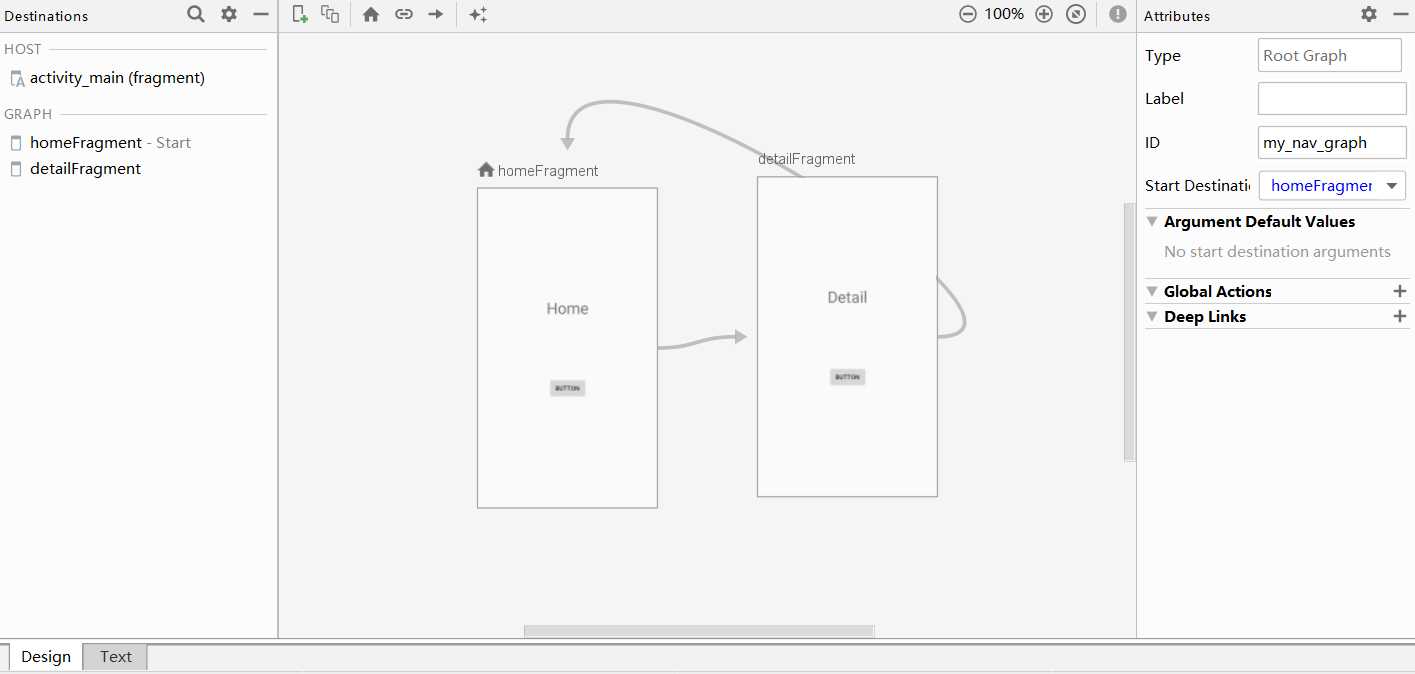
建立Fragment之间的跳转关系,当然也可以直接在xml文件里写,不过这样会有点麻烦。
 1 <?xml version="1.0" encoding="utf-8"?>
 2 <navigation xmlns:android="http://schemas.android.com/apk/res/android"
 3     xmlns:app="http://schemas.android.com/apk/res-auto"
 4     xmlns:tools="http://schemas.android.com/tools"
 5     android:id="@+id/my_nav_graph"
 6     app:startDestination="@id/homeFragment"
 7     tools:ignore="UnusedNavigation">
 8
 9     <fragment
10         android:id="@+id/homeFragment"
11         android:name="com.example.navigationdemo.HomeFragment"
12         android:label="Home"
13         tools:layout="@layout/fragment_home">
14         <action
15             android:id="@+id/action_homeFragment_to_detailFragment"
16             app:destination="@id/detailFragment"
17             app:enterAnim="@anim/nav_default_enter_anim"
18             app:exitAnim="@anim/nav_default_exit_anim" />
19     </fragment>
20     <fragment
21         android:id="@+id/detailFragment"
22         android:name="com.example.navigationdemo.DetailFragment"
23         android:label="Detail"
24         tools:layout="@layout/fragment_detail">
25         <action
26             android:id="@+id/action_detailFragment_to_homeFragment"
27             app:destination="@id/homeFragment"
28             app:enterAnim="@anim/nav_default_enter_anim"
29             app:exitAnim="@anim/nav_default_exit_anim" />
30     </fragment>
31 </navigation>
HomeFragment.java
 1 package com.example.navigationdemo;
 2
 3
 4 import android.os.Bundle;
 5
 6 import androidx.fragment.app.Fragment;
 7 import androidx.navigation.NavController;
 8 import androidx.navigation.Navigation;
 9
10 import android.view.LayoutInflater;
11 import android.view.View;
12 import android.view.ViewGroup;
13 import android.widget.Button;
14
15 import com.google.android.material.internal.NavigationMenuItemView;
16
17
18 /**
19  * A simple {@link Fragment} subclass.
20  */
21 public class HomeFragment extends Fragment {
22
23
24     public HomeFragment() {
25         // Required empty public constructor
26     }
27
28
29     @Override
30     public View onCreateView(LayoutInflater inflater, ViewGroup container,
31                              Bundle savedInstanceState) {
32         // Inflate the layout for this fragment
33         return inflater.inflate(R.layout.fragment_home, container, false);
34     }
35
36     @Override
37     public void onActivityCreated(Bundle savedInstanceState) {
38         super.onActivityCreated(savedInstanceState);
39         Button button;
40         button = getView().findViewById(R.id.button);
41         button.setOnClickListener(new View.OnClickListener() {
42             @Override
43             public void onClick(View v) {
44                 NavController controller = Navigation.findNavController(v);
45                 controller.navigate(R.id.action_homeFragment_to_detailFragment);
46             }
47         });
48     }
49 }
DetaiFragment.java
 1 package com.example.navigationdemo;
 2
 3
 4 import android.os.Bundle;
 5
 6 import androidx.fragment.app.Fragment;
 7 import androidx.navigation.Navigation;
 8
 9 import android.view.LayoutInflater;
10 import android.view.View;
11 import android.view.ViewGroup;
12
13
14 /**
15  * A simple {@link Fragment} subclass.
16  */
17 public class DetailFragment extends Fragment {
18
19
20     public DetailFragment() {
21         // Required empty public constructor
22     }
23
24
25     @Override
26     public View onCreateView(LayoutInflater inflater, ViewGroup container,
27                              Bundle savedInstanceState) {
28         // Inflate the layout for this fragment
29         return inflater.inflate(R.layout.fragment_detail, container, false);
30     }
31
32     @Override
33     public void onActivityCreated(Bundle savedInstanceState) {
34         super.onActivityCreated(savedInstanceState);
35         getView().findViewById(R.id.button2).setOnClickListener(Navigation.createNavigateOnClickListener(R.id.action_detailFragment_to_homeFragment));
36
37     }
38 }
这样就能实现两个界面之间的跳转。
如果想要实现手机屏幕左上角 ![]() 的返回功能,则需要在MainActivity中添加代码
的返回功能,则需要在MainActivity中添加代码
 1 package com.example.navigationdemo;
 2
 3 import androidx.appcompat.app.AppCompatActivity;
 4 import androidx.navigation.NavController;
 5 import androidx.navigation.Navigation;
 6 import androidx.navigation.ui.NavigationUI;
 7
 8 import android.os.Bundle;
 9
10 public class MainActivity extends AppCompatActivity {
11
12     @Override
13     protected void onCreate(Bundle savedInstanceState) {
14         super.onCreate(savedInstanceState);
15         setContentView(R.layout.activity_main);
16         NavController controller = Navigation.findNavController(this, R.id.fragment);
17         NavigationUI.setupActionBarWithNavController(this, controller);
18     }
19
20     @Override
21     public boolean onSupportNavigateUp() {
22         NavController controller = Navigation.findNavController(this, R.id.fragment);
23         return controller.navigateUp();
24         //return super.onSupportNavigateUp();
25     }
26 }
这里也没有很大的变化,也是通过Bundle来传递的,然后接收方通过getArguments()来获取到对应的Bundle从而取出数据。
是可以直接在Navigation graph中直接设置转换动画,极大减少了工作量。当然如果对自带动画效果不满意,也可以创建Animation资源自己编写xml文件来创建动画。
但要切记,在实际工程中不要把转换动画设置的太过花哨,以免影响用户的操作体验。
Android Jetpack -- Navigation 篇
原文:https://www.cnblogs.com/best-hym/p/12213210.html