本文通过在kubernetes上启动Jenkins服务,并将宿主机上的docker、docker.sock挂载到Jenkins容器中,实现在Jenkins容器中直接打镜像的形式实现CI功能。
Kubernetes 集群的安装请参考kubernetes安装
下载Jenkins对应的镜像
docker pull jenkins/jenkins:2.221
将jenkins镜像上传到自己的私有镜像仓库中
docker tag jenkins/jenkins:2.221 192.168.0.107/k8s/jenkins:2.221

docker push     192.168.0.107/k8s/jenkins:2.221
编写启动Jenkins的yml文件
cat > jenkins.yml << EOF
kind: PersistentVolume
apiVersion: v1
metadata:
  name: jenkins
  labels:
    type: local
    app: jenkins
spec:
  capacity:
    storage: 10Gi
  accessModes:
    - ReadWriteOnce
  hostPath:
    path: /opt/k8s/yml/jenkins/data
---

kind: PersistentVolumeClaim
apiVersion: v1
metadata:
  name: jenkins-claim
spec:
  accessModes:
    - ReadWriteOnce
  resources:
    requests:
      storage: 10Gi
---

apiVersion: v1
kind: ServiceAccount
metadata:
  name: jenkins
  namespace: default
automountServiceAccountToken: true
---

apiVersion: rbac.authorization.k8s.io/v1
kind: ClusterRoleBinding
metadata:
  name: Jenkins-cluster-admin
roleRef:
  apiGroup: rbac.authorization.k8s.io
  kind: ClusterRole
  name: cluster-admin
subjects:
- kind: ServiceAccount
  name: jenkins
  namespace: default
---

apiVersion: v1
kind: Service
metadata:
  name: jenkins
  labels:
    app: jenkins
spec:
  ports:
    - port: 80
      targetPort: 8080
      nodePort: 8888
      name: jenkins
    - port: 50000
      targetPort: 50000
      nodePort: 50000
      name: agent
  selector:
    app: jenkins
    tier: jenkins
  type: NodePort
---

apiVersion: apps/v1
kind: Deployment
metadata:
  name: jenkins
  labels:
    app: jenkins
spec:
  strategy:
    type: Recreate
  selector:
    matchLabels:
      app: jenkins
      tier: jenkins
  template:
    metadata:
      labels:
        app: jenkins
        tier: jenkins
    spec:
      serviceAccountName: jenkins
      containers:
      - image: 192.168.0.107/k8s/jenkins:2.221
        imagePullPolicy: IfNotPresent
        name: jenkins
        securityContext:
          privileged: true
          runAsUser: 0
        volumeMounts:
        - name: kubeconfig
          mountPath: /var/jenkins_home/.kube
        - name: docker
          mountPath: /var/run/docker.sock
        - name: docker-bin
          mountPath: /usr/bin/docker
        - name: jenkins-persistent-storage
          mountPath: /var/jenkins_home
        ports:
        - containerPort: 8080
          name: jenkins
        - containerPort: 50000
            name: agent
      volumes:
      - name: kubeconfig
        emptyDir: {}
      - name: docker
        hostPath:
          path: /var/run/docker.sock
      - name: docker-bin
        hostPath:
          path: /opt/k8s/bin/docker
      - name: jenkins-persistent-storage
        persistentVolumeClaim:
          claimName: jenkins-claim
EOF
其中ServiceAccount和ClusterRoleBinding是为了后续步骤在kubernets集群中启动pod完成构建任务而创建
Jenkins容器设置成特权用户执行,并把执行用户Id设置成0(root用户),原因参看遇到问题一节
启动Jenkins
mkdir -p /opt/k8s/yml/jenkins/data
chmod -R 777 /opt/k8s/yml/jenkins/data
kubectl create -f jenkins.yml
启动后首次登陆密码可在日志中查看,或通过如下命令获取
kubectl exec -it `kubectl get pods --selector=app=jenkins --output=jsonpath={.items..metadata.name}` cat /var/jenkins_home/secrets/initialAdminPassword
安装插件
安装:git-parameter、git-client、git、pipeline相关插件,可在jenkins插件管理界面上选择安装,如果下载失败,可以查看对应软件的版本从https://mirrors.tuna.tsinghua.edu.cn/jenkins/plugins下载后放到Jenkins工作目录下的plugins目录下。
创建git工程,在gitlab上创建一个简单的hello-ci工程,功能是:基于nginx镜像打一个自己的镜像,替换其中的欢迎页 index.html
工程目录
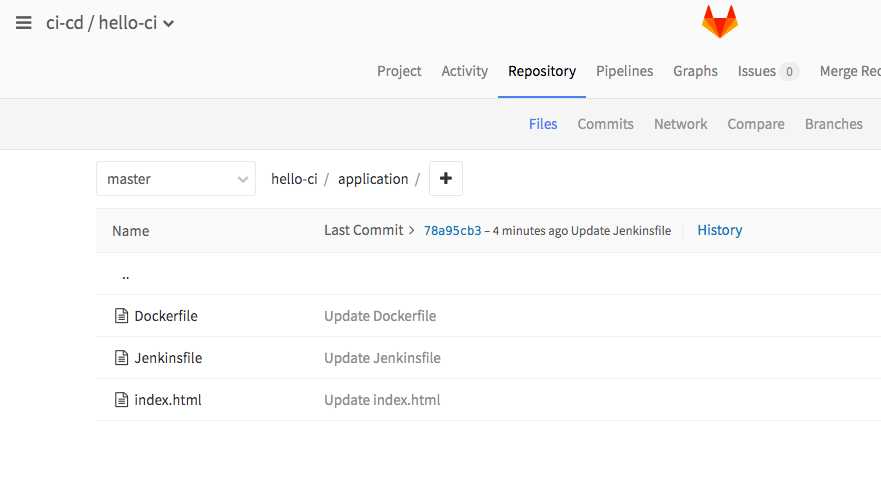
工程代码
index.html
<html>
    <p><h2 style="font-family:sans-serif">Hello from ci! You've successfully built and run the Hello-ci app.</h2> </p>
    <p style="font-family:sans-serif">The Hello-ci app is a modified version of the <a href="https://hub.docker.com/_/nginx/">nginx web server image</a>. If you open up the <b>kubernetes-ci-cd/hello-ci/DockerFile</b>, you will note several things:</p>
    <p style="font-family:sans-serif">welcome to ci </p>
</html>
Dockerfile
FROM 192.168.0.107/k8s/nginx:1.9.1

COPY index.html /usr/share/nginx/html/index.html

EXPOSE 80
Jenkinsfile
node {


        properties([parameters([[$class: 'GitParameterDefinition', branch: '', branchFilter: '.*', defaultValue: '', description: '', name: 'release_version', quickFilterEnabled: false, selectedValue: 'NONE', sortMode: 'NONE', tagFilter: '*', type: 'PT_BRANCH_TAG']])])

        checkout scm

        stage ("edit parameters") {

            echo "release_version:${release_version}"

            real_version = release_version.replaceAll("origin/","")

            echo "real_version:${real_version}"

        }

        imageName = "192.168.0.107/k8s/hello-ci:${real_version}"


        stage ("docker login") {
            sh "docker login -u admin -p Harbor12345 192.168.0.107"
        }

        stage ("Build") {

            sh "docker build -t ${imageName} application"
        }
        stage ("Push") {

            sh "docker push ${imageName}"
        }


    }
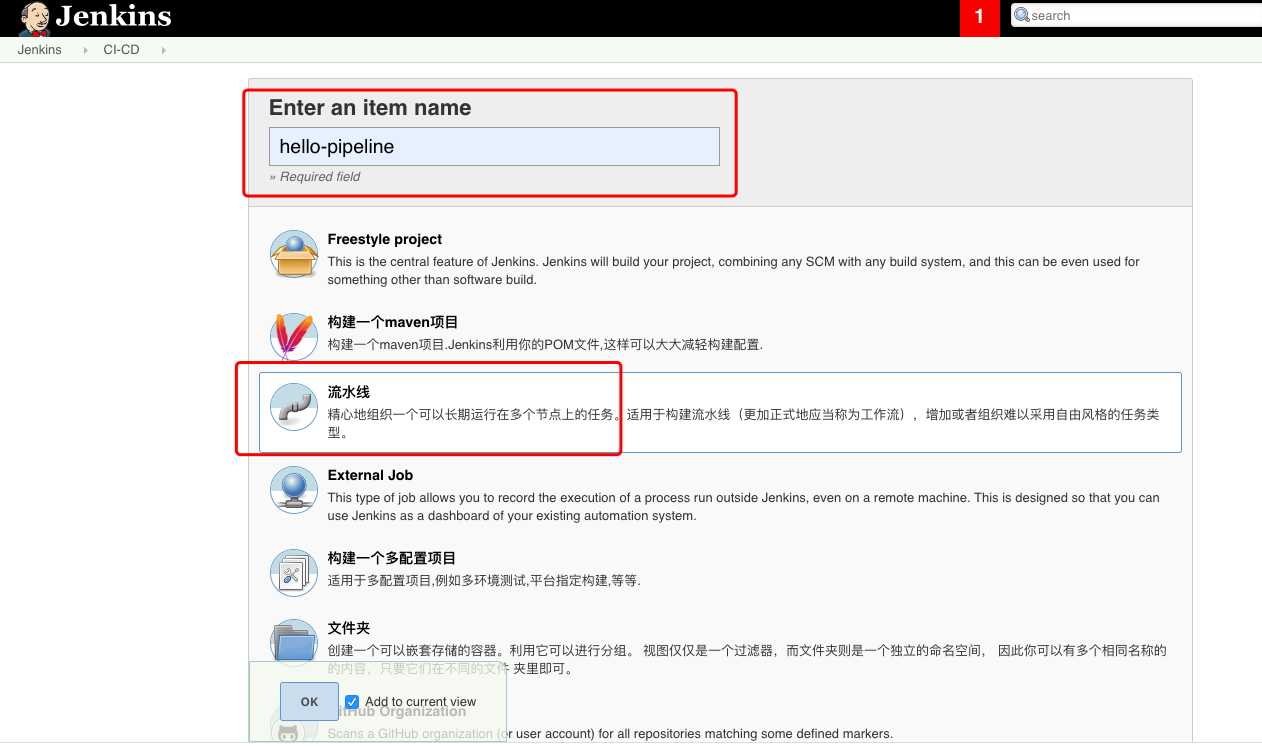
创建Jenkins工程
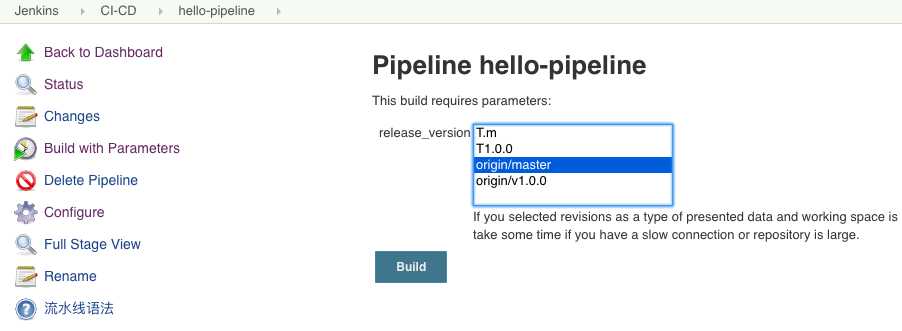
在Jenkins界面新建一个item,名称hello-pipeline, 类型选择:流水线(pipeline)
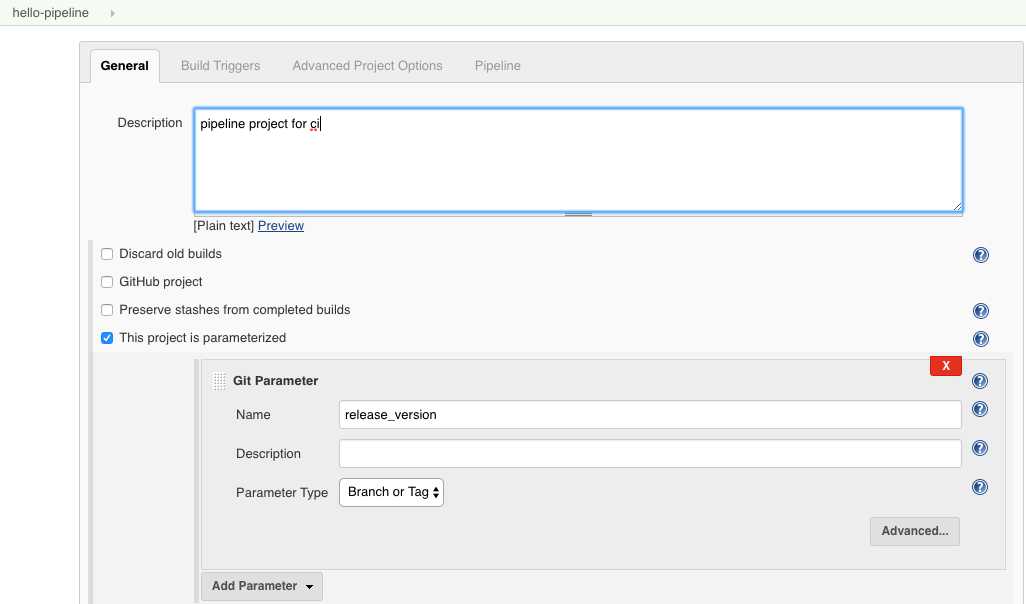
配置工程为参数化构建,参数列表中选择gitparameter,类型为branchortag
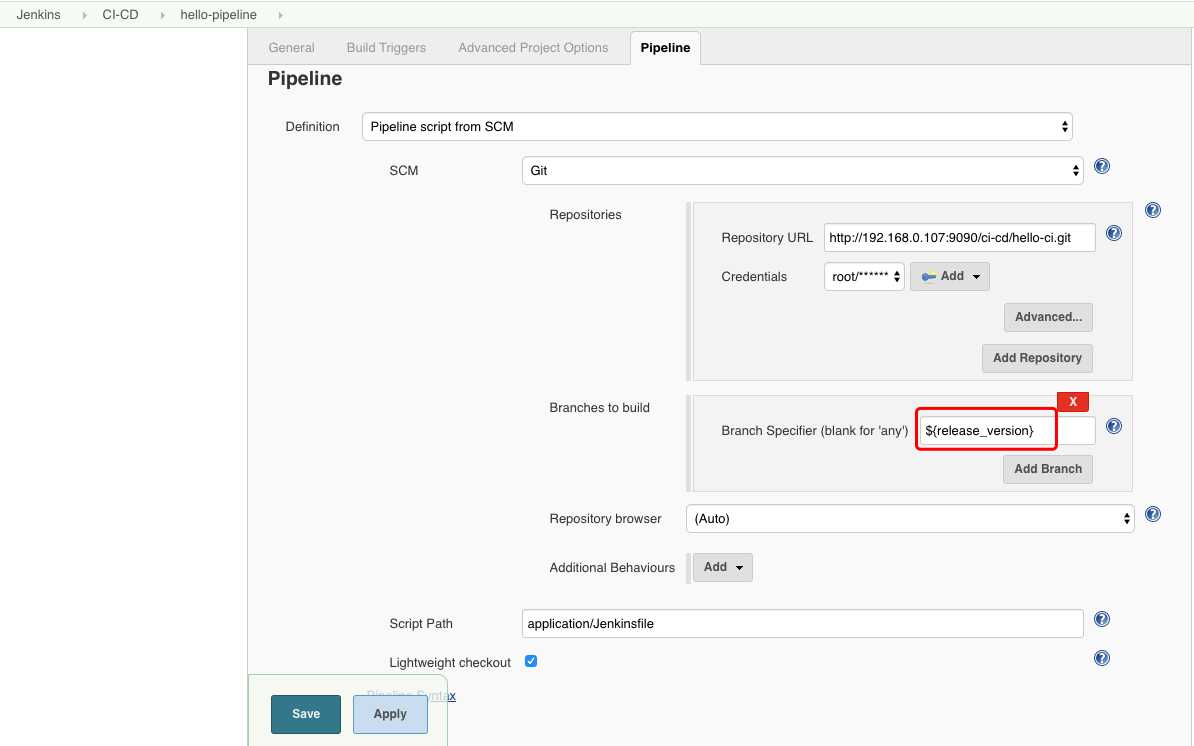
设置工程路径,对应的脚本路径
执行构建,选择一个分支,以master为例,执行构建
构建日志
Started by user admin
Lightweight checkout support not available, falling back to full checkout.
Checking out git http://192.168.0.107:9090/ci-cd/hello-ci.git into /var/jenkins_home/workspace/hello-pipeline@script to read application/Jenkinsfile
Cloning the remote Git repository

 ...

[Pipeline] Start of Pipeline

...

[Pipeline] stage
[Pipeline] { (edit parameters)
[Pipeline] echo
release_version:origin/master
[Pipeline] echo
real_version:master
[Pipeline] }
[Pipeline] // stage
[Pipeline] stage
[Pipeline] { (docker login)
[Pipeline] sh
+ docker login -u admin -p Harbor12345 192.168.0.107
...

Login Succeeded
[Pipeline] }
[Pipeline] // stage
[Pipeline] stage
[Pipeline] { (Build)
[Pipeline] sh
+ docker build -t 192.168.0.107/k8s/hello-ci:master application
...

Successfully built b2b4f45901a6
Successfully tagged 192.168.0.107/k8s/hello-ci:master
[Pipeline] }
[Pipeline] // stage
[Pipeline] stage
[Pipeline] { (Push)
[Pipeline] sh
+ docker push 192.168.0.107/k8s/hello-ci:master
The push refers to repository [192.168.0.107/k8s/hello-ci]

...

4fc9a49e07e9: Pushed
master: digest: sha256:a90710b35388915d2b01dfc6173da996f8191be2a850b9c8453534e85c91a7f9 size: 3012
[Pipeline] }
[Pipeline] // stage
[Pipeline] }
[Pipeline] // node
[Pipeline] End of Pipeline
Finished: SUCCESS
编写启动镜像的文件
cat > hello-ci.yml << EOF
apiVersion: v1
kind: Service
metadata:
  name: hello-ci
  labels:
    app: hello-ci
spec:
  type: NodePort
  selector:
    app: hello-ci
  ports:
  - name: http
    port: 8089
    targetPort: 80
    nodePort: 8089
---
apiVersion: apps/v1
kind: Deployment
metadata:
  name: hello-ci-deployment
spec:
  selector:
    matchLabels:
      app: hello-ci
  replicas: 1
  template:
    metadata:
      labels:
        app: hello-ci
    spec:
      containers:
      - name: hello-ci
        image: 192.168.0.107/k8s/hello-ci:master
        ports:
        - containerPort: 80
EOF
启动hello-ci
kubectl create -f hello-ci.yml
访问界面

配置slave节点(在slave节点上执行)
为Jenkins执行用户(按照本文创建的Jenkins用户是root(runAsUser: 0 配置)生成可信赖的认证key,(如果已经生成过,可以直接拿来用)
cd ~/.ssh
ssh-keygen -t rsa -C "admin@example.com"

cat id_rsa.pub >> authorized_keys

chmod 700 authorized_keys

service sshd restart
在Jenkins界面
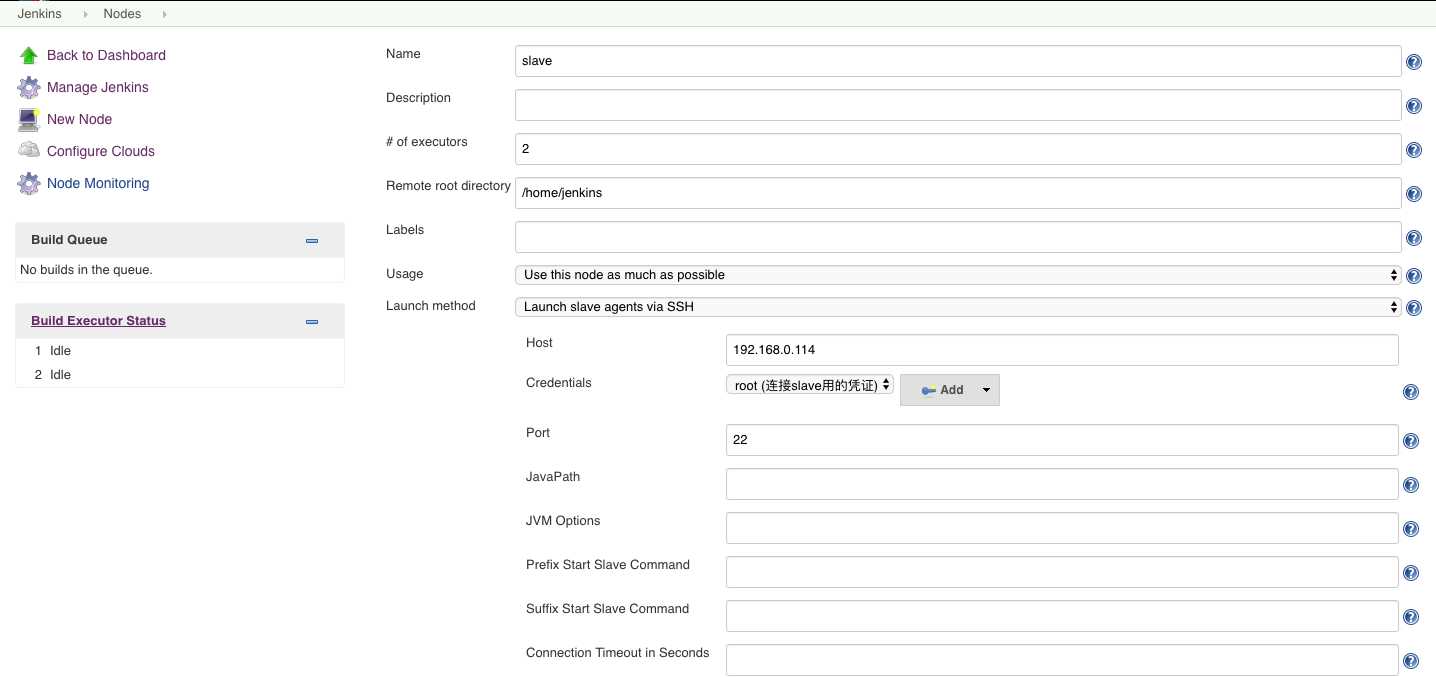
Manage Jenkins -> Manage Nodes -> New Node追加一个node

点击OK后进入node配置界面
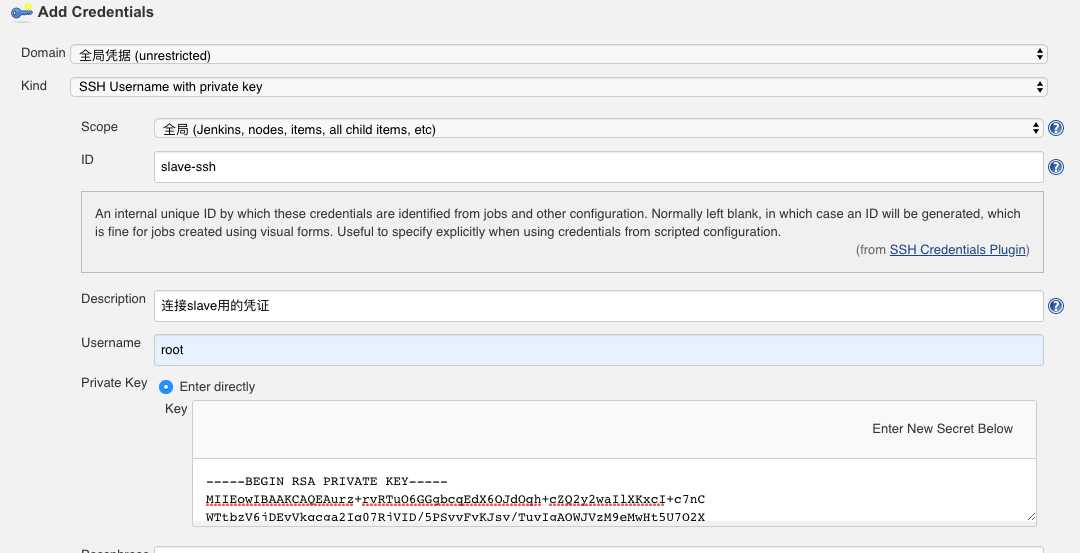
Credentials追加
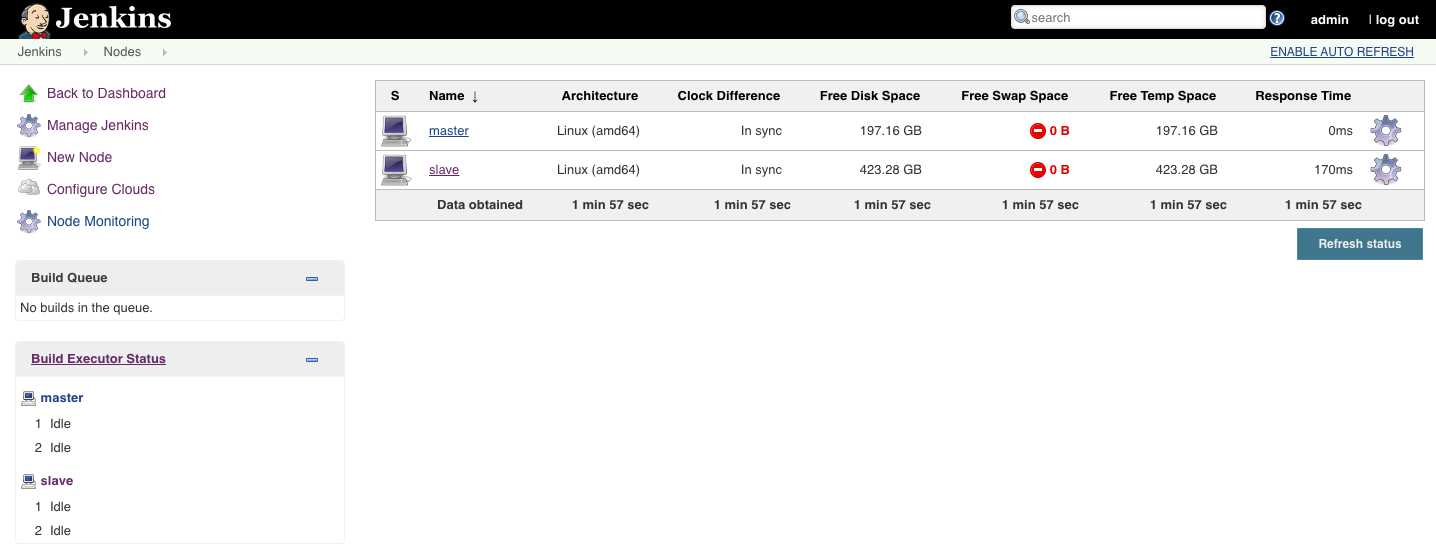
保存后Jenkins就会自动的launch 对应的slave,并检查节点上的环境,如是否有java,如果没有就尝试去下载安装(因为现在oracle下载jdk需要登陆,此步骤不会自动成功,所以需要提前在slave节点上安装好jdk工具)
长时间处于Please wait while Jenkins is getting ready to work ...
修改hudson.model.UpdateCenter.xml文件
# 删除
#https://updates.jenkins-ci.org/update-center.json

#追加
<url>https://mirrors.tuna.tsinghua.edu.cn/jenkins/updates/update-center.json</url>
jenkinsfile中执行 sh "docker ..."相关命令时出错
dial unix /var/run/docker.sock: connect: permission denied
因为宿主机上docker是以root身份启动的,每次启动docker服务会生成docker.sock,此时docker.sock默认对应的用户和用户组都是root的
root@master:/opt/k8s/yml/jenkins# ls -l /var/run/docker.sock
srw-rw---- 1 root root 0 2月  19 20:11 /var/run/docker.sock
而默认的Jenkins镜像是以jenkins用户执行
root@master:/opt/k8s/yml/jenkins/data/plugins# kubectl exec -it jenkins-798d66fc78-x9zbr bash

jenkins@jenkins-798d66fc78-x9zbr:/$
所以不具有访问/var/run/docker.sock的权限,解决方法是在jenkins对应的container的securityContext属性中追加runAsUser: 0 配置
jenkinsfile执行中docker pull和docker push镜像时没有权限访问私有仓库,
docker push 192.168.0.107/k8s/hello-ci:v1.0.0
...
denied: requested access to the resource is denied
可以先在宿主机上执行好docker login,然后把认证后的/root/.docker/config.json挂载到jenkins容器中,或者在Jenkinsfile中追加docker login的步骤
service 和 容器没有启动 50000端口,而agent和master之间通信用的是这个端口,造成一直出错,
SEVERE: http://192.168.0.107:8888/ provided port:50000 is not reachable
java.io.IOException: http://192.168.0.107:8888/ provided port:50000 is not reachable
    at org.jenkinsci.remoting.engine.JnlpAgentEndpointResolver.resolve(JnlpAgentEndpointResolver.java:303)
    at hudson.remoting.Engine.innerRun(Engine.java:527)
    at hudson.remoting.Engine.run(Engine.java:488)
原文:https://www.cnblogs.com/gaofeng-henu/p/12345141.html