容器就是窗口和面板,而组件为按钮、文本域、标签等(待续),二者的声明、设置很相似,
因此本文只做对于容器的详解。组件与容器的区别在于组件不能做容器,而部分容器可以兼顾组件和容器的特性
属于容器,不可作为组件添加至其他容器中
Frame frame = new Frame();
public void setBounds(int x, int y, int width, int height);//设置窗口的初始位置和大小,可参照电脑屏幕:1900*1080
public void setTitle(String title);//设置窗口名称
public void setResizable(boolean resizable);//设置窗口大小是否可变,false-窗口大小只能以初始值显示
public void setBackground(Color bgColor);//设置窗口颜色
public void setLayout(LayoutManager mgr);//设置窗口布局
public void setVisible(boolean b);//设置窗口的可见性
import java.awt.*;
public class TheFirstFrame{
  public static void main(string[] args){
        Frame frame = new Frame();
        frame.setTitle("hello");
        //Frame frame = new Frame("hello");与前两句效果一致
        frame.setBounds(100,100,100,100);
        frame.seBackground(new Color(255,0,0));//Color(r,g,b);
        //frame.setLocation(100,100);
        //frame.setSize(100,100);以上两句与setBounds效果一致
        frame.setResizable(false);
        frame.setVisible(true);
    }
}
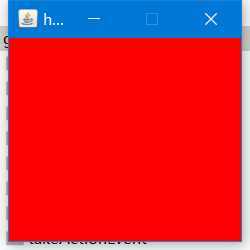 上例的运行结果
与Frame相似,可以作为组件被添加至容器中
Frame frame = new Frame();
Panel panel = new Panel();
frame.setLayout(new FlowLayout());//设置布局,默认布局为边框布局-居中
frame.add(panel);
绝对布局、非绝对布局
FlowLayout,从上至下,从左至右依次在容器中排列组件,默认为从上到下居中
Frame frame = new Frame();
Button button01 = new Button(“button1”);//Button属于组件,不做解释
Button button02 = new Button("button2");
Button button03 = new Button("button3");
Button button04 = new Button("button4");
//布局
frame.setLayout(new FlowLayout(FlowLayout.LEFT));//意为从左对齐排列
//添加组件-add
frame.add(button1);
frame.add(button2);
frame.add(button3);
frame.add(button4);
//设置窗口属性
frame.setBounds(200,200,200,200);
frame.setVisible(true);
frame.ReSizeable(true);
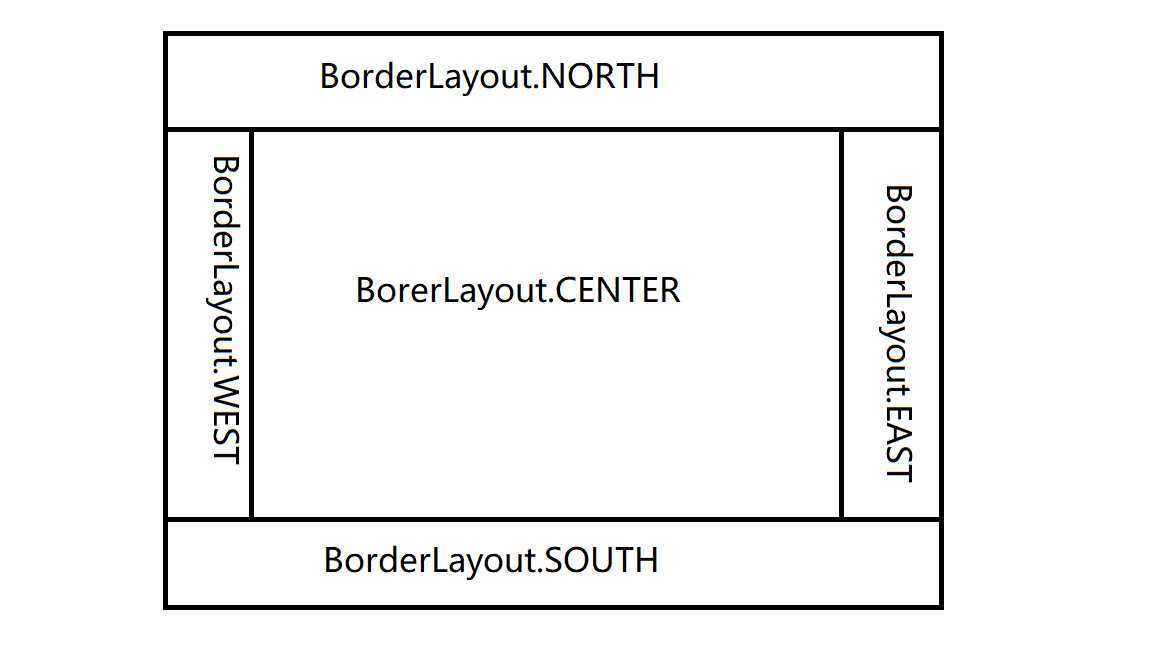
BorderLayout,分为东西南北中五个区域
public class BorderLayoutDemo {
    public static void main(String[] args) {
        Frame frame = new Frame();
        Button button1 = new Button("1");
        Button button3 = new Button("1");
        Button button2 = new Button("1");
        Button button4 = new Button("1");
        Button button5 = new Button("1");
        frame.setLayout(new BorderLayout());
        frame.add(button1,BorderLayout.CENTER);
        frame.add(button2,BorderLayout.EAST);
        frame.add(button3,BorderLayout.WEST);
        frame.add(button4,BorderLayout.NORTH);
        frame.add(button5,BorderLayout.SOUTH);
        frame.setBounds(200,200,200,200);
        frame.setVisible(true);
    }
}

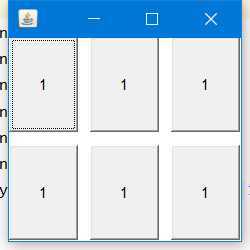
GridLayout,自定义表格的行列数以及行距
public class DemoForBlog01 {
    public static void main(String[] args) {
        Frame frame = new Frame();
        Button button1 = new Button("1");
        Button button3 = new Button("1");
        Button button2 = new Button("1");
        Button button4 = new Button("1");
        Button button5 = new Button("1");
        Button button6 = new Button("1");
        frame.setLayout(new GridLayout(2,2,10,10));
        frame.add(button1);
        frame.add(button2);
        frame.add(button3);
        frame.add(button4);
        frame.add(button5);
        frame.add(button6);
        frame.setVisible(true);
        frame.setBounds(200,200,200,200);
    }
}
监听各个动作的发生并自定义下一个行为,
分为:事件监听、鼠标监听、窗口监听、键盘监听
ActionListener,是一个接口,其中只有actionPerformed(ActionEvent e)一个抽象方法,定义当此事件(调用此监听的主体)发生时的行为
public interface ActionListener extends EventListener {

    /**
     * Invoked when an action occurs.
     * @param e the event to be processed
     */
    public void actionPerformed(ActionEvent e);

}
一个监听器对应于一种事件
public class ActionDemo{
      public ActionDemo(){
           Frame frame = new Frame("ButtonDemo");
           MyListener myListener = new MyListener();
           Button button = new Button("actionListener");
           button.addActionListener(myListener);
           frame.add(button);
           frame.setBounds(200,200,200,200);
           frame.setVisible(true);
     }
     public static void main(){
           new ActionDemo();
     }
}
class MyListener implements ActionListener{
      @Override
      public void actionPerformed(){
            System.out.print("this is a button");
            //当事件(即按钮被点击)发生时,会打印出“this is a button”
      }
}
指写一个监听器的实现类同时监听两个事
public class ActionListenerDemo {
     public static void main(String[] args) {
     Frame frame = new Frame("actionListener");
        Button button01 = new Button("start");
        Button button02 = new Button("stop");
        button01.setActionCommand("button001");
        //actionCommand直译为事件注释,是除了按钮title外可以分辨而又不会显示在按钮上的文本信息,String类型
        MyListener myActionListener = new MyListener();
        button01.addActionListener(myActionListener);
        button02.addActionListener(myActionListener);
        //监听器通过add加在按钮事件上
        frame.setLayout(new FlowLayout(FlowLayout.LEFT));
        frame.add(button01);
        frame.add(button02);
        frame.setBounds(200,200,200,200);
        frame.setVisible(true);
    }
}
class MyListener implements ActionListener{
    @Override
    public void actionPerformed(ActionEvent e) {
      //参数e是调用此监听器的主体,即按钮
        String str = e.getActionCommand();
        if(str.equals("start")){
            System.out.println("start button");
        }
        else if(str.equals("stop")){
            System.out.println("stop button");
        }
    }
}
MouseListener对鼠标事件的监听
首先,鼠标行为分为三种:按下、谈起、按住不放,同样地,它的方法也比较少:
public interface MouseListener extends EventListener {

    /**
     * Invoked when the mouse button has been clicked (pressed
     * and released) on a component.
     * @param e the event to be processed
     */
    public void mouseClicked(MouseEvent e);

    /**
     * Invoked when a mouse button has been pressed on a component.
     * @param e the event to be processed
     */
    public void mousePressed(MouseEvent e);

    /**
     * Invoked when a mouse button has been released on a component.
     * @param e the event to be processed
     */
    public void mouseReleased(MouseEvent e);

    /**
     * Invoked when the mouse enters a component.
     * @param e the event to be processed
     */
    public void mouseEntered(MouseEvent e);

    /**
     * Invoked when the mouse exits a component.
     * @param e the event to be processed
     */
    public void mouseExited(MouseEvent e);
}
适配器模式
鼠标监听中的方法我们不会全部使用,一般而言,只要mousePressed这一个即可。
但是如果直接实例化MouseListener接口的话就需要将其中的方法全部重写,此时我们引入一种设计模式【适配器模式】
可以简单地理解为在这种模式下可以选择性地重写方法。
使用
首先提供有一个adapter类(译为适配器)方法,是已经对MouseListener接口实例化了的一个类,直接对其继承即可
class MyMouse extends MouseAdapter{
        @Override
        public void mousePressed(MouseEvent e){
             System.out.println("mouse press");
        }
}
WindowListener接口,适配器:WindowsAdapter
窗口中比较常用的就是窗口关闭(closing)和窗口激活(activated),
如果没有设置窗口监听的话点击生成窗口上面的关闭按钮时不会起作用的
public class WindowListenerDemo{
    public static void main(String[] args) {
        Frame frame = new Frame();
        frame.setBounds(200,200,200,200);
        frame.setVisible(true);
        frame.addWindowListener(new MyWindowListener());//调用构造器
    }
}
class MyWindowListener extends WindowAdapter{
    @Override
    public void windowClosing(WindowEvent e) {
        System.out.println("window closing");
        System.exit(0);//结束程序(关闭窗口)
    }
    @Override
    public void windowActivated(WindowEvent e) {
        System.out.println("window activated");
    }
}
KeyLinstener,适配器:KeyAdapter,键盘事件有:按下,弹起,按住不放。一般只用按下(KeyPressed)这一个方法
键盘上每一个按键都是固定的,不能用其他名字等代替,为获取按键值使用getKeyCode()方法,int类型
KeyEvent表示键盘事件,通过类KeyEvent来获取按键,如KeyEvent.VK_Space表示空格
public class MouseListenerDemo {
    public MouseListenerDemo(){
        Frame frame = new Frame();
        frame.addKeyListener(new MyKey());
        frame.setBounds(200,200,200,200);
        frame.setVisible(true);
    }

    public static void main(String[] args) {
        new MouseListenerDemo();
    }
}
class MyKey extends KeyAdapter{
    @Override
    public void keyPressed(KeyEvent e) {
        int key = e.getKeyCode();
        if(key == KeyEvent.VK_SPACE){
            System.out.println("space");
        }
    }
}
原文:https://www.cnblogs.com/YuanShiRenY/p/GUI-AWT.html