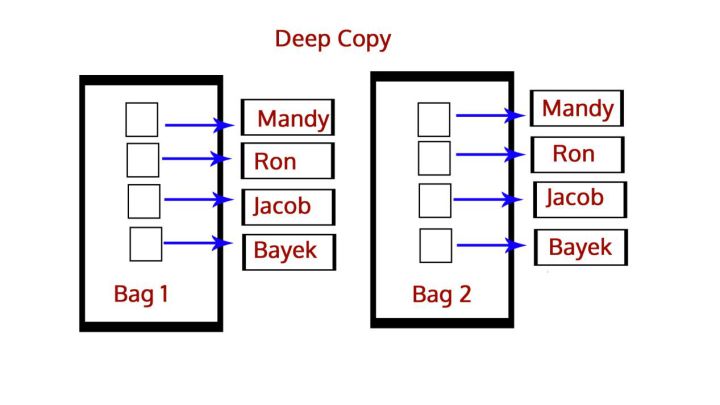
浅copy与deepcopy

深浅拷贝之间的区别?
import copy
b=copy.deepcopy(a)
b=copy.copy(a)
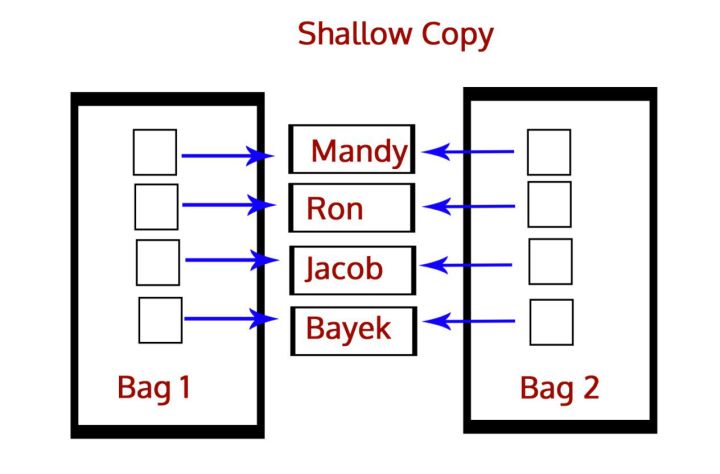
可变与不可变
copy.copy()  # 浅拷贝
copy.deepcopy()  # 深拷贝
引计数
标记-清除

分代回收
TCP协议
UDP协议
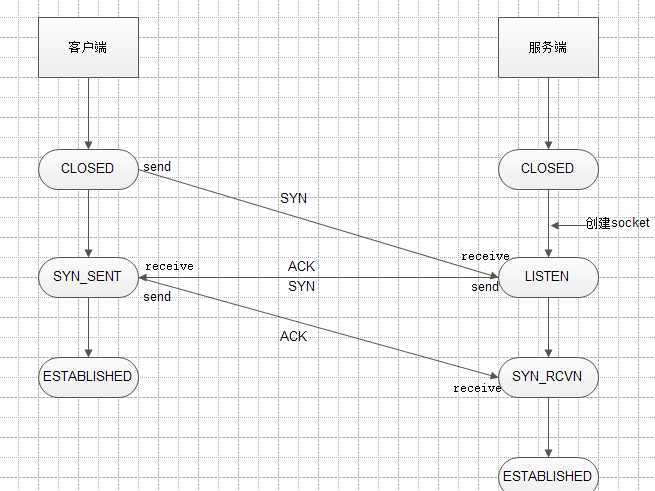
三次握手

三次握手过程说明
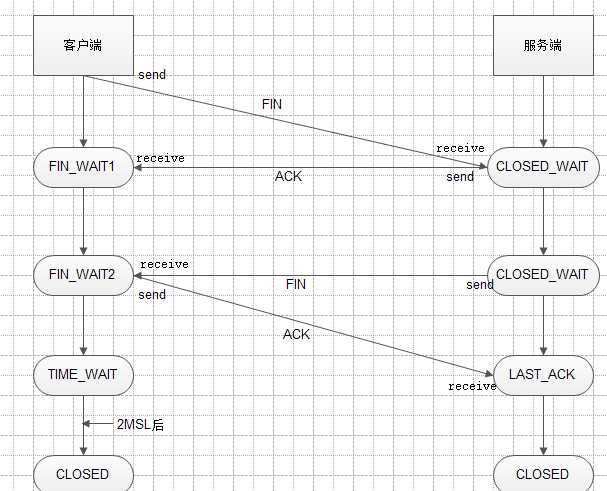
四次挥手

四次挥手过程说明
11种状态
由于TCP连接是全双工的,断开连接会比建立连接麻烦一点点。
CLOSING状态表示:

LISTEN  --------------- # 等待从任何远端TCP 和端口的连接请求。

SYN_SENT  ----------- # 发送完一个连接请求后等待一个匹配的连接请求。

SYN_RECEIVED  ------ # 发送连接请求并且接收到匹配的连接请求以后等待连接请求确认。

ESTABLISHED  -------- # 表示一个打开的连接,接收到的数据可以被投递给用户。连接的数据传输阶段的正常状态。

FIN_WAIT_1  ----------- # 等待远端TCP 的连接终止请求,或者等待之前发送的连接终止请求的确认。

FIN_WAIT_2  ---------- #  等待远端TCP 的连接终止请求。

CLOSE_WAIT  --------- #  等待本地用户的连接终止请求。

CLOSING  ------------- #   等待远端TCP 的连接终止请求确认。

LAST_ACK  ------------ #  等待先前发送给远端TCP 的连接终止请求的确认(包括它字节的连接终止请求的确认)

TIME_WAIT  ----------- #  等待足够的时间过去以确保远端TCP 接收到它的连接终止请求的确认。

CLOSED  --------------- # 不在连接状态(这是为方便描述假想的状态,实际不存在)
TIME_WAIT 两个存在的理由:
>>> def f(s):
...    return s.title()
...
>>> l = map(f, [‘pYthon‘, ‘jaVa‘, ‘kOtlin‘])
>>> list(l)
[‘Python‘, ‘Java‘, ‘Kotlin‘]
lists= [11,22,33,44,55]
ret = map(lambda x:x if x % 2 != 0 else x + 100,lists)
print(list(ret))
# 运行结果: [11, 122, 33, 144, 55]
lists= [11,22,33,44,55]
def add(num):
    if num%2 == 0:
        return num
    else:
        return num + 100
rs = map(add, lists)
# 例如有一个list,里边的元素都是字符串,要把它拼接成一个字符串:

>>> from functools import reduce
>>> def f(x, y):
...    return x + y
...
>>> reduce(f, [‘ab‘, ‘c‘, ‘de‘, ‘f‘])
‘abcdef‘
from functools import reduce
def f(x, y):
 return x + y

print(reduce(f, [1, 3, 5, 7, 9]))  # 25
# 1、先计算头两个元素:f(1, 3),结果为4;
# 2、再把结果和第3个元素计算:f(4, 5),结果为9;
# 3、再把结果和第4个元素计算:f(9, 7),结果为16;
# 4、再把结果和第5个元素计算:f(16, 9),结果为25;
# 5、由于没有更多的元素了,计算结束,返回结果25。

print( reduce(lambda x, y: x + y, [1, 3, 5, 7, 9])  )  # 25
‘‘‘使用reduce将字符串反转‘‘‘
s = ‘Hello World‘
from functools import reduce

result = reduce(lambda x,y:y+x,s)
# 1、第一次:x=H,y=e  => y+x = eH
# 2、第二次:x=l,y=eH  => y+x = leH
# 3、第三次:x=l,y=leH  => y+x = lleH
print( result )      # dlroW olleH
例如一个list中元素有纯字母、纯数字、字母数字组合的,我们要保留纯字母的:

>>> def f(s):
...    return s.isalpha()
...
>>> l = filter(f, [‘abc‘, ‘xyz‘, ‘123kg‘, ‘666‘])
>>> list(l)
[‘abc‘, ‘xyz‘]
>>> sorted([6, -2, 4, -1])
[-2, -1, 4, 6]

>>> sorted([6, -2, 4, -1], key=abs)
[-1, -2, 4, 6]

>>> sorted([6, -2, 4, -1], key=abs, reverse=True)
[6, 4, -2, -1]

>>> sorted([‘Windows‘, ‘iOS‘, ‘Android‘])
[‘Android‘, ‘Windows‘, ‘iOS‘]

>>> d = [(‘Tom‘, 170), (‘Jim‘, 175), (‘Andy‘, 168), (‘Bob‘, 185)]
>>> def by_height(t):
...     return t[1]
...
>>> sorted(d, key=by_height)
 [(‘Andy‘, 168), (‘Tom‘, 170), (‘Jim‘, 175),  (‘Bob‘, 185)]
sorted和sort区别
sorted使用
students = [(‘john‘, ‘A‘, 15), (‘jane‘, ‘B‘, 12), (‘dave‘, ‘B‘, 10)]
print( sorted(students, key=lambda s: s[2], reverse=False) )    # 按年龄排序
# 结果:[(‘dave‘, ‘B‘, 10), (‘jane‘, ‘B‘, 12), (‘john‘, ‘A‘, 15)]
d = {‘k1‘:1, ‘k3‘: 3, ‘k2‘:2}
# d.items() = [(‘k1‘, 1), (‘k3‘, 3), (‘k2‘, 2)]
a = sorted(d.items(), key=lambda x: x[1])
print(a)            # [(‘k1‘, 1), (‘k2‘, 2), (‘k3‘, 3)]
>>> a = ‘cheesezh‘
>>> b = ‘cheesezh‘
>>> a == b
True
>>> x = y = [4,5,6]
>>> z = [4,5,6]
>>> x == y
True
>>> x == z
True
>>> x is y
True
>>> x is z
False
>>>
>>> print id(x)
3075326572
>>> print id(y)
3075326572
>>> print id(z)
3075328140
下面再来看一个例子,例3中同一类型下的a和b的(a==b)都是为True,而(a is b)则不然。
>>> a = 1 #a和b为数值类型
>>> b = 1
>>> a is b
True
>>> id(a)
14318944
>>> id(b)
14318944
>>> a = ‘cheesezh‘ #a和b为字符串类型
>>> b = ‘cheesezh‘
>>> a is b
True
>>> id(a)
42111872
>>> id(b)
42111872
>>> a = (1,2,3) #a和b为元组类型
>>> b = (1,2,3)
>>> a is b
False
>>> id(a)
15001280
>>> id(b)
14790408
>>> a = [1,2,3] #a和b为list类型
>>> b = [1,2,3]
>>> a is b
False
>>> id(a)
42091624
>>> id(b)
42082016
>>> a = {‘cheese‘:1,‘zh‘:2} #a和b为dict类型
>>> b = {‘cheese‘:1,‘zh‘:2}
>>> a is b
False
>>> id(a)
42101616
>>> id(b)
42098736
>>> a = set([1,2,3])#a和b为set类型
>>> b = set([1,2,3])
>>> a is b
False
>>> id(a)
14819976
>>> id(b)
14822256
通过例3可看出,只有数值型和字符串型的情况下,a is b才为True,当a和b是tuple,list,dict或set型时,a is b为False。
open函数用来打开文件
with open("data1.txt",‘r‘,encoding = ‘utf-8‘) as f:
    for line in f:
        print(line)
三种读操作比较
#1. read()一次读取所有内容
‘‘‘aaa111
bbb222‘‘‘
f = open(r"data.txt")
print(f.read())
f.close()

#2. readline(),每次只读取一行,光标下移
‘‘‘
0: aaa111

1: bbb222
‘‘‘
f = open(r"data.txt")
for i in range(2):
    print(str(i) + ": " + f.readline(),)

#3. 一次读取所有,每行作为列表的一个值
‘‘‘[‘aaa111\n‘, ‘bbb222\n‘]‘‘‘
f = open(r"data.txt")
print(f.readlines())
读取大文件正确方式
#!/usr/bin/python
# -*- coding: utf-8 -*-
def read_big_file_v(fname):
    block_size = 1024 * 8
    with open(fname,encoding="utf8") as fp:
        while True:
            chunk = fp.read(block_size)
            # 当文件没有更多内容时,read 调用将会返回空字符串 ‘‘
            if not chunk:
                break
            print(chunk)
path = r‘C:\aaa\luting\edc-backend\tttt.py‘
read_big_file_v(path)
使用read()读文件
f = open(r"somefile.txt")
print(f.read(7))        # Welcome        先读出 7 个字符
print(f.read(4))        #‘ to ‘                接着上次读出 4 个字符
f.close()
f = open(r"somefile.txt", "w")
f.write("01234567890123456789")
f.seek(5)
f.write("Hello, World!")
f.close()
f = open(r"somefile.txt")
print(f.read())                 # 01234Hello, World!89
f = open(r"somefile.txt")
f.read(1)
f.read(2)
print(f.tell())             # 3     3就是读取到文件的第三个字符
readline()读文件
f1 = open(‘test02.py‘,‘r‘)
f2 = open(‘test.txt‘,‘w‘)
while True:
    line = f1.readline()
    if not line:
        break
    f2.write(line)
f1.close()
f2.close()
readlines()读文件
f1=open("readline.txt","r")
for line in f1.readlines():
    print(line)
将data1.txt中内容读取并写入到data2.txt中
f1 = open(‘data1.txt‘,‘r‘)
f2 = open(‘data2.txt‘,‘w‘)

for line in f1:
    f2.write(line)

f1.close()
f2.close()
使用eval()方法将文件读取成字典
f = open(‘data1.txt‘)
f1 = (f.read())
data = eval(f1)
f.close()
print(data)         # 运行结果: {‘k2‘: ‘v2‘, ‘k3‘: ‘v3‘, ‘k1‘: ‘v1‘}
将文件内容读取成列表
lock = []
f = open("password.txt")
for name in f.readlines():
    lock.append(name.strip(‘\n‘))
print(lock)
运行结果: [‘aaa 111‘, ‘bbb 222‘, ‘ccc 333‘]
闭包概念
闭包特点
#闭包函数的实例
def outer( a ):
    b = 10
    def inner():          # 在内函数中 用到了外函数的临时变量
        print(a+b)        # 外函数的返回值是内函数的引用
    return inner

if __name__ == ‘__main__‘:
    demo = outer(5)
    demo()    # 15

# 在这里我们调用外函数传入参数5
# 此时外函数两个临时变量 a是5 b是10 ,并创建了内函数,然后把内函数的引用返回存给了demo
# 外函数结束的时候发现内部函数将会用到自己的临时变量,这两个临时变量就不会释放,会绑定给这个内部函数
# 我们调用内部函数,看一看内部函数是不是能使用外部函数的临时变量
# demo存了外函数的返回值,也就是inner函数的引用,这里相当于执行inner函数
闭包中内函数修改外函数局部变量
#修改闭包变量的实例
def outer( a ):
    b = 10            # a和b都是闭包变量
    c = [a]           # 这里对应修改闭包变量的方法2
    def inner():
        # 方法一: nonlocal关键字声明(python3)
        nonlocal  b
        b+=1

        # 方法二: 把闭包变量修改成可变数据类型 比如列表(python2)
        c[0] += 1
        print(c[0])
        print(b)
    return inner         # 外函数的返回值是内函数的引用

if __name__ == ‘__main__‘:
    demo = outer(5)
    demo()             # 6  11
什么是with语句
with语句使用场景
with处理文件操作的实例
with open(‘/etc/passwd‘) as f:
    for line in f:
        print(line)
  # 这段代码的作用:打开一个文件,如果一切正常,把文件对象赋值给f,然后用迭代器遍历文件中每一行,当完成时,关闭文件;
  # 而无论在这段代码的任何地方,如果发生异常,此时文件仍会被关闭。
各种编码由来
Unicode(每个字母需要用两个字节:a/b/c)
Utf-8 : 可变长码, 是Unicode 的扩展集
python2和python3中编码转换
re模块(一)
‘.‘         # 默认匹配除\n之外的任意一个字符,若指定flag DOTALL,则匹配任意字符,包括换行
 2 ‘^‘         # 匹配字符开头,若指定flags MULTILINE,这种也可以匹配上(r"^a","\nabc\neee",flags=re.MULTILINE)
 3 ‘$‘         # 匹配字符结尾,或e.search("foo$","bfoo\nsdfsf",flags=re.MULTILINE).group()也可以
 4 ‘*‘        #  匹配*号前的字符0次或多次,re.findall("ab*","cabb3abcbbac")  结果为[‘abb‘, ‘ab‘, ‘a‘]
 5 ‘+‘         # 匹配前一个字符1次或多次,re.findall("ab+","ab+cd+abb+bba") 结果[‘ab‘, ‘abb‘]
 6 ‘?‘         # 匹配前一个字符1次或0次
 7 ‘{m}‘       # 匹配前一个字符m次
 8 ‘{n,m}‘     # 匹配前一个字符n到m次,re.findall("ab{1,3}","abb abc abbcbbb") 结果‘abb‘, ‘ab‘, ‘abb‘]
 9 ‘|‘         # 匹配|左或|右的字符,re.search("abc|ABC","ABCBabcCD").group() 结果‘ABC‘
10 ‘(...)‘     # 分组匹配,re.search("(abc){2}a(123|456)c", "abcabca456c").group() 结果 abcabca456c
11
12 ‘\A‘       # 只从字符开头匹配,re.search("\Aabc","alexabc") 是匹配不到的
13 ‘\Z‘       # 匹配字符结尾,同$
14 ‘\d‘       # 匹配数字0-9
15 ‘\D‘       # 匹配非数字
16 ‘\w‘       # 匹配[A-Za-z0-9]
17 ‘\W‘       # 匹配非[A-Za-z0-9]
18 ‘s‘        # 匹配空白字符、\t、\n、\r , re.search("\s+","ab\tc1\n3").group() 结果 ‘\t‘
19 \b           # 匹配一个单词边界,也就是指单词和空格间的位置,如,“er\b”可以匹配“never”中的“er”,但不能匹配“verb”中的“er”
20 \B          #  匹配非单词边界。“er\B”能匹配“verb”中的“er”,但不能匹配“never”中的“er”
函数                                          描述

compile(pattern[, flags])         # 根据正则表达式字符串创建模式对象

search(pattern, string[, flags]) # 在字符串中寻找模式

match(pattern, 常用模块[, flags]) # 在字符串的开始处匹配模式

split(pattern, string[, maxsplit=0]) # 根据模式的匹配项来分割字符串

findall(pattern, string)     # 列出字符串中模式的所有匹配项并以列表返回

sub(pat, repl, string[, count=0])     # 将字符串中所有pat的匹配项用repl替换
escape(string)     # 将字符串中所有特殊正则表达式字符转义
re.compile(pattern[, flags])
import re
mobile_re = re.compile(r‘^(13[0-9]|15[012356789]|17[678]|18[0-9]|14[57])[0-9]{8}$‘)
ret = re.match(mobile_re,‘18538762511‘)
print(ret)            # <_sre.SRE_Match object; span=(0, 11), match=‘18538652511‘>
search(pattern, string[, flags]) 和 match(pattern, string[, flags])
import re
a =re.match(‘www.bai‘, ‘www.baidu.com‘)
b = re.match(‘bai‘, ‘www.baidu.com‘)
print(a.group())                                # www.bai
print(b)                                        # None

# 无论有多少个匹配的只会匹配一个
c = re.search(‘bai‘, ‘www.baidubaidu.com‘)
print(c)                                        # <_sre.SRE_Match object; span=(4, 7), match=‘bai‘>
print(c.group())                                # bai
split(pattern, string[, maxsplit=0])
import re
text = ‘aa 1bb###2cc3ddd‘
print(re.split(‘\W+‘, text))        # [‘aa‘, ‘1bb‘, ‘2cc3ddd‘]
print(re.split(‘\W‘, text))          # [‘aa‘, ‘1bb‘, ‘‘, ‘‘, ‘2cc3ddd‘]
print(re.split(‘\d‘, text))           # [‘aa ‘, ‘bb###‘, ‘cc‘, ‘ddd‘]
print(re.split(‘#‘, text))            # [‘aa 1bb‘, ‘‘, ‘‘, ‘2cc3ddd‘]
print(re.split(‘#+‘, text))          # [‘aa 1bb‘, ‘2cc3ddd‘]
findall(pattern, string)
import re
p = re.compile(r‘\d+‘)
print(p.findall(‘one1two2three3four4‘))             # [‘1‘, ‘2‘, ‘3‘, ‘4‘]
print(re.findall(‘o‘,‘one1two2three3four4‘))        # [‘o‘, ‘o‘, ‘o‘]
print(re.findall(‘\w+‘, ‘he.llo, wo#rld!‘))         # [‘he‘, ‘llo‘, ‘wo‘, ‘rld‘]
sub(pat, repl, string[, count=0])
import re
test="Hi, nice to meet you where are you from?"
print(re.sub(r‘\s‘,‘-‘,test))          # Hi,-nice-to-meet-you-where-are-you-from?
print(re.sub(r‘\s‘,‘-‘,test,5))        # Hi,-nice-to-meet-you-where are you from?
print(re.sub(‘o‘,‘**‘,test))           # Hi, nice t** meet y**u where are y**u fr**m?
escape(string)
import re
print(re.escape(‘www.python.org‘))
re模块中的匹配对象和组 group()
import re
a = "123abc321efg456"
print(re.search("([0-9]*)([a-z]*)([0-9]*)",a).group(0))    # 123abc321
print(re.search("([0-9]*)([a-z]*)([0-9]*)",a).groups())    # (‘123‘, ‘abc‘, ‘321‘)
print(re.search("([0-9]*)([a-z]*)([0-9]*)",a).group(1))    # 123
print(re.search("([0-9]*)([a-z]*)([0-9]*)",a).group(2))    # abc
print(re.search("([0-9]*)([a-z]*)([0-9]*)",a).group(3))    # 321


import re
m = re.match(‘(..).*(..)(..)‘,‘123456789‘)
print(m.group(0))              # 123456789
print(m.group(1))              # 12
print(m.group(2))              # 67
print(m.group(3))              # 89
import re
m = re.match(‘www\.(.*)\..*‘,‘www.baidu.com‘)
print(m.group(1))           # baidu
print(m.start(1))             # 4
print(m.end(1))             # 9
print(m.span(1))            # (4, 9)
import re
test = ‘dsfdf 22 g2323  GigabitEthernet0/3        10.1.8.1        YES NVRAM up eee‘
# print(re.match(‘(\w.*\d)\s+(\d{1,3}\.\d{1,3}\.\d{1,3}\.\d{1,3})\s+YES\s+NVRAM\s+(\w+)\s+(\w+)\s*‘, test).groups())

ret = re.search(  r‘(\w*\/\d+).*\s(\d{1,3}\.\d{1,3}\.\d{1,3}\.\d{1,3}).*(\s+up\s+)‘,test ).groups()
print(ret)          # 运行结果: (‘GigabitEthernet0/3‘, ‘10.1.8.1‘, ‘ up ‘)

#1. (\w*\d+\/\d+)      匹配结果为:GigabitEthernet0/3
#1.1   \w*: 匹配所有字母数字
#1.2   /\d+:匹配所有斜杠开头后根数字 (比如:/3 )

#2. (\d{1,3}\.\d{1,3}\.\d{1,3}\.\d{1,3})  匹配结果为:10.1.8.1

#3. \s+up\s+   匹配结果为: up 这个单词,前后都为空格
re模块其他知识点
import re
#匹配时忽略大小写
print(re.search("[a-z]+","abcdA").group())                #abcd
print(re.search("[a-z]+","abcdA",flags=re.I).group())            #abcdA
#连同换行符一起匹配:
#‘.‘默认匹配除\n之外的任意一个字符,若指定flag DOTALL,则匹配任意字符,包括换行
print(re.search(r".+","\naaa\nbbb\nccc").group())            #aaa
print(re.search(r".+","\naaa\nbbb\nccc",flags=re.S))
        #<_sre.SRE_Match object; span=(0, 12), match=‘\naaa\nbbb\nccc‘>
print(re.search(r".+","\naaa\nbbb\nccc",flags=re.S).group())
                                                                                   aaa
                                                                                   bbb
                                                                                   ccc
1)init_l=[i for i in re.split(‘(\-\d+\.*\d*)‘,expression) if i]
        a. 按照类似负数的字符串分割成列表
        b. \-\d+\.*\d*是为了可以匹配浮点数(比如:3.14)
        c. (if i)是为了去除列表中的空元素
        d. 分割结果:[‘-1‘, ‘-2‘, ‘*((‘, ‘-60‘, ‘+30+(‘,
2)re.search(‘[\+\-\*\/\(]$‘,expression_l[-1])
        a. 匹配expression_l列表最后一个元素是 +,-,*,/,( 这五个符号就是负数
3)new_l=[i for i in re.split(‘([\+\-\*\/\(\)])‘,exp) if i]
        a. 将字符串按照+,-,*,/,(,)切分成列表(不是正真的负数就切分)
4)print(re.split(‘([\+\-])‘,‘-1+2-3*(2*2+3)‘))            #按照加号或者减号分割成列表
运行结果: [‘‘, ‘-‘, ‘1‘, ‘+‘, ‘2‘, ‘-‘, ‘3*(2*2‘, ‘+‘, ‘3)‘]
paramiko模块(二)
在windows中安装paramiko: pip3 install paramiko
linux中scp命令的使用
ssh root@10.1.0.51     #ssh远程登录
scp -rp aa.txt  root@10.1.0.50:/tmp/    #将本地aa.txt文件复制到10.1.0.50的/tmp文件夹中
Paramiko模块作用
paramiko基于用户名密码连接
import paramiko

# 1 创建SSH对象
ssh = paramiko.SSHClient()
# 2 允许连接不在know_hosts文件中的主机
ssh.set_missing_host_key_policy(paramiko.AutoAddPolicy())
# 3 连接服务器
ssh.connect(hostname=‘1.1.1.3‘, port=22, username=‘root‘, password=‘chnsys@2016‘)

# 4 执行命令                                         #stdin标准输入: 自己输入的命令
stdin, stdout, stderr = ssh.exec_command(‘pwd‘)      # stdout标准输出:  命令执行结果
# 5 获取命令结果                                     #stderr标准错误:  命令执行报错的结果
res, err = stdout.read(), stderr.read()
result = res if res else err
print(result.decode())                              #运行结果: /root

# 6 关闭连接
ssh.close()
import paramiko

#1 连接客户端
transport = paramiko.Transport((‘10.1.0.50‘,22))
transport.connect(username=‘root‘,password=‘chnsys@2016‘)

#2 定义与客户端交互    将刚刚定义的transport当参数传递给他
sftp = paramiko.SFTPClient.from_transport(transport)
#3 将location.py 上传至服务器 /tmp/test.py
sftp.put(r‘C:\bbb\file.txt‘, ‘/tmp/file.txt‘)

#4 将remove_path 下载到本地 local_path
sftp.get(‘/tmp/file.txt‘,r‘C:\bbb\file.txt‘)

#5 关闭连接
transport.close()
在两台Linux中演示无密码ssh登陆对方
[tom@localhost .ssh]$ ssh-keygen
Generating public/private rsa key pair.
Enter file in which to save the key (/home/tom/.ssh/id_rsa):
Enter passphrase (empty for no passphrase):
Enter same passphrase again:
Your identification has been saved in /home/tom/.ssh/id_rsa.
Your public key has been saved in /home/tom/.ssh/id_rsa.pub.
手动创建秘钥并手动copy到被管理服务器(法2:较复杂)
[root@localhost /]# ssh-keygen
Generating public/private rsa key pair.
Enter file in which to save the key (/root/.ssh/id_rsa):
Enter passphrase (empty for no passphrase):
Enter same passphrase again:
Your identification has been saved in /root/.ssh/id_rsa.        #存放私钥 的路径
Your public key has been saved in /root/.ssh/id_rsa.pub.        #存放公约 的路径
注:将10.1.0.51上生成的密钥对中的公钥放到10.1.0.50的服务器tom用户家目录/home/tom/.ssh/authorized_keys 中,就可以在10.1.0.51中无密码登陆10.1.0.50了
1、mkdir /home/tom/.ssh                                               #创建/home/tom/.ssh目录
2、chmod 700 /home/tom/.ssh/                                     #将目录权限改为 700
3、touch /home/tom/.ssh/authorized_keys                              #创建/home/tom/.ssh/authorized_keys文件
4、chmod 600 /home/tom/.ssh/authorized_keys                     #将文件权限改为600
5、将10.1.0.51的公钥文件粘贴到10.1.0.50的/home/tom/.ssh/authorized_keys中
paramiko基于公钥密钥连接:(ssh_rsa)
[anyuser@localhost ~]$ ssh-keygen
Generating public/private rsa key pair.

Enter file in which to save the key (/home/anyuser/.ssh/id_rsa): Created directory ‘/home/anyuser/.ssh‘.
Enter passphrase (empty for no passphrase):
Enter same passphrase again:
Your identification has been saved in /home/anyuser/.ssh/id_rsa.
Your public key has been saved in /home/anyuser/.ssh/id_rsa.pub.
import paramiko

# 1 指定公钥所在本地的路径
private_key = paramiko.RSAKey.from_private_key_file(‘id_rsa50.txt‘)

# 2 创建SSH对象
ssh = paramiko.SSHClient()
# 3 允许连接不在know_hosts文件中的主机
ssh.set_missing_host_key_policy(paramiko.AutoAddPolicy())
# 4 连接服务器
ssh.connect(hostname=‘10.1.0.51‘, port=22, username=‘winuser‘, pkey=private_key)

# 5 执行命令
stdin, stdout, stderr = ssh.exec_command(‘pwd‘)  # stdout标准输出:  命令执行结果
# 6 获取命令结果                                          #stderr标准错误:  命令执行报错的结果
res, err = stdout.read(), stderr.read()
result = res if res else err
print(result.decode())
# 7 关闭连接
ssh.close()
复制代码
import paramiko
#1 指定公钥所在本地的路径
private_key = paramiko.RSAKey.from_private_key_file(‘id_rsa50.txt‘)

#2 连接客户端
transport = paramiko.Transport((‘10.1.0.51‘, 22))
transport.connect(username=‘winuser‘, pkey=private_key )
#3 定义与客户端交互
sftp = paramiko.SFTPClient.from_transport(transport)

#4上传 将本地test1.py 上传至服务器 /tmp/test1.py
sftp.put(‘test1.py‘, ‘/tmp/test1.py‘)

#5下载 将服务器/tmp/test1.py文件 下载到本地C:\bbb\test1.txt
sftp.get(‘/tmp/test1.py‘, r‘C:\bbb\test1.txt‘)

transport.close()
subprocess模块(三)
subprocess原理以及常用的封装函数
#1、返回执行状态:0 执行成功
retcode = subprocess.call([‘ping‘, ‘www.baidu.com‘, ‘-c5‘])

#2、返回执行状态:0 执行成功,否则抛异常
subprocess.check_call(["ls", "-l"])

#3、执行结果为元组:第1个元素是执行状态,第2个是命令结果
>>> ret = subprocess.getstatusoutput(‘pwd‘)
>>> ret
(0, ‘/test01‘)

#4、返回结果为 字符串 类型
>>> ret = subprocess.getoutput(‘ls -a‘)
>>> ret
‘.\n..\ntest.py‘


#5、返回结果为‘bytes‘类型
>>> res=subprocess.check_output([‘ls‘,‘-l‘])
>>> res.decode(‘utf8‘)
‘总用量 4\n-rwxrwxrwx. 1 root root 334 11月 21 09:02 test.py\n‘
subprocess.check_output([‘chmod‘, ‘+x‘, filepath])
subprocess.check_output([‘dos2unix‘, filepath])
subprocess.Popen()
#1、先打印‘parent process‘不等待child的完成
import subprocess
child = subprocess.Popen([‘ping‘,‘-c‘,‘4‘,‘www.baidu.com‘])
print(‘parent process‘)

#2、后打印‘parent process‘等待child的完成
import subprocess
child = subprocess.Popen(‘ping -c4 www.baidu.com‘,shell=True)
child.wait()
print(‘parent process‘)
child.poll()                                 # 检查子进程状态
child.kill()                                  # 终止子进程
child.send_signal()                   # 向子进程发送信号
child.terminate()                       # 终止子进程
subprocess.PIPE 将多个子进程的输入和输出连接在一起
import subprocess
#下面执行命令等价于: cat /etc/passwd | grep root
child1 = subprocess.Popen(["cat","/etc/passwd"], stdout=subprocess.PIPE)
child2 = subprocess.Popen(["grep","root"],stdin=child1.stdout, stdout=subprocess.PIPE)
out = child2.communicate()               #返回执行结果是元组
print(out)
#执行结果: (b‘root:x:0:0:root:/root:/bin/bash\noperator:x:11:0:operator:/root:/sbin/nologin\n‘, None)
import subprocess

list_tmp = []
def main():
    p = subprocess.Popen([‘ping‘, ‘www.baidu.com‘, ‘-c5‘], stdin = subprocess.PIPE, stdout = subprocess.PIPE)
    while subprocess.Popen.poll(p) == None:
        r = p.stdout.readline().strip().decode(‘utf-8‘)
        if r:
            # print(r)
            v = p.stdout.read().strip().decode(‘utf-8‘)
            list_tmp.append(v)
main()
print(list_tmp[0])
原文:https://www.cnblogs.com/yangmaosen/p/12466709.html
