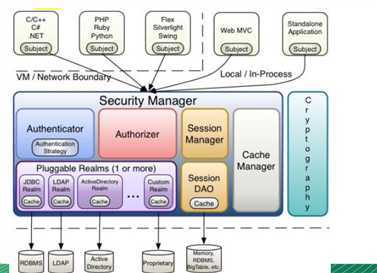
在学习之前,我们先了解一下shiro的这些基本功能。后面会详细说明
从外部来看,即从应用程序角度来观察如何使用Shiro完成工作:

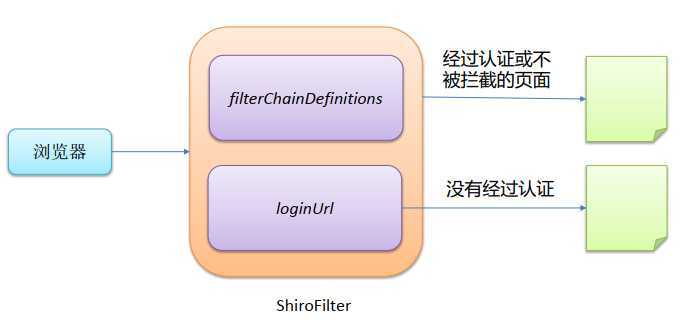
在web.xml中的配置Filter
<!--
	1. 配置  Shiro 的 shiroFilter.
	2. DelegatingFilterProxy 实际上是 Filter 的一个代理对象. 默认情况下, Spring 会到 IOC 容器中查找和
	<filter-name> 对应的 filter bean. 也可以通过 targetBeanName 的初始化参数来配置 filter bean 的 id.
	-->
    <filter>
        <filter-name>shiroFilter</filter-name>
        <filter-class>org.springframework.web.filter.DelegatingFilterProxy</filter-class>
        <init-param>
            <param-name>targetFilterLifecycle</param-name>
            <param-value>true</param-value>
        </init-param>
    </filter>

    <filter-mapping>
        <filter-name>shiroFilter</filter-name>
        <url-pattern>/*</url-pattern>
    </filter-mapping>
对应的bean
<!--
     配置 ShiroFilter.
    id 必须和 web.xml 文件中配置的 DelegatingFilterProxy 的 <filter-name> 一致.
若不一致, 则会抛出: NoSuchBeanDefinitionException. 因为 Shiro 会来 IOC 容器中查找和 <filter-name> 名字对应的 filter bean.
    -->
    <bean id="shiroFilter" class="org.apache.shiro.spring.web.ShiroFilterFactoryBean">
        <property name="securityManager" ref="securityManager"/>
        <property name="loginUrl" value="/login.jsp"/>
        <property name="successUrl" value="/list.jsp"/>
        <property name="unauthorizedUrl" value="/unauthorized.jsp"/>

        <property name="filterChainDefinitionMap" ref="filterChainDefinitionMap"></property>

        <!--
        	配置哪些页面需要受保护.
        	以及访问这些页面需要的权限.
        	1). anon 可以被匿名访问
        	2). authc 必须认证(即登录)后才可能访问的页面.
        	3). logout 登出.
        	4). roles 角色过滤器
        -->
        <property name="filterChainDefinitions">
            <value>
                /login.jsp = anon
                /shiro/login = anon
                /shiro/logout = logout

                /user.jsp = roles[user]
                /admin.jsp = roles[admin]

                <!-- # everything else requires authentication:-->
                /** = authc
            </value>
        </property>

    </bean>
| 过滤器名称(全称) | 描述 |
|---|---|
| anon(AnonymousFilter) | 没有参数,表示可以匿名使用(不需登录) |
| authc(AuthenticationFilter) | 没有参数,表示需要认证(登录)使用 |
| authcBasic(BasicHttpAuthenticationFilter) | 没有参数,表示需要通过httpBasic验证,如果不通过,跳转登录页面 |
| logout(LogoutFilter) | 注销登录。任何现有的session都将失效。(RememberMe cookie也会删除) |
| noSessionCreation(NoSessionCreationFilter) | 阻止在请求期间创建新的会话。以保证无状态的体验 |
| perms(PermissionAuthorizationFilter) | 参数可以写多个,多个时必须加上引号,并用逗号分隔。当有多个参数时,必须每个参数都通过才能放行 |
| port(PortFilter) | 指定请求访问的端口号,如果不匹配则跳转到登录页面 |
| rest(HttpMethodPemissionFilter) | 根据请求的方法 |
| roles(RolesAuthorizationFilter) | 角色过滤器。判断当前用户是否指定角色。参数可以写多个,多个时必须加上引号,并且参数之间用逗号分隔,当有多个参数时,每个参数通过才算通过 |
| ssl(SslFilter) | 没有参数。表示安全的url请求,协议为https |
| user(UserFilter) | 没有参数。表示必须存在用户 |
url模式使用Ant风格
Ant路径通配符支持?、\*、**,注意通配符匹配不包括目录分割符"/""
URL权限采取第一次匹配优先的原则,即从头开始使用第一个匹配的url模式对应的拦截器链
Shiro 从 Realm 获取安全数据(如用户、角色、 权限);
即 SecurityManager 要验证用户身份,那么它需 要从 Realm 获取相应的用户进行比较以确定用户身份是否 合法;
也需要从Realm得到用户相应的角色/权限进行验证 用户是否能进行操作。
一般继承 AuthorizingRealm(授权)即可;其继承了 AuthenticatingRealm(即身份验证),而且也间接继承了 CachingRealm(带有缓存实现)。
public interface Realm {
    //返回一个唯一的Realm名字
    String getName();

    //支持的AuthenticationToken的类型
    boolean supports(AuthenticationToken var1);

    //认证的逻辑
    AuthenticationInfo getAuthenticationInfo(AuthenticationToken var1) throws AuthenticationException;
}
密码的比对:
通过 AuthenticatingRealm 的 credentialsMatcher 属性来进行的密码的比对!
如何把一个字符串加密为 MD5
替换当前 Realm 的 credentialsMatcher 属性. 直接使用 HashedCredentialsMatcher 对象, 并设置加密算法即可.
为什么使用 MD5 盐值加密:
如何做到:
1). 在 doGetAuthenticationInfo 方法返回值创建 SimpleAuthenticationInfo 对象的时候, 需要使用
SimpleAuthenticationInfo(principal, credentials, credentialsSalt, realmName) 构造器
2). 使用 ByteSource.Util.bytes() 来计算盐值.
3). 盐值需要唯一: 一般使用随机字符串或 user id
4). 使用 new SimpleHash(hashAlgorithmName, credentials, salt, hashIterations); 来计算盐值加密后的密码的值.
AuthenticationStrategy
AuthenticationStrategy 接口的默认实现:
FirstSuccessfulStrategy:只要有一个 Realm 验证成功即可,只返回第 一个 Realm 身份验证成功的认证信息,其他的忽略;
AtLeastOneSuccessfulStrategy:只要有一个Realm验证成功即可,和 FirstSuccessfulStrategy 不同,将返回所有Realm身份验证成功的认证信 息;
AllSuccessfulStrategy:所有Realm验证成功才算成功,且返回所有 Realm身份验证成功的认证信息,如果有一个失败就失败了。
ModularRealmAuthenticator 默认是 AtLeastOneSuccessfulStrategy 策略
<bean id="authenticator"
      class="org.apache.shiro.authc.pam.ModularRealmAuthenticator">
    <property name="authenticationStrategy">
        <bean class="org.apache.shiro.authc.pam.AtLeastOneSuccessfulStrategy"></bean>
    </property>
</bean>
在枚举类DefaultFilter可以查看shiro的全部默认权限.在前面也已经相似说明过。
public enum DefaultFilter {
    anon(AnonymousFilter.class),
    authc(FormAuthenticationFilter.class),
    authcBasic(BasicHttpAuthenticationFilter.class),
    authcBearer(BearerHttpAuthenticationFilter.class),
    logout(LogoutFilter.class),
    noSessionCreation(NoSessionCreationFilter.class),
    perms(PermissionsAuthorizationFilter.class),
    port(PortFilter.class),
    rest(HttpMethodPermissionFilter.class),
    roles(RolesAuthorizationFilter.class),
    ssl(SslFilter.class),
    user(UserFilter.class);
    ...
}
授权需要继承AuthorizingRealm类,并实现其doGetAuthorizationInfo方法
AuthorizingRealm类继承自AuthenticatingRealm,但没有实现doGetAuthenticationInfo方法。所有认证和授权可以同时完成。
@Override
protected AuthorizationInfo doGetAuthorizationInfo(PrincipalCollection principalCollection) {
        //1.通过PrincipalCollection获取用户信息
        Object principal = principalCollection.getPrimaryPrincipal();
        //2.根据登录的用户信息来给用户权限
        Set<String> roles = new HashSet<>();
        //3.创建SimpleAuthorizationInfo并设置roles属性
    	//普通用户只有user权限,admin有管理员权限
        roles.add("user");
        if("admin".equals(principal)){
            roles.add("admin");
        }
        //4.返回SimpleAuthorizationInfo对象
         return new SimpleAuthorizationInfo(roles);
}
流程如下:
Shiro提供的JSTL标签,用于在JSP页面进行权限控制,如根据登录用户显示相应的页面按钮。
这里简单介绍一些,如有需要,可在网上搜索。
<!--guest用户没有身份验证时显示相应信息-->
<shiro:guest>
	欢迎游客访问,<a href="login.jsp">登录</a>
</shiro:guest>

<!--用户经过认证/记住我登录后显示相应的信息-->
<shiro:user>
	欢迎[<shiro:principal/>]登录,<a href="logout">退出</a>
</shiro:user>

<!--authenticated 标签:用户已经身份验证通过,即
Subject.login登录成功,不是记住我登录的
-->
<shiro:authenticated></shiro:authenticated>

<!--notAuthenticated 标签:用户未进行身份验证,即没有调
用Subject.login进行登录,包括记住我自动登录的也属于
未进行身份验证。-->
<shiro:notAuthenticated></shiro:notAuthenticated>

<!--pincipal 标签:显示用户身份信息,默认调用
Subject.getPrincipal() 获取,即 Primary Principal。-->
<shiro:principal property="username"></shiro:principal>

<!--hasRole 标签:如果当前 Subject 有角色将显示 body 体内
容:-->
<shiro:hasRole name="admin">
	拥有管理员权限
</shiro:hasRole>

<!--hasAnyRoles 标签:如果当前Subject有任意一个
角色(或的关系)将显示body体内容。-->
<shiro:hasAnyRoles name="admin,user">
	拥有管理员或普通用户权限
</shiro:hasAnyRoles>
<bean id="shiroFilter" class="org.apache.shiro.spring.web.ShiroFilterFactoryBean">
    <property name="securityManager" ref="securityManager"/>
    <property name="loginUrl" value="/login.jsp"/>
    <property name="successUrl" value="/list.jsp"/>
    <property name="unauthorizedUrl" value="/unauthorized.jsp"/>
    <property name="filterChainDefinitionMap" ref="filterChainDefinitionMap"></property>
    <!--
         配置哪些页面需要受保护.
         以及访问这些页面需要的权限.
         1). anon 可以被匿名访问
         2). authc 必须认证(即登录)后才可能访问的页面.
         3). logout 登出.
         4). roles 角色过滤器
        -->

    <property name="filterChainDefinitions">
        <value>
            /login.jsp = anon
            /shiro/login = anon
            /shiro/logout = logout

            /user.jsp = roles[user]
            /admin.jsp = roles[admin]

            <!-- # everything else requires authentication:-->
            /** = authc
        </value>
    </property>
</bean>
每次若有添加或修改页面的权限都要在xml文件中进行修改太过麻烦。
我们可以知道,<property name="filterChainDefinitions">,此类属性的赋值就是调用其set方法;
而setFilterChainDefinitions方法中调用了setFilterChainDefinitionMap方法为filterChainDefinitionMap属性赋值;
filterChainDefinitionMap里封装的正是我们在<property name="filterChainDefinitions">下进行的配置;
因此,我们只要对filterChainDefinitionMap属性进行操作,便能对资源和权限进行管理了。
上面的配置可以写为
<bean id="shiroFilter" class="org.apache.shiro.spring.web.ShiroFilterFactoryBean">
    <property name="securityManager" ref="securityManager"/>
    <property name="loginUrl" value="/login.jsp"/>
    <property name="successUrl" value="/list.jsp"/>
    <property name="unauthorizedUrl" value="/unauthorized.jsp"/>

    <!--引用实例工厂创建的Bean-->
    <property name="filterChainDefinitionMap" ref="filterChainDefinitionMap"></property>

</bean>
通过实例工厂的方式来为filterChainDefinitionMap属性赋值。
FilterChainDefinitionMapBuilder。filterChainDefinitionMap的Bean,然后让filterChainDefinitionMap使用该Bean的值public class FilterChainDefinitionMapBuilder {
public LinkedHashMap<String, String> buildFilterChainDefinitionMap(){
LinkedHashMap<String, String> map = new LinkedHashMap<>();
/*进行数据表的读取
map.put("/login.jsp", "anon");
map.put("/shiro/login", "anon");
map.put("/shiro/logout", "logout");
map.put("/user.jsp", "authc,roles[user]");
map.put("/admin.jsp", "authc,roles[admin]");
map.put("/list.jsp", "user");
map.put("/**", "authc");*/
return map;
}
}
实例工厂bean的配置
<!--配置一个工厂实例-->
<bean id="filterChainDefinitionMapBuilder"
    	class="com.atguigu.shiro.factory.FilterChainDefinitionMapBuilder"></bean>

<!--通过使用工厂和其工厂方法获得filterChainDefinitionMap实例-->
<bean id="filterChainDefinitionMap"
    	factory-bean="filterChainDefinitionMapBuilder" factory-method="buildFilterChainDefinitionMap"></bean>

<!--filterChainDefinitionMap属性的赋值-->
<bean id="shiroFilter" class="org.apache.shiro.spring.web.ShiroFilterFactoryBean">
    ...
    <!--引用实例工厂创建的Bean-->
    <property name="filterChainDefinitionMap" ref="filterChainDefinitionMap"></property>
</bean>
Shiro的会话在web环境与servlet的会话功能是一致的,不同的是Shiro的会话不依赖与servlet容器,所以在javaSE环境下依然可以使用。
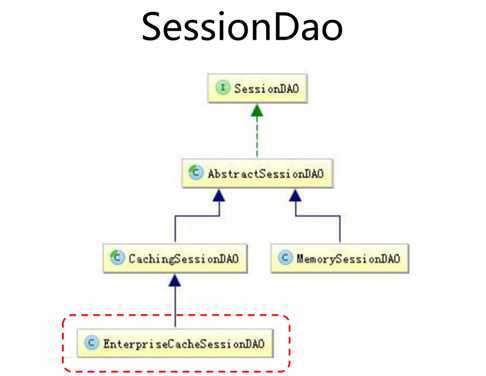
SessionDAO进行增删改查使用序列化。
Shiro 内部相应的组件(DefaultSecurityManager)会自 动检测相应的对象(如Realm)是否实现了 CacheManagerAware 并自动注入相应的 CacheManager。
原文:https://www.cnblogs.com/ylcc-zyq/p/12570675.html