转载请注明出处:葡萄城官网,葡萄城为开发者提供专业的开发工具、解决方案和服务,赋能开发者。
原文出处:https://blog.bitsrc.io/build-an-html-css-js-playground-64c62133746d
目前市面上已经有很多类似的平台和方案了,类似像jsfiddle、CodePen、Storybook这样的平台,这些平台可以让我们在浏览器中创建代码并直接执行,无需单独在我们本地创建项目,所以当你在测试一段代码时,这些平台可能会为你提供一些帮助。
本篇文章是我们 “如何创建____编辑器” 系列中的第一篇,后续可能还会包括:
- 创建一个Angular编辑器
- 创建一个React编辑器
- …
在本文中,我们将学习如何创建一个基本的 HTML/CSS/JS 编辑器。
让我们立即开始吧
首先,创建一个项目文件夹,例如:“js_editor“
创建index.html 和 editor.js 文件
现在,我们创建一个HTML,CSS和JS的选项卡,每个选项卡包含了一个文本框,一个文本框用于HTML、另一个用于CSS、最后一个用于JS。我们将使用iframe来呈现所有的HTML、CSS、JS。Iframe是一个创建新浏览器实例的html标记,它可以在其中呈现所有你自定义的代码效果,使用上就像你直接在浏览器中看到的效果是一样的。
现在,废话不多说,index.html全部代码如下:
|
1
2
3
4
5
6
7
8
9
10
11
12
13
14
15
16
17
18
19
20
21
22
23
24
25
26
27
28
29
30
31
32
33
34
35
36
37
38
39
40
41
42
43
44
45
46
47
48
49
50
51
52
53
54
55
56
57
58
59
60
|
<html><title>HTML/CSS/JS Playground</title><link rel="stylesheet" href=‘./bootstrap.min.css‘ /><body> <style> textarea { color: white; width: 600px; height: 350px; } iframe { width: 400px; height: 350px } </style> <div class="container"> <h3>HTML/CSS/JS Playground</h3> <div class="row"> <div class="col-12"> <ul id="myTab" class="nav nav-tabs"> <li class="active"><a href="#html" data-toggle="tab"> HTML</a></li> <li><a href="#css" data-toggle="tab">CSS</a></li> <li><a href="#js" data-toggle="tab">JS</a></li> </ul> <div id="myTabContent" class="tab-content"> <div class="tab-pane fade in active" id="html"> <p> <textarea style="float:left" id="htmlTextarea"></textarea> </p> </div> <div class="tab-pane fade" id="css"> <p> <textarea style="float:left" id="cssTextarea"></textarea> </p> </div> <div class="tab-pane fade" id="js"> <p> <textarea style="float:left" id="jsTextarea"></textarea> </p> </div> </div> </div> <div class="col-12"> <div> <iframe id="iFrame"></iframe> </div> </div> </div> </div></body><script src="./jquery.js"></script><script src="./bootstrap.min.js"></script><script src="./editor.js"></script></html> |
在其中,为了使选项卡功能更容易实现一点,我用到了bootstrap.min.js,bootstrap.min.css和jquery.js来帮助我。
现在,让我们继续丰富editor.js吧:
|
1
2
3
4
5
6
7
8
9
10
11
12
13
14
15
16
17
18
19
20
|
const getEl = id => document.getElementById(id)const iFrame = getEl(‘iFrame‘).contentWindow.documentconst htmlTextArea = getEl(‘htmlTextarea‘)const cssTextArea = getEl(‘cssTextarea‘)const jsTextArea = getEl(‘jsTextarea‘)document.body.onkeyup = function() { iFrame.open() iFrame.writeln( htmlTextArea.value + ‘<style>‘ + cssTextArea.value + ‘</style>‘ + ‘<script>‘ + jsTextArea.value + ‘</script>‘ ) iFrame.close()} |
我们有一个函数getEl,它通过Dom的id来获取元素,下面我们得到iframe的contentwindow.document。 然后,我们分别创建HTML、CSS、JS textarea的实例,并获得内容。
我们监听了body元素的keyup 事件,如果其子元素输入任意内容,将会触发对函数的调用,然后通过writeln写入Dom,通过获取这些内容,即能在相应的标签中加入合适的内容。
开始使用编辑器
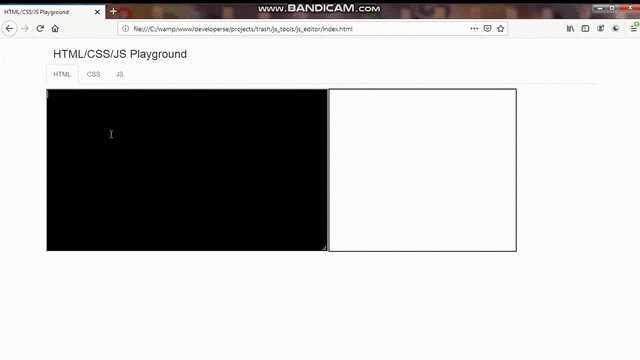
好的,经过简单的几行代码,我们的编辑器已经初具雏形,请在浏览器中加载index.html。在这,我们可以在相应的选项卡中输入相应的代码,右侧的iframe上即可完整呈现你设置的HTML、CSS和JS。
可以通过下面的gif看到,我是如何添加ID为“but“的按钮,然后设置样式,并在按钮上添加click事件并弹出”yes“框。

结论
制作一个属于自己的编辑器非常简单,我也在文末提供了本文使用的项目地址,如果有任何疑问或建议,欢迎提出,谢谢!
