如下是网络拓扑图:
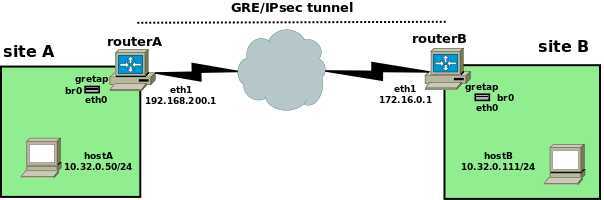
我们使用GRETAP Tunnel 互联 A&B;
GRE 是encapsulate为 IP packets;
GRETAP encapsulate为 Ethernet frames,请留意 Linux GRETAP可与Cisco EoGRE建立互联。
# 请先确认已安装iproute,若未安装,可先安装iproute:
yum install -y iproute
# 创建、启用、查看gretap interface
routerA# ip link add gretap1 type gretap local 192.168.200.1 remote 172.16.0.1 dev eth1
routerA# ip link set gretap1 up
routerA# ip link show gretap1
6: gretap@eth1: <BROADCAST,MULTICAST> mtu 1462 qdisc noop state DOWN mode DEFAULT qlen 1000 link/ether 62:24:67:45:44:ad brd ff:ff:ff:ff:ff:ff
目的是:创建gretap interface到tunnel 两侧的bridge,可以让siteA与siteB 是桥接在一起。然后使用IPsec去加密siteA&B之间的GRE traffic 。
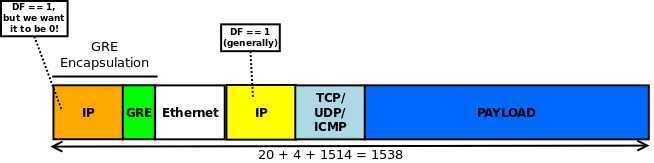
如上述创建的GRETAP,MTU为1462。计算方式:
1500 (物理接口MTU) - 20 (GRE新增的外部IP包头) - 4 (GRE header) - 14 (封装的ethernet header) = 1462.
对于IP packet的传输,当传输packet大于MTU时,经过的路由设备允许切片重传就保障数据继续传输(当然重传会会成倍增加网络传输延迟)。对于Ethernet Network 且 gretap 属于桥接接口,MTU必须一致才能通信,否则会被丢弃。下面,我们来验证一下:
# 在routerA 添加gretap interface到bridge br0:
routerA# ip link add br0 type bridge
routerA# ip link set eth0 down
routerA# ip addr del 10.32.x.x/24 dev eth0    # 移除eth0的IP。此处留意如果是AWS EC2,务必小心;如果是阿里或腾讯Cloud Server,错误也可用控制台管理。建议在本地环境试验。
routerA# ip link set eth0 master br0
routerA# ip link set eth0 up
routerA# ip link set br0 up
routerA# ip addr add 10.0.0.254/24 dev br0
routerA# ip link set gretap1 up
routerA# ip link set gretap1 master br0
# 在routerB 添加gretap interface到bridge br0:routerB
routerB# ip link add br0 type bridge
routerB# ip link set eth0 down
routerB# ip addr del 10.32.x.x/24 dev eth0   # 移除eth0的IP。此处留意如果是AWS EC2,务必小心;如果是阿里或腾讯Cloud Server,错误也可用控制台管理。建议在本地环境试验。
routerB# ip link set eth0 master br0
routerB# ip link set eth0 up
routerB# ip link set br0 up
routerB# ip addr add 10.0.0.253/24 dev br0
routerB# ip link set gretap1 up
routerB# ip link set gretap1 master br0
# 结果:
hostA# ping -s 172 10.32.0.111
PING 10.32.0.111 (10.32.0.111) 1472(1500) bytes of data.
^C
--- 10.32.0.111 ping statistics ---
3 packets transmitted, 0 received, 100% packet loss, time 2015ms
我们-s发起max size frame,从hostA 无法ping hostB
通过抓包分析,我们能看到 小型的ARP request/reply frames 是能正常通过tunnel。然而,ICMP request packets是在routerA的br0就被静默丢弃,因为routerA 的br0 MTU依然是1462。
# 如果我们将br0强制调整为1500,让HostA能够通过1500的包到HostB:
routerA&B的gretap1都需要执行,此处仅展示routerA侧br0:
routerA# ip link show br0
4: br0: <BROADCAST,MULTICAST,UP,LOWER_UP> mtu 1462 qdisc noqueue state UP mode DEFAULT
    link/ether 00:16:3e:c3:8c:ef brd ff:ff:ff:ff:ff:ff
routerA# ip link set gretap1 mtu 1500
routerA# ip link show br0
4: br0: <BROADCAST,MULTICAST,UP,LOWER_UP> mtu 1500 qdisc noqueue state UP mode DEFAULT
    link/ether 00:16:3e:c3:8c:ef brd ff:ff:ff:ff:ff:ff
如果强制将gretap1的MTU从1462增加38到1500,则封装之后,routerA&B的eth1会相应增加到1538. 需要与网络运营商确认siteA和siteB之间的线路连接,如果是云服务器,需要调整云服务器MTU。
理想情况下,Frame是不可分割时(DF[Don‘t Fragment]为0),Ethernet frames也能通信的。.
iproute2文档说,tunnel interface有一个选项nopmtudisc (用途是:disable Path MTU Discovery on this tunnel.)
在此,我们重新创建tunnel interface(同时在routerA&B执行):
routerA# ip link del gretap1
routerA# ip link add gretap1 type gretap local 192.168.200.1 remote 172.16.0.1 dev eth1 nopmtudisc
routerA# ip link set gretap1 mtu 1500
routerA# ip link set gretap1 up
routerA# ip link set gretap1 master br0
可是如果我们现在从hostA ping (-s 1472) hostB,却无法ping通,为什么?
抓包显示,当hostA 发出的包,DF已设置为1,经过GRE时包的DF也为1(即使我们设置了nopmtud),这样就出现了一个不可拆分的包在被静默丢弃。
所以,我们在HostA发起ping时,如果显式的明确disable DF(可以拆分包),则才可以ping通。
ping -Mdont -s 1472 10.32.0.111
PING 10.32.0.111 (10.32.0.111) 1472(1500) bytes of data.
1480 bytes from 10.32.0.111: icmp_req=1 ttl=64 time=1.26 ms
1480 bytes from 10.32.0.111: icmp_req=2 ttl=64 time=0.932 ms
1480 bytes from 10.32.0.111: icmp_req=3 ttl=64 time=1.01 ms
^C
--- 10.32.0.111 ping statistics ---
3 packets transmitted, 3 received, 0% packet loss, time 2002ms
rtt min/avg/max/mdev = 0.932/1.071/1.264/0.143 ms
此时,在routerA&B抓包都显示包被拆分。(拆包通不是最好的体验,但总比不能ping通要好)。因为Linux操作系统默认都是执行PMUTD的,所以这里我们人为地去拆分包,仅能在实验环境求真,不能满足所有应用自由通信的结果。如果需要Linux默认不支持PMUTD,可以设置kernel:
hostA# echo "net.ipv4.ip_no_pmtu_disc = 1 " >> /etc/sysctl.conf
hostA# sysctl -p
# 这里分享gretap encapsulation 图
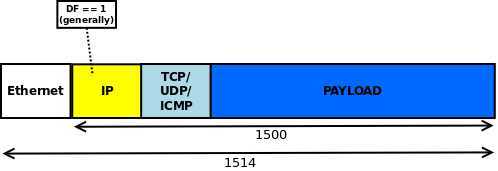
首先有一个original ethernet frame最终能达到1514 bytes (1500 IP + 14 ethernet header):
当这个fram被GRE封装后,得到:
我们希望尝试标准的工具来解决这个问题,但是是有些难度的:
a. 创建iptables 规则,去match 那些 准备用NFQUEUE处理的 包
b. 然后一个user-space程序,就可以接收、处理这些包,并裁决verdict这些包:[1] 发回iptables(按规则修改这些包) [2]丢弃这些包。 这种通讯原理为 nfnetlink , 这个库主要使用C,但也有使用Perl和Python。 netlink之netfilter Queue详情Click Here.
我们可以通过 iptables allows tracing 方法,来记录packet 经过了哪些tables和chains。有这些信息,才能方便地制定相应的iptables rule。
对于outgoing packet ,TRACE结果:
1 TRACE: raw:PREROUTING:policy:2 IN=br0 OUT= PHYSIN=eth0 MAC=00:16:3e:52:ba:6c:00:16:3e:93:08:ca:08:00 SRC=10.32.0.50 DST=10.32.0.111 LEN=84 TOS=0x00 PREC=0x00 TTL=64 ID=0 DF PROTO=ICMP TYPE=8 CODE=0 ID=819 SEQ=1
2 TRACE: filter:FORWARD:policy:1 IN=br0 OUT=br0 PHYSIN=eth0 PHYSOUT=gretap MAC=00:16:3e:52:ba:6c:00:16:3e:93:08:ca:08:00 SRC=10.32.0.50 DST=10.32.0.111 LEN=84 TOS=0x00 PREC=0x00 TTL=64 ID=0 DF PROTO=ICMP TYPE=8 CODE=0 ID=819 SEQ=1
3 TRACE: raw:OUTPUT:rule:1 IN= OUT=eth1 SRC=192.168.200.1 DST=172.16.0.1 LEN=122 TOS=0x00 PREC=0x00 TTL=64 ID=0 DF PROTO=47
4 TRACE: raw:OUTPUT:policy:2 IN= OUT=eth1 SRC=192.168.200.1 DST=172.16.0.1 LEN=122 TOS=0x00 PREC=0x00 TTL=64 ID=0 DF PROTO=47
5 TRACE: filter:OUTPUT:policy:2 IN= OUT=eth1 SRC=192.168.200.1 DST=172.16.0.1 LEN=122 TOS=0x00 PREC=0x00 TTL=64 ID=0 DF PROTO=47
对于reply return packet,TRACE结果:
6 TRACE: raw:PREROUTING:policy:2 IN=eth1 OUT= MAC=00:16:3e:c3:8c:12:00:16:3e:11:b8:8e:08:00 SRC=172.16.0.1 DST=192.168.200.1 LEN=122 TOS=0x00 PREC=0x00 TTL=63 ID=40301 PROTO=47
7 TRACE: filter:INPUT:policy:1 IN=eth1 OUT= MAC=00:16:3e:c3:8c:12:00:16:3e:11:b8:8e:08:00 SRC=172.16.0.1 DST=192.168.200.1 LEN=122 TOS=0x00 PREC=0x00 TTL=63 ID=40301 PROTO=47
8 TRACE: raw:PREROUTING:rule:1 IN=br0 OUT= PHYSIN=gretap MAC=00:16:3e:93:08:ca:00:16:3e:52:ba:6c:08:00 SRC=10.32.0.111 DST=10.32.0.50 LEN=84 TOS=0x00 PREC=0x00 TTL=64 ID=18065 PROTO=ICMP TYPE=0 CODE=0 ID=819 SEQ=1
9 TRACE: raw:PREROUTING:policy:2 IN=br0 OUT= PHYSIN=gretap MAC=00:16:3e:93:08:ca:00:16:3e:52:ba:6c:08:00 SRC=10.32.0.111 DST=10.32.0.50 LEN=84 TOS=0x00 PREC=0x00 TTL=64 ID=18065 PROTO=ICMP TYPE=0 CODE=0 ID=819 SEQ=1
10 TRACE: filter:FORWARD:policy:1 IN=br0 OUT=br0 PHYSIN=gretap PHYSOUT=eth0 MAC=00:16:3e:93:08:ca:00:16:3e:52:ba:6c:08:00 SRC=10.32.0.111 DST=10.32.0.50 LEN=84 TOS=0x00 PREC=0x00 TTL=64 ID=18065 PROTO=ICMP TYPE=0 CODE=0 ID=819 SEQ=1
请留意:由于涉及bridge,上面的TRACE实际结果需要依靠是否 /proc/sys/net/bridge/bridge-nf-call-iptables 设置为0或1。很多系统默认bridge-nf-call-iptables为1,则会呈现上述TRACE结果;如果为0,则包经过bridge的TRACE记录将不会被显示,也就是上述的步骤1/2/8/9/10步骤不会存在。
那么,我们得到TRACE记录后,我们究竟tap into哪个flow去获得packets?显然,我们想看到GRE包,我们只关注从local LAN 到tunnel 的traffic(也就是上述TRACE的步骤 3、4、5)。所以,我们这里选择OUTPUT chain,至于raw或filter table,都是OK的。这里,我们选择filter table在routerA&B 操作:
routerA# iptables -A OUTPUT -s 192.168.200.1 -d 172.16.0.1 -p gre -j NFQUEUE --queue-bypass
routerB# iptables -A OUTPUT -s 172.16.0.1 -d 192.168.200.1 -p gre -j NFQUEUE --queue-bypass
这样就能匹配所有发送traffic 去到NFQUEUE (默认序号queue number为0)。同时,如果程序监听该队列(--queue-bypass),则移动到next policy或rule,所以至少可以通过small packet。
我们需要编写代码去:
a. 接收来自 queue number 0 的packet
b. 执行clearing DF
c. 发送处理后的包回到iptables
幸运的,有一些 案例C代码 可提供我们一些参考。现在,我们可以编写如下代码:

/***************************************************************************************
 * clear_df.c: clear, uh, DF bit from IPv4 packets. Heavily borrowed from              *
 * http://netfilter.org/projects/libnetfilter_queue/doxygen/nfqnl__test_8c_source.html *
 ***************************************************************************************/

#include <stdio.h>
#include <stdlib.h>
#include <unistd.h>
#include <netinet/in.h>
#include <linux/types.h>
#include <linux/netfilter.h>            /* for NF_ACCEPT */
#include <arpa/inet.h>
#include <time.h>
#include <libnetfilter_queue/libnetfilter_queue.h>

/* Standard IPv4 header checksum calculation, as per RFC 791 */
u_int16_t ipv4_header_checksum(char *hdr, size_t hdrlen) {

  unsigned long sum = 0;
  const u_int16_t *bbp;
  int count = 0;

  bbp = (u_int16_t *)hdr;
  while (hdrlen > 1) {
    /* the checksum field itself should be considered to be 0 (ie, excluded) when calculating the checksum */
    if (count != 10) {
      sum += *bbp;
    }
    bbp++; hdrlen -= 2; count += 2;
  }

  /* in case hdrlen was an odd number, there will be one byte left to sum */
  if (hdrlen > 0) {
    sum += *(unsigned char *)bbp;
  }

  while (sum >> 16) {
    sum = (sum & 0xffff) + (sum >> 16);
  }

  return (~sum);
}

/* callback function; this is called for every matched packet. */
static int cb(struct nfq_q_handle *qh, struct nfgenmsg *nfmsg, struct nfq_data *nfa, void *data) {

  u_int32_t queue_id;
  struct nfqnl_msg_packet_hdr *ph;
  int pkt_len;

  char *buf;
  size_t hdr_len;

  /* determine the id of the packet in the queue */
  ph = nfq_get_msg_packet_hdr(nfa);
  if (ph) {
    queue_id = ntohl(ph->packet_id);
  } else {
    return -1;
  }

  /* try to get at the actual packet */
  pkt_len = nfq_get_payload(nfa, &buf);

  if (pkt_len >= 0) {

    hdr_len = ((buf[0] & 0x0f) * 4);

    /* clear DF bit */
    buf[6] &= 0xbf;

    /* set new packet ID */
    *((u_int16_t *)(buf + 4)) = htons((rand() % 65535) + 1);

    /* recalculate checksum */
    *((u_int16_t *)(buf + 10)) = ipv4_header_checksum(buf, hdr_len);
  }

  /* "accept" the mangled packet */
  return nfq_set_verdict(qh, queue_id, NF_ACCEPT, pkt_len, buf);
}

int main(int argc, char **argv) {

    struct nfq_handle *h;
    struct nfq_q_handle *qh;
    int fd;
    int rv;
    char buf[4096] __attribute__ ((aligned));

    /* printf("opening library handle\n"); */
    h = nfq_open();
    if (!h) {
        fprintf(stderr, "error during nfq_open()\n");
        exit(1);
    }

    /* printf("unbinding existing nf_queue handler for AF_INET (if any)\n"); */
    if (nfq_unbind_pf(h, AF_INET) < 0) {
        fprintf(stderr, "error during nfq_unbind_pf()\n");
        exit(1);
    }

    /* printf("binding nfnetlink_queue as nf_queue handler for AF_INET\n"); */
    if (nfq_bind_pf(h, AF_INET) < 0) {
        fprintf(stderr, "error during nfq_bind_pf()\n");
        exit(1);
    }

    /* printf("binding this socket to queue ‘0‘\n"); */
    qh = nfq_create_queue(h,  0, &cb, NULL);
    if (!qh) {
        fprintf(stderr, "error during nfq_create_queue()\n");
        exit(1);
    }

    /* printf("setting copy_packet mode\n"); */
    if (nfq_set_mode(qh, NFQNL_COPY_PACKET, 0xffff) < 0) {
        fprintf(stderr, "can‘t set packet_copy mode\n");
        exit(1);
    }

    fd = nfq_fd(h);

    /* initialize random number generator */
    srand(time(NULL));

    while ((rv = recv(fd, buf, sizeof(buf), 0)) && rv >= 0) {
        nfq_handle_packet(h, buf, rv);
    }

    /* printf("unbinding from queue 0\n"); */
    nfq_destroy_queue(qh);

    /* printf("closing library handle\n"); */
    nfq_close(h);

    exit(0);
}
在说明前,我们可以回顾一下 IPv4 Header Format 图: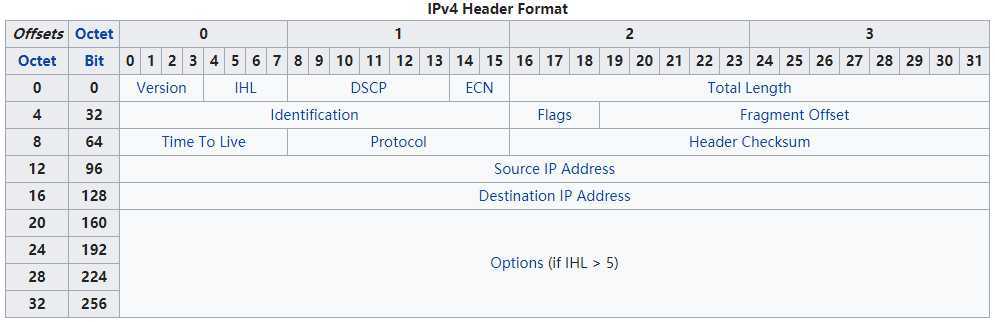
请留意,如果我们clear DF,则我们需要填充"Indentification" field。当DF设置为1时,Indentification field一般是0,因为这种情况(DF=1)下,包不会被分割,所以不需要Indentification 去标识fragmentation碎片包。而当我们设置DF=0或者说clear DF时,则需要设置Indentification 。此处,我们可以生成一个1-65535的随机数,去填入Indentification field。
编译需要提供header files:
gcc -o clear_df -lnfnetlink -lnetfilter_queue clear_df.c
routerA# clear_df
routerB# clear_df
hostA# ping -s 1472 -Mdo 10.32.0.111   ##此处我们强制DF,看看效果
PING 10.32.0.111 (10.32.0.111) 1472(1500) bytes of data.
1480 bytes from 10.32.0.111: icmp_req=1 ttl=64 time=1.48 ms
1480 bytes from 10.32.0.111: icmp_req=2 ttl=64 time=0.969 ms
1480 bytes from 10.32.0.111: icmp_req=3 ttl=64 time=1.11 ms
1480 bytes from 10.32.0.111: icmp_req=4 ttl=64 time=0.946 ms
1480 bytes from 10.32.0.111: icmp_req=5 ttl=64 time=0.944 ms
^C
--- 10.32.0.111 ping statistics ---
5 packets transmitted, 5 received, 0% packet loss, time 4005ms
rtt min/avg/max/mdev = 0.944/1.091/1.481/0.208 ms
回到正轨,IPsec是我们的最终目的。为了使实验更精彩,对于IPsec的实现,我们让routerA使用 " ipsec-tools + racoon",routerB使用 openswan 实现。
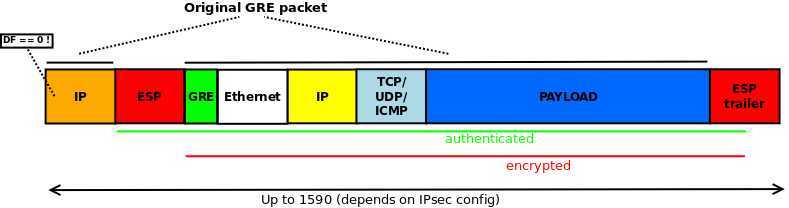
此时,在第一个IP header之后,IPsec transport mode将插入一个新的ESP header,以至于Protocol field会由47(GRE)更改为50(ESP),在ESP应用后(当然是,这是是说在未DF前的结构),我们得到如下:
我们再次追踪新结构的packet到user-space,提前做一下TRACE:
1 TRACE: raw:OUTPUT:policy:2 IN= OUT=eth1 SRC=192.168.200.1 DST=172.16.0.1 LEN=122 TOS=0x00 PREC=0x00 TTL=64 ID=0 DF PROTO=47
2 TRACE: filter:OUTPUT:rule:2 IN= OUT=eth1 SRC=192.168.200.1 DST=172.16.0.1 LEN=122 TOS=0x00 PREC=0x00 TTL=64 ID=0 DF PROTO=47
3 TRACE: raw:OUTPUT:rule:1 IN= OUT=eth1 SRC=192.168.200.1 DST=172.16.0.1 LEN=152 TOS=0x00 PREC=0x00 TTL=64 ID=0 DF PROTO=ESP SPI=0xdb28966a
4 TRACE: raw:OUTPUT:policy:2 IN= OUT=eth1 SRC=192.168.200.1 DST=172.16.0.1 LEN=152 TOS=0x00 PREC=0x00 TTL=64 ID=0 DF PROTO=ESP SPI=0xdb28966a
5 TRACE: filter:OUTPUT:policy:3 IN= OUT=eth1 SRC=192.168.200.1 DST=172.16.0.1 LEN=152 TOS=0x00 PREC=0x00 TTL=64 ID=0 DF PROTO=ESP SPI=0xdb28966a

6 TRACE: raw:PREROUTING:policy:2 IN=eth1 OUT= MAC=00:16:3e:c3:8c:12:00:16:3e:11:b8:8e:08:00 SRC=172.16.0.1 DST=192.168.200.1 LEN=152 TOS=0x00 PREC=0x00 TTL=63 ID=21840 PROTO=ESP SPI=0x4802e17
7 TRACE: filter:INPUT:policy:1 IN=eth1 OUT= MAC=00:16:3e:c3:8c:12:00:16:3e:11:b8:8e:08:00 SRC=172.16.0.1 DST=192.168.200.1 LEN=152 TOS=0x00 PREC=0x00 TTL=63 ID=21840 PROTO=ESP SPI=0x4802e17
8 TRACE: raw:PREROUTING:rule:1 IN=eth1 OUT= MAC=00:16:3e:c3:8c:12:00:16:3e:11:b8:8e:08:00 SRC=172.16.0.1 DST=192.168.200.1 LEN=122 TOS=0x00 PREC=0x00 TTL=63 ID=21840 PROTO=47
9 TRACE: raw:PREROUTING:policy:2 IN=eth1 OUT= MAC=00:16:3e:c3:8c:12:00:16:3e:11:b8:8e:08:00 SRC=172.16.0.1 DST=192.168.200.1 LEN=122 TOS=0x00 PREC=0x00 TTL=63 ID=21840 PROTO=47
10 TRACE: filter:INPUT:policy:1 IN=eth1 OUT= MAC=00:16:3e:c3:8c:12:00:16:3e:11:b8:8e:08:00 SRC=172.16.0.1 DST=192.168.200.1 LEN=122 TOS=0x00 PREC=0x00 TTL=63 ID=21840 PROTO=47
Linux 没有真正的 IPsec virtual interface,但我们看到IPsec 穿过2次chain:
第1次: before encryption (with PROTO=47, lines 1-2)
第2次: after encryption (with PROTO=ESP, that is, protocol 50, lines 3-5)
这意味着我们有2种处理方式:
第1种:保留现有的iptables rule (但我们的代码将收到未加密的packet)
第2种:改变匹配协议为ESP (iptables rule 中使用 -p 50 or -p esp都行)
在此,我们推荐使用第2种处理方式。因为有一种情况存在:如果使用AH (protocol 51),我们将不能更改ID field。 由于NFQUEUE会在kernel space和 user space之间来回copy packet,且由于没有加密的packet 更小,能够使匹配 Protocol 47更加高效,综合上述原因,我们不对iptables rule做更改。
这里分享在routerA上的ipsec-tools.conf 配置:
#!/usr/sbin/setkey -f

## Flush the SAD and SPD
#
flush;
spdflush;

spdadd 192.168.200.1/32 172.16.0.1/32 gre -P out ipsec
   esp/transport//require;

spdadd 172.16.0.1/32 192.168.200.1/32 gre -P in ipsec
   esp/transport//require;

racoon.conf on routerA:
log notify;
path pre_shared_key "/etc/racoon/psk.txt";
path certificate "/etc/racoon/certs";

remote 172.16.0.1 {
        exchange_mode main;
        proposal {
                encryption_algorithm 3des;
                hash_algorithm md5;
                authentication_method pre_shared_key;
                dh_group modp1024;
        }
}

sainfo address 192.168.200.1/32 gre address 172.16.0.1/32 gre {
        pfs_group modp1024;
        encryption_algorithm 3des;
        authentication_algorithm hmac_md5;
        compression_algorithm deflate;
}

ipsec.conf on routerB:
version 2.0     # conforms to second version of ipsec.conf specification

# basic configuration
config setup
  nhelpers=0
  interfaces="%none"
  protostack=netkey
  klipsdebug=""
  plutodebug=""

conn to-routerA
  type=transport
  left=172.16.0.1
  leftsubnet=172.16.0.1/32
  right=192.168.200.1
  rightsubnet=192.168.200.1/32
  authby=secret
  phase2alg=3des-md5;modp1024
  keyexchange=ike
  ike=3des-md5;modp1024
  auto=start
  leftprotoport=gre
  rightprotoport=gre
请留意:上述配置仅加密了GRE流量;身份验证使用了PSK方式。
参考海外英文原稿:Click
笔记:Linux上实验 GRE Bridge ,IPsec , NFQUEUE
原文:https://www.cnblogs.com/linetwork/p/12633919.html
