1.怎么添加UI文件
我们知道在新建项目的时候,可以选择添加*.ui和不添加两种。
当添加上ui 文件的时候,我们可以利用designer来添加控件,直观上看到界面的布局,控件的外观
如果没有添加ui文件,那么久只能用代码生成。
那么如果有一个现有的类(不带ui文件),可否给他新增ui文件呢?
答案是可以。毕竟qt designer form 的简介就是
Creates a Qt Designer form that you can add to a Qt Widget Project. This is useful if you already have an existing class for the UI business logic.
目录结构:
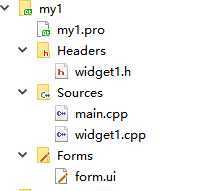
第一步:右键项目名称->添加新文件->Qt->Qt designer Form->Widget->**.ui
第二步:编译。编译下会生成ui_**.h
第三步:在要添加界面的类的头文件内这样写:
#ifndef WIDGET1_H
#define WIDGET1_H

#include <QWidget>

namespace Ui {   //新增的
 class Form;
}

class Widget1 : public QWidget
{
    Q_OBJECT

    public:
    Widget1(QWidget *parent = 0);
    ~Widget1();
    private :
    Ui::Form *ff;   //新增的
};

#endif // WIDGET1_H
第四步:在其对应的.cpp文件内:
#include "widget1.h"
#include "QPushButton"
#include "ui_form.h"   //新增的
#include <QLabel>


Widget1::Widget1(QWidget *parent)
    : QWidget(parent),ff(new Ui::Form)  //新增的

{

    QPushButton *a=new QPushButton(this);
    a->setText("a");
    QLabel *vv=new QLabel(this);
    vv->setText("shsh");
    vv->move(100,20);
    ff->setupUi(this);
}

Widget1::~Widget1()
{

}
5.在ui界面的头文件内这样写改
/********************************************************************************
** Form generated from reading UI file ‘form.ui‘
**
** Created by: Qt User Interface Compiler version 5.11.1
**
** WARNING! All changes made in this file will be lost when recompiling UI file!
********************************************************************************/

#ifndef UI_FORM_H
#define UI_FORM_H

#include <QtCore/QVariant>
#include <QtWidgets/QApplication>
#include <QtWidgets/QPushButton>
#include <QtWidgets/QWidget>

QT_BEGIN_NAMESPACE

class Ui_Form
{
public:
    QPushButton *pushButton;

    void setupUi(QWidget *Form)
    {
        if (Form->objectName().isEmpty())
            Form->setObjectName(QStringLiteral("Form"));
        Form->resize(400, 300);
        pushButton = new QPushButton(Form);
        pushButton->setObjectName(QStringLiteral("pushButton"));
        pushButton->setGeometry(QRect(240, 180, 75, 23));

        retranslateUi(Form);

        QMetaObject::connectSlotsByName(Form);
    } // setupUi

    void retranslateUi(QWidget *Form)
    {
        Form->setWindowTitle(QApplication::translate("Form", "Form", nullptr));
        pushButton->setText(QApplication::translate("Form", "PushButton", nullptr));
    } // retranslateUi

};

namespace Ui {
    class Form: public Ui_Form {};
} // namespace Ui

QT_END_NAMESPACE

#endif // UI_FORM_H
6.试一试:
在ui界面上直接拖拽控件,看最终的显示结果:
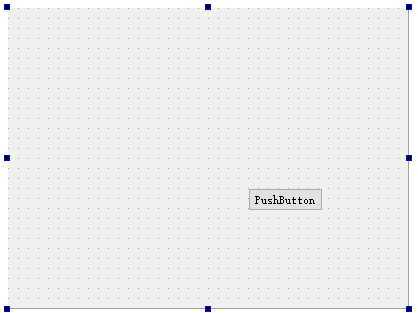
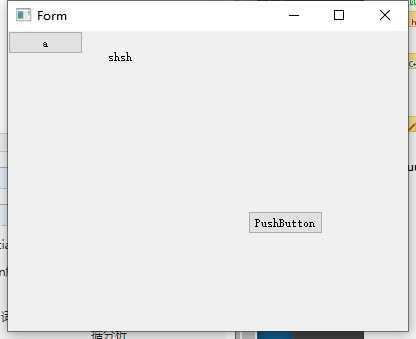
7.显示结果:
2.为什么?
单继承方式是相对于后面要讲的多继承方式,单继承方式也称组合(即委托或代理)方式。单继承方式简单来说就是在代码中首先要自定义一个子类(例如下文中的GoToCellDialog类),该类要从form对应的窗体类(或其兼容的子类)派生;并用ui生成的类定义一个类里的成员变量,该成员变量可以是值也可以是指针,根据使用成员变量的形式不同,又分为成员变量和指针成员变量两种形式。这样在GoToCellDialog的构造函数中可以直接调用ui和ui中的变量和函数,使用起来很方便。
即将 Ui::GotoCellDialog ui; 作为类GotoCellDialog(只继承自QDialog,单一继承)的成员变量。这里有一点值得注意的地方,就是ui文件提供的类被包含在了名为Ui的name space里,这样做的目的是将ui文件的命名空间与用户的代码分离,避免两者出现命名冲突的情况。
与成员变量形式相似,唯一不同的是,将Ui::GoToCellDialog声明为指针成员,即 Ui::GoToCellDialog *ui;
3.更加详细的资料补充
QObject→QWidget→QFrame→QLabel。提示,标准 C++ 语言里并没有 property 关键字,property 是 Qt 对标准 C++ 的扩展,使得在 Qt Designer 里就可以可视化设置类的数据。
在图 1 显示的设计窗体上,放置一个 Label 和一个 Push Button 组件,它们的主要属性设置见表 3。| LabDemo | QLabel | Text=”Hello, World” Font.PointSize=20 Font.bold=true |
设置标签显示文字和字体 |
| btnClose | QPushButton | Text=”Close” | 设置按钮的文字 |
| widget.h | 定义窗体类的头文件,定义了类Widget |
| widget.cpp | Widget 类的功能实现源程序文件 |
| widget.ui | 窗体界面文件,由UI设计器自动生成,存储了窗体上各个组件的属性设置和布局 |
| ui_widget.h | 编译后,根据窗体上的组件及其属性、信号与槽的关联等自动生成的一个类的定义文件,类的名称是Ui_Widget |
#ifndef WIDGET_H
#define WIDGET_H

#include <QWidget>

namespace Ui {
class Widget;
}

class Widget : public QWidget
{
    Q_OBJECT

public:
    explicit Widget(QWidget *parent = 0);
    ~Widget();

private:
    Ui::Widget *ui;
};

#endif // WIDGET_H
widget.h 文件有几个重要的部分。namespace Ui {
class Widget;
}
这是声明了一个名称为 Ui 的命名空间(namespace),包含一个类 Widget。但是这个类 Widget 并不是本文件里定义的类 Widget,而是 ui_widget.h 文件里定义的类,用于描述界面组件的。这个声明相当于一个外部类型声明(具体要看完 ui_widget.h 文件内的解释之后才能搞明白)。Ui::Widget *ui;
这个指针是用前面声明的 namespace Ui 里的 Widget 类定义的,所以指针 ui 是指向可视化设计的界面,后面会看到要访问界面上的组件,都需要通过这个指针 ui。#include "widget.h"
#include "ui_widget.h"
Widget::Widget(QWidget *parent) :
QWidget(parent),
ui(new Ui::Widget)
{
ui->setupUi(this);
}
Widget::~Widget()
{
delete ui;
}
注意到,在这个文件的包含文件部分自动加入了如下一行内容:
#include "ui_widget.h"
这个就是 Qt 编译生成的与 UI 文件 widget.ui 对应的类定义文件。Widget::Widget(QWidget *parent) : QWidget(parent), ui(new Ui::Widget)
其意义是:执行父类 QWidget 的构造函数,创建一个 Ui::Widget 类的对象 ui。这个 ui 就是 Widget 的 private 部分定义的指针变量 ui。ui->setupUi(this)
它是执行了 Ui::Widget 类的 setupUi() 函数,这个函数实现窗口的生成与各种属性的设置、信号与槽的关联(后面会具体介绍)。<?xml version="1.0" encoding="UTF-8"?>
<ui version="4.0">
<class>Widget</class>
<widget class="QWidget" name="Widget">
<property name="geometry">
<rect>
<x>0</x>
<y>0</y>
<width>336</width>
<height>216</height>
</rect>
</property>
<property name="windowTitle">
<string>My First Demo</string>
</property>
<widget class="QLabel" name="Lablabel">
<property name="geometry">
<rect>
<x>100</x>
<y>70</y>
<width>141</width>
<height>61</height>
</rect>
</property>
<property name="font">
<font>
<pointsize>12</pointsize>
<weight>75</weight>
<bold>true</bold>
</font>
</property>
<property name="text">
<string>Hello,World</string>
</property>
</widget>
<widget class="QPushButton" name="btnClose">
<property name="geometry">
<rect>
<x>210</x>
<y>150</y>
<width>75</width>
<height>23</height>
</rect>
</property>
<property name="text">
<string>Close</string>
</property>
</widget>
</widget>
<layoutdefault spacing="6" margin="11"/>
<resources/>
<connections>
<connection>
<sender>btnClose</sender>
<signal>clicked()</signal>
<receiver>Widget</receiver>
<slot>close()</slot>
<hints>
<hint type="sourcelabel">
<x>247</x>
<y>161</y>
</hint>
<hint type="destinationlabel">
<x>167</x>
<y>107</y>
</hint>
</hints>
</connection>
</connections>
</ui>
QLabel *LabDemo;
QPushButton *btnClose;
QObject::connect(btnClose, SIGNAL(clicked()), Widget, SLOT(close()));
QMetaObject::connectSlotsByName(Widget);
namespace Ui {
class Widget: public Ui_Widget {};
}
| 谈.ui文件的用法 | 这是一篇对Qt项目中ui文件用法的软件,有对.ui文件的详细介绍 |
| Qt之UI文件设计和运行机制 | 这是一篇对Qt项目中各个文件整体介绍的一篇软文,讲的很详细 |
| Qt中.ui文件的使用 | .ui文件有3种使用形式在这篇文章中得到了很好的阐述 |
原文:https://www.cnblogs.com/sggggr/p/12680756.html