在Java基础中我们知道,一般要实现一个线程通常是有两种方法,当然我这里没有算上使用callable等其他的实现方式。这里我们暂且使用继承Thread或者实现runnable接口。那么我们总是需要重写里面的run方法。
 public synchronized void start() {
        /**
         * This method is not invoked for the main method thread or "system"
         * group threads created/set up by the VM. Any new functionality added
         * to this method in the future may have to also be added to the VM.
         *
         * A zero status value corresponds to state "NEW".
         */
        if (threadStatus != 0)
            throw new IllegalThreadStateException();

        /* Notify the group that this thread is about to be started
         * so that it can be added to the group‘s list of threads
         * and the group‘s unstarted count can be decremented. */
        group.add(this);

        boolean started = false;
        try {
            start0();
            started = true;
        } finally {
            try {
                if (!started) {
                    group.threadStartFailed(this);
                }
            } catch (Throwable ignore) {
                /* do nothing. If start0 threw a Throwable then
                  it will be passed up the call stack */
            }
        }
    }

    private native void start0();
可以从上面的源码可以看见,实际上thread在调用start方法时,其实还调用了一个start0的方法。而且这个start0的方法是个本地native方法。我们可以假设其实Java虚拟机就是调用这个start0的方法,开启了一个Linux的内核线程。下面我们来做些实验:
我们简单的写一个Java类TestThread:
package test;

public class TestThread{
        static{
              System.loadLibrary("TestThreadNative");
        }
        public static void main(String[] args){
                TestThread testThread=new TestThread();
                testThread.start0();
        }
        private native void start0();
}
这里我么来说说,这里的System.loadLibrary方法,这个方法就类似我们win电脑中dll,一个链接库。其实这个库就是就是为了完成下面start0函数的实现。而且这里要注意一点,这串字符确定后,需要在编译这个库时需要指定,所以请记住各个字符串。
接下来我们使用Javac函数来编译一下:就可以得到TestThread.class文件
下一步,我们使用Javah TestThread.class 注意使用这个命令是需要带类的全路径包名,否则会报错。我这里是 javah test.TestThread 。得到就是一个test_TestThread.h 通常这个文件是在和Java文件包的同一级目录下。我们最好把这个test_TestThread.h放进和TestThread.class一起。下面是生成的test_TestThread.h的内容:
/* DO NOT EDIT THIS FILE - it is machine generated */
#include <jni.h>
/* Header for class test_TestThread */

#ifndef _Included_test_TestThread
#define _Included_test_TestThread
#ifdef __cplusplus
extern "C" {
#endif
/*
 * Class:     test_TestThread
 * Method:    start0
 * Signature: ()V
 */
JNIEXPORT void JNICALL Java_test_TestThread_start0
  (JNIEnv *, jobject);

#ifdef __cplusplus
}
#endif
#endif
我们从上面可以看出,其实我们需要实现的就是其中的这个方法
JNIEXPORT void JNICALL Java_test_TestThread_start(JNIEnv *, jobject);
那么下一步,我们此时已经得到了TestThread.class、test_TestThread.h 我们接下来需要写一个C文件thread.c,这个C文件引入testThread.h这个头文件,在thread.c文件中,我们实现那个头文件中的start线程方法。在Linux中,创建一个线程需要用到pthread_create(&pid,NULL,thread_entity,NULL);这个方法。
这里解释下,第一个参数pid是线程的地址,第二个参数是线程属性,第三个参数方法是线程体,或者说是实现线程逻辑的函数指针,第四个参数是传入的参数;
下面贴出我们自己定义的thread.c的内容:
#include <pthread.h>
#include <stdio.h>
#include <unistd.h>
#include "test_TestThread.h"
pthread_t pid;
void* thread_entity(void* arg)
{
      while(1){
           usleep(100);
           printf("i am new thread\n");
      }
}
JNIEXPORT void JNICALL Java_test_TestThread_start0(JNIEnv  *env, jobject c1)
{
     pthread_create(&pid,NULL,thread_entity,NULL);
     while(1){
           usleep(100);
           printf("i am main\n");
     }
}
int main()
{
   return 0;
}
最后,我们需要把这部分逻辑,编译成在TestThread.java中的TestThreadNative.so文件 然后让TestThread.java文件进行加载。
gcc -fPIC -I /usr/lib/jvm/java-1.8.0-openjdk-amd64/include/ -I /usr/lib/jvm/java-1.8.0-openjdk-amd64/include/linux/ -shared -o libTestThreadNative.so thread.c
/usr/lib/jvm/java‐1.8.0‐openjdk/include //这个文件下有jni相关的文件 因为我们在test_TestThread.h中引入了 #include <jni.h>
/usr/lib/jvm/java‐1.8.0‐openjdk/include/linux //在这个文件下 我们需要linux相关的依赖把 这里我还不是特别清楚 可以在这个打个问号?
注意:在输入这个命令的时候很容易出错 出错的原因很可能是 链接的文件路径不正确 所以一定要确定位置正确 最好输入的时候按TAB键 这样可以保证路径正确
现在离最后一步还差:把链接库加入到环境变量:
export LD_LIBRARY_PATH=$LD_LIBRARY_PATH:/root/test //注意 我这里是用root账号登录的 所以是/root/test 通常是/home/用户名/test
最后运行 Java com.TestThread 带包名运行即可
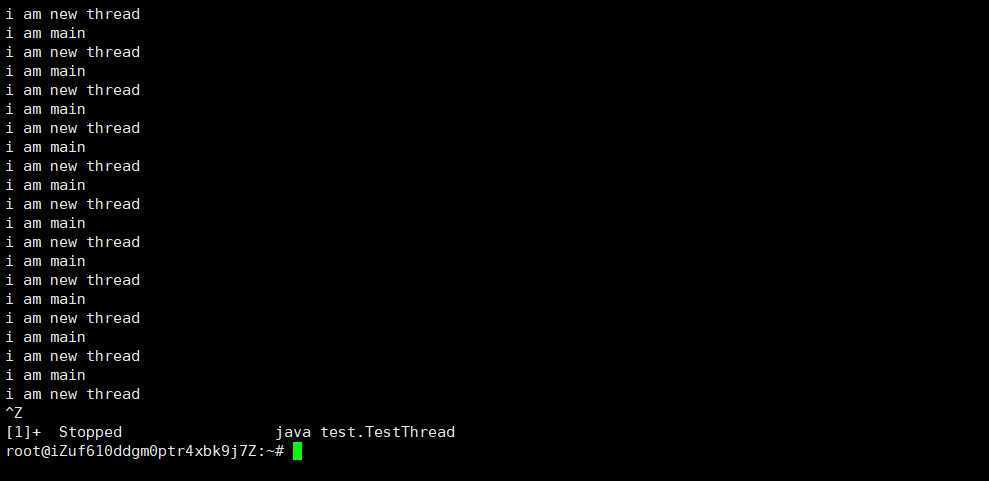
到这里我们就完成了Java调用C语言的的线程的过程。
总结:TestThread.java ->TestThread.class->test_TestThread.h->thread.c->libTestThreadNative.so->添加so文件到libaray_path最后运行 java test.TestThread
原文:https://www.cnblogs.com/foot-or-car/p/12776555.html