前言:整合了之前的笔记,加入新记的笔记信息
<!DOCTYPE html>
<html lang="en">
<head>
<meta charset="UTF-8">
<meta name="viewport" content="width=device-width, initial-scale=1.0">
<meta http-equiv="X-UA-Compatible" content="ie=edge">
<title>test</title>
</head>
<body>
<div id="app">
<ul>
<li>{{message}}</li>
</ul>
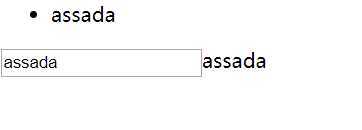
<input type="text" v-model="message" />{{message}}
</div>
<script src="../../js/vue.js"></script>
<script>
const app = new Vue({
el: "#app",
data: {
message: "hello world"
}
});
</script>
</body>
</html>
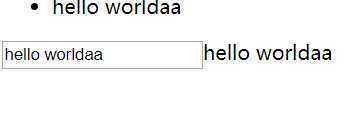
v-model.lazy
只有在input失去焦点的时候才会刷新数据
<!DOCTYPE html>
<html lang="en">
<head>
    <meta charset="UTF-8">
    <title>Title</title>
    <script src="../../js/vue.js"></script>
</head>
<body>
<div id="app">
    <ul>
        <li>{{message}}</li>
    </ul>
    <!--    失去焦点或者enter才会更新值-->
    <input type="text" v-model.lazy="message">{{message}}
</div>

<script>
    const app = new Vue({
        el: "#app",
        data: {
            message: "hello world"
        }
    });

</script>
</body>
</html>
| order | 语法糖 | 作用 |
|---|---|---|
| v-bind=attr | :attr | 将数据和标签帮顶起来 |
| v-on:action=actionName | @action=actionName | 绑定事件,事件不需要传参数可以省略() |
| {{expression}} | 从vue对象中取值 | |
| v-if="boolean" | if | |
| v-else-if="boolean" | else if | |
| v-else | else | |
| key | 作为一种标签的身份标识 | |
| v-show="boolean" | 和v-if的区别是,它是display=none标签还在 | |
| v-for="(item, index) in items" | for循环 | |
| :class="{className:boolean}" | 也可以用数组 | |
| v-model="entity" | 双向绑定表单,实际上是两个指令结合v-bind:value和v-on:input | |
| v-html | 输出真正的 HTML | |
| v-once | 写在标签上只渲染一次 | |
$forceUpdate |
强制更新数据 | |
export default {
  name: "Home",
  created() {
    console.log("Home组件被创建成功");
  }
};
未挂载成功的元素不能被获取到
export default {
  name: "Home",
  created() {
    console.log("Home组件被创建成功");
  },
  mounted(){
    console.log("组件被挂载成功")
  }
};
updated(): 当组件中发生变化时
export default {
  name: "Home",
  created() {
    console.log("Home组件被创建成功");
  },
  mounted(){
    console.log("组件被挂载成功")
  },
  updated(){
    console.log("组件中发生改变时");
  }
};
其他
<!DOCTYPE html>
<html>
<head>
<meta charset="utf-8">
<title></title>
<script src="vue.js" type="text/javascript" charset="utf-8"></script>
</head>
<body>
<div id="app">
{{msg}}
</div>
<script type="text/javascript">
var vm = new Vue({
el : "#app",
data : {
msg : "hi vue",
},
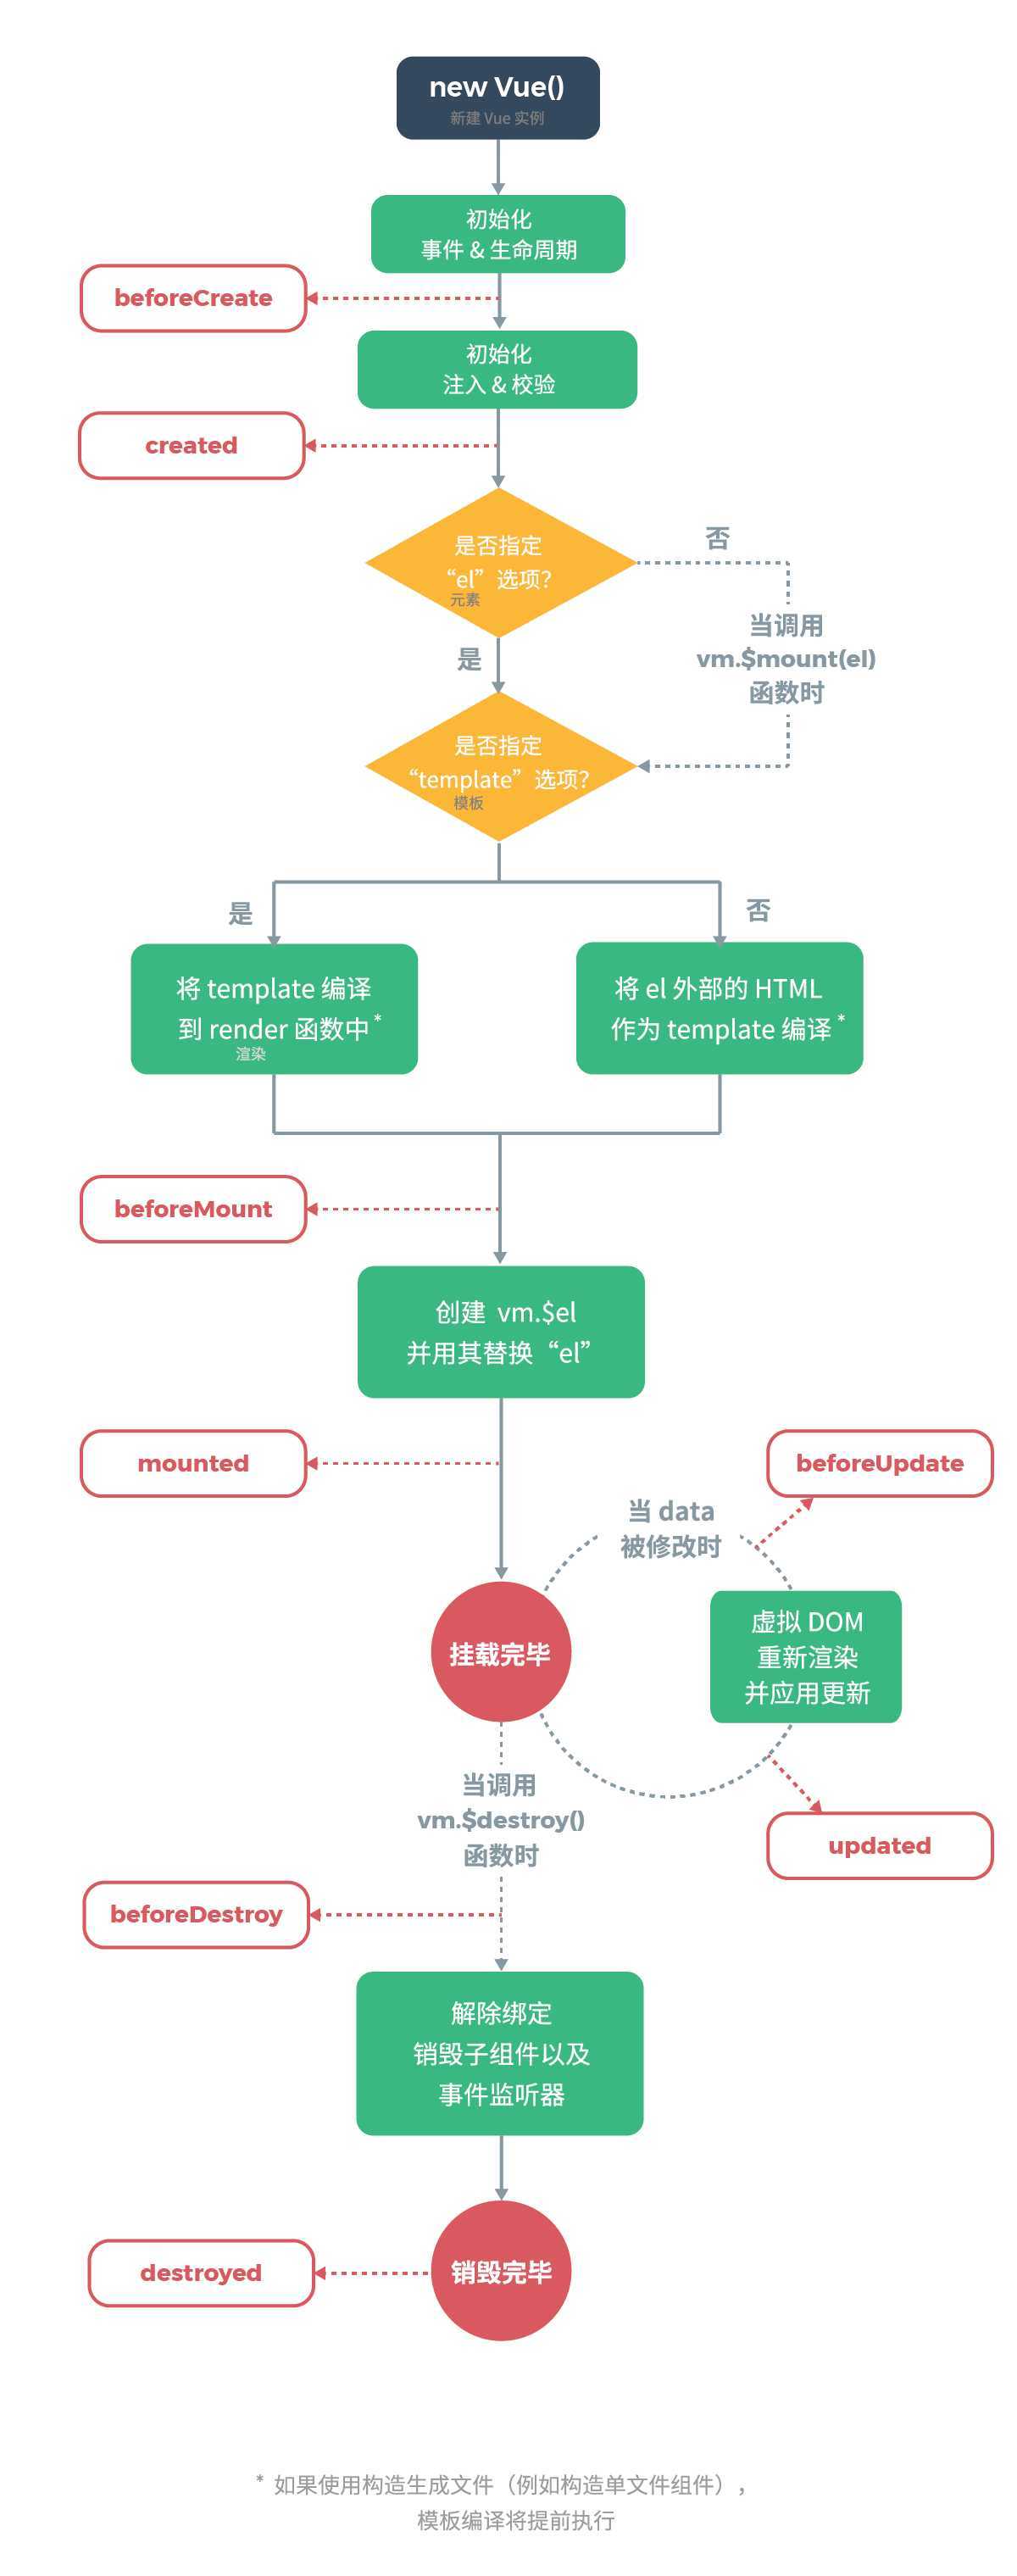
//在实例初始化之后,数据观测 (data observer) 和 event/watcher 事件配置之前被调用。
beforeCreate:function(){
console.log(‘beforeCreate‘);
},
/* 在实例创建完成后被立即调用。
在这一步,实例已完成以下的配置:数据观测 (data observer),属性和方法的运算,watch/event 事件回调。
然而,挂载阶段还没开始,$el 属性目前不可见。 */
created :function(){
console.log(‘created‘);
},
//在挂载开始之前被调用:相关的渲染函数首次被调用
beforeMount : function(){
console.log(‘beforeMount‘);
},
//el 被新创建的 vm.$el 替换, 挂在成功
mounted : function(){
console.log(‘mounted‘);
},
//数据更新时调用
beforeUpdate : function(){
console.log(‘beforeUpdate‘);
},
//组件 DOM 已经更新, 组件更新完毕
updated : function(){
console.log(‘updated‘);
}
});
setTimeout(function(){
vm.msg = "change ......";
}, 3000);
</script>
</body>
</html>
需要给标签添加一个key的属性就可以了,是因为虚拟dom的问题
 <!-- 当items是数组 -->
    <ul v-for="(item, index) in items" :key="item">
        <li></li>
    </ul>
    <!-- 当items是对象,默认是取value -->
    <ul v-for="value in obj" :key="value">
        <li></li>
    </ul>
    <!-- 当items是对象,默认是取value,key,index -->
    <ul v-for="(value,key,index) in obj" >
        <li></li>
    </ul>
支持响应式的方法
pop()删除最后一个元素
push(a,b...)追加一【多】个元素
shift()删除第一个元素
unshift(a,b...)添加【多】元素到第一个的位置
sort([compare])
reverse()
splice(起始位置,删除几个【只填第一个参数就是从第一个位置删除到完】,从第一个参数位置添加【可以多个】的元素)
Vue.set(src,index,newValue) 修改src 中index位置值,或者对象赋值,对象直接赋值不起作用
this.$set(a,‘title‘,‘列表2‘);
//或者
Vue.set(a,‘title‘,‘列表2‘);
不支持响应式的方法
在vue的options中定义filters:{run :function(pram),调用 param|run
关键字:computed
更加高效因为使用了缓存
计算属性的响应式是建立在计算一个响应式的数据上的,它变化才会更新计算属性,而方法是每次都计算不使用缓存
计算属性默认只有 getter ,不过在需要时你也可以提供一个 setter ,给计算属性赋值的时候会调用setter方法,取值调用getter方法
computed: {
  fullName: {
    // getter
    get: function () {
      return this.firstName + ‘ ‘ + this.lastName
    },
    // setter
    set: function (newValue) {
      var names = newValue.split(‘ ‘)
      this.firstName = names[0]
      this.lastName = names[names.length - 1]
    }
  }
}
var data = { a: 1 }
var vm = new Vue({
  el: ‘#example‘,
  data: data
})

vm.$data === data // => true
vm.$el === document.getElementById(‘example‘) // => true

// $watch 是一个实例方法
vm.$watch(‘a‘, function (newValue, oldValue) {
  // 此回调函数将在 `vm.a` 改变后调用
})
<input type="text" v-model="message" />{{message}}
<!-- 失去焦点或者enter才会更新值--><input type="text" v-model.lazy="message">{{message}}
每当 data 对象发生变化,都会触发视图重新渲染。值得注意的是,如果实例已经创建,那么只有那些 data 中的原本就已经存在的属性,才是响应式的。也就是说,如果在实例创建之后,添加一个新的属性将不是响应式的
借鉴了将一个大的问题拆分成一个个的小问题这种思想 , 就是"基础库"或者“基础组件",意思是把代码重复的部分提炼出一个个组件供给功能使用。
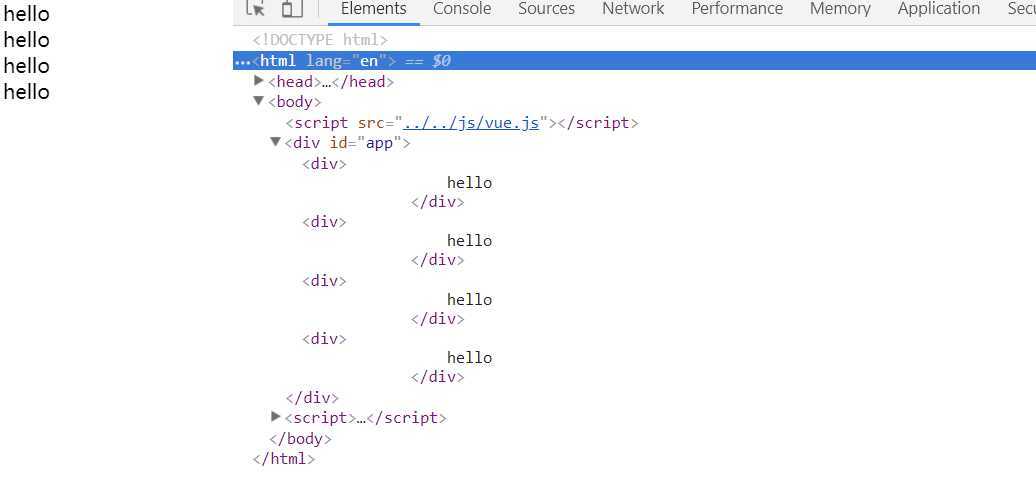
组件必须放在vue管理的作用域内,如果是多个标签必须被一个元素包裹,就是有一个唯一的祖先元素
<!DOCTYPE html>
<html lang="en">
<head>
    <meta charset="UTF-8">
    <title>Title</title>
</head>
<body>
<script src="../../js/vue.js"></script>
<div id="app">
    <cpt></cpt>
    <cpt></cpt>
    <cpt></cpt>
    <cpt></cpt>
</div>

<script>
    // 1. 创建组件构造器
    const component = Vue.extend({
        template: `
            <div>
                hello
            </div>`,
    });
    // 2. 注册组件 全局组件
    Vue.component(‘cpt‘, component);

    const app = new Vue({
        el: "#app",
        data: {
            message: "hello world"
        }
    });

</script>
</body>
</html>
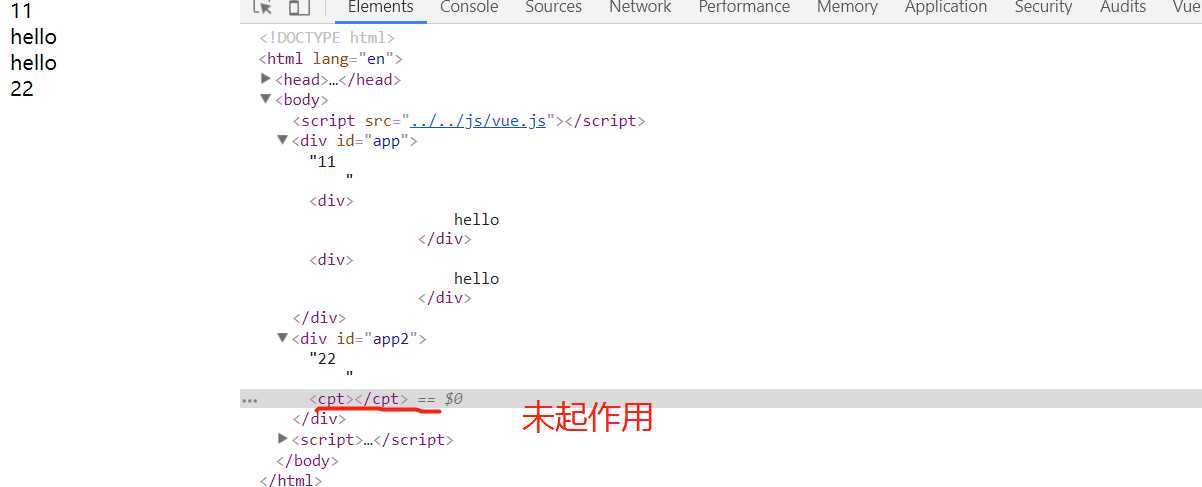
<div id="app">11
    <cpt></cpt>
    <cpt></cpt>
</div>

<div id="app2">22
    <cpt></cpt>
</div>
<script>
    // 1. 创建组件构造器
    const component = Vue.extend({
        template: `
            <div>
                hello
            </div>`,
    });

    //局部组件 只在app中的作用域有效
    const app = new Vue({
        el: "#app",
        data: {
            message: "hello world"
        },
        components: {
            cpt: component
        }
    });

    //未注册组件
    const app2 = new Vue({
        el: "#app2",
        data: {
            message: "hello"
        }
    });

</script>
<div id="app">11
    <pt></pt>
    <pt></pt>
    <pt></pt>
</div>
<script>

    /*第1个组件构造器*/
    const child = Vue.extend({
        template: `
            <div>
                child
            </div>`
    });
    // 第二创建组件构造器
    const parent = Vue.extend({
        template: `
            <div>
                parent
                <cd></cd>
            </div>`,
        components: {
            cd: child
        }
    });


    //局部组件 只在app中的作用域有效
    const app = new Vue({
        el: "#app",
        data: {
            message: "hello world"
        },
        components: {
            pt: parent
        }
    });

</script>
组件不会向上级作用域传递,只会向下传递,孙子没有在爷爷的作用域注册的话孙子只能在父亲的作用域使用
<div id="app">11
  <pt></pt>
  <pt></pt>
  <pt></pt>
</div>
<script>

  //局部组件 只在app中的作用域有效
  const app = new Vue({
    el: "#app",
    data: {
      message: "hello world"
    },
    components: {
      pt: {
        //  语法糖直接可以放在注册的地方
        template: `
            <div>
                hello
            </div>`
      }
    }
  });

</script>
<script src="../../js/vue.js"></script>
<div id="app">11
  <pt></pt>
  <pt></pt>
  <pt></pt>
</div>
<!--<script type="text/x-template" id="pt">
  <div>
    <div>我是标题</div>
  </div>
</script>-->

<template id="pt">
  <div>
    <div>我是tempalte</div>
  </div>

</template>
<script>

  //局部组件 只在app中的作用域有效
  const app = new Vue({
    el: "#app",
    data: {
      message: "hello world"
    },
    components: {
      pt: {
        //  语法糖直接可以放在注册的地方
        template: "#pt"
      }
    }
  });

</script>
<div id="app">11
  <pt></pt>
  <pt></pt>
  <pt></pt>
</div>

<template id="pt">
  <div>
    <div>我是{{title}}</div>
  </div>
</template>
<script>

  //局部组件 只在app中的作用域有效
  const app = new Vue({
    el: "#app",
    data: {
      message: "hello world"
    },
    components: {
      pt: {

        template: "#pt",
        //是一个函数,且只能访问自己的数据
        data(){
          return {title:"title"};
        }
      }
    }
  });

</script>
<div id="app">
  <pt :msg="msg" :title="title"></pt>
</div>

<template id="pt">
  <div>
    <div>{{title}}</div>
    <div>{{msg}}</div>
  </div>
</template>
<script>
  // 1.注册组件
  const pt = {
    template:"#pt",
    data() {
      return {};
    },
    methods: {},
    // props:["title","msg"] 可以写成数组或者对象,对象可以限制类型,对象更好点
    props:{
      // title:Array,
      title:{
        type: Array,
        default(){
          return [];
        }
      },
      //也可以写成对象的添加更多的限制、给默认值
      msg:{
        type:String,
        default:"",
        required:true,
        //自定义validator 这个待查阅
        validator: function (val) {
          return val == "hello worl";
        }
      }
    }
  }

  //局部组件 只在app中的作用域有效
  const app = new Vue({
    el: "#app",
    data: {
      msg: "hello world",
      title:["aaa","bbb","ccc"]
    },
    //字面量简写  pt可替换pt:pt
    components:{pt}
  });

</script>
v-on 事件监听器在 DOM 模板中会被自动转换为全小写 (因为 HTML 是大小写不敏感的),所以 v-on:myEvent 将会变成 v-on:myevent——导致 myEvent 不可能被监听到。<div id="app">
<!-- 不写参数会默认将$emit事件后传的参数【可多个】传出来,写了参数报错-->
<pt @child-click="parentClick"></pt>
</div>
<template id="pt">
<div>
<button v-for="item in categories" @click="btnClick(item)">{{item.name}}</button>
</div>
</template>
<script>
// 1.注册组件
const pt = {
template: "#pt",
data() {
return {
categories: [
{id: "aaa", name: "aaa"},
{id: "bbb", name: "bbb"},
{id: "ccc", name: "ccc"},
{id: "ddd", name: "ddd"}
]
};
},
methods: {
btnClick(ite) {
// js中这样写不能驼峰,vue可以
this.$emit(‘child-click‘, ite,1);
}
}
};
//局部组件 只在app中的作用域有效
const app = new Vue({
el: "#app",
data: {
msg: "hello world",
title: ["aaa", "bbb", "ccc"]
},
components: {pt},
methods: {
parentClick(obj,a) {
console.log(obj,a);
}
}
});
</script>
<!--1. num1、num2从父组件传递过来
2. 修改num1,dnum1也变,同时传dnum1给父组件,父组件改变num1,也改变了prop1
3. dnum2一直是dnum1的1%-->
<div id="app">
  <pt :cnum1="num1" :cnum2="num2"
      @change1="cc1"
      @change2="cc2"
  ></pt>
</div>

<template id="pt">
  <div>
    <p>props:{{cnum1}}</p>
    <p>data:{{dnum1}}</p>
    cnum1<input type="text" :value="dnum1" @input="changeProp1"><br>
    <p>props:{{cnum2}}</p>
    <p>data:{{dnum2}}</p>
    cnum2<input type="text" :value="dnum2" @input="changeProp2">
  </div>
</template>
<script>

  //局部组件 只在app中的作用域有效
  const app = new Vue({
    el: "#app",
    data: {
      num1: 1,
      num2: 2
    },
    methods: {
      cc1(eve1) {
        this.num1 = eve1;
      },
      cc2(eve2) {
        this.num2 = eve2;
      }
    },
    components: {
      pt: {
        template: "#pt",
        props: {
          cnum1: {
            type: Number,
            default: 3
          },
          cnum2: {
            type: Number,
            default: 4
          }
        },
        data() {
          return {
            dnum1: this.cnum1,
            dnum2: this.cnum2,
          };
        },
        methods: {
          changeProp1(event1) {
            this.dnum1 = event1.target.value;
            console.log(this.dnum1)
            if (this.dnum1) {
              this.dnum1 = parseInt(this.dnum1)
              this.dnum2 = this.dnum1 / 100;
              this.$emit(‘change1‘, this.dnum1);
            } else {
              this.dnum2 = "";
            }

          },
          changeProp2(event2) {
            this.dnum2 = event2.target.value;
            this.$emit(‘change2‘, parseInt(this.dnum2));
          }

        }
      }
    }
  });

</script>
watch监听对象不能直接监听,可以用computed代替对象
语法:
watch:{
	监听的属性名(newValue, oldValue){

	}
}
<script src="../../js/vue.js"></script>
<div id="app">
  {{message}}
  <input type="text" v-model="message">
  {{demo.name}}
  <input type="text" v-model="demo.name">
</div>

<template id="cd">
  <div>
    aaaaa
  </div>

</template>
<script>
  const app = new Vue({
    el: "#app",
    data: {
      message: "hello world",
      demo: {
        name: "nameObj"
      }
    },
    computed:{
      demoName(){
        return this.demo.name;
      }
    },
    watch: {
      message(newVal, oldVal) {
        console.log(newVal, oldVal);
      },
      //不能直接监听对象
      // demo(val) {
      //   console.log(val);
      // }
      demoName(val) {
        console.log(val);
      }
    },
    components: {
      cd: {
        template: "#cd"
      }
    }
  });

</script>
如果是键的路径需要用引号包裹
也可以外部调用
immediate和handler
watch有一个特点,就是当值第一次绑定的时候,不会执行监听函数,只有值发生改变才会执行。如果我们需要在最初绑定值的时候也执行函数,则就需要用到immediate属性。
比如当父组件向子组件动态传值时,子组件props首次获取到父组件传来的默认值时,也需要执行函数,此时就需要将immediate设为true。
**deep: **当需要监听一个对象的改变时,普通的watch方法无法监听到对象内部属性的改变,只有data中的数据才能够监听到变化,此时就需要deep属性对对象进行深度监听
<div id="app">
  {{demo1.name}}
  <input type="text" v-model="demo1.name">
  {{demo.name}}
  <input type="text" v-model="demo.name">
  <input type="text" v-model="demo2">
</div>

<script>
  const app = new Vue({
    el: "#app",
    data: {
      message: "hello world",
      demo: {
        name: "nameObj"
      },
      demo1: {
        name: "nameObj"
      },
      demo2:"qweqw"
    },
    computed: {
      demoName() {
        return this.demo.name;
      }
    },
    watch: {
      //如果是键的路径需要用引号包裹
      "demo.name": function (val) {
        console.log(val);
      },

      // childrens: {  //监听的属性的名字
      //   handler:function(val){
      //     console.log(val.name);
      //   },
      //   deep: true, //可以监听到一个对象的内部属性变化
       //  immediate: true
      // },
      // "childrens.name":function (val) {
      //   console.log(val);
      // }
    }
  });
  //外部调用
  app.$watch("demo2",function (val) {
    console.log(val)
  })
</script>
<div id="app">
  <tmp ref="a"></tmp>
  <tmp ref="a"></tmp>
  <tmp ref="b"></tmp>
  <button @click="btnClick">打印子组件</button>
</div>
<template id="tmp">
  <div>
    <p>哈哈哈</p>
  </div>
</template>

<script>
  const app = new Vue({
    el: "#app",
    data: {
      message: "hello world"
    },
    methods:{
      btnClick(){
        //1. 一般不会用$children来取子组件
        // console.log("第一个子组件:",this.$children[0]);
        // console.log("所有子组件:",this.$children);

        // 2.$refs.refName|[‘refName‘]
        console.log("所有组件有ref属性的组件:",this.$refs);
        //如果多个相同的引用会取最后一个
        console.log("取得固定的ref的元素:",this.$refs["a"]);
        console.log("取得固定的ref的元素:",this.$refs.b);
      }
    },
    components: {
      tmp: {
        template: "#tmp"
      }
    },

  });

</script>
<div id="app">
  <tmp></tmp>
</div>
<template id="tmp">
  <div>
    <p>哈哈哈</p>
    <button @click="btnClick">打印父组件</button>
  </div>
</template>

<script>
  const app = new Vue({
    el: "#app",
    data: {
      message: "hello world"
    },
    components: {
      tmp: {
        template: "#tmp",
        methods: {
          btnClick() {
            //1. 不建议使用,会让组件的耦合增强不够独立
            console.log("打印直系父组件:", this.$parent);
            //祖先组件
            console.log("打印root组件:", this.$root);
          }
        }
      },
    },

  });
<!--1. 插槽的基本使用 <slot></slot>-->
<!--2. 插槽的默认值 <slot>默认值</slot>-->
<div id="app">
  <tmp></tmp><br>
  <tmp></tmp><br>
  <tmp></tmp><br>
  <tmp><div>我是插槽</div></tmp>
  <tmp><i>我是插槽i</i></tmp>
</div>
<template id="tmp">
  <div>
    <p>哈哈哈</p>
    <slot><p>我是默认值*******</p></slot>
    <p>娃娃</p>
  </div>
</template>

<script>
  const app = new Vue({
    el: "#app",
    data: {
      message: "hello world"
    },
    components: {
      tmp: {
        template: "#tmp"
      },
    }

  });

</script>
<div id="app">
  <tmp ><a slot="right" href="#">我替换右边</a></tmp><br>
  <tmp ><a slot="left" href="#">我替换左边</a></tmp><br>
  <tmp><a href="#">我替换没名字的</a></tmp><br>
</div>
<template id="tmp">
  <div>
    <slot name="left"><p>我是默认值left</p></slot>
    <slot name="center"><p>我是默认值center</p></slot>
    <slot name="right"><p>我是默认值right</p></slot>
    <slot><p>我是默认值没有名字</p></slot>
  </div>
</template>

<script>
  const app = new Vue({
    el: "#app",
    data: {
      message: "hello world"
    },
    components: {
      tmp: {
        template: "#tmp"
      },
    }

  });
<div id="app">
<!--    在谁的作用域用谁的变量-->
  <cp v-show="isShow"></cp>
</div>
<template id="cp">

  <div v-show="isShow"><!-- div父元素初始化的时候不受影响 -->
    <a href="">aaa</a>
    <button v-show="isShow">按钮</button>
  </div>
</template>

<script>
  const app = new Vue({
    el: "#app",
    data: {
      message: "hello world",
      isShow: true
    },
    components: {
      cp: {
        template: "#cp",
        data() {
          return {
            isShow: false
          };
        }
      }
    }
  });

</script>
<!DOCTYPE html>
<html lang="en">
<head>
  <meta charset="UTF-8">
  <meta name="viewport" content="width=device-width, initial-scale=1.0">
  <meta http-equiv="X-UA-Compatible" content="ie=edge">
  <title>Document</title>
</head>
<body>
<script src="../../js/vue.js"></script>
<div id="app">
  <cp>
    <!--    slotData:类似于该组件的对象,2.5之前要用template-->
    <template slot-scope="slotData">
      <!--      取得绑定在组件中的数据-->
      <span v-for="item in slotData.datas">{{item}}-</span>
    </template>
  </cp>

  <cp>
    <template slot-scope="slotData">
      <!--      join方法将数组拼接成字符串-->
      <span>{{slotData.datas.join(‘ * ‘)}}</span>
    </template>
  </cp>
</div>
<template id="cp">

  <div>
    <!--    作为传递的数据-->
    <slot :datas="languages">
      <ul>
        <li v-for="item in languages">{{item}}</li>
      </ul>
    </slot>
  </div>
</template>

<script>
  const app = new Vue({
    el: "#app",
    data: {
      message: "hello world",
    },
    components: {
      cp: {
        template: "#cp",
        data() {
          return {
            languages: [‘java‘, ‘javascript‘, ‘css‘, ‘html‘, ‘vb‘, ‘python‘]
          };
        }
      }
    }
  });

</script>
</body>
</html>
把功能进行划分,将同一类型的代码整合在一起,所以模块的功能相对复杂,但都同属于一个业务
// ;是为了防止其他的导入js相互影响
;var xm01 = (function xiaoming01() {
  return {
    aa:"asdas",
    flag: true
  };
}())


//js文件2
;(function () {
  if (xm01.flag) {
    alert("xm01.flag:" + xm01.flag);
  }
}());
组件化类似模块化的更细粒度,组件充当了基本类库一样的东西目的是复用拓展性,模块主要是以功能区分类别划分尽量隔离其他业务
xiaoming01.js
// es6的导出,02中导入
export let exa = "222";
let exa1 = "333";
let exb = "333";

export {exb, exa1};
export function fun(){
  console.log("asasddsds");
}


//export default :import的时候可以自定义命名,一个js中只能有一个default
let aaa="export default";
export default aaa;
xiaoming02.js
// 导入 ,这里需要写上.js
import {exa, exa1, exb} from "./xiaoming01.js";
// 01
console.log(exa1, exb);

//导入default可以自定义命名
import asd from "./xiaoming01.js";

console.log(‘export:‘,asd);

//导入全部的导出,并且重命名
import * as all from "./xiaoming01.js";

console.log(all);
console.log(all.default)
01-es6.html
<!DOCTYPE html>
<html lang="en">
<head>
  <meta charset="UTF-8">
  <title>Title</title>
  <script src="./xiaoming01.js" type="module"></script>
  <script src="./xiaoming02.js" type="module"></script>
</head>
<body>
没有使用导入导出的话:
Uncaught ReferenceError: flag is not defined
at xiaoming02.js:3
    以前是可以执行的先在不知道怎么执行不了了
</body>
</html>
node package manager , node包管理工具
查看版本:npm -v

卸载安装的包 npm uninstall 包名 或 npm remove 包名
查看包的详细信息, npm info 包名
查看一个包存在的所有版本号 npm view 包名 versions
查看指定包当前的最新版本 npm view 包名 version
下载指定版本的包 npm install 包名@1.8
npm list 查看项目安装了哪些包 或 npm ls
npm install jquery --save 或 npm i jquery -S 下载生产包
npm install jquery --save-dev 或 npm i jquery -D 下载开发依赖包
npm ls jquery 查看当前安装包的版本
npm config set registry https://registry.npm.taobao.org 更改 npm 的下载镜像为淘宝镜像
npm help npm帮助文档
使用和linux有的很像
*webpack* 是一个现代 JavaScript 应用程序的*静态模块打包器(module bundler)*。当 webpack 处理应用程序时,它会递归地构建一个*依赖关系图(dependency graph)*,其中包含应用程序需要的每个模块,然后将所有这些模块打包成一个或多个 *bundle*(捆,束),它做的事情是,分析你的项目结构,找到JavaScript模块以及其它的一些浏览器不能直接运行的拓展语言(Scss,TypeScript等),并将其打包为合适的格式以供浏览器使用。
入口js
//commonjs规范
const {add} = require(‘./mathUtil.js‘);

console.log(add(1,3));

//es6规范
import {result} from "./es6.js";

console.log(result);
es6规范
const result = 45456;
export {result};
function add(a, b) {
  return a + b;
}

module.exports = {add};
//node的包里面的path模块,用来拼接绝对路径
const path = require(‘path‘);

//这里要用commonjs导出,不能用es6
module.exports = {
    //打包转换的调用入口和main方法类似
  entry: ‘./src/main.js‘,
  ouput: {
    //必须使用绝对路径,path.resolve(__dirname,‘dist‘)返回绝对路径
    path: path.resolve(__dirname,‘dist‘),
    filename: ‘bundle.js‘
  }
};
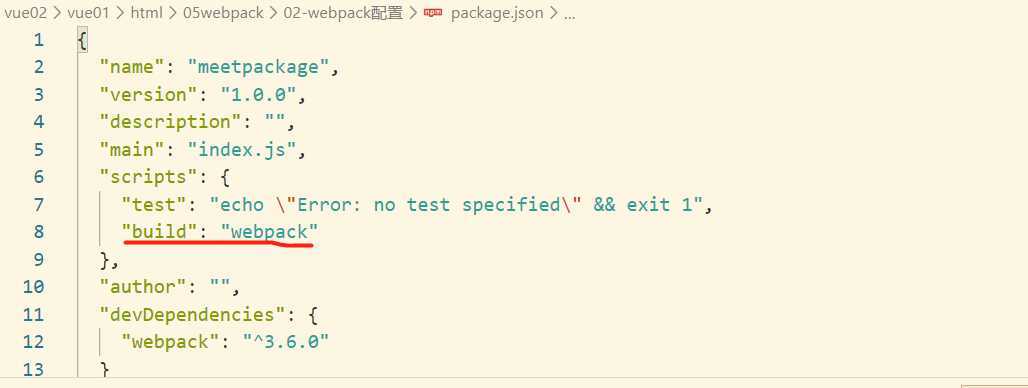
{
"name": "meetpackage",
"version": "1.0.0",
"description": "",
"main": "index.js",
"scripts": {
"test": "echo \"Error: no test specified\" && exit 1",
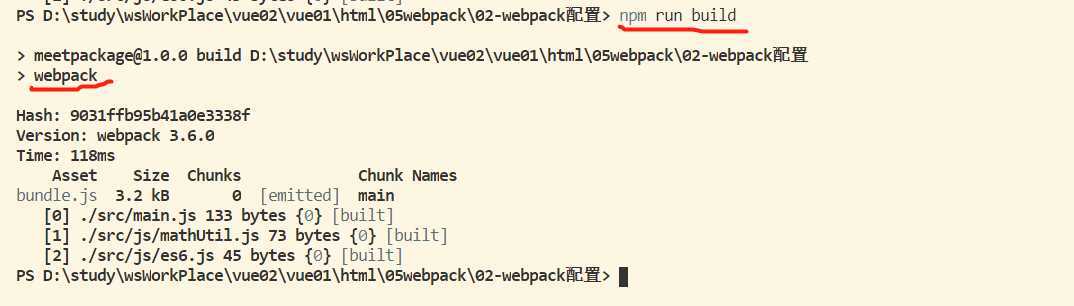
//npm run build 会在这个配置文件中找webpack命令,这个使用的是本地的命令,
//不是全局的webpack,本地是针对于你的这个开发项目
"build":"webpack"
},
"author": "",
//开发的依赖
"devDependencies": {
"webpack": "^3.6.0"
},
//开源才需要这个,json中不能注释
"license": "ISC"
}
--save 会把依赖包名称添加到 package.json 文件 dependencies 下;
--save-dev 则添加到 package.json 文件 devDependencies 键下;
//node的包里面的path模块,用来拼接绝对路径
const path = require(‘path‘);

//这里要用commonjs导出,不能用es6
module.exports = {
  entry: ‘./src/main.js‘,
  output: {
    //必须使用绝对路径
    path: path.resolve(__dirname,‘dist‘),
    filename: ‘bundle.js‘,
    //为所有的url相关的添加路径
    publicPath:‘dist/‘
  },
  module:{
    rules: [
      {
        test: /\.css$/,
        // style-loader将模块的导出作为样式添加到 DOM 中
        // loader解析 CSS 文件后,使用 import 加载,并且返回 CSS 代码
        // 从右到左的顺序加载
        use: [ ‘style-loader‘, ‘css-loader‘ ]
      },
      // {
      //   test: /\.(png|jpg|gif)$/,
      //   use: [
      //     {
      //       loader: ‘url-loader‘,
      //       options: {
      //         //限制图片大小,大于limit会找file-loader
      //         limit: 9999
      //       }
      //     }
      //   ]
      // },
      // 在使用webpack进行打包时,对图片路径的处理方法常用的有两种,一种是file-loader,
      // 一种是url-loader,当我们使用其中一种是,请把另一种删掉,不然会出现图片无法正常显示的问题
      {
        test: /\.(png|jpg|gif)$/,
        use: [
          {
            loader: ‘file-loader‘,
            options: {
              //name是文件名,hash取8位,ext是拓展名
              name:‘img/[name].[hash:8].[ext]‘
            }
          }
        ]
      },
      {
        test: /\.js$/,
        exclude: /(node_modules|bower_components)/,
        use: {
          loader: ‘babel-loader‘,
          options: {
            presets: [‘es2015‘]
          }
        }
      }
    ]
  }
};
npm install vue -save
不写路径默认从node_modules引入 import Vue from ‘vue‘
runtime-only:是运行的时候代码不能包含任意一个template标签
runtime-compiler:代码中可以有template标签
 module:{

  resolve:{
    alias:{
      // vue$正则,表示导入的时候会检测vue指向的文件夹,如果这里不指定,会去找默认的runtime-only
      ‘vue$‘:‘vue/dist/vue.esm.js‘
    }
  }
//使用vue
import Vue from ‘vue‘;


const App = {
    template: `
    <h2>{{msg}}</h2>
    `,
    data() {
        return {
            msg: ‘hello world‘

        };
    }
};

new Vue({
    el: ‘#app‘,
    // template和el关系是,这里的template会替换el的标签
    template: `<App/>`,
    components: {
        App
    }
});
<template>
  <h2>{{msg}}</h2>
  <span class="title">{{tit}}</span>
</template>

<script>
  export default {
    name: "App",
    data() {
      return {
        msg: ‘hello world‘,
        tit:‘title‘
      };
    }
  }
</script>

<style scoped>
.title{
  color: red;
}
</style>
全局安装:可以不用
npm install webpack-dev-server -g
开发环境:
npm install webpack-dev-server -save -dev
配置参数:
--content-base //设定webpack-dev-server的director根目录。如果不进行设定的话,默认是在当前目录下。
--quiet: //控制台中不输出打包的信息,开发中一般设置为false,进行 打印,这样查看错误比较方面
--no-info: // 不显示任何信息
--colors: //对信息进行颜色输出
--no-colors: //对信息不进行颜色输出
--compress:  //开启gzip压缩
--host <hostname/ip>: //设置ip
--port <number>: //设置端口号,默认是:8080
--inline: //webpack-dev-server会在你的webpack.config.js的入口配置文件中再添加一个入口,
--hot: //开发热替换
--open: //启动命令,自动打开浏览器
--history-api-fallback: //查看历史url
两种方式:
  plugins: [
    new webpack.BannerPlugin(‘最终版权是小明‘),
    //打包静态资源,并且指定模板
    new htmlWebpackPlugin({
      template:`index.html`
    }),
    //压缩js
    new UglifyJsWebpackPlugin(),
    //热加载,不会全部加载,只加载改动的地方,配置了hot就需要配置,直接在命令中使用--hot就不需要配置这个插件
    // new webpack.HotModuleReplacementPlugin()
  ],
  // devServer: {
  //   contentBase: ‘src‘,
  //   port: 80,
  //   hot:true
  // },
报错可能是版本问题
//node的包里面的path模块,用来拼接绝对路径
const path = require(‘path‘);
const webpack = require(‘webpack‘);
const htmlWebpackPlugin = require(‘html-webpack-plugin‘);
const UglifyJsWebpackPlugin = require(‘uglifyjs-webpack-plugin‘);

//这里要用commonjs导出,不能用es6
module.exports = {
  entry: ‘./src/main.js‘,
  output: {
    //必须使用绝对路径
    path: path.resolve(__dirname, ‘dist‘),
    filename: ‘bundle.js‘,
    //为所有的url相关的添加路径
    // publicPath: ‘dist/‘
  },
  module: {
    rules: [
      {
        test: /\.css$/,
        // style-loader将模块的导出作为样式添加到 DOM 中
        // loader解析 CSS 文件后,使用 import 加载,并且返回 CSS 代码
        // 从右到左的顺序加载
        use: [‘style-loader‘, ‘css-loader‘]
      },
      // {
      //   test: /\.(png|jpg|gif)$/,
      //   use: [
      //     {
      //       loader: ‘url-loader‘,
      //       options: {
      //         //限制图片大小,大于limit会找file-loader
      //         limit: 9999
      //       }
      //     }
      //   ]
      // },
      // 在使用webpack进行打包时,对图片路径的处理方法常用的有两种,一种是file-loader,
      // 一种是url-loader,当我们使用其中一种是,请把另一种删掉,不然会出现图片无法正常显示的问题
      {
        test: /\.(png|jpg|gif)$/,
        use: [
          {
            loader: ‘file-loader‘,
            options: {
            //name是文件名,hash取8位,ext是拓展名
              name: ‘img/[name].[hash:8].[ext]‘
            }
          }
        ]
      },
      {
        test: /\.js$/,
        exclude: /(node_modules|bower_components)/,
        use: {
          loader: ‘babel-loader‘,
          options: {
            presets: [‘es2015‘]
          }
        }
      },
      {
        test: /\.vue$/,
        use: {
          loader: ‘vue-loader‘
        }
      }
    ]
  },
  resolve: {
    // 这写拓展名可以省略
    extensions: [‘.css‘, ‘.js‘, ‘.vue‘],
    alias: {
      // vue$正则,表示导入的时候会检测vue指向的文件夹,如果这里不指定,会去找默认的runtime-only
      ‘vue$‘: ‘vue/dist/vue.esm.js‘
    }
  },
  plugins: [
    new webpack.BannerPlugin(‘最终版权是小明‘),
    //打包静态资源,并且指定模板
    new htmlWebpackPlugin({
      template:`index.html`
    }),
    //压缩js
    new UglifyJsWebpackPlugin(),
    //热加载,不会全部加载,只加载改动的地方,配置了hot就需要配置,直接在命令中使用--hot就不需要配置这个插件
    // new webpack.HotModuleReplacementPlugin()
  ],
  // devServer: {
  //   contentBase: ‘src‘,
  //   port: 80,
  //   hot:true
  // },
};
//node的包里面的path模块,用来拼接绝对路径
const path = require(‘path‘);
const webpack = require(‘webpack‘);
const htmlWebpackPlugin = require(‘html-webpack-plugin‘);

//这里要用commonjs导出,不能用es6
module.exports = {
    entry: ‘./src/main.js‘,
    output: {
        //必须使用绝对路径
        path: path.resolve(__dirname, ‘../dist‘),
        filename: ‘bundle.js‘,
    },
    module: {
        rules: [
            {
                test: /\.css$/,
                // style-loader将模块的导出作为样式添加到 DOM 中
                // loader解析 CSS 文件后,使用 import 加载,并且返回 CSS 代码
                // 从右到左的顺序加载
                use: [‘style-loader‘, ‘css-loader‘]
            },
            {
                test: /\.(png|jpg|gif)$/,
                use: [
                    {
                        loader: ‘file-loader‘,
                        options: {
                            //name是文件名,hash取8位,ext是拓展名
                            name: ‘img/[name].[hash:8].[ext]‘
                        }
                    }
                ]
            },
            {
                test: /\.js$/,
                exclude: /(node_modules|bower_components)/,
                use: {
                    loader: ‘babel-loader‘,
                    options: {
                        presets: [‘es2015‘]
                    }
                }
            },
            {
                test: /\.vue$/,
                use: {
                    loader: ‘vue-loader‘
                }
            }
        ]
    },
    resolve: {
        // 这写拓展名可以省略
        extensions: [‘.css‘, ‘.js‘, ‘.vue‘],
        alias: {
            // vue$正则,表示导入的时候会检测vue指向的文件夹,如果这里不指定,会去找默认的runtime-only
            ‘vue$‘: ‘vue/dist/vue.esm.js‘
        }
    },
    plugins: [
        new webpack.BannerPlugin(‘最终版权是小明‘),
        //打包静态资源,并且指定模板
        new htmlWebpackPlugin({
            template: `index.html`
        })
    ],
};
dev.config.js : 存放开发时配置
const WebpackMerge = require(‘webpack-merge‘);
const baseConfig = require(‘./base.config‘);

module.exports = WebpackMerge(baseConfig, {
    devServer: {
        contentBase: ‘src‘,
        port: 80,
        inline: true
    }
});
prod.config.js : 存放生产时配置
const UglifyJsWebpackPlugin = require(‘uglifyjs-webpack-plugin‘);
const WebpackMerge = require(‘webpack-merge‘);
const baseConfig = require(‘./base.config‘);

module.exports = WebpackMerge(baseConfig, {
    plugins: [
        //压缩js
        new UglifyJsWebpackPlugin()
    ]
});
"scripts": {
    "test": "echo \"Error: no test specified\" && exit 1",
    "dev": "webpack-dev-server --config ./build/dev.config.js",
    "build": "webpack --config ./build/prod.config.js"
  },
使用webpack,也可以不用配置文件自己在命令后指定参数,以下是使用配置文件

使用npm,会找到package.json找到对应的script里的命令执行,实际上还是调用了webpack命令
介绍:
安装:
卸载之前版本
拉取v2的模板
npm install -g @vue/cli-init
vue init webpack projectName

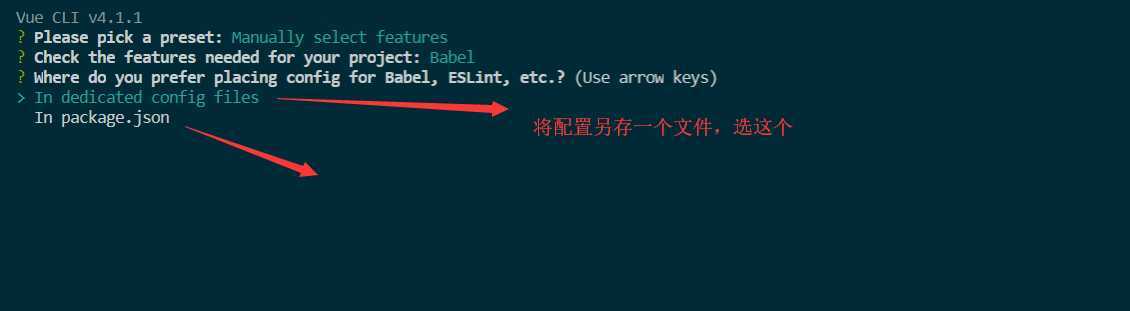
零配置
隐藏build和config目录,可以在node-modules/@vue/cli-service
要修改配置需要根目录创建一个vue.config.js
module.exports={};
基于webpack4
提供vue ui命令,图形化操作
移除static,新增public目录将index.html移动到下面
项目名不能有大写
vue create projectName
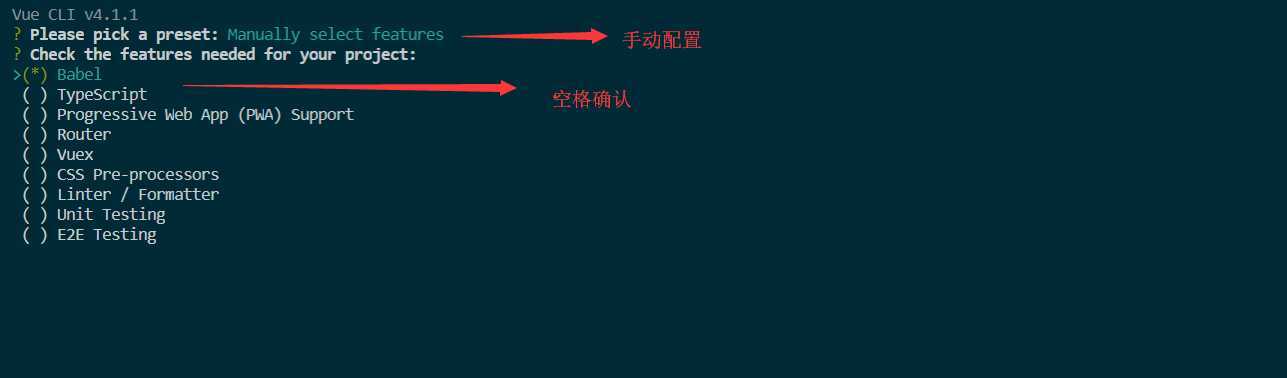
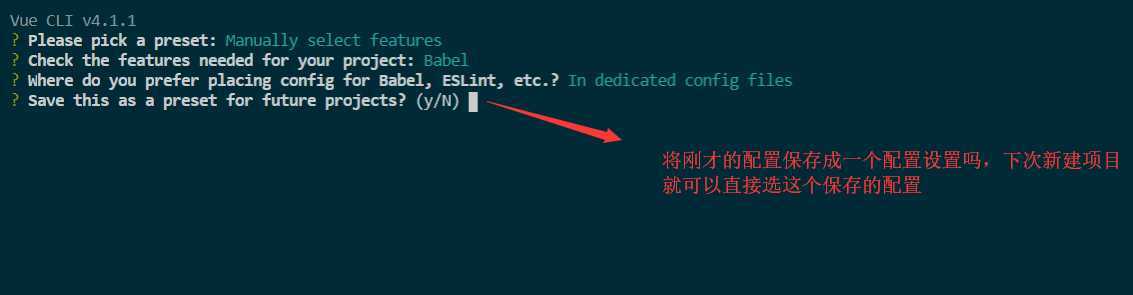
会默认创建一个.git文件夹
自定义配置:
module.exports = {
  configureWebpack: {
    resolve: {
      // extensions:[],
      //配置别名
      alias: {
        ‘assets‘: ‘@/assets‘,
        ‘components‘: ‘@/components‘,
        ‘network‘: ‘@/network‘,
        ‘common‘: ‘@/commom‘,
        ‘views‘: ‘@/views‘,
      }
    }
  }
};
root = true

[*]
charset = utf-8
indent_style = space
indent_size = 2
end_of_line = lf
insert_final_newline = true
trim_trailing_whitespace = true
vue ui 打开图形管理界面
runtime-only:是运行的时候代码不能包含任意一个template标签
runtime-compiler:代码中可以有template标签
template加载过程:
template - 》parse - 》ast 抽象语法树 - 》compiler - 》render(h)- 》 virtual Dom - 》UI真实dom
1比2性能更高,代码更少(少6kb)
//runtime-compiler
// The Vue build version to load with the `import` command
// (runtime-only or standalone) has been set in webpack.base.conf with an alias.
import Vue from ‘vue‘
import App from ‘./App‘

Vue.config.productionTip = false

/* eslint-disable no-new */
new Vue({
  el: ‘#app‘,
  components: { App },
  template: ‘<App/>‘
})


import Vue from ‘vue‘
import App from ‘./App‘

Vue.config.productionTip = false

//runtime-only,这个h是一个createElement(‘tagName‘,{attrName:‘attrVal‘},[‘innerHtml‘])
//在vue中也可以传一个template对象靠vue-template-compiler解析成render(),也可以递归创建
/* eslint-disable no-new */
new Vue({
  el: ‘#app‘,
  render: h => h(App)
})
一般使用vue的插件都要用Vue.use(插件)
安装路由:npm install vue-router --save 因为生产也需要路由
导入:
import Vue from ‘vue‘
//1. 导入插件
import Router from ‘vue-router‘
import HelloWorld from ‘@/components/HelloWorld‘

//2. 使用插件
Vue.use(Router)

//3. 创建路由配置
const routes = [
  {
    path: ‘/‘,
    name: ‘HelloWorld‘,
    component: HelloWorld
  }
];

//4. 传入路由配置,导出路由对象
export default new Router({
  routes
})
import Vue from ‘vue‘
import App from ‘./App‘
//只写目录默认会找  index.js
import router from ‘./router‘

Vue.config.productionTip = false

new Vue({
  el: ‘#app‘,
  router,
  render: h => h(App)
})
<div id="app">
    <router-link to="/home">首页</router-link>
    <!-- 相当于占位符 -->
    <router-view></router-view>
    <router-link to="/about">详情</router-link>
  </div>
常用属性
tag 、replace
<!-- tag设置替换成什么标签 -->
    <!-- replace表示禁用了返回前进按钮,是使用了history.replaceState() -->
    <router-link to="/home" tag=‘button‘ replace>首页</router-link>
配置默认的active的样式
.router-link-active{
  color: #f00
}
自定义样式:手动一个一个标签的写
<!--active-class 自定义点击后的样式 -->
    <router-link to="/home" tag=‘button‘ replace active-class="active">首页</router-link>
配置全局的active-class
export default new Router({
  routes,
  mode:‘history‘,
  linkActiveClass:‘active‘
})
const routes = [
  {
    path:‘/‘,
    redirect:‘/home‘
  },
  {
    path: ‘/home‘,
    name: ‘Home‘,
    component: Home
  },
  {
    path:‘/about‘,
    name:‘About‘,
    component:About
  }
];
//4. 传入路由配置,导出路由对象
export default new Router({
  routes,
  mode:‘history‘
})
<template>
  <div id="app">
    <button @click="homeClick">首页</button>
    <button @click="aboutClick">详细</button>
    <router-view></router-view>
  </div>
</template>

<script>
export default {
  name: ‘App‘,
  methods:{
    //router会给每个组件传$router
    homeClick(){
      // this.$router.push(‘/home‘);
      this.$router.replace(‘/home‘);
    },
    aboutClick(){
      // this.$router.push(‘/about‘);
      this.$router.replace(‘/about‘);
    }
  }
}
</script>

<style>
#app {
  font-family: ‘Avenir‘, Helvetica, Arial, sans-serif;
  -webkit-font-smoothing: antialiased;
  -moz-osx-font-smoothing: grayscale;
  text-align: center;
  color: #2c3e50;
  margin-top: 60px;
}
</style>
创建一个vue组件:User.vue
<template>
  <div>
      <h2>个人信心</h2>
      <h3></h3>
  </div>
</template>

<script>
export default {
    name:‘User‘,
}
</script>

<style>

</style>
配置路由:index.js
import Vue from ‘vue‘
import User from ‘../components/User.vue‘

//1. 导入插件
import Router from ‘vue-router‘

//2. 使用插件
Vue.use(Router)

//3. 创建路由配置
const routes = [
  {
    path:‘/user‘,
    component:User
  }
];

//4. 传入路由配置,导出路由对象
export default new Router({
  routes,
  mode:‘history‘,
  linkActiveClass:‘active‘
})
加入路由到目标组件:Vue.vue
<template>
  <div id="app">
    <router-link to="/user" replace>用户</router-link>
    <router-view></router-view>
  </div>
</template>

<script>
export default {
  name: ‘App‘,
}
</script>

<style>
.active{
  color: rgb(209, 15, 25)
}
</style>
导入组件到入口 : main.js
import Vue from ‘vue‘
import App from ‘./App‘
//只写目录默认会找  index.js
import router from ‘./router‘

Vue.config.productionTip = false

/* eslint-disable no-new */
new Vue({
  el: ‘#app‘,
  router,
  render: h => h(App)
})
设置动态路由:index.js
import Vue from ‘vue‘
import User from ‘../components/User.vue‘

//1. 导入插件
import Router from ‘vue-router‘

//2. 使用插件
Vue.use(Router)

//3. 创建路由配置
const routes = [
  {
    path:‘/user/:userName‘,
    component:User
  }
];

//4. 传入路由配置,导出路由对象
export default new Router({
  routes,
  mode:‘history‘,
  linkActiveClass:‘active‘
})
配置页面的url: Vue.vue
<template>
  <div id="app">
    <router-link v-bind:to="‘/user/‘+userName" replace>用户</router-link>
    <router-view></router-view>
  </div>
</template>

<script>
export default {
  name: ‘App‘,
  data(){
      return {
          userName:‘xiaoming‘
      }
  }
}
</script>

<style>
.active{
  color: rgb(209, 15, 25)
}
</style>
获取动态路由中的参数:User.vue
<template>
  <div>
      <h2>个人信心</h2>
      <h3>{{userName}}</h3>
  </div>
</template>

<script>
export default {
    name:‘User‘,
    computed:{
        userName(){
            return this.$route.params.userName;
        }
    }
}
</script>

<style>

</style>
路由配置中props 被设置为 true,route.params 将会被设置为组件属性。
编程式路由
// 字符串
router.push(‘home‘)

// 对象
router.push({ path: ‘home‘ })

// 命名的路由
router.push({ name: ‘user‘, params: { userId: ‘123‘ }})

// 带查询参数,变成 /register?plan=private
router.push({ path: ‘register‘, query: { plan: ‘private‘ }})
注意: path和params 不共存params会被忽略,path和query 可以。name和params也可以
const userId = ‘123‘

//命名路由
router.push({ name: ‘user‘, params: { userId }}) // -> /user/123
router.push({ path: `/user/${userId}` }) // -> /user/123

// 这里的 params 不生效
router.push({ path: ‘/user‘, params: { userId }}) // -> /user
同样的规则也适用于 router-link 组件的 to 属性
有时候,同一个路径可以匹配多个路由,此时,匹配的优先级就按照路由的定义顺序:谁先定义的,谁的优先级就最高。
如果把所有的js都打包到app中,js将会很大,访问的时候会有等待时间,所以把不同的路由对应的组件分割成不同的代码块,然后当路由被访问的时候加载对应的资源,就更加高效了
import Vue from ‘vue‘

//替换成懒加载
// import Home from ‘../components/Home.vue‘
// import About from ‘../components/About.vue‘
// import User from ‘../components/User.vue‘

//懒加载:
const Home = ()=>import(‘../components/Home.vue‘)
const About = ()=>import(‘../components/About.vue‘)
const User = ()=>import(‘../components/User.vue‘)


//1. 导入插件
import Router from ‘vue-router‘

//2. 使用插件
Vue.use(Router)

//3. 创建路由配置
const routes = [
  {
    path:‘/‘,
    redirect:‘/home‘
  },
  {
    path: ‘/home‘,
    name: ‘Home‘,
    component: Home
  },
  {
    path:‘/about‘,
    name:‘About‘,
    component:About
  },
  {
    path:‘/user/:userName‘,
    component:User
  }
];

//4. 传入路由配置,导出路由对象
export default new Router({
  routes,
  mode:‘history‘,
  linkActiveClass:‘active‘
})
import Vue from ‘vue‘

//替换成懒加载
// import Home from ‘../components/Home.vue‘
// import About from ‘../components/About.vue‘
// import User from ‘../components/User.vue‘

//懒加载:
const Home = () => import(‘../components/Home.vue‘)
const About = () => import(‘../components/About.vue‘)
const User = () => import(‘../components/User.vue‘)
const HomeChild = () => import (‘../components/HomeChild.vue‘)


//1. 导入插件
import Router from ‘vue-router‘

//2. 使用插件
Vue.use(Router)

//3. 创建路由配置
const routes = [
  {
    path: ‘/‘,
    redirect: ‘/home‘
  },
  {
    path: ‘/home‘,
    name: ‘Home‘,
    component: Home,
    children: [
      {
        path: ‘‘,
        // redirect:‘child‘
      },
      {
        //这里不能同/开头,会自动加上
        path: ‘child‘,
        name: ‘HomeChild‘,
        component: HomeChild
      }]
  },
  {
    path: ‘/about‘,
    name: ‘About‘,
    component: About
  },
  {
    path: ‘/user/:userName‘,
    component: User
  }
];

//4. 传入路由配置,导出路由对象
export default new Router({
  routes,
  mode: ‘history‘,
  linkActiveClass: ‘active‘
})
<template>
  <div>
      <h2>首页11</h2>
      <router-link to="/home/child">child</router-link>
      <router-view></router-view>
  </div>
</template>

<script>
export default {
    name:‘Home‘
}
</script>

<style>

</style>
<template>
  <div><span>个人档案</span>
    <span>{{$route.query}}</span><br>
    <span>query.name: {{$route.query.name}}</span>

  </div>
</template>

<script>
  export default {
    name: "Profile"
  }
</script>

<style scoped>

</style>
const Profile = () => import(‘../components/Profile‘)

{
    path: ‘/profile‘,
    component: Profile
  }
<template>
  <div id="app">
    <router-link to="/home" tag=‘button‘ replace >首页</router-link>
    <router-link to="/about" replace>详情</router-link>
    <router-link :to="‘/user/‘+userName" replace>用户</router-link>
    <router-link :to="{path:‘/profile‘,query:{name:‘lisa‘,age:18},fragment:‘4d5as46s‘}" replace>档案</router-link>

    <!-- <button @click="homeClick">首页</button>
    <button @click="aboutClick">详细</button> -->
    <router-view></router-view>
  </div>
</template>

注意导航守卫并没有应用在跳转(redirect)路由上,而仅仅应用在其目标上。为redirect的路由添加一个 beforeEach 或 beforeLeave 守卫并不会有任何效果
? 所有的路由都会被过滤,也可以在特定的组件内创建局部守卫
主要监听页面的跳转
from从哪个组件来的
to去跳转到哪个组件
next()
import Vue from ‘vue‘

//替换成懒加载
// import Home from ‘../components/Home.vue‘
// import About from ‘../components/About.vue‘
// import User from ‘../components/User.vue‘

//懒加载:
const Home = () => import(‘../components/Home.vue‘)
const About = () => import(‘../components/About.vue‘)
const User = () => import(‘../components/User.vue‘)
const HomeChild = () => import(‘../components/HomeChild.vue‘)
const Profile = () => import(‘../components/Profile‘)


//1. 导入插件
import Router from ‘vue-router‘

//2. 使用插件
Vue.use(Router)

//3. 创建路由配置
const routes = [
  {
    path: ‘/‘,
    redirect: ‘/home‘
  },
  {
    path: ‘/home‘,
    name: ‘Home‘,
    component: Home,
    meta: {
      title: ‘首页‘
    },
    children: [
      {
        path: ‘‘,
        // redirect:‘child‘
      },
      {
        //这里不能同/开头,会自动加上
        path: ‘child‘,
        name: ‘HomeChild‘,
        component: HomeChild,
      }]
  },
  {
    path: ‘/about‘,
    name: ‘About‘,
    component: About,
    meta: {
      title: ‘详情‘
    },
  },
  {
    path: ‘/user/:userName‘,
    component: User,
    meta: {
      title: ‘用户‘
    },
  },
  {
    path: ‘/profile‘,
    component: Profile,
    meta: {
      title: ‘档案‘
    },
  }
];
const router = new Router({
  routes,
  mode: ‘history‘,
  linkActiveClass: ‘active‘
})

router.beforeEach((to, from, next) => {
  next()
  //匹配path中的meta对象的title
  document.title = to.matched[0].meta.title
  console.log(to);
  // console.log(from);
  // console.log("next: "+next);
})

//4. 传入路由配置,导出路由对象
export default router
import Vue from ‘vue‘
//懒加载:
const Home = () => import(‘../components/Home.vue‘)
//1. 导入插件
import Router from ‘vue-router‘
//2. 使用插件
Vue.use(Router)
//3. 创建路由配置
const routes = [
{
path: ‘/‘,
redirect: ‘/home‘
},
{
path: ‘/home‘,
name: ‘Home‘,
component: Home,
meta: {
title: ‘首页‘
},
children: [
{
path: ‘‘,
// redirect:‘child‘
},
{
//这里不能同/开头,会自动加上
path: ‘child‘,
name: ‘HomeChild‘,
component: HomeChild,
beforeEnter: (to, from, next) => {
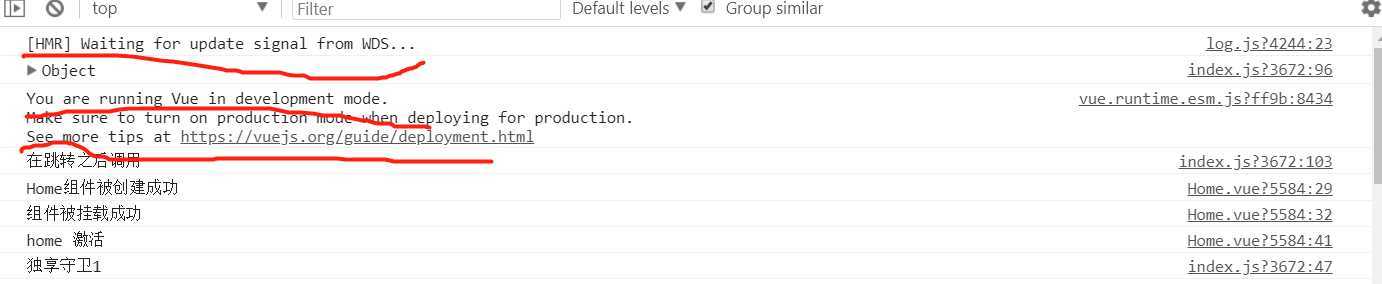
console.log("独享守卫");
next()
}
}]
}
];
const router = new Router({
routes,
mode: ‘history‘,
linkActiveClass: ‘active‘
})
//4. 传入路由配置,导出路由对象
export default router
import Vue from ‘vue‘

//懒加载:
const Home = () => import(‘../components/Home.vue‘)

//1. 导入插件
import Router from ‘vue-router‘

//2. 使用插件
Vue.use(Router)

//3. 创建路由配置
const routes = [
  {
    path: ‘/‘,
    redirect: ‘/home‘
  },
  {
    path: ‘/home‘,
    name: ‘Home‘,
    component: Home,
    meta: {
      title: ‘首页‘
    }
  },

];
const router = new Router({
  routes,
  mode: ‘history‘,
  linkActiveClass: ‘active‘
})

//前置钩子 hook,像filter一样
router.beforeEach((to, from, next) => {
  next()
  //匹配path中的meta对象的title
  document.title = to.matched[0].meta.title
  console.log(to);
})

//后置钩子
router.afterEach((to,from)=>{
  console.log("在跳转之后调用");
})

//4. 传入路由配置,导出路由对象
export default router
是vue的一个组件:保证一些组件进入缓存不用你每次请求解析资源,提高效率,在显示的地方配置
<template>
  <div id="app">
    <router-link to="/home" tag="button" replace>首页</router-link>
    <router-link to="/about" replace>详情</router-link>
    <router-link :to="‘/user/‘+userName" replace>用户</router-link>
    <router-link :to="{path:‘/profile‘,query:{name:‘lisa‘,age:18},fragment:‘4d5as46s‘}" replace>档案</router-link>
    <button @click="toProfile">档案2</button>
    <!-- <button @click="homeClick">首页</button>
    <button @click="aboutClick">详细</button>-->
    <!-- <router-view></router-view> -->

    <!-- 保存到缓存中 -->
    <keep-alive>
      <router-view></router-view>
    </keep-alive>
  </div>
</template>
keep-alive的组件才可以使用activated()、deactivated()
<template>
  <div>
    <h2>首页11</h2>
    <router-link :to="{path:‘/home/child‘,query:{content:‘child1‘}}">child</router-link>
    <router-link :to="toChild2">child2</router-link>
    <router-view></router-view>
  </div>
</template>

<script>
export default {
  name: "Home",
  data() {
    return {
      toChild2: {
        path: "/home/child2",
        query: {
          content: "child2"
        }
      },
      path: "/home/child",
      query:{
        childContent:‘child1‘
      }
    };
  },
  methods: {},
  created() {
    console.log("Home组件被创建成功");
  },
  mounted() {
    console.log("组件被挂载成功");
  },
  updated() {
    console.log("组件中发生改变时");
  },
  destroyed() {
    console.log("home destroyed");
  },
  activated() {
    console.log("home 激活");
    this.$router.push(this.path)
  },
  deactivated() {
    console.log("home 离开");
  },
  beforeRouteLeave(to, from, next) {
    console.log(‘before leave home‘);
    this.path = this.$route.path;
    console.log(this.path);
    next();
  }
};
</script>

<style>
</style>
keep-alive 的exclude、include属性
<keep-alive exclude="Profile">
      <router-view></router-view>
    </keep-alive>
export default {
  name: "Profile",
  created() {
    console.log("profile created");
  },
  destroyed() {
    console.log("profile destroyed");
  }
};
/*style中引用要用@import */
准备好tabbar.vue,调好样式,预留出来一个插槽,用来放具体的tabbar的item
<template>
  <div id="tab-bar">
    <slot></slot>
  </div>
</template>

<script>

  export default {
    name: "TabBar",
  }
</script>

<style scoped>

  #tab-bar {
    display: flex;
    background-color: #fdfdff;

    /*显示在最下面和屏幕等宽*/
    position: fixed;
    left: 0;
    right: 0;
    bottom: 0;

    /*阴影  fgba(最后是0.1表示透明度)*/
    box-shadow: 0 -1px 1px rgba(100, 100, 100, .1);
  }

</style>
封装tab-bar-item
<template>
  <div class="tab-bar-item" @click="itemClick">
    <div v-if="!isActive">
      <slot name="item-icon"></slot>
    </div>
    <div v-else>
      <slot name="item-icon-active"></slot>
    </div>
    <div :class="{active:isActive}">
      <slot name="item-text"></slot>
    </div>

  </div>
</template>

<script>
  export default {
    name: "TabBarItem",
    props:{
      path:{
        type:String
      }
    },
    data() {
      return {
        // isActive: true
      }
    },
    computed:{
      isActive(){
        return this.$route.path.indexOf(this.path) !== -1
      }
    },
    methods:{
      itemClick(e){
        this.$router.replace(this.path)
      }
    }
  }
</script>

<style scoped>

  .tab-bar-item {
    flex: 1;
    text-align: center;
    /*一般移动端的tabbar都是49px*/
    height: 49px;
    font-size: 14px;
  }

  .tab-bar-item img {
    width: 24px;
    height: 24px;
    margin-top: 3px;
    margin-bottom: 2px;
    /*可以去掉图片下面的三个像素*/
    vertical-align: bottom;
  }

  .active {
    color: red;
  }
</style>
注册到app.vue中
<template>
  <div id="app">
    <router-view></router-view>
    <tab-bar>
      <tab-bar-item path="/home">
        <img slot="item-icon" src="./assets/images/tabbar/home.png" alt="首页">
        <img slot="item-icon-active" src="./assets/images/tabbar/home_active.png" alt="">
        <div slot="item-text">首页</div>
      </tab-bar-item>
      <tab-bar-item path="/category">
        <img slot="item-icon" src="./assets/images/tabbar/category.png" alt="">
        <img slot="item-icon-active" src="./assets/images/tabbar/category_active.png" alt="">
        <div slot="item-text">分类</div>
      </tab-bar-item>
      <tab-bar-item path="/cart">
        <img slot="item-icon" src="./assets/images/tabbar/cart.png" alt="">
        <img slot="item-icon-active" src="./assets/images/tabbar/cart_active.png" alt="">
        <div slot="item-text">购物车</div>
      </tab-bar-item>
      <tab-bar-item path="/profile">
        <img slot="item-icon" src="./assets/images/tabbar/profile.png" alt="">
        <img slot="item-icon-active" src="./assets/images/tabbar/profile_active.png" alt="">
        <div slot="item-text">我的</div>
      </tab-bar-item>
    </tab-bar>
  </div>
</template>

<script>
  import TabBar from "./components/tabbar/TabBar";
  import TabBarItem from "./components/tabbar/TabBarItem";

  export default {
    name: ‘App‘,
    components: {
      TabBar,
      TabBarItem
    }
  }
</script>

<style>
  /*style中引用要用@*/
  @import "./assets/css/base.css";
</style>
可以优化class,颜色直接写死不合适
还可以从父组件传过来,然后绑定style来设置
配置别名:\build\webpack.base.conf.js
  resolve: {
    extensions: [‘.js‘, ‘.vue‘, ‘.json‘],
    alias: {
      ‘@‘: resolve(‘src‘),
      ‘assets‘: resolve(‘src/assets‘),
      ‘components‘: resolve(‘src/components‘),
      ‘views‘: resolve(‘src/views‘),
    }
  },
项目中使用
html中: 前面要加 ~
<tab-bar-item path="/home" activeColor="blue">
      <img slot="item-icon" src="~assets/images/tabbar/home.png" alt="首页" />
      <img slot="item-icon-active" src="~assets/images/tabbar/home_active.png" alt />
      <div slot="item-text">首页</div>
    </tab-bar-item>
import中使用
import TabBarItem from "components/tabbar/TabBarItem";
根目录下新建vue.config.js
在vue.config.js中的chainWebpack中配置config.resolve.alias.set(‘@‘, resolve(‘src‘)).set(‘components‘, resolve(‘src/components‘));
是异步编程的一种解决方案
  new Promise((resolve, reject) => {
            setTimeout(() => {
                resolve(‘传入then 中的 data‘)
            }, 1500)
        }).then(data => {
            console.log(data);

            return new Promise((resolve, reject) => {
                setTimeout(() => {
                    // resolve(‘内部的resolve‘)
                    reject(‘内部的reject‘)
                }, 1500)
            })
        }).catch(data => {
            console.log(data);
        })
promise异步完成后会有三种状态
promise的另一种写法
 new Promise((resolve, reject) => {
            setTimeout(() => {
                resolve(‘传入then 中的 data‘)
                // reject(‘失败‘)
            }, 1500)
        }).then(data => {
            console.log(data);
        },reject => {
            console.log(reject);
        })
再简化
// new Promise(resolve) ==>Promise.resolve(data) ==> data
        //throw ‘msg‘也会被catch()捕获

        new Promise((resolve, reject) => {
            setTimeout(() => {
                resolve(‘第一层...‘)
            }, 1500)
        }).then(data => {
            console.log(data);
            return Promise.resolve(‘第二层...‘)
            // return Promise.reject(‘额鹅鹅鹅‘)
            throw ‘dsadsa‘
        }).then(data=>{
            console.log(data);
            return ‘aaa‘
        }).then(data=>{
            console.log(data);
        }).catch(err=>{
            console.log(err);
        })
Promise.all([
                new Promise((resolve, reject)=>{
                    setTimeout(()=>{
                        resolve(‘1111111‘)
                    },1000)
                }),
                new Promise((resolve, reject)=>{
                    setTimeout(()=>{
                        resolve(‘222222‘)
                    },2000)
                })
        ]).then(data=>{
            //1111111,222222
            console.log(data.toString())
        })
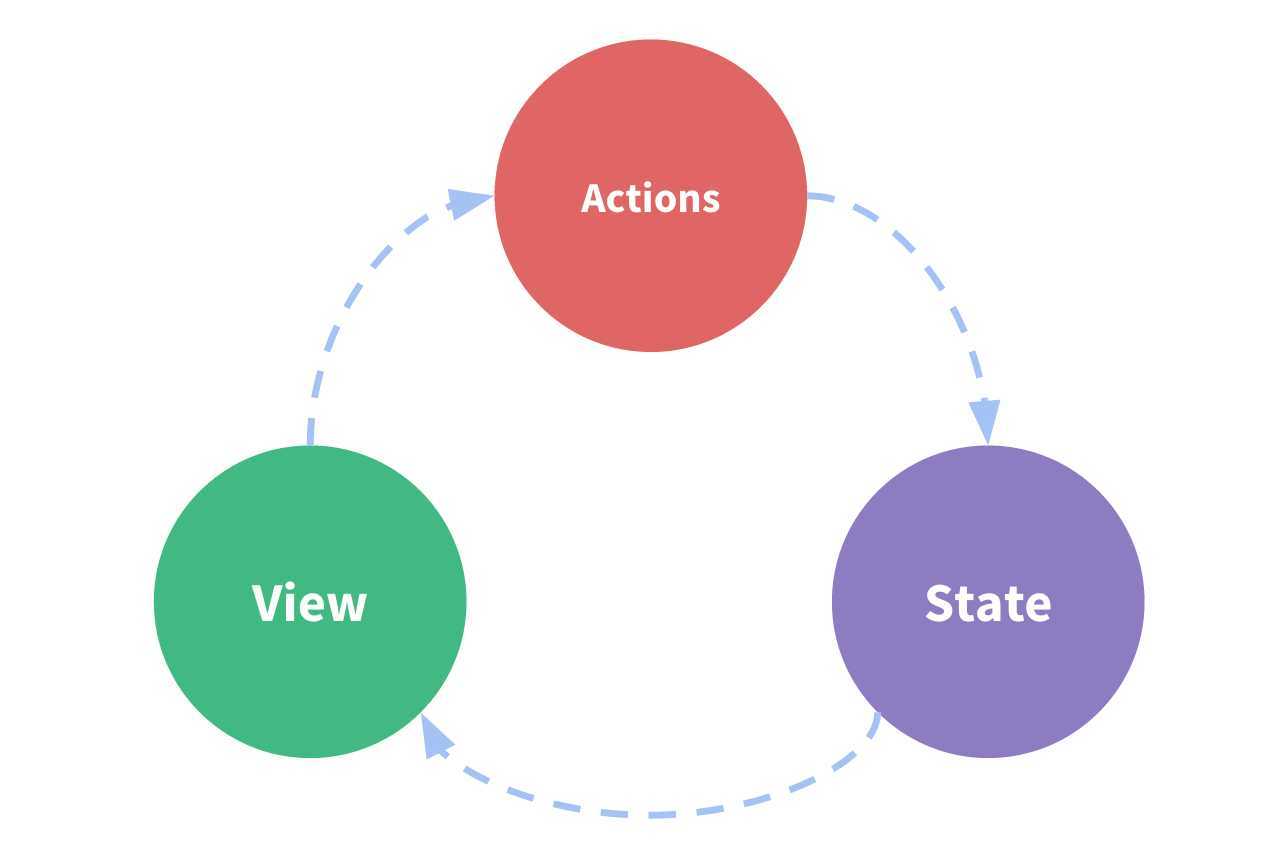
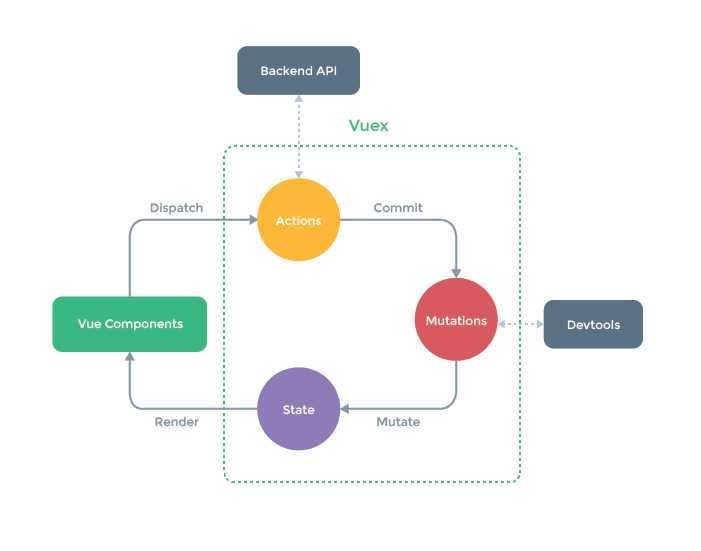
通过提交 mutation 的方式,而非直接改变 store.state.count,是因为我们想要更明确地追踪到状态的变化。这个简单的约定能够让你的意图更加明显,这样你在阅读代码的时候能更容易地解读应用内部的状态改变。此外,这样也让我们有机会去实现一些能记录每次状态改变,保存状态快照的调试工具。有了它,我们甚至可以实现如时间穿梭般的调试体验。
由于 store 中的状态是响应式的,在组件中调用 store 中的状态简单到仅需要在计算属性中返回即可。触发变化也仅仅是在组件的 methods 中提交 mutation。
actions步骤可以省略,一般异步的操作放在actions中完成后放在mutations中
mutations只能是同步的操作,devtools监听不到异步操作
store用法
state中所有的已定义的属性都是响应式的,新加入的不被响应:因为属性初始化后,都被一个dep对象=【watcher,watcher..】监控,后面加入的不受监控
npm install vuex --save
新建、src/store/index.js
import Vue from ‘vue‘
import Vuex from ‘vuex‘

//1.安装,底层会调用Vuex.install
Vue.use(Vuex)

// 2.创建对象
const store = new Vuex.Store({
  state: {
    count: 0
  }, mutations: {
    //state必须传,默认会传进来
    increment(state) {
      state.count++
    }
  }, actions: {}, getters: {}, modules: {}
})

// 3.导出store对象
export default store
import Vue from ‘vue‘
import App from ‘./App‘
import store from "./store";

Vue.config.productionTip = false

/* eslint-disable no-new */
new Vue({
  el: ‘#app‘,
  store,
  render: h => h(App)
})
<template>
  <div id="app">
    <h2>{{$store.state.count}}</h2>
    <button @click="increment">+</button>
    <hello-vuex></hello-vuex>
  </div>
</template>

<script>
import HelloVuex from "./components/HelloVuex";


export default {
  name: ‘App‘,
  methods:{
    increment(){
      this.$store.commit(‘increment‘)
    }
  },
  components: {
    HelloVuex
  }
}
</script>

<style>
</style>
<template>
  <div>
    <h2>{{$store.state.count}}</h2>
  </div>
</template>

<script>
  export default {
    name: "HelloVuex"
  }
</script>

<style scoped>

</style>
有点像computed的概念
<template>
  <div id="app">
    <h2>{{$store.state.count}}</h2>
    <button @click="increment">+</button>
    <h2>年龄大于20:{{$store.getters.more20Person}}</h2>
    <h2>年龄大于20个数:{{$store.getters.more20PersonCount}}</h2>
    <h2>年龄大于age个数:{{$store.getters.moreAgePerson(13)}}</h2>
    <hello-vuex></hello-vuex>
  </div>
</template>

<script>
import HelloVuex from "./components/HelloVuex";


export default {
  name: ‘App‘,
  methods:{
    increment(){
      this.$store.commit(‘increment‘)
    }
  },
  components: {
    HelloVuex
  }
}
</script>

<style>
</style>
import Vue from ‘vue‘
import Vuex from ‘vuex‘

//1.安装,底层会调用Vuex.install
Vue.use(Vuex)

// 2.创建对象
const store = new Vuex.Store({
  state: {
    count: 0,
    persons: [
      {name: ‘a‘, age: 12},
      {name: ‘b‘, age: 23},
      {name: ‘c‘, age: 32},
      {name: ‘d‘, age: 24}
    ]
  }, mutations: {
    //state必须传,默认会传进来
    increment(state) {
      state.count++
    }
  },
  actions: {},
  //最多只能写两个参数时state,getters,默认会传进来
  getters: {
    more20Person(state) {
      return state.persons.filter(per=>per.age>20)
    },
    more20PersonCount(state,getters){
      // 这里不用写括号
      return getters.more20Person.length
    },
    //返回一个函数可以传动态的参数
    moreAgePerson(state){
      return (age)=>{
        return state.persons.filter(per=>per.age>age)
      }
    }

  },
  modules: {}
})

// 3.导出store对象
export default store
//store/index.js
mutations: {
    //state必须传,默认会传进来
    increment(state) {
      state.count++
    },
    add(state,num){
      state.count +=num
    }
  }

//app.vue
methods:{
    increment(){
      this.$store.commit(‘increment‘)
    },
    add(num){
      this.$store.commit(‘add‘,num)
    }
  }
第二种提交风格
inc(num){
      this.$store.commit({
        type:‘inc‘,
        num
      })
    }
mutations: {
    //state必须传,默认会传进来
    increment(state) {
      state.count++
    },
    add(state,num){
      state.count +=num
    },
        //当成对象处理参数
    inc(state,payLoad){
      state.count +=payLoad.num
    }
  }
update(state){
      //响应式
      // state.persons.push({name:‘e‘,age:99})
      //响应式
      // state.person={name:‘f‘,age:101}

      //新加的属性不会被监控,只有在其他任意的属性变化一次后他会刷新一次
      // state.person.add=111
      // state.person[‘address‘]=222
      //删除一个对象的属性
      // delete state.person.age

      //vue set value是响应式的,key必须是字符串
      // Vue.set(state.person,‘asd‘,‘vue set value是响应式的‘)
      Vue.delete(state.person,‘age‘)
    }
避免写错,定义一个常量对象,在使用的文件中导入
定义
[const](){}
//mutation-type.js
export const INCREMENT=‘increment‘
export const ADD=‘add‘
export const INC=‘inc‘
export const UPDATE=‘update‘


import {INCREMENT,ADD,UPDATE,INC} from "./mutation-type";

//app.vue
update(){
      this.$store.commit({
        type:UPDATE,
      })
    }


//index.js
mutations: {
    //state必须传,默认会传进来
    [INCREMENT](state) {
      state.count++
    },
    [ADD](state,num){
      state.count +=num
    },
    //当成对象处理参数
    [INC](state,payLoad){
      state.count +=payLoad.num
    },
    [UPDATE](state){
      Vue.delete(state.person,‘age‘)
    }
  }
action处理异步操作:
//app.vue
aUpdate(){
      // this.$store.dispatch(‘aUpdate‘,{
      //   msg:‘参数信息‘,
      //  success:(data)=>{console.log(data)}
      // })

      //第二种方法,异步函数返回的promise对象
      this.$store.dispatch(‘aUpdate‘,{
        msg:‘参数信息‘
      }).then(res=>{
        console.log(‘完成异步操作‘);
        console.log(res);
      })
    }


//index.js
actions: {
    // aUpdate(context,payload) {
    //   // console.log(‘默认参数是上下文对象: ‘,context)
    //   setTimeout(function () {
    //     context.commit(‘aUpdate‘,payload)
    //   }, 1000)
    // }

    //第二种方式返回一个promise对象,在调用处可以使用
    aUpdate(context, payload) {
      return new Promise((resolve, reject) => {
        setTimeout(() => {
          context.commit(‘aUpdate‘, payload)
          resolve(12312)
        }, 1000)
      })
    }

  }
显示:app.vue
 <h2>-------------state--modules的内容---------</h2>
    <h2>{{$store.state.a.name}}</h2>
    <h2>{{$store.getters.getModuleA}}</h2>
    <h2>{{$store.getters.getModuleA_add(‘age‘)}}</h2>
    <h2>{{$store.getters.getModuleA_add_root}}</h2>
    <button @click="moduleA">模块a修改name</button>
    <button @click="asyncUpdateModuleA">异步模块a修改name</button>


methods:{
	  moduleA() {
        this.$store.commit(‘aUpdate‘,‘模块a名字修改‘)
      },
      asyncUpdateModuleA(){
        this.$store.dispatch(‘asyncUpdateModuleA‘)
      }
}
index.js
modules: {
    a:{
      //需要指定模块名,可以和父模块同名
      state:{name:‘module_a‘,person:123},
      //和父模块同名会报错,可以直接访问不需要指定模块名
      getters:{
        getModuleA(state){
          return state.name+‘_getModuleA‘
        },
        getModuleA_add(state,getters){
          return (age) => {
            return getters.getModuleA+age
          }

        },
        //三个默认参数
        getModuleA_add_root(state,getters,rootState){
          return state.name+getters.getModuleA+‘_add_‘+rootState.count
        }
      },
      // 和mutations使用差不多
      actions:{
          //也可以使用对象的解构,详见es6
        asyncUpdateModuleA(context){
          setTimeout(()=>{
            context.commit(‘aUpdate‘,‘异步修改子模块‘)
          },1000)
        }
      },
      mutations:{
        //和父模块名字相同都会调用,先调用父模块的,所以不要定义相同的名字
        aUpdate(state,payload){
          state.name=payload
          console.log(‘child mutations 被调用‘)
        }
      },
      modules:{}
    },

    //模块b
    b:ModuleB
  }
import Vue from ‘vue‘
import Vuex from ‘vuex‘
import mutations from "./mutations";
import actions from "./actions";
import getters from "./getters";
import module_a from "./modules/module_a";

//1.安装,底层会调用Vuex.install
Vue.use(Vuex)

// 2.创建对象
const store = new Vuex.Store({
  state: {
    count: 0,
    persons: [
      {name: ‘a‘, age: 12},
      {name: ‘b‘, age: 23},
      {name: ‘c‘, age: 32},
      {name: ‘d‘, age: 24}
    ],
    person: {
      name: ‘g‘,
      age: 100
    }
  },
  mutations,
  actions,
  getters,
  modules: {
    a: module_a
  }
})

// 3.导出store对象
export default store
export default new Vuex.Store({
    state:sessionStorage.getItem(‘state‘) ? JSON.parse(sessionStorage.getItem(‘state‘)): {
        enterprise: {},
        grid: [],
        iofficeUserRoleID: ‘‘,
        userVO: {},
    },
mounted() {
            window.addEventListener(‘unload‘, this.saveState)
        },
        methods: {
            saveState() {
                sessionStorage.setItem(‘state‘, JSON.stringify(this.$store.state))
            }
        }
import axios from ‘axios‘

axios.defaults.baseURL = ‘https://httpbin.org‘
axios.defaults.timeout = 5000
axios({
  // url:‘http://123.207.32.32:8080/home/mutidata‘,
  url: ‘post‘,
  method: ‘post‘,
  // 拼接在URL后
  params: {
    name: 1
  },
  // 请求体中的参数
  data: {
    type: ‘sell‘,
    page: 3
  },
  //拦截请求
  transformRequest:[function (query) {

  }],
  //拦截返回数据
  transformResponse:[function (response) {

  }],
}).then(res => {
  console.log(res);
})

// 同时处理多个异步请求,最后返回一个数据数组,像java的栅栏
axios.all([axios({url: ‘post‘, method: ‘post‘}), axios({url: ‘get‘})]).then(res => {
  console.log(res);
})

//处理返回的结果数组,使用的是数组的解构是根据下标解构的
axios.all([axios({url: ‘post‘, method: ‘post‘}), axios({url: ‘get‘})])
  .then(([res1, res2]) => {
    console.log(res1);
    console.log(res2);
  })
// 这样也可以
axios.all([axios({url: ‘post‘, method: ‘post‘}), axios({url: ‘get‘})])
  .then(
    axios.spread((res1, res2) => {
      console.log(res1);
      console.log(res2);
    }))
避免使用全局的axios,可能每个模块的请求是不一样的
新建/network/request.js
import axios from "axios";

export function request(config) {
  if (!config.baseURL) {
    config.baseURL = ‘https://httpbin.org‘
  }
  if (!config.timeout) {
    config.timeout = 5000;
  }
  const axiosInstance = axios.create(config);
  //req是请求参数对象
  axiosInstance.interceptors.request.use(req => {
    console.log(req);
    //1.可以修改一些请求的参数
    // 2.可以设置一个加载图片
    return req
  })
  //res是返回的对象
  axiosInstance.interceptors.response.use(res => {
    console.log(res.data);
    return res.data
  })
  return axiosInstance(config);
}
只会取当前模块的引用
只会作用当前的组件的css
false 以阻止 vue 在启动时生成生产提示。
:style 后面是对象的时候里面的属性值是字符串格式
controller
@RequestMapping("save")
public ResponseModel savenew(@RequestBody @Validated SysUser user, BindingResult 		result) {
        if (result.hasErrors()) {
            return ResponseModel.FAIL()
                    .setMsg(result.getAllErrors()
                            .stream()
                            .map(err->err.getDefaultMessage())
                                    .collect(Collectors.joining(";"))
                            );
        }
        String password = user.getPassword();
        if (password.length() < 32) {
            user.setPassword(CryptUtil.shiroEncry(user));
        }
        userService.save(user);
        return ResponseModel.SUCCESS();
}
vue
<template>
	<div id="user">
		<div>
			姓名:
			<input type="text" name="username" v-model="entity.username"/>
		</div>
		<div>
			密码:
			<input type="password" v-model="entity.password" />
		</div>
		<div>
			电话:
			<input type="text" v-model="entity.phone" />
		</div>
		<div>
			电话:
			<input type="text" v-model="entity.role.roleName" />
		</div>
		<button @click="saveUserInfo">保存</button>
	</div>
</template>

<script>
	import {
		saveUser
	} from ‘network/module/user.js‘;

	export default {
		name: "User",
		methods: {
			saveUserInfo() {
				saveUser(this.entity).then(res=>alert(res.msg));
			}
		},
		data(){
			return {
				entity:{
					role:{}
				}
			}
		}
	};
</script>
前端工具请求接口的类型和后端服务器定义的类型不一致造成
vue.config.js
//vue-cli3配置这个做代理
	devServer: {
		proxy: {
			‘/api‘: {
				target: ‘http://localhost:8080/mall/api‘, //API服务器的地址
				changeOrigin: true, // 是否跨域
				pathRewrite: {
					‘^/api‘: ‘‘
				}
			}
		},
	},
	//vue-cli2使用这个
	// dev: {
	// 	proxyTable: {
	// 		‘/api‘: {
	// 			target: ‘http://localhost:8080/mall/api‘, //API服务器的地址
	// 			changeOrigin: true, // 是否跨域
	// 			pathRewrite: {
	// 				‘^/api‘: ‘‘
	// 			}
	// 		}
	// 	}
	// },
手写嵌套对象:
{
    a:{
        ‘b.c‘:d
    }
}
qs默认嵌套对象的序列化会用 ‘[]’
//{ allowDots: true }会将【】转换成 ‘.’
this.$qs.stringify(obj,{ allowDots: true })
~1.15.2 := >=1.15.2 <1.16.0 匹配到第二位,大于当前版本小于1.16.0
^3.3.4 := >=3.3.4 <4.0.0 匹配到第一位所有大于当前版本且小于4
this.$nextTick(function)将回调延迟到下次 DOM 更新循环之后执行,vm.$nextTick() 实例方法特别方便,因为它不需要全局 Vue,并且回调函数中的 this 将自动绑定到当前的 Vue 实例上
原文:https://www.cnblogs.com/zpyu521/p/12847207.html