1.添加applicationContext.xml配置文件
1.1配置扫描dao和service
    <!-- 开启注解扫描,管理service和dao -->
    <context:component-scan base-package="com.test.service">
    </context:component-scan>
    <context:component-scan base-package="com.test.dao">
    </context:component-scan>
1.2spring整合mybatis
    <context:property-placeholder location="classpath:db.properties"/>
    <!-- 配置连接池 -->
    <bean id="dataSource" class="com.mchange.v2.c3p0.ComboPooledDataSource">
           <property name="driverClass" value="${jdbc.driver}" />
           <property name="jdbcUrl" value="${jdbc.url}" />
           <property name="user" value="${jdbc.username}" />
           <property name="password" value="${jdbc.password}" />
       </bean>
    <!-- 把交给IOC管理 SqlSessionFactory -->
    <bean id="sqlSessionFactory" class="org.mybatis.spring.SqlSessionFactoryBean">
           <property name="dataSource" ref="dataSource" />
           <!-- 传入PageHelper的插件 -->
           <property name="plugins">
               <array>
                   <!-- 传入插件的对象 -->
                   <bean class="com.github.pagehelper.PageInterceptor">
                       <property name="properties">
                           <props>
                               <prop key="helperDialect">mysql</prop>
                               <prop key="reasonable">true</prop>
                           </props>
                       </property>
                   </bean>
               </array>
           </property>
       </bean>
1.3事务配置
    <!-- 配置Spring的声明式事务管理 -->
    <!-- 配置事务管理器 -->
       <bean id="transactionManager" class="org.springframework.jdbc.datasource.DataSourceTransactionManager">
           <property name="dataSource" ref="dataSource"/>
       </bean>
  <tx:annotation-driven transaction-manager="transactionManager"/>
1.4扫描接口
    <!-- 扫描dao接口 -->
    <bean id="mapperScanner" class="org.mybatis.spring.mapper.MapperScannerConfigurer">
           <property name="basePackage" value="com.test.dao"/>
       </bean>
2.添加spring-mvc.xm配置文件
2.1配置扫描web
    <!-- 扫描controller的注解,别的不扫描 -->
    <context:component-scan base-package="com.test.controller">
    </context:component-scan>
2.2配置视图解析器
jsp文件目录
文件的后缀
    <!-- 配置视图解析器 -->
    <bean id="viewResolver" class="org.springframework.web.servlet.view.InternalResourceViewResolver">
        <!-- JSP文件所在的目录 -->
        <property name="prefix" value="/pages/" />
        <!-- 文件的后缀名 -->
        <property name="suffix" value=".jsp" />
    </bean>
2.3设置静态资源不过滤
    <!-- 设置静态资源不过滤 -->
    <mvc:resources location="/css/" mapping="/css/**" />
    <mvc:resources location="/img/" mapping="/img/**" />
    <mvc:resources location="/js/" mapping="/js/**" />
    <mvc:resources location="/plugins/" mapping="/plugins/**" />
2.4开启springmvc的注解支持
    <!-- 开启对SpringMVC注解的支持 -->
    <mvc:annotation-driven />

    <!--
        支持AOP的注解支持,AOP底层使用代理技术
        JDK动态代理,要求必须有接口
        cglib代理,生成子类对象,proxy-target-class="true" 默认使用cglib的方式
    -->
    <aop:aspectj-autoproxy proxy-target-class="true"/>
3.web.xml文件
3.1配置spring mvc的核心控制器
    <!-- 前端控制器(加载classpath:springmvc.xml 服务器启动创建servlet) -->
    <servlet>
        <servlet-name>dispatcherServlet</servlet-name>
        <servlet-class>org.springframework.web.servlet.DispatcherServlet</servlet-class>
        <!-- 配置初始化参数,创建完DispatcherServlet对象,加载springmvc.xml配置文件 -->
        <init-param>
            <param-name>contextConfigLocation</param-name>
            <param-value>classpath:springmvc.xml</param-value>
        </init-param>
        <!-- 服务器启动的时候,让DispatcherServlet对象创建 -->
        <load-on-startup>1</load-on-startup>
    </servlet>
    <servlet-mapping>
        <servlet-name>dispatcherServlet</servlet-name>
        <url-pattern>*.do</url-pattern>
    </servlet-mapping>
3.2配置加载类路径的配置文件
    <!-- 配置加载类路径的配置文件 -->
    <context-param>
        <param-name>contextConfigLocation</param-name>
        <param-value>classpath*:applicationContext.xml,classpath*:spring-security.xml</param-value>
    </context-param>
3.3配置监听器
<!-- 配置监听器 -->
    <listener>
        <listener-class>org.springframework.web.context.ContextLoaderListener</listener-class>
    </listener>
    <!-- 配置监听器,监听request域对象的创建和销毁的 -->
    <listener>
        <listener-class>org.springframework.web.context.request.RequestContextListener</listener-class>
    </listener>
3.4解决中文乱码过滤器
    <!-- 解决中文乱码过滤器 -->
    <filter>
        <filter-name>characterEncodingFilter</filter-name>
        <filter-class>org.springframework.web.filter.CharacterEncodingFilter</filter-class>
        <init-param>
            <param-name>encoding</param-name>
            <param-value>UTF-8</param-value>
        </init-param>
    </filter>
    <filter-mapping>
        <filter-name>characterEncodingFilter</filter-name>
        <url-pattern>/*</url-pattern>
    </filter-mapping>
3.5指定加载首页页面
    <welcome-file-list>
        <welcome-file>index.html</welcome-file>
        <welcome-file>index.htm</welcome-file>
        <welcome-file>index.jsp</welcome-file>
        <welcome-file>default.html</welcome-file>
        <welcome-file>default.htm</welcome-file>
        <welcome-file>default.jsp</welcome-file>
    </welcome-file-list>
4.在pom中指定tomcat配置
        <plugins>
            <plugin>
                <groupId>org.apache.tomcat.maven</groupId>
                <artifactId>tomcat7-maven-plugin</artifactId>
                <configuration><port>8888</port></configuration>
                <version>2.1</version>
            </plugin>
        </plugins>
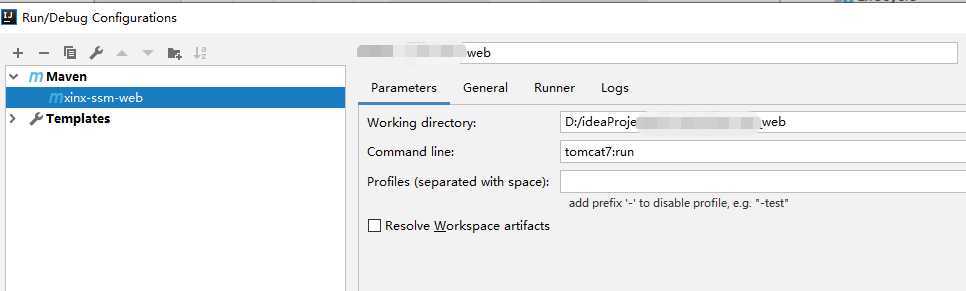
5.配置tomcat运行
原文:https://www.cnblogs.com/zxh06820/p/12899518.html