一.首页信息展示
1.1 轮播图
①.goods下serializers.py添加
class BannerSerializer(serializers.ModelSerializer):
    ‘‘‘
    轮播图
    ‘‘‘
    class Meta:
        model = Banner
        fields = "__all__"
②.view.py添加
class BannerViewset(mixins.ListModelMixin, viewsets.GenericViewSet):
    """
    首页轮播图
    """
    queryset = Banner.objects.all().order_by("index")
    serializer_class = BannerSerializer
③.urls.py添加
# 配置首页轮播图的url
router.register(r‘banners‘, BannerViewset, basename="banners")
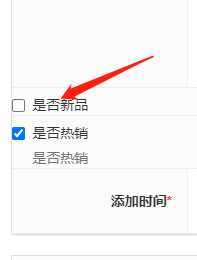
1.2 新品展示
①.后台是否新品勾选即可
1.3 商品分类展示
①.序列化文件添加

class BrandSerializer(serializers.ModelSerializer):
    ‘‘‘
    大类下面的宣传商标
    ‘‘‘
    class Meta:
        model = GoodsCategoryBrand
        fields = "__all__"


class IndexCategorySerializer(serializers.ModelSerializer):
    #某个大类的商标,可以有多个商标,一对多的关系
    brands = BrandSerializer(many=True)
    # good有一个外键category,但这个外键指向的是三级类,直接反向通过外键category(三级类),取某个大类下面的商品是取不出来的
    goods = serializers.SerializerMethodField()
    # 在parent_category字段中定义的related_name="sub_cat"
    # 取二级商品分类
    sub_cat = CategorySerializer2(many=True)
    # 广告商品
    ad_goods = serializers.SerializerMethodField()

    def get_ad_goods(self, obj):
        goods_json = {}
        ad_goods = IndexAd.objects.filter(category_id=obj.id, )
        if ad_goods:
            #取到这个商品Queryset[0]
            good_ins = ad_goods[0].goods
            #在serializer里面调用serializer的话,就要添加一个参数context(上下文request),嵌套serializer必须加
            # serializer返回的时候一定要加 “.data” ,这样才是json数据
            goods_json = GoodsSerializer(good_ins, many=False, context={‘request‘: self.context[‘request‘]}).data
        return goods_json

    #自定义获取方法
    def get_goods(self, obj):
        # 将这个商品相关父类子类等都可以进行匹配
        all_goods = Goods.objects.filter(Q(category_id=obj.id) | Q(category__parent_category_id=obj.id) | Q(
            category__parent_category__parent_category_id=obj.id))
        goods_serializer = GoodsSerializer(all_goods, many=True, context={‘request‘: self.context[‘request‘]})
        return goods_serializer.data

    class Meta:
        model = GoodsCategory
        fields = "__all__"
②.view.py添加
class IndexCategoryViewset(mixins.ListModelMixin, viewsets.GenericViewSet):
    """
    首页商品分类数据
    """
    # 获取is_tab=True(导航栏)里面的分类下的商品数据
    queryset = GoodsCategory.objects.filter(is_tab=True, name__in=["生鲜食品", "酒水饮料"])
    serializer_class = IndexCategorySerializer
③.urls.py添加
# 首页系列商品展示url
router.register(r‘indexgoods‘, IndexCategoryViewset, basename="indexgoods")
1.4 商品点击与收藏数
①.点击数 # 更新GoodListViewSet类
class GoodsListViewSet(mixins.ListModelMixin, mixins.RetrieveModelMixin,viewsets.GenericViewSet):
    ‘‘‘
    list:
        商品列表,分页,搜索,过滤,排序
    retrieve:
        获取商品详情
    ‘‘‘

    # authentication_classes = (TokenAuthentication,)
    #这里必须要定义一个默认的排序,否则会报错
    queryset = Goods.objects.all().order_by(‘id‘)
    # 分页
    pagination_class = GoodsPagination
    #序列化
    serializer_class = GoodsSerializer
    filter_backends = (DjangoFilterBackend,filters.SearchFilter,filters.OrderingFilter)

    # 设置filter的类为我们自定义的类
    #过滤
    filter_class = GoodsFilter
    #搜索
    search_fields = (‘name‘, ‘goods_brief‘, ‘goods_desc‘)
    #排序
    ordering_fields = (‘sold_num‘, ‘shop_price‘)

    #商品点击数 + 1
    def retrieve(self, request, *args, **kwargs):
        instance = self.get_object()
        instance.click_num += 1
        instance.save()
        serializer = self.get_serializer(instance)
        return Response(serializer.data)
②.收藏数 # 更新UserFavViewSet类
class UserFavViewset(viewsets.GenericViewSet, mixins.ListModelMixin, mixins.CreateModelMixin, mixins.DestroyModelMixin):
    ‘‘‘
    用户收藏
    ‘‘‘
    #permission是用来做权限判断的
    # IsAuthenticated:必须登录用户;IsOwnerOrReadOnly:必须是当前登录的用户
    permission_classes = (IsAuthenticated,IsOwnerOrReadOnly)
    #auth使用来做用户认证的
    authentication_classes = (JSONWebTokenAuthentication,SessionAuthentication)
    #搜索的字段
    lookup_field = ‘goods_id‘

    #动态选择serializer
    def get_serializer_class(self):
        if self.action == "list":
            return UserFavDetailSerializer
        elif self.action == "create":
            return UserFavSerializer
        return UserFavSerializer

    def get_queryset(self):
        #只能查看当前登录用户的收藏,不会获取所有用户的收藏
        return UserFav.objects.filter(user=self.request.user)

    # 用户收藏的商品数量+1
    def perform_create(self, serializer):
        instance = serializer.save()
        # 这里instance相当于UserFav model,通过它找到goods
        goods = instance.goods
        goods.fav_num += 1
        goods.save()
1.5 信号量实现数量加减
①.user_operation下新建signals.py文件
from django.db.models.signals import post_save,post_delete
from django.dispatch import receiver
from user_operation.models import UserFav

# post_save:接收信号的方式
#sender: 接收信号的model
@receiver(post_save, sender=UserFav)
def create_UserFav(sender, instance=None, created=False, **kwargs):
    # 是否新建,因为update的时候也会进行post_save
    if created:
        goods = instance.goods
        goods.fav_num += 1
        goods.save()

@receiver(post_delete, sender=UserFav)
def delete_UserFav(sender, instance=None, created=False, **kwargs):
        goods = instance.goods
        goods.fav_num -= 1
        goods.save()
②.apps.py文件添加
def ready(self):
        import user_operation.signals
1.6 库存与销量修改
①.库存数量更新ShoppingCartViewSet类
class ShoppingCartViewset(viewsets.ModelViewSet):
    """
    购物车功能
    list:
        获取购物车详情
    create:
        加入购物车
    delete:
        删除购物记录
    """
    permission_classes = (IsAuthenticated, IsOwnerOrReadOnly)
    authentication_classes = (JSONWebTokenAuthentication, SessionAuthentication)
    serializer_class = ShopCartSerializer
    #商品的id
    lookup_field = "goods_id"

    def get_serializer_class(self):
        if self.action == ‘list‘:
            return ShopCartDetailSerializer
        else:
            return ShopCartSerializer

    #获取购物车列表
    def get_queryset(self):
        return ShoppingCart.objects.filter(user=self.request.user)

    # 库存数-1
    def perform_create(self, serializer):
        shop_cart = serializer.save()
        goods = shop_cart.goods
        goods.goods_num -= shop_cart.nums
        goods.save()

    # 库存数+1
    def perform_destroy(self, instance):
        goods = instance.goods
        goods.goods_num += instance.nums
        goods.save()
        instance.delete()

    # 更新库存,修改可能是增加页可能是减少
    def perform_update(self, serializer):
        #首先获取修改之前的库存数量
        existed_record = ShoppingCart.objects.get(id=serializer.instance.id)
        existed_nums = existed_record.nums
        # 先保存之前的数据existed_nums
        saved_record = serializer.save()
        #变化的数量
        nums = saved_record.nums-existed_nums
        goods = saved_record.goods
        goods.goods_num -= nums
        goods.save()
②.销量更新AlipayView类
class AlipayView(APIView):
    def get(self, request):
        """
        处理支付宝的return_url返回
        """
        processed_dict = {}
        # 1. 获取GET中参数
        for key, value in request.GET.items():
            processed_dict[key] = value
        # 2. 取出sign
        sign = processed_dict.pop("sign", None)

        # 3. 生成ALipay对象
        alipay = AliPay(
            appid="2016091500517456",
            app_notify_url="http://47.93.198.159:8000/alipay/return/",
            app_private_key_path=private_key_path,
            alipay_public_key_path=ali_pub_key_path,  # 支付宝的公钥,验证支付宝回传消息使用,不是你自己的公钥,
            debug=True,  # 默认False,
            return_url="http://47.93.198.159:8000/alipay/return/"
        )

        verify_re = alipay.verify(processed_dict, sign)

        # 这里可以不做操作。因为不管发不发return url。notify url都会修改订单状态。
        if verify_re is True:
            order_sn = processed_dict.get(‘out_trade_no‘, None)
            trade_no = processed_dict.get(‘trade_no‘, None)
            trade_status = processed_dict.get(‘trade_status‘, None)

            existed_orders = OrderInfo.objects.filter(order_sn=order_sn)
            for existed_order in existed_orders:
                existed_order.pay_status = trade_status
                existed_order.trade_no = trade_no
                existed_order.pay_time = datetime.now()
                existed_order.save()

            response = redirect("/index/#/app/home/member/order")
            return response

        else:
            response = redirect("index")
            return response

    def post(self, request):
        """
        处理支付宝的notify_url
        """
        #存放post里面所有的数据
        processed_dict = {}
        #取出post里面的数据
        for key, value in request.POST.items():
            processed_dict[key] = value
        #把signpop掉,文档有说明
        sign = processed_dict.pop("sign", None)

        #生成一个Alipay对象
        alipay = AliPay(
            appid="2016091500517456",
            app_notify_url="http://47.93.198.159:8000/alipay/return/",
            app_private_key_path=private_key_path,
            alipay_public_key_path=ali_pub_key_path,  # 支付宝的公钥,验证支付宝回传消息使用,不是你自己的公钥,
            debug=True,  # 默认False,
            return_url="http://47.93.198.159:8000/alipay/return/"
        )

        #进行验证
        verify_re = alipay.verify(processed_dict, sign)

        # 如果验签成功
        if verify_re is True:
            #商户网站唯一订单号
            order_sn = processed_dict.get(‘out_trade_no‘, None)
            #支付宝系统交易流水号
            trade_no = processed_dict.get(‘trade_no‘, None)
            #交易状态
            trade_status = processed_dict.get(‘trade_status‘, None)

            # 查询数据库中订单记录
            existed_orders = OrderInfo.objects.filter(order_sn=order_sn)
            for existed_order in existed_orders:
                # 订单商品项
                order_goods = existed_order.goods.all()
                # 商品销量增加订单中数值
                for order_good in order_goods:
                    goods = order_good.goods
                    goods.sold_num += order_good.goods_num
                    goods.save()

                # 更新订单状态
                existed_order.pay_status = trade_status
                existed_order.trade_no = trade_no
                existed_order.pay_time = datetime.now()
                existed_order.save()
            #需要返回一个‘success‘给支付宝,如果不返回,支付宝会一直发送订单支付成功的消息
            return Response("success")
二.缓存的设置
2.1 DRF缓存
①.GoodsListViewSet类中增加 # goods下view.py文件
CacheResponseMixin
②.settings中设置过期时间
#缓存配置
REST_FRAMEWORK_EXTENSIONS = {
    ‘DEFAULT_CACHE_RESPONSE_TIMEOUT‘: 5   #5s过期,时间自己可以随便设定
}
2.2 redis缓存
①.settings中添加
# redis缓存
CACHES = {
    "default": {
        "BACKEND": "django_redis.cache.RedisCache",
        "LOCATION": "redis://127.0.0.1:6379",
        "OPTIONS": {
            "CLIENT_CLASS": "django_redis.client.DefaultClient",
        }
    }
}
2.3 反爬虫设置
①.访问频率的设置 # 在settings的REST_FRAMEWORK中新增
#限速设置
    ‘DEFAULT_THROTTLE_CLASSES‘: (
            ‘rest_framework.throttling.AnonRateThrottle‘,   #未登陆用户
            ‘rest_framework.throttling.UserRateThrottle‘    #登陆用户
        ),
    ‘DEFAULT_THROTTLE_RATES‘: {
        ‘anon‘: ‘3/minute‘,         #每分钟可以请求两次
        ‘user‘: ‘5/minute‘          #每分钟可以请求五次
    }
②.goods.view.py中使用 # 在GoodListViewSet类中增加即可
throttle_classes = (UserRateThrottle, AnonRateThrottle)
原文:https://www.cnblogs.com/JangNara/p/12992797.html
