1)掌握单元测试的方法
2) 学习XUnit测试原理及框架;
3)掌握使用测试框架进行单元测试的方法和过程。
二、实验内容与要求
1.1 单元测试原理
单元测试(unit testing),是指对软件中的最小可测试单元进行检查和验证。对于单元测试中单元的含义,一般来说,要根据实际情况去判定其具体含义,如C语言中单元指一个函数,Java里单元指一个类,图形化的软件中可以指一个窗口或一个菜单等。总的来说,单元就是人为规定的最小的被测功能模块。单元测试是在软件开发过程中要进行的最低级别的测试活动,软件的独立单元将在与程序的其他部分相隔离的情况下进行测试。单元测试是由程序员自己来完成,最终受益的也是程序员自己。可以这么说,程序员有责任编写功能代码,同时也就有责任为自己的代码编写单元测试。执行单元测试,就是为了证明这段代码的行为和我们期望的一致。
单元测试的内容包括
模块接口测试、局部数据结构测试、路径测试、错误处理测试、边界测试
模块接口测试是单元测试的基础。只有在数据能正确流入、流出模块的前提下,其他测试才有意义。模块接口测试也是集成测试的重点,这里进行的测试主要是为后面打好基础。测试接口正确与否应该考虑下列因素:
-输入的实际参数与形式参数的个数是否相同
-输入的实际参数与形式参数的属性是否匹配
-输入的实际参数与形式参数的量纲是否一致
-调用其他模块时所给实际参数的个数是否与被调模块的形参个数相同;
-调用其他模块时所给实际参数的属性是否与被调模块的形参属性匹配;
-调用其他模块时所给实际参数的量纲是否与被调模块的形参量纲一致;
-调用预定义函数时所用参数的个数、属性和次序是否正确;
-是否存在与当前入口点无关的参数引用;
-是否修改了只读型参数;
-对全程变量的定义各模块是否一致;
-是否把某些约束作为参数传递。
如果模块功能包括外部输入输出,还应该考虑下列因素:
-文件属性是否正确;
-OPEN/CLOSE语句是否正确;
-格式说明与输入输出语句是否匹配;
-缓冲区大小与记录长度是否匹配;
-文件使用前是否已经打开;
-是否处理了文件尾;
-是否处理了输入/输出错误;
-输出信息中是否有文字性错误。
-局部数据结构测试;
-边界条件测试;
-模块中所有独立执行通路测试;
(2)局部数据结构测试
检查局部数据结构是为了保证临时存储在模块内的数据在程序执行过程中完整、正确,局部功能是整个功能运行的基础。重点是一些函数是否正确执行,内部是否运行正确。局部数据结构往往是错误的根源,应仔细设计测试用例,力求发现下面几类错误:
-不合适或不相容的类型说明;
-变量无初值;
-变量初始化或省缺值有错;
-不正确的变量名(拼错或不正确地截断);
-出现上溢、下溢和地址异常。
(3)边界条件测试
边界条件测试是单元测试中最重要的一项任务。众所周知,软件经常在边界上失效,采用边界值分析技术,针对边界值及其左、右设计测试用例,很有可能发现新的错误。边界条件测试是一项基础测试,也是后面系统测试中的功能测试的重点,边界测试执行的较好,可以大大提高程序健壮性。
(4)独立路径测试
在模块中应对每一条独立执行路径进行测试,单元测试的基本任务是保证模块中每条语句至少执行一次。测试目的主要是为了发现因错误计算、不正确的比较和不适当的控制流造成的错误。具体做法就是程序员逐条调试语句。常见的错误包括:
-误解或用错了算符优先级;
-混合类型运算;
-变量初值错;
-精度不够;
-表达式符号错。
(5)错误处理测试
检查模块的错误处理功能是否包含有错误或缺陷。例如,是否拒绝不合理的输入;出错的描述是否难以理解、是否对错误定位有误、是否出错原因报告有误、是否对错误条件的处理不正确;在对错误处理之前错误条件是否已经引起系统的干预等。
通常单元测试在编码阶段进行。在源程序代码编制完成,经过评审和验证,确认没有语法错误之后,就开始进行单元测试的测试用例设计。利用设计文档,设计可以验证程序功能、找出程序错误的多个测试用例。对于每一组输入,应有预期的正确结果。
1.2 测试框架
xUnit是各种代码驱动测试框架的统称,这些框架可以测试 软件的不同内容(单元),比如函数和类。xUnit框架的主要优点是,它提供了一个自动化测试的解决方案。可以避免多次编写重复的测试代码。
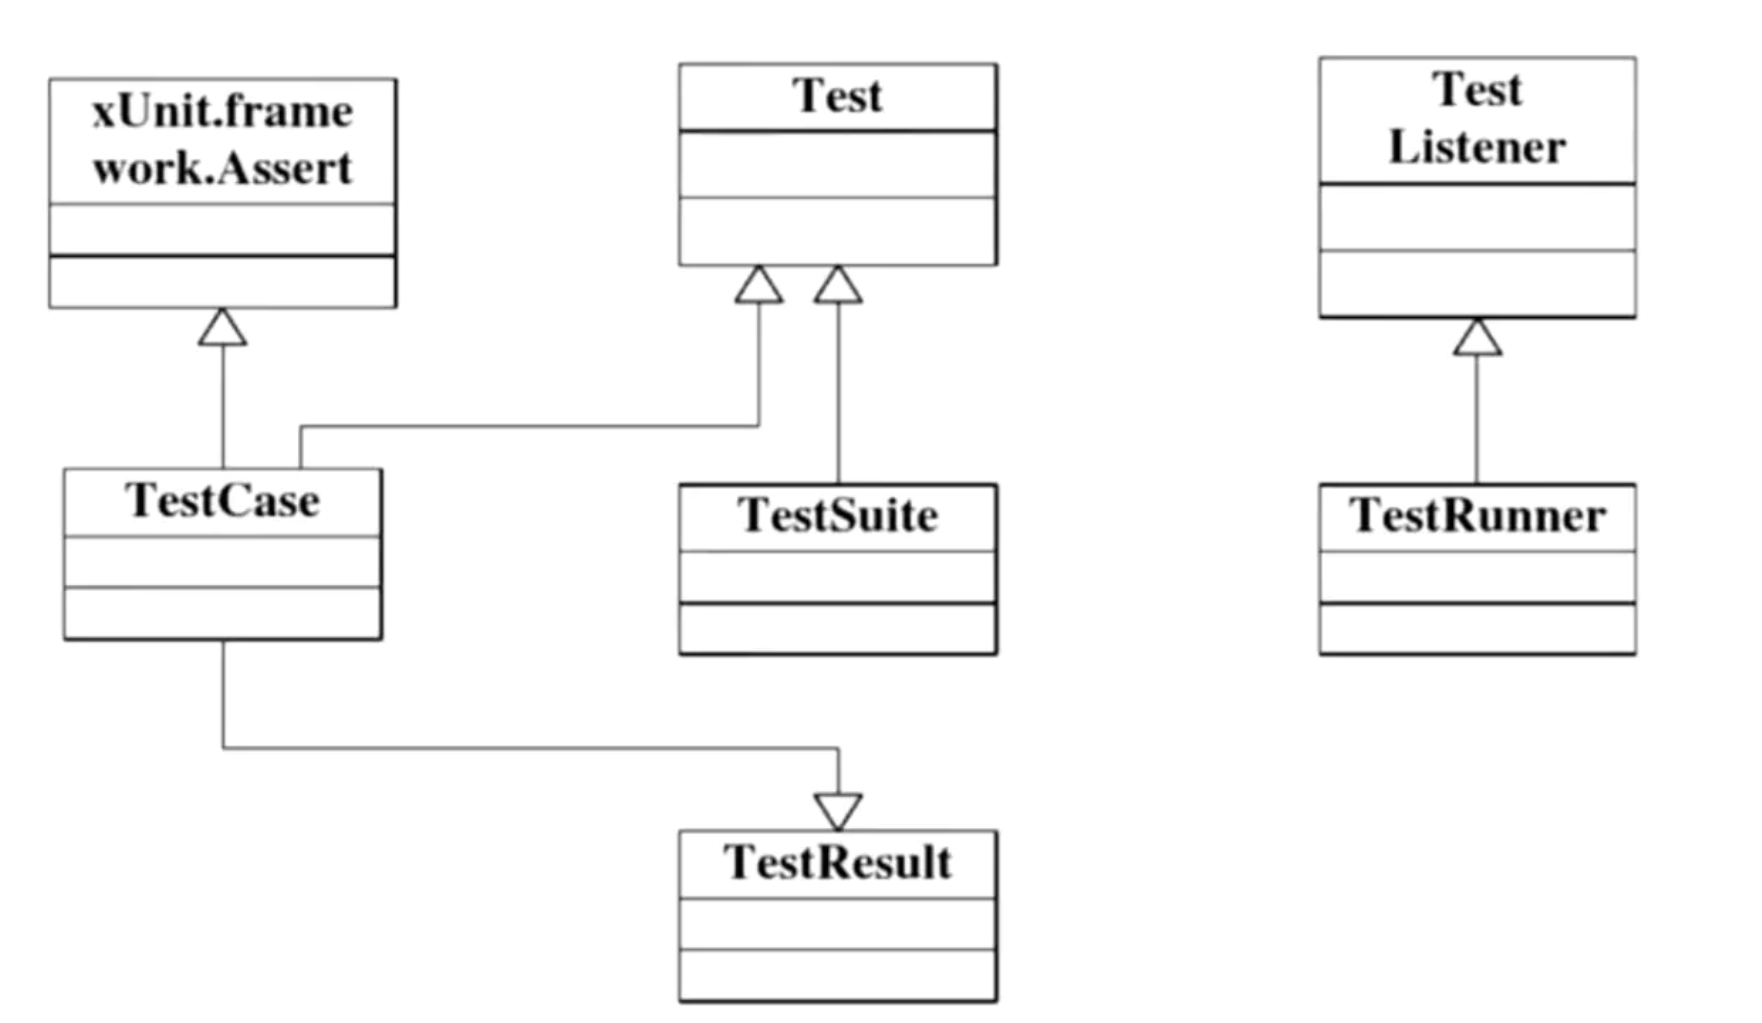
底层是xUnit的framwork,xUnit的类库,提供了对外的功能方法、工具类、api等
TestCase(具体的测试用例)去使用framwork
TestCase执行后会有TestResult
使用TestSuite控制TestCase的组合
TestRunner执行器,负责执行case
TestListener过程监听,监听case成功失败以及数据结果,输出到结果报告中
Unit测试框架包括四个要素:
(1)测试目标(对象)
一组认定被测对象或被测程序单元测试成功的预定条件或预期结果的设定。Fixture就是被测试的目标,可以是一个函数、一组对象或一个对象。 测试人员在测试前应了解被测试的对象的功能或行为。
(2)测试集
测试集是一组测试用例,这些测试用例要求有相同的测试Fixture,以保证这些测试不会出现管理上的混乱。
(3)测试执行
单个单元测试的执行可以按下面的方式进行:
第一步 编写 setUp() 函数,目的是:建立针对被测试单元的独立测试环境;举个例子,这可能包含创建临时或代理的数据库、目录,再或者启动一个服务器进程。
第二步 编写所有测试用例的测试体或者测试程序;
第三步 编写tearDown()函数,目的是:无论测试成功还是失败,都将环境进行清理,以免影响后续的测试;
(4)断言
断言实际上就是验证被测程序在测试中的行为或状态的一个函数或者宏。断言的失败会引发异常,终止测试的执行。
1.3 面向特定语言的,基于xUnit框架的自动化测试框架
Junit : 主要测试用Java语言编写的代码
CPPunit:主要测试用C++语言编写的代码
unittest , PyUnit:主要测试用python语言编写的代码
MiniUnit: 主要用于测试C语言编写的代码
三、实验过程
本次实验所使用的语言为C++,使用的IDE是VC6.0,采用的测试框架是CppUnitLite.
1、实验源码(不包括界面设计代码)
  1 #include "stdio.h"
  2 #include "time.h"
  3 #include "windows.h"
  4 #include "windowsx.h"
  5 #include "iostream"
  6 using namespace std;
  7
  8 #define WORLD_TIMER_ID (1)  //定时器ID
  9 #define WORLD_TIMER_ELAPSE (1000)   //定时器超时时间
 10 #define RANDOM_BTN_ID (1)
 11 #define START_BTN_ID (2)
 12 #define PAUSE_BTN_ID (3)
 13 #define NEXT_BTN_ID (4)
 14 #define KILL_ALL_BTN_ID (5)
 15
 16 #define WINDOW_WIDTH  820
 17 #define WINDOW_HEIGHT 600
 18 #define WORLD_WIDTH 40
 19 #define WORLD_HEIGHT 20
 20 #define CELL_SIZE 20
 21
 22 #define WIDTH 40
 23 #define HEIGHT 20
 24
 25 class CWorld *g_world = NULL;   //全局世界指针
 26
 27 typedef struct _SCell              //细胞生存状态
 28 {
 29     int Alive;
 30 }
 31 SCell;
 32
 33 class CWorld
 34 {
 35 private:
 36     int width;
 37     int height;
 38     SCell* current_map;   //当前地图
 39     SCell* new_map;   //下一轮使用的地图
 40     void setCurCell(int x, int y, int Alive);
 41     void setNewCell(int x, int y, int Alive);
 42     int getAroundCellNum(int x, int y); //获得某个位置周围存活的细胞数量
 43     int locValid(int x, int y);   //判定输入位置是否有效, 1-有效 0-无效
 44     void swapMap(void) ;    //交换地图
 45     SCell* getCell(SCell* buf, int x, int y); //从地图buffer中获取某坐标的细胞指针
 46 public:
 47     CWorld(int Width, int Height);
 48     ~CWorld();
 49     void InitMap(void);  //随机初始化地图
 50     void killAll(void);     //杀死所有细胞
 51     void nextStep(void);    //进入下一回合
 52     int getCellAlive(int x, int y); //获取细胞存活状态 , 返回值:1-存活, 0-死亡 -1-出错
 53     int setCellAlive(int x, int y, int Alive);    //设置细胞存活状态 , 返回值:0-成功 负值-失败
 54     int getWidth() { return width; }      //获得当前地图宽度
 55     int getHeight() { return height; }    //获得当前地图高度
 56 };
 57
 58
 59 SCell* current_map = (SCell *) new SCell[WIDTH * HEIGHT];
 60 SCell* new_map = (SCell *) new SCell[WIDTH * HEIGHT];
 61
 62 void CWorld::killAll(void)                //清屏
 63 {
 64     if (current_map != NULL && new_map != NULL)
 65     {
 66         for (int i = 0; i < WIDTH; ++i)
 67         {
 68             for (int j = 0; j < HEIGHT; ++j)
 69             {
 70                 setCurCell(i, j, 0);
 71                 setNewCell(i, j, 0);
 72             }
 73         }
 74     }
 75
 76 }
 77
 78
 79 void CWorld::InitMap()        //初始化细胞矩阵
 80 {
 81     killAll();
 82
 83     srand((unsigned)time(NULL)); //用时间做种,每次产生随机数不一样
 84
 85     for (int i = 0; i < WIDTH; ++i)
 86     {
 87         for (int j = 0; j < HEIGHT; ++j)
 88         {
 89             int Alive = rand() % 2;  //产生0或1的随机数
 90             setCurCell(i, j, Alive);
 91         }
 92
 93     }
 94 }
 95
 96
 97 void CWorld::setCurCell(int x, int y, int Alive)  //设置当前细胞矩阵细胞存活状态
 98 {
 99     if (locValid(x, y) == 0)
100     {
101         return;
102     }
103     else
104     {
105         SCell* cell = getCell(current_map, x, y);
106         if (cell - current_map >= WIDTH * HEIGHT)
107         {
108             return;
109         }
110         cell->Alive = Alive;
111     }
112 }
113
114
115 void CWorld::setNewCell(int x, int y, int Alive)  //设置下一时刻细胞矩阵存活状态
116 {
117     if (locValid(x, y) == 0)
118     {
119         return;
120     }
121     else
122     {
123         SCell* cell = getCell(new_map, x, y);
124         if (cell - new_map >= WIDTH * HEIGHT)
125         {
126             return;
127         }
128         cell->Alive = Alive;
129     }
130 }
131
132
133 int CWorld::getAroundCellNum(int x, int y)   //计算周围存活细胞数量
134 {
135     int count = 0;
136
137     if (locValid(x, y) == 0)  //边界判断
138     {
139         return -1;
140     }
141     //测试目标位置周围的八个相邻位置
142     for (int i = x - 1; i <= x + 1; ++i)
143     {
144         for (int j = y - 1; j <= y + 1; ++j)
145         {
146             if (i == x && j == y)
147             {
148                 continue;
149             }
150             if (locValid(i, j) == 1)
151             {
152                 if (getCellAlive(i, j) == 1)
153                 {
154                     count++;
155                 }
156             }
157         }
158     }
159
160     return count;
161 }
162
163
164 int CWorld::locValid(int x, int y) //边界判断
165 {
166     if (x >= WIDTH || x < 0 || y >= HEIGHT || y < 0)
167     {
168         return 0;
169     }
170     return 1;
171 }
172
173
174
175
176 /*
177 每个细胞的生死遵循下面的原则:
178 1. 如果一个细胞周围有3个细胞为生(一个细胞周围共有8个细胞),则该细胞为生(即该细胞若原先为死,则转为生,若原先为生,则保持不变) 。
179 2. 如果一个细胞周围有2个细胞为生,则该细胞的生死状态保持不变;
180 3. 在其它情况下,该细胞为死
181 */
182
183 void CWorld::nextStep(void)     //根据规则计算下一时刻细胞矩阵
184 {
185     int aroundNum = 0;
186     for (int i = 0; i < WIDTH; ++i)
187     {
188         for (int j = 0; j < HEIGHT; ++j)
189         {
190             aroundNum = getAroundCellNum(i, j);
191             if (aroundNum == 2)
192             {
193                 setNewCell(i, j, getCellAlive(i, j));
194             }
195             else if (aroundNum == 3)
196             {
197                 setNewCell(i, j, 1);
198             }
199             else
200             {
201                 setNewCell(i, j, 0);
202             }
203         }
204     }
205     swapMap();
206 }
207
208
209 int CWorld::getCellAlive(int x, int y)     //获取细胞存活状态
210 {
211     if (locValid(x, y) == 0)
212     {
213         return -1;
214     }
215     SCell* cell = getCell(current_map, x, y);
216     return cell->Alive;
217 }
218
219
220 void CWorld::swapMap(void) //交换地图
221 {
222     SCell* temp = current_map;
223     current_map = new_map;
224     new_map = temp;
225 }
226
227
228 SCell* CWorld::getCell(SCell* buf, int x, int y) //从地图中获取某坐标的细胞指针
229 {
230     return buf + y * WIDTH + x;
231 }
232
233
234 CWorld::CWorld(int Width, int Height)
235 {
236     width = Width;
237     height = Height;
238     current_map =(SCell *) new SCell[width * height];
239     new_map = (SCell *) new SCell[width * height];
240     killAll();
241 }
242
243
244 CWorld::~CWorld()
245 {
246     delete[] current_map;
247     delete[] new_map;
248 }
249
250
2、CppUnitLite在VC6.0中的应用
下载CppUnitLite的安装包后,可以看到如下目录结构:
/om
/CppUnitLite
/Failure.cpp
/Failure.h
/SimpleString.cpp
/SimpleString.h
...
/CppUnitTests
/Cpp
/StackMain.cpp
/StackTest.cpp
/Stack.h
/readme.txt
使用VC6.0打开CppUnitTests文件夹下的CppUnitTests.dsw即可。StackMain.cpp就是Main函数,它保证运行所有的TestCase,这个几乎都不用改.StackTest.cpp就是我们自己要写的代码。
3、设计测试用例以及测试结果
(1)计算周围存活细胞数量
①测试用例
| 细胞坐标(横坐标或者纵坐标) | 输出 | |
| 合法用例 | x=20 | 提示测试无错 |
| 不合法用例 | x=-1 | 提示数值错误 |
②运行结果
合法用例

不合法用例

(2)获取细胞存活状态
①测试用例
| 细胞坐标(横坐标或者纵坐标) | 输出 | |
| 合法用例 | x=10 | 提示测试无错 |
| 不合法用例 | y=-2 | 提示数值错误 |
②运行结果
合法用例

不合法用例

(3)设置下一时刻细胞矩阵存活状态
①测试用例
| 细胞存活状态 | 输出 | |
| 合法用例 | Alive=0 | 提示测试无错 |
| 合法用例 | Alive=1 | 提示测试无错 |
| 不合法用例 | Alive=-1 | 提示数值错误 |
②运行结果
合法用例

不合法用例

4、测试源码
#Test.h
 1 ///////////////////////////////////////////////////////////////////////////////
 2 //
 3 // TEST.H
 4 //
 5 // This file contains the Test class along with the macros which make effective
 6 // in the harness.
 7 //
 8 ///////////////////////////////////////////////////////////////////////////////
 9
10 #ifndef TEST_H
11 #define TEST_H
12
13
14 #include <cmath>
15 #include "SimpleString.h"
16
17 class TestResult;
18
19
20
21 class Test
22 {
23 public:
24     Test (const SimpleString& testName);
25
26     virtual void    run (TestResult& result) = 0;
27
28
29     void            setNext(Test *test);
30     Test            *getNext () const;
31
32 protected:
33
34     bool check (long expected, long actual, TestResult& result, const SimpleString& fileName, long lineNumber);
35     bool check (const SimpleString& expected, const SimpleString& actual, TestResult& result, const SimpleString& fileName, long lineNumber);
36
37     SimpleString    name_;
38     Test            *next_;
39
40 };
41
42
43 #define TEST(testName, testGroup)44   class testGroup##testName##Test : public Test 45     { public: testGroup##testName##Test () : Test (#testName "Test") {} 46             void run (TestResult& result_); } 47     testGroup##testName##Instance; 48     void testGroup##testName##Test::run (TestResult& result_)
49
50
51
52 #define CHECK(condition)53 { if (!(condition)) 54 { result_.addFailure (Failure (name_, __FILE__,__LINE__, #condition)); return; } }
55
56
57
58 #define CHECK_EQUAL(expected,actual)59 { if ((expected) == (actual)) return; result_.addFailure(Failure(name_, __FILE__, __LINE__, StringFrom(expected), StringFrom(actual))); }
60
61
62 #define LONGS_EQUAL(expected,actual)63 { long actualTemp = actual; 64   long expectedTemp = expected; 65   if ((expectedTemp) != (actualTemp)) 66 { result_.addFailure (Failure (name_, __FILE__, __LINE__, StringFrom(expectedTemp), 67 StringFrom(actualTemp))); return; } }
68
69
70
71 #define DOUBLES_EQUAL(expected,actual,threshold)72 { double actualTemp = actual; 73   double expectedTemp = expected; 74   if (fabs ((expectedTemp)-(actualTemp)) > threshold) 75 { result_.addFailure (Failure (name_, __FILE__, __LINE__, 76 StringFrom((double)expectedTemp), StringFrom((double)actualTemp))); return; } }
77
78
79
80 #define FAIL(text) 81 { result_.addFailure (Failure (name_, __FILE__, __LINE__,(text))); return; }
82
83
84
85 #endif
 #Test.cpp
 1 #include "Test.h"
 2 #include "TestRegistry.h"
 3 #include "TestResult.h"
 4 #include "Failure.h"
 5
 6
 7 Test::Test (const SimpleString& testName)
 8     : name_ (testName)
 9 {
10     TestRegistry::addTest (this);
11 }
12
13
14 Test *Test::getNext() const
15 {
16     return next_;
17 }
18
19
20 void Test::setNext(Test *test)
21 {
22     next_ = test;
23 }
24
25 bool Test::check(long expected, long actual, TestResult& result, const SimpleString& fileName, long lineNumber)
26 {
27     if (expected == actual)
28         return true;
29     result.addFailure (
30         Failure (
31             name_,
32             StringFrom (__FILE__),
33             __LINE__,
34             StringFrom (expected),
35             StringFrom (actual)));
36
37     return false;
38
39 }
40
41
42 bool Test::check(const SimpleString& expected, const SimpleString& actual, TestResult& result, const SimpleString& fileName, long lineNumber)
43 {
44     if (expected == actual)
45         return true;
46     result.addFailure (
47         Failure (
48             name_,
49             StringFrom (__FILE__),
50             __LINE__,
51             expected,
52             actual));
53
54     return false;
55
56 }
 #TestResult.cpp
 1 #include "TestResult.h"
 2 #include "Failure.h"
 3
 4 #include <stdio.h>
 5
 6
 7 TestResult::TestResult ()
 8     : failureCount (0)
 9 {
10 }
11
12
13 void TestResult::testsStarted ()
14 {
15 }
16
17
18 void TestResult::addFailure (const Failure& failure)
19 {
20     fprintf (stdout, "%s%s%s%s%ld%s%s\n",
21         "Failure: \"",
22         failure.message.asCharString (),
23         "\" " ,
24         "line ",
25         failure.lineNumber,
26         " in ",
27         failure.fileName.asCharString ());
28
29     failureCount++;
30 }
31
32
33 void TestResult::testsEnded ()
34 {
35     if (failureCount > 0)
36         fprintf (stdout, "There were %ld failures\n", failureCount);
37     else
38         fprintf (stdout, "There were no test failures\n");
39 }
5、提交
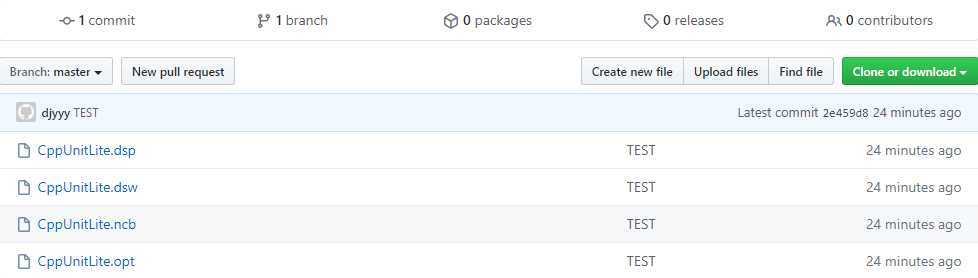
利用git命令将测试代码远程提交到已建立好的GitHub仓库
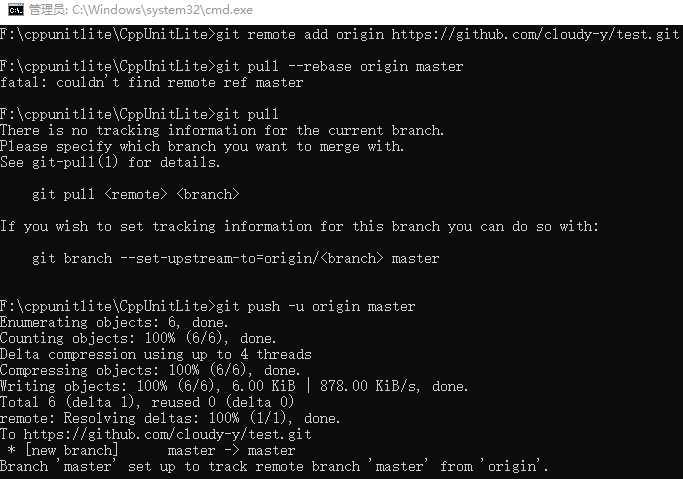
提交后仓库内容如下:
四、思考题
比较以下二个工匠的做法,你认为哪种好?结合编码和单元测试,谈谈你的认识。
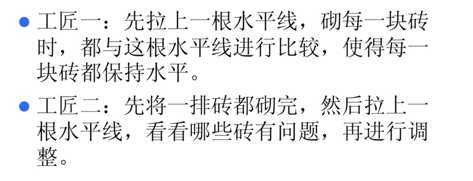
答:我认为工匠一的做法更科学。在软件项目中,在“砌砖”时以“水平线”为标准,会降低开发与需求理解的偏差、降低开发过程中的缺陷率,同时可以提高bug定位速度。测试驱动开发的基本思想就是在开发功能代码之前,先编写测试代码。
什么时候测试?单元测试越早越好,早到什么程度?XP开发理论讲究TDD,即测试驱动开发,先编写测试代码,再进行开发。在实际的工作中,可以不必过分强调先什么后什么,重要的是高效和感觉舒适。以经验来看,先编写产品函数的框架,然后编写测试函数,针对产品函数的功能编写测试用例,然后编写产品函数的代码,每写一个功能点都运行测试,随时补充测试用例。所谓先编写产品函数的框架,是指先编写函数空的实现,有返回值的随便返回一个值,编译通过后再编写测试代码,这时,函数名、参数表、返回类型都应该确定下来了,所编写的测试代码以后需修改的可能性比较小。
五、实验小结
1、本次实验花了很多时间在安装软件上,从一开始的CppUnitLite到决定使用自带的单元测试的VS2019,最后再到机缘巧合之下发现的CppUnitLite。过多被浪费的时间使我认识到对软件的安装不要盲目,要清楚自己需要什么样的功能,然后再去选择合适的软件。
2、虽然我们是第一次接触单元测试,但是其实单元测试是软件开发过程中进行的最低级别的测试活动。而对代码进行测试,是一件普通而又重要的事情。
原文:https://www.cnblogs.com/cloudyyy/p/13025915.html