dominate是一个使用优雅的DOM API创建和操作HTML文档的Python库。使用它能非常简洁地编写纯Python的HTML页面,这消除了学习另一种模板语言的需要,利用Python更强大的特性。
首先安装依赖:
pip install dominate
1个简单的小例:
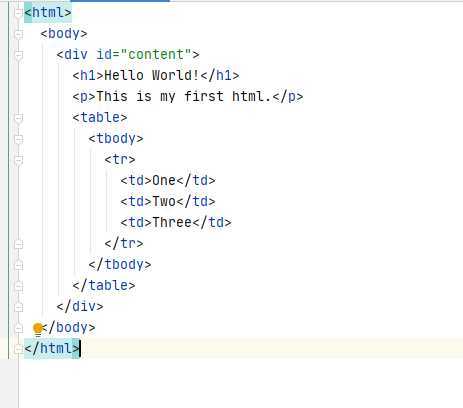
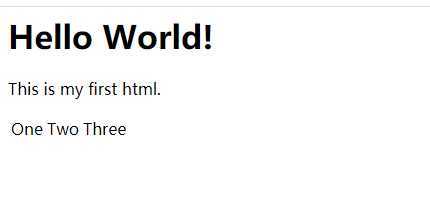
from dominate.tags import *
h = html()

with h.add(body()).add(div(id=‘content‘)):
    h1(‘Hello World!‘)
    p(‘This is my first html.‘)
    with table().add(tbody()):
        l=tr()
        l +=td(‘One‘)
        l.add(td(‘Two‘))
        with l:
            td(‘Three‘)
with open(‘test.html‘,‘w‘) as f:
    f.write(h.render())
生成的Html 源码 如下:
效果:
分解:
dominate 的最基本的特性为每个HTML标记构建了一个类。可以使用
from dominate.tags import *
导入所有html标记
Root element: html
Document metadata: head, title, base, link, meta, style,
Scripting: script, noscript
Sections: body, section, nav, article, aside, h1, h2, h3, h4, h5, h6, hgroup, header, footer, address
Grouping content: p, hr, pre, blockquote, ol, ul, li, dl, dt, dd, figure, figcaption, div
Text semantics: a, em, strong, small, s, q, dfn, abbr, time_, code, var, samp, kbd, sub, i, b, u, mark, ruby, rt, rp, bdo, span, br, wbr
Edits: ins, del_
Embedded content: img, iframe, embed, object_, param, video, audio, source, track, canvas, map_, area
Tabular data: table, caption, colgroup, col, tbody, thead, tfoot, tr, td, th
Forms: form, fieldset, legend, label, input_, button, select, datalist, optgroup, option, textarea, keygen, output, progress, meter
Interactive elements: details, summary, command, menu, font
Additional markup: comment
用1个小例子来体会一下:
print(html(body(h1(‘Hello, World!‘))))
输出:
<html>
  <body>
    <h1>hello,world</h1>
  </body>
</html>
dominate 还可以使用关键字参数将属性附加到标签上。大多数属性都是来自HTML规范的直接拷贝.
class和for可以使用如下别名
class: _class, cls, className, class_name
for: _for, fr, htmlFor, html_for
使用data_*代表定制HTML5数据属性。
属性的声明有如下方式:
例1:
test=label(‘text‘,cls=‘classname anothername‘,fr=‘someinput‘)
#输出结果
<label class="classname anothername" for="someinput">text</label>
例2:
header=div(‘text‘)
header[‘id‘]=‘header‘
print(header)
<div id="header">text</div>
通过使用+=操作符,如下:
list = ul()
for item in range(4):
    list += li(‘Item #‘, item)
print(list)
输出:
<ul>
    <li>Item #0</li>
    <li>Item #1</li>
    <li>Item #2</li>
    <li>Item #3</li>
</ul>
通过add()方法:
_html=html()
_body=_html.add(body())
header=_body.add(div(id=‘header‘))
content=_body.add(div(id=‘content‘))
footer=_body.add(div(id=‘footer‘))
print(_html)
输出:
<html>
  <body>
    <div id="header"></div>
    <div id="content"></div>
    <div id="footer"></div>
  </body>
</html>
header=div()
header[‘id‘]=‘header‘
print(header)
输出
<div id="header"></div>
header=div(‘Test‘)
header[0]=‘Hello World‘
print(header)
输出
<div>Hello World</div>
a=div(span(‘Hello World‘))
print(a.render())

<div>
  <span>Hello World</span>
</div>
print(a.render(pretty=False))

<div><span>Hello World</span></div>

print(a.render(indent=‘\t‘))

<div>
    <span>Hello World</span>
</div>

a=div(span(‘Hello World‘),__pretty=False)
print(a.render(xhtml=True))

<div><span>Hello World</span></div>
上下文管理器
例子:
with h:
...     li(‘One‘)
...     li(‘Two‘)
...     li(‘Three‘)
... print(h)
输出:
<html>
  <li>One</li>
  <li>Two</li>
  <li>Three</li>
</html>
更复杂的例子见文章开头的例子。
可以在with内加入attr(),用来使当前的标签加入属性,如:
d=div()
with d:
...     attr(id=‘header‘)
... print(d)
输出:
<div id="header"></div>
@div(h2(‘Welcome‘),cls=‘greeting‘)
... def greeting(name):
...     p(‘Hello %s‘ %name)
...
print(greeting(‘Bob‘))
输出:
<div class="greeting">
  <h2>Welcome</h2>
  <p>Hello Bob</p>
</div>
创建一个新文档时,创建了基本的HTML标记结构。
from dominate import document
d = document()
d +=h1(‘Hello,World!‘)
d.body+=p(‘This is a paragraph.‘)
print(d)
输出:
<!DOCTYPE html>
<html>
  <head>
    <title>Dominate</title>
  </head>
  <body>
    <h1>Hello,World!</h1>
    <p>This is a paragraph.</p>
  </body>
</html>
还可以直接访问<title>, <head>, <body>
d.head
<dominate.tags.head at 1f60dddc8d0: 0 attributes, 1 child>
d.title
‘Dominate‘
d.body
<dominate.tags.body at 1f60dddc6d8: 0 attributes, 2 children>
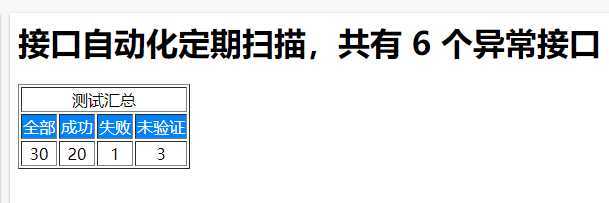
我希望生成一个测试报告的html,然后将这段html以邮件内容的方式发送出去,这样在邮箱中看到的内容就是比较友好的了。
from dominate.tags import *
h = html()

datas= {‘all‘:30,‘success‘:20,‘fail‘:1,‘pass‘:3}
with h.add(body()).add(div(id=‘content‘)):
    h1(‘接口自动化定期扫描,共有 6 个异常接口‘)

    with table(border=‘1‘).add(tbody()):

        # 生成报表头部
        with tr(align=‘center‘):
            td(colspan="4").add(‘测试汇总‘)

        l = tr(align="center", bgcolor="#0080FF", style="color:white")

        l += td(‘全部‘)
        l += td(‘成功‘)
        l += td(‘失败‘)
        l += td(‘未验证‘)

        #插入表格数据
        l=tr(align=‘center‘)
        with l:
            td(datas[‘all‘])
            td(datas[‘success‘])
            td(datas[‘fail‘])
            td(datas[‘pass‘])

print(h.render())
<html>
  <body>
    <div id="content">
      <h1>接口自动化定期扫描,共有 6 个异常接口</h1>
      <table border="1">
        <tbody>
          <tr align="center">
            <td colspan="4">测试汇总</td>
          </tr>
          <tr align="center" bgcolor="#0080FF" style="color:white">
            <td>全部</td>
            <td>成功</td>
            <td>失败</td>
            <td>未验证</td>
          </tr>
          <tr align="center">
            <td>30</td>
            <td>20</td>
            <td>1</td>
            <td>3</td>
          </tr>
        </tbody>
      </table>
    </div>
  </body>
</html>

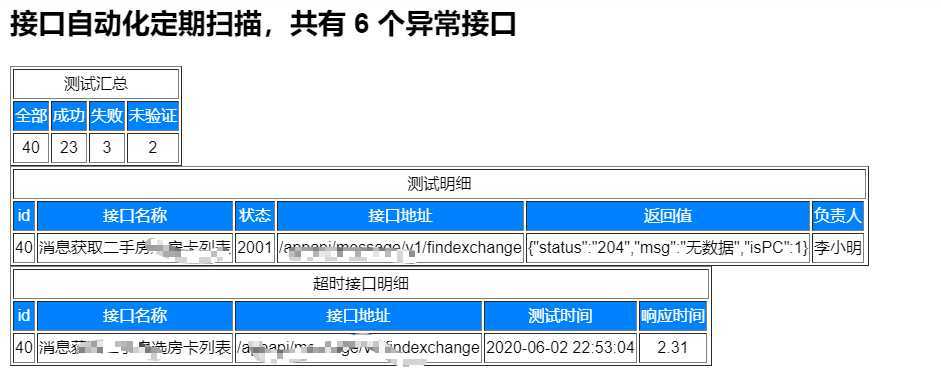
from dominate.tags import *
    h = html()

    with h.add(body()).add(div(id=‘content‘)):
        h1(‘接口自动化定期扫描,共有 6 个异常接口‘)
        h2(‘其中2个状态异常,4个响应超时‘)
        with table(border=‘1‘).add(tbody()):
            # 生成报表头部
            with tr(align=‘center‘):
                td(colspan="4").add(‘测试汇总‘)
            l = tr(align="center", bgcolor="#0080FF", style="color:white")

            l += td(‘全部‘)
            l += td(‘成功‘)
            l += td(‘失败‘)
            l += td(‘未验证‘)

            # 插入表格数据
            l = tr(align=‘center‘)
            with l:
                td(40)
                td(23)
                td(3)
                td(2)

    with h.add(body()).add(div(id=‘content‘)):
        with table(border=‘1‘).add(tbody()):
            # 生成报表头部
            with tr(align=‘center‘):
                td(colspan="7").add(‘测试明细‘)
            l = tr(align="center", bgcolor="#0080FF", style="color:white")

            l += td(‘id‘)
            l += td(‘接口名称‘)
            l += td(‘状态‘)
            l += td(‘接口地址‘)
            l += td(‘返回值‘)
            l += td(‘负责人‘)

            # 插入表格数据
            l = tr(align=‘center‘)
            with l:
                td(40)
                td(‘消息获取二手房选房卡列表‘)
                td(2001)
                td(‘/appapi/message/v1/findexchange    ‘)
                td(‘{"status":"204","msg":"无数据","isPC":1}‘)
                td(‘李小明‘)

    with h.add(body()).add(div(id=‘content‘)):
        with table(border=‘1‘).add(tbody()):
            # 生成报表头部
            with tr(align=‘center‘):
                td(colspan="7").add(‘超时接口明细‘)
            l = tr(align="center", bgcolor="#0080FF", style="color:white")

            l += td(‘id‘)
            l += td(‘接口名称‘)
            l += td(‘接口地址‘)
            l += td(‘测试时间‘)
            l += td(‘响应时间‘)

            # 插入表格数据
            l = tr(align=‘center‘)
            with l:
                td(40)
                td(‘消息获取二手房选房卡列表‘)
                td(‘/appapi/message/v1/findexchange    ‘)
                td(‘2020-06-02 22:53:04‘)
                td(2.31)

print(h.render())
效果:
参考文档:
原文:https://www.cnblogs.com/kaerxifa/p/13035376.html
