Spring初始化事件广播的源码很简单,和上一节初始化消息源的逻辑非常相似,我把代码贴在这。
 1 protected void initApplicationEventMulticaster() {
 2     ConfigurableListableBeanFactory beanFactory = getBeanFactory();
 3     // 检查配置中是否有applicationEventMulticaster的Bean定义
 4     if (beanFactory.containsLocalBean(APPLICATION_EVENT_MULTICASTER_BEAN_NAME)) {
 5         // 如果有则获取(实例化Bean)
 6         this.applicationEventMulticaster =
 7             beanFactory.getBean(APPLICATION_EVENT_MULTICASTER_BEAN_NAME, ApplicationEventMulticaster.class);
 8         if (logger.isDebugEnabled()) {
 9             logger.debug("Using ApplicationEventMulticaster [" + this.applicationEventMulticaster + "]");
10         }
11     }
12     else {
13         // 如果没有手动创建SimpleApplicationEventMulticaster的实例
14         this.applicationEventMulticaster = new SimpleApplicationEventMulticaster(beanFactory);
15         // 把创建的SimpleApplicationEventMulticaster注册到BeanFactory
16         beanFactory.registerSingleton(APPLICATION_EVENT_MULTICASTER_BEAN_NAME, this.applicationEventMulticaster);
17         if (logger.isDebugEnabled()) {
18             logger.debug("Unable to locate ApplicationEventMulticaster with name ‘" +
19                          APPLICATION_EVENT_MULTICASTER_BEAN_NAME +
20                          "‘: using default [" + this.applicationEventMulticaster + "]");
21         }
22     }
23 }
要想了解Spring和Java的事件机制你就得先了解下什么是观察者模式。我在这里简述下,观察者模式中主要分为三个元素,事件、观察者、被观察者,也可以叫做事件对象、事件源、监听器。
我你举个例方便你理解,就以最简单且常见的吃饭排号来说吧:
具体代码实现如下:
https://www.cnblogs.com/bzfsdr/p/12685451.html
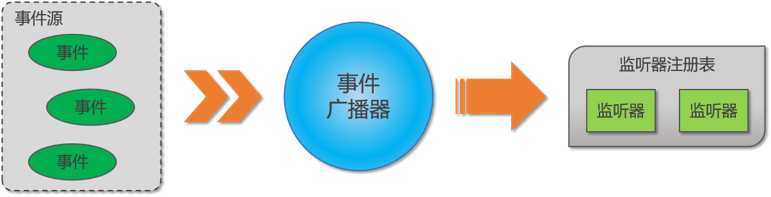
说Java事件机制前首先让我们了解下什么是事件驱动机制:
———————————————————————————————————————————————————————
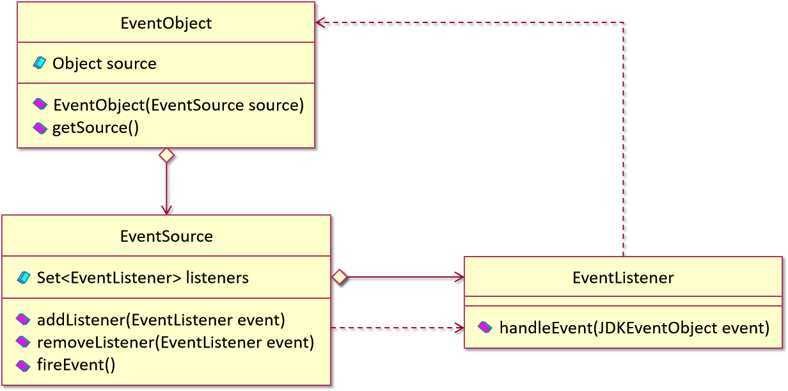
Java事件机制则是基于观察者模式,定义了如下接口:
具体使用方式:与观察者模式大同小异。
1、事件对象:
 1 public class JDKEventObject extends EventObject {
 2
 3     private Object source;
 4
 5     public JDKEventObject(JDKEventSource source) {
 6         super(source);
 7         this.source = source;
 8     }
 9
10     @Override
11     public Object getSource() {
12         return source;
13     }
14 }
2、监听器:
1 public interface JDKEventListener extends EventListener {
2
3     public void handleEvent(JDKEventObject event);
4 }
3、事件源:
 1 public class JDKEventSource {
 2
 3     private Set<EventListener> listeners = new HashSet();
 4
 5     private String message;
 6
 7     public void addListener(EventListener event) {
 8         listeners.add(event);
 9     }
10
11     public void removeListener(EventListener event) {
12         if (listeners.contains(event))
13             listeners.remove(event);
14     }
15
16     public void fireEvent() {
17         Iterator<EventListener> iter = listeners.iterator();
18         while (iter.hasNext()) {
19             JDKEventListener listener = (JDKEventListener) iter.next();
20             listener.handleEvent(new JDKEventObject(this));
21         }
22     }
23 }
Spring事件驱动是基于Java的事件驱动实现的,并且内置了一些时间:
———————————————————————————————————————————————————————
Spring事件机制中除了事件对象和监听者者两个角色之外,“事件广播器”则负责把事件转发给监听者:
Spring 中,不需要我们手动进行监听器注册。ApplicationListener对象一旦在Spring容器中被注册,Spring会进行监听器的注册,实现事件的监听。
1、服务类:
 1 // Spring容器检测到Service实现了ApplicationEventPublisherAware接口,会自动调用setApplicationEventPublisher
 2 public class SpringService implements ApplicationEventPublisherAware {
 3
 4     private List<String> nameList;
 5     private ApplicationEventPublisher publisher;
 6
 7     @Override
 8     public void setApplicationEventPublisher(ApplicationEventPublisher publisher) {
 9         this.publisher = publisher;
10     }
11
12     public void setNameList(List<String> list) {
13         this.nameList = list;
14     }
15
16     // 要发布自定义ApplicationEvent,需要在ApplicationEventPublisher上调用publishEvent方法
17     public void sendMessage(String name) {
18         if (nameList.contains(name)) {
19             publisher.publishEvent(new SpringEvent(this, name));
20             return;
21         }
22     }
23 }
2、监听器:
 1 // 要接收自定义的ApplicationEvent,需要实现ApplicationListener监听器
 2 public class SpringListener implements ApplicationListener<SpringEvent> {
 3
 4     String notifier;
 5
 6     public void setNotifier(String notifier) {
 7         this.notifier = notifier;
 8     }
 9
10     @Override
11     public void onApplicationEvent(SpringEvent event) {
12         System.out.println("onApplicationEvent: "+ notifier);
13     }
14 }
3、事件类:
 1 public class SpringEvent extends ApplicationEvent {
 2
 3     String name;
 4
 5     /**
 6      * Create a new ApplicationEvent.
 7      *
 8      * @param source the object on which the event initially occurred (never {@code null})
 9      */
10     public SpringEvent(Object source, String name) {
11         super(source);
12         this.name = name;
13     }
14 }
之前我们所说的BeanPostProcessor及Bean的初始和销毁回调这些事件都是建立在容器已经成功启动的基础上,如果我们想在容器启动前后做一些处理就需要实现如下接口:
 1 // 生命周期接口,任何Spring管理的对象都可以实现该接口
 2 public interface Lifecycle {
 3     void start();
 4     void stop();
 5     boolean isRunning();
 6 }
 7
 8 // 管理ApplicationContext生命周期
 9 public interface LifecycleProcessor extends Lifecycle {
10     void onRefresh();
11     void onClose();
12 }
13
14 public interface SmartLifecycle extends Lifecycle, Phased {
15     // Lifecycle Bean是否自动启动
16     boolean isAutoStartup();
17
18     // 停止的时候执行回调,默认超时时间30秒
19     void stop(Runnable callback);
20 }
21
22 // Phased最小的对象首先启动,停止时,顺序和启动时相反
23 public interface Phased {
24     // SmartLifecycle的实现类默认Phase为0
25     int getPhase();
26 }
示例:
 1 <?xml version="1.0" encoding="UTF-8"?>
 2 <beans xmlns="http://www.springframework.org/schema/beans"
 3        xmlns:xsi="http://www.w3.org/2001/XMLSchema-instance"
 4        xsi:schemaLocation="http://www.springframework.org/schema/beans http://www.springframework.org/schema/beans/spring-beans.xsd">
 5
 6     <bean class="com.jdr.spring.event.TestLifeCycle" name="testLifeCycle"/>
 7
 8     <bean class="com.jdr.spring.event.TestSmartLifeCycle" name="testSmartLifeCycle"/>
 9
10     <bean class="com.jdr.spring.event.CustomContextEvent" name="customContextEvent"/>
11
12 </beans>
 1 public class TestLifeCycle implements Lifecycle {
 2
 3     private boolean running = false;
 4
 5     public TestLifeCycle() {
 6         System.out.println("TestLifeCycle....");
 7     }
 8
 9     @Override
10     public void start() {
11         System.out.println("TestLifeCycle start...");
12     }
13
14     @Override
15     public void stop() {
16         System.out.println("TestLifeCycle stop...");
17     }
18
19     @Override
20     public boolean isRunning() {
21         return running;
22     }
23 }
 1 public class TestSmartLifeCycle implements SmartLifecycle {
 2
 3     private boolean running = false;
 4
 5     public TestSmartLifeCycle() {
 6         System.out.println("TestSmartLifeCycle....");
 7     }
 8
 9     @Override
10     public boolean isAutoStartup() {
11         // 若自动启动标识为false,则容器启动时不会调用start()
12         return true;
13     }
14
15     @Override
16     public void stop(Runnable callback) {
17         System.out.println("TestSmartLifeCycle stop callback....");
18         this.running = false;
19     }
20
21     @Override
22     public void start() {
23         System.out.println("TestSmartLifeCycle start....");
24         this.running = true;
25     }
26
27     @Override
28     public void stop() {
29         System.out.println("TestSmartLifeCycle stop....");
30         this.running = false;
31     }
32
33     @Override
34     public boolean isRunning() {
35         return running;
36     }
37
38     @Override
39     public int getPhase() {
40         return 100;
41     }
42 }
 1 public class CustomContextEvent implements ApplicationListener<ApplicationEvent> {
 2
 3     @Override
 4     public void onApplicationEvent(ApplicationEvent event) {
 5         if (event instanceof ContextRefreshedEvent) {
 6             System.out.println("ContextRefreshedEvent...");
 7         }
 8         if (event instanceof ContextStartedEvent) {
 9             System.out.println("ContextStartedEvent...");
10         }
11         if (event instanceof ContextStoppedEvent) {
12             System.out.println("ContextStoppedEvent...");
13         }
14         if (event instanceof ContextClosedEvent) {
15             System.out.println("ContextClosedEvent...");
16         }
17     }
18 }
注意:
Spring源码学习笔记(十、Spring启动流程解析:初始化事件广播 )
原文:https://www.cnblogs.com/bzfsdr/p/13038863.html