学习ASP.NETCore,原链接
https://www.cnblogs.com/laozhang-is-phi/p/9511869.html
原教程是Core2.2,后期也升级到了Core3.0,但是文章中和GitHub的代码感觉有些乱,一直对应不上,
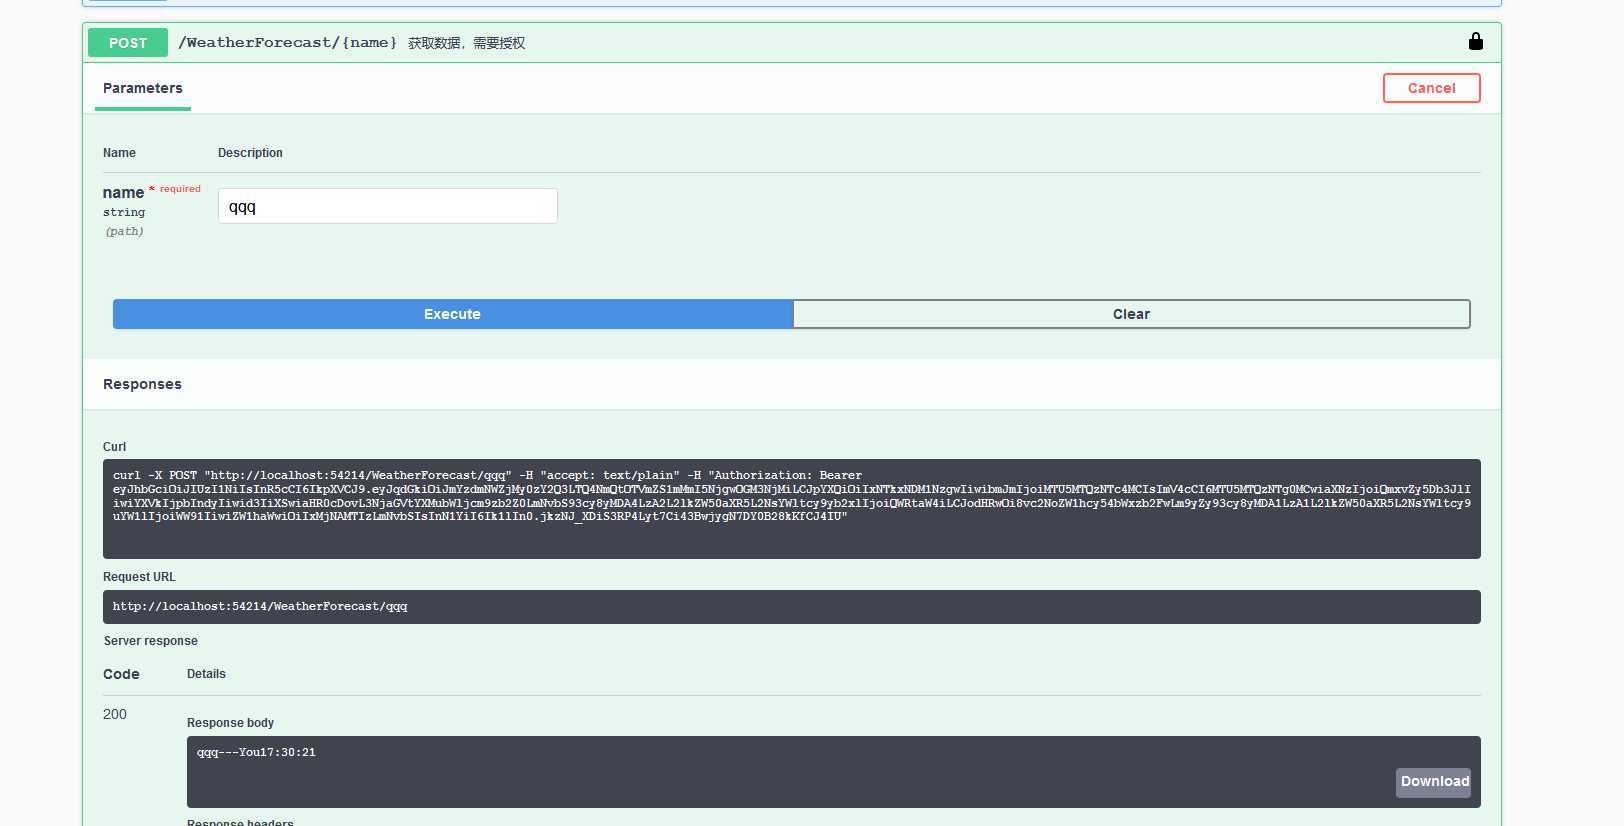
我创建的项目是Core3.0,而在Swagger中使用JWT一直访问401,此处做个笔记,供以后学习时查看。
参考博文,原链接
https://www.cnblogs.com/CreateMyself/p/11123023.html
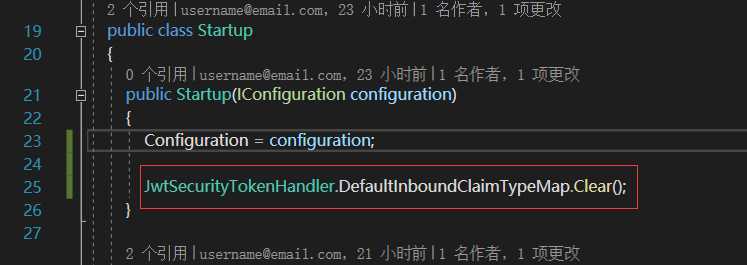
JwtSecurityTokenHandler.DefaultInboundClaimTypeMap.Clear();
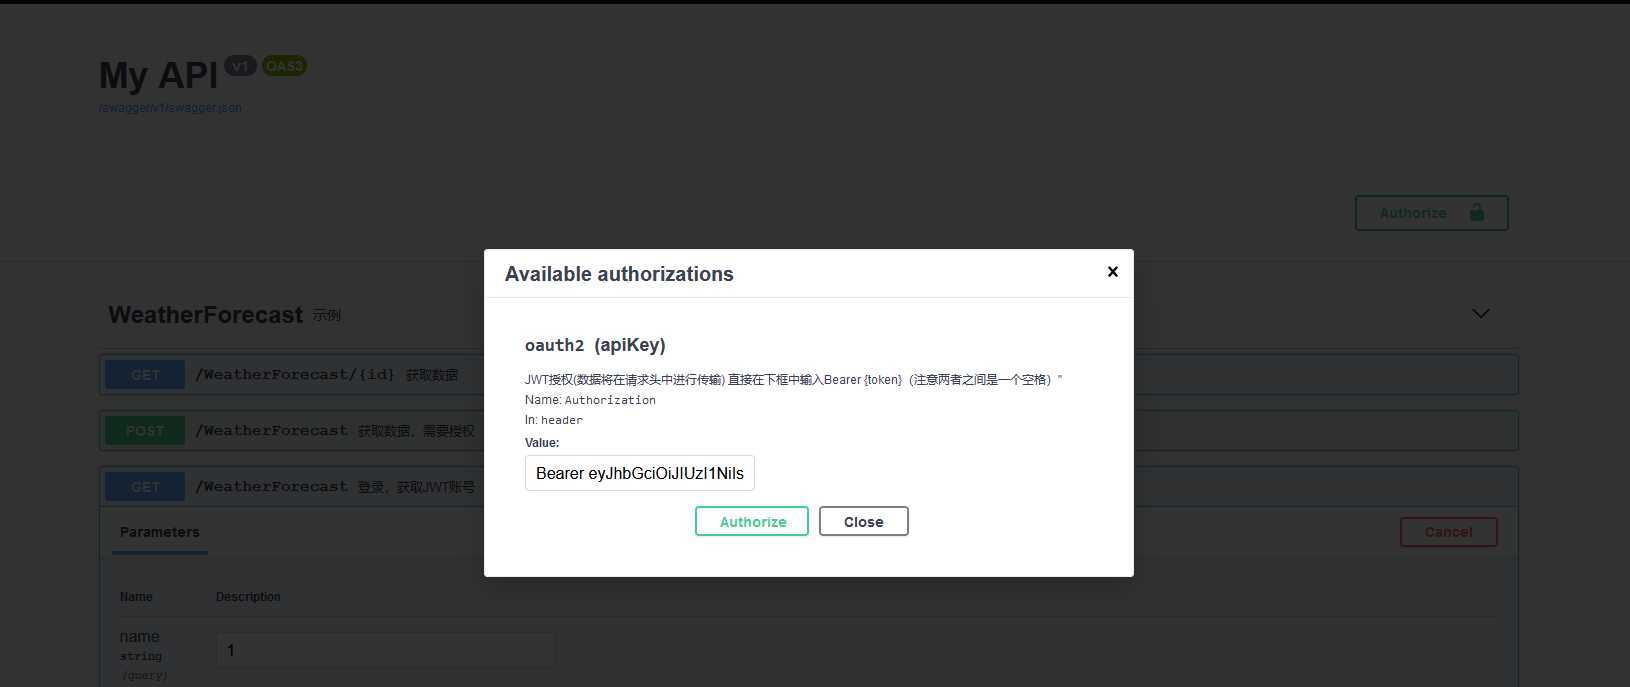
这里需要Nuget引用Swashbuckle.AspNetCore.Filters,oauth2需要写死,SecurityRequirementsOperationFilter中默认securitySchemaName="oauth2";
未添加该配置时,Bearer一直无法加入到JWT发起的Http请求的头部,无论怎么请求都会是401;
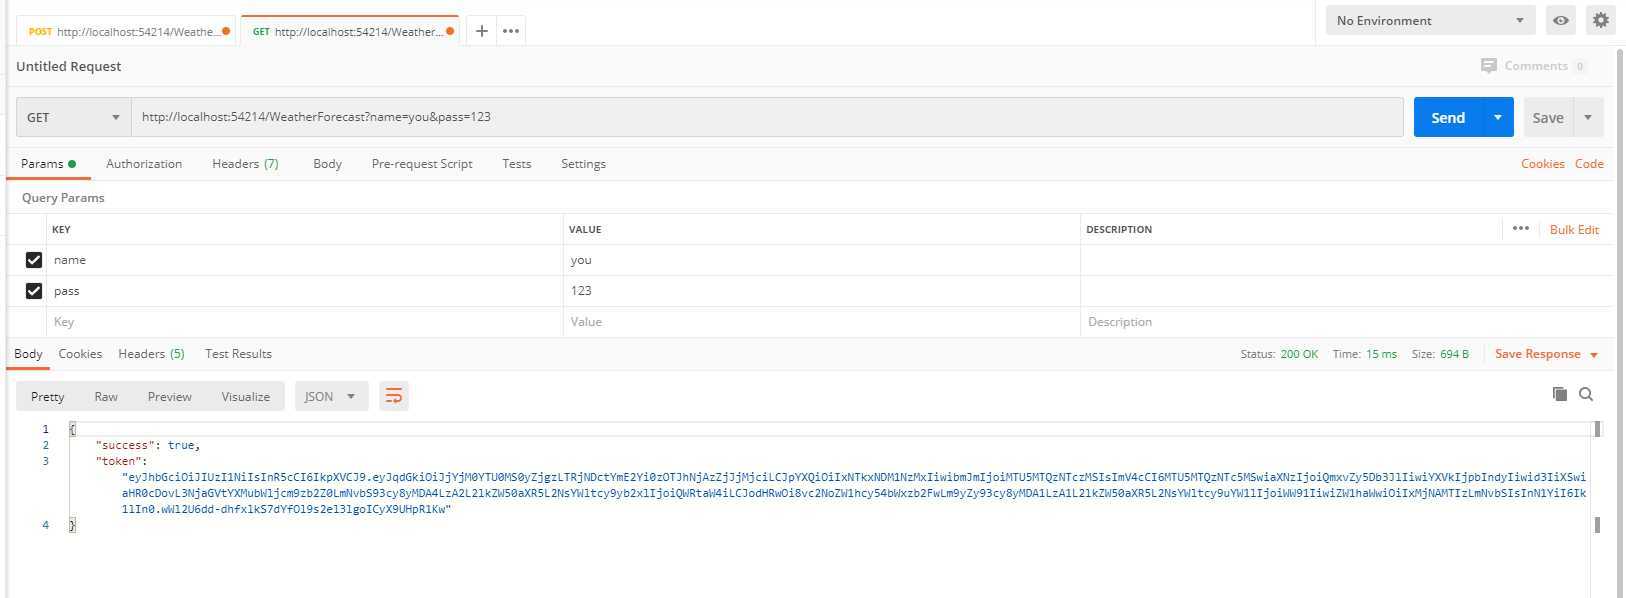
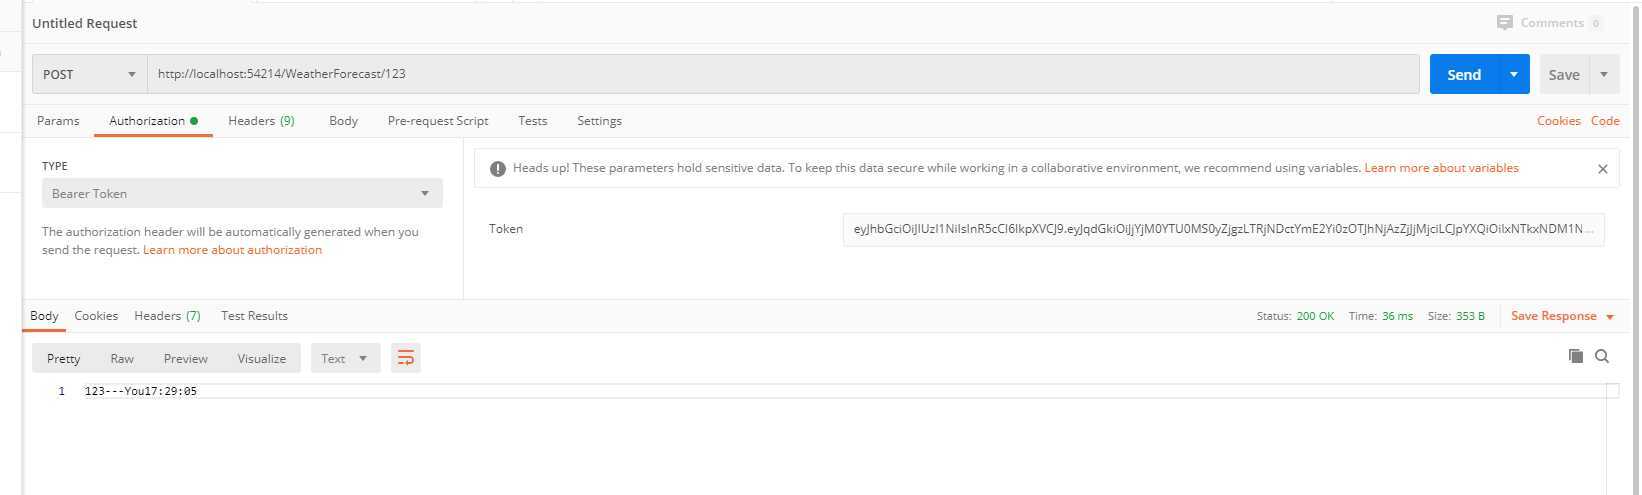
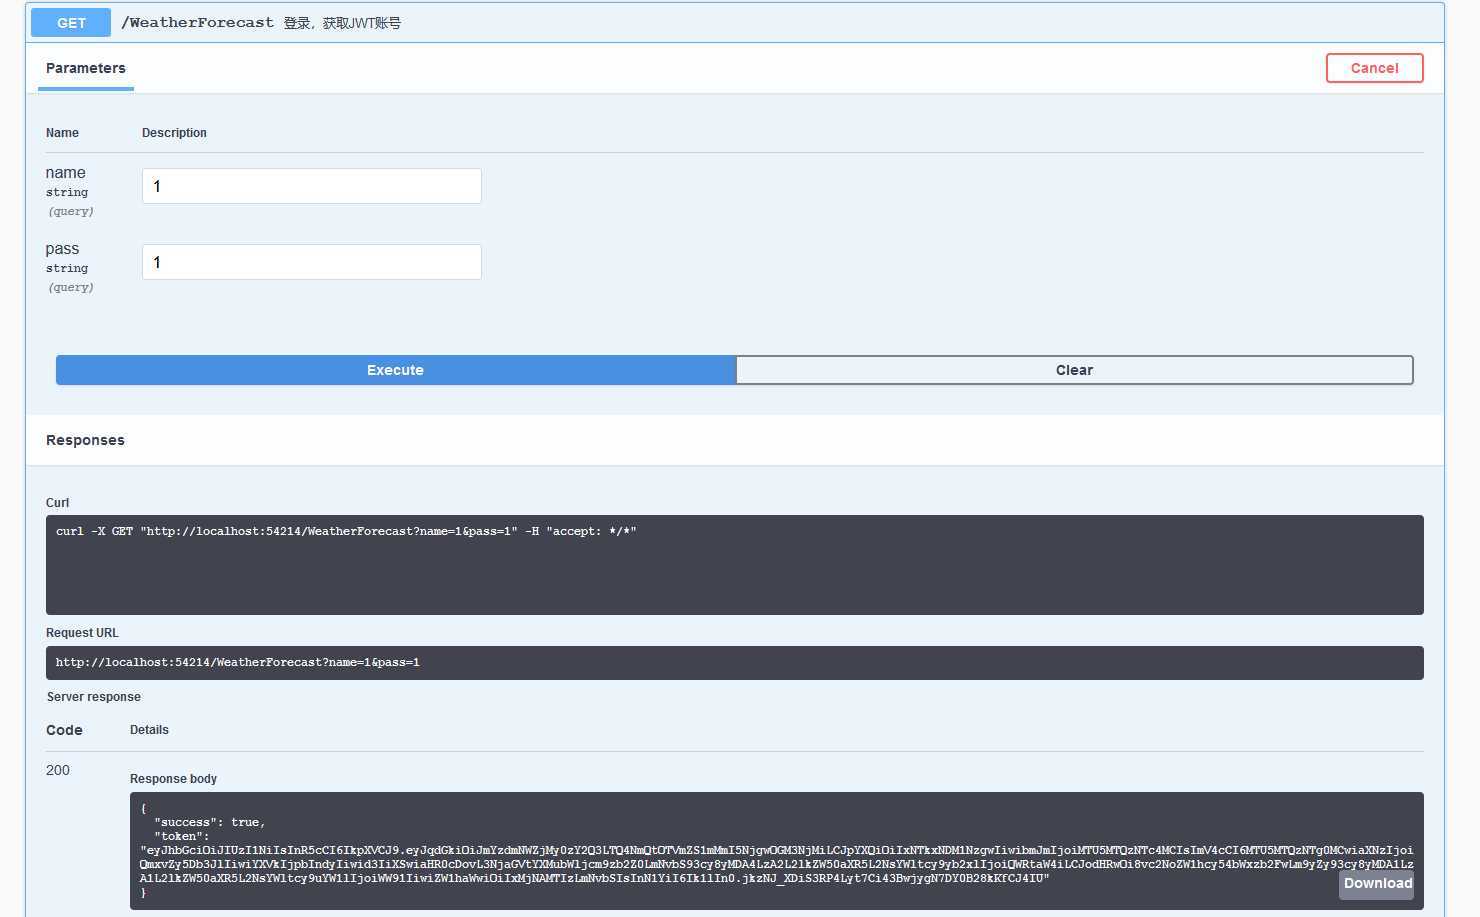
用Postman在Authorization添加了Bearer,就会正常响应,
                #region Token绑定到ConfigureServices
                // 在header中添加token,传递到后台
                c.OperationFilter<SecurityRequirementsOperationFilter>();

                c.AddSecurityDefinition("oauth2", new OpenApiSecurityScheme
                {
                    Description = "JWT授权(数据将在请求头中进行传输) 直接在下框中输入Bearer {token}(注意两者之间是一个空格)\"",
                    Name = "Authorization",//jwt默认的参数名称
                    In = ParameterLocation.Header,//jwt默认存放Authorization信息的位置(请求头中)
                    Type = SecuritySchemeType.ApiKey
                });
                #endregion

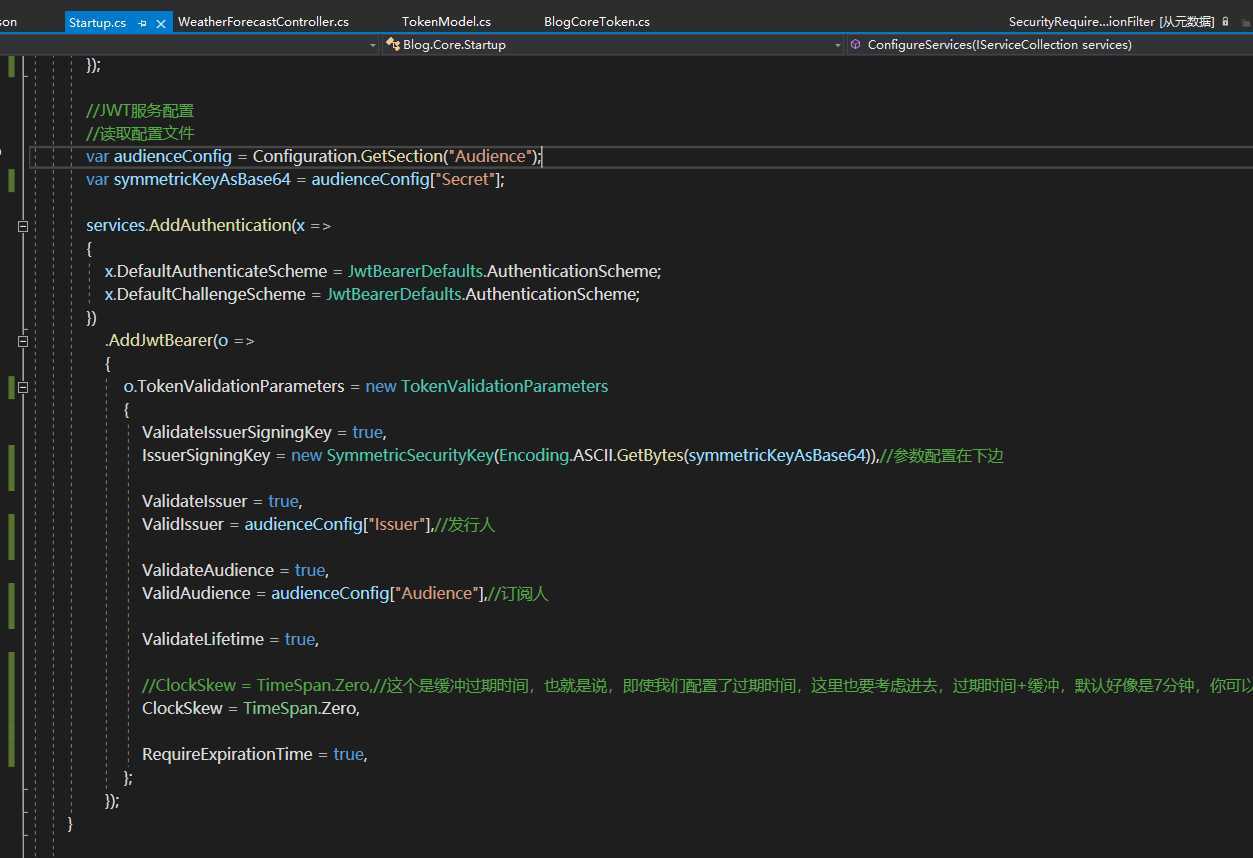
            //JWT服务配置
            //读取配置文件
            var audienceConfig = Configuration.GetSection("Audience");
            var symmetricKeyAsBase64 = audienceConfig["Secret"];

            services.AddAuthentication(x =>
            {
                x.DefaultAuthenticateScheme = JwtBearerDefaults.AuthenticationScheme;
                x.DefaultChallengeScheme = JwtBearerDefaults.AuthenticationScheme;
            })
                .AddJwtBearer(o =>
                {
                    o.TokenValidationParameters = new TokenValidationParameters
                    {
                        ValidateIssuerSigningKey = true,
                        IssuerSigningKey = new SymmetricSecurityKey(Encoding.ASCII.GetBytes(symmetricKeyAsBase64)),//参数配置在下边

                        ValidateIssuer = true,
                        ValidIssuer = audienceConfig["Issuer"],//发行人

                        ValidateAudience = true,
                        ValidAudience = audienceConfig["Audience"],//订阅人

                        ValidateLifetime = true,

                        //ClockSkew = TimeSpan.Zero,//这个是缓冲过期时间,也就是说,即使我们配置了过期时间,这里也要考虑进去,过期时间+缓冲,默认好像是7分钟,你可以直接设置为0
                        ClockSkew = TimeSpan.Zero,

                        RequireExpirationTime = true,
                    };
                });
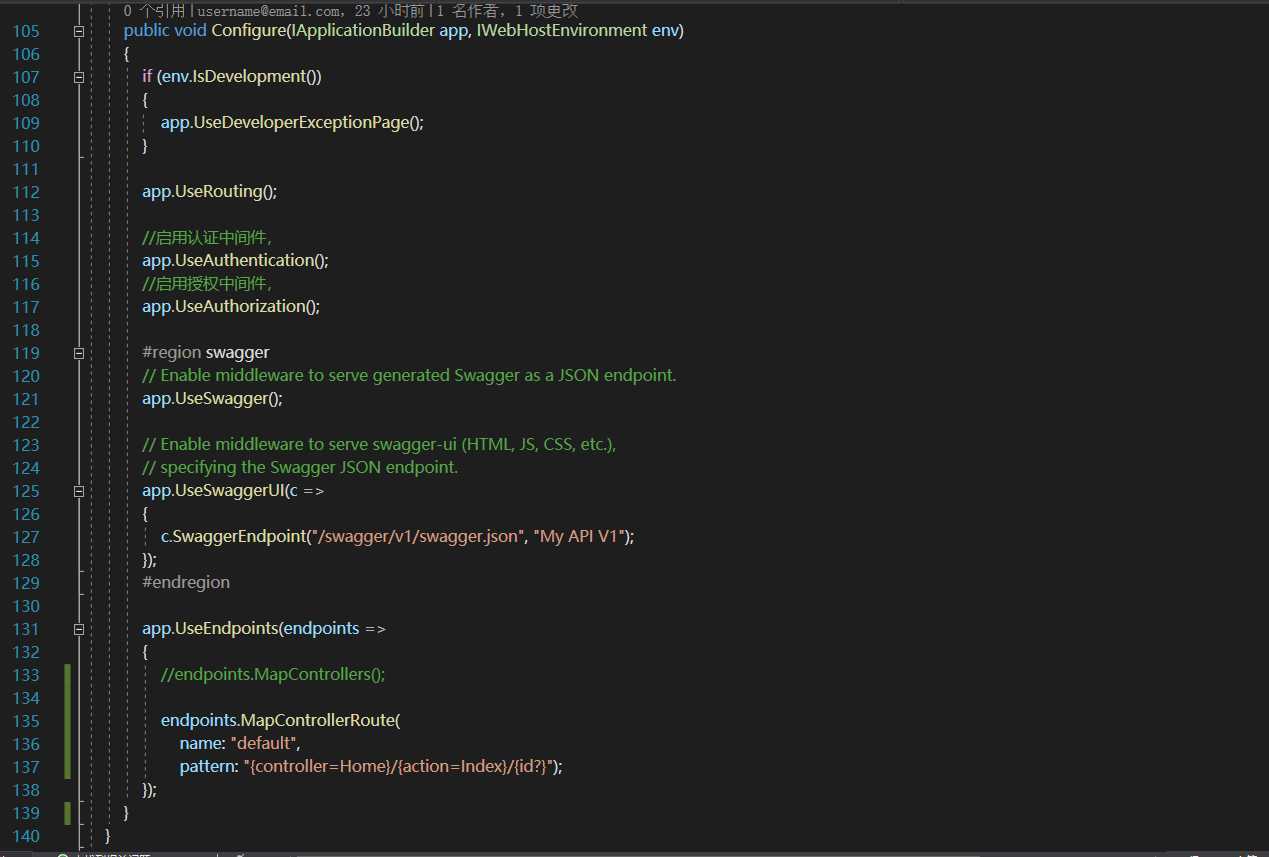
这里的顺序,必须严格遵守
  public void Configure(IApplicationBuilder app, IWebHostEnvironment env)
        {
            if (env.IsDevelopment())
            {
                app.UseDeveloperExceptionPage();
            }

            app.UseRouting();

            //启用认证中间件,
            app.UseAuthentication();
            //启用授权中间件,
            app.UseAuthorization();

            #region swagger
            // Enable middleware to serve generated Swagger as a JSON endpoint.
            app.UseSwagger();

            // Enable middleware to serve swagger-ui (HTML, JS, CSS, etc.),
            // specifying the Swagger JSON endpoint.
            app.UseSwaggerUI(c =>
            {
                c.SwaggerEndpoint("/swagger/v1/swagger.json", "My API V1");
            });
            #endregion

            app.UseEndpoints(endpoints =>
            {
                //endpoints.MapControllers();

                endpoints.MapControllerRoute(
                    name: "default",
                    pattern: "{controller=Home}/{action=Index}/{id?}");
            });
        }
这里的区别,jwt对象,多加了audience和expires属性。
audience:就是配置的值,
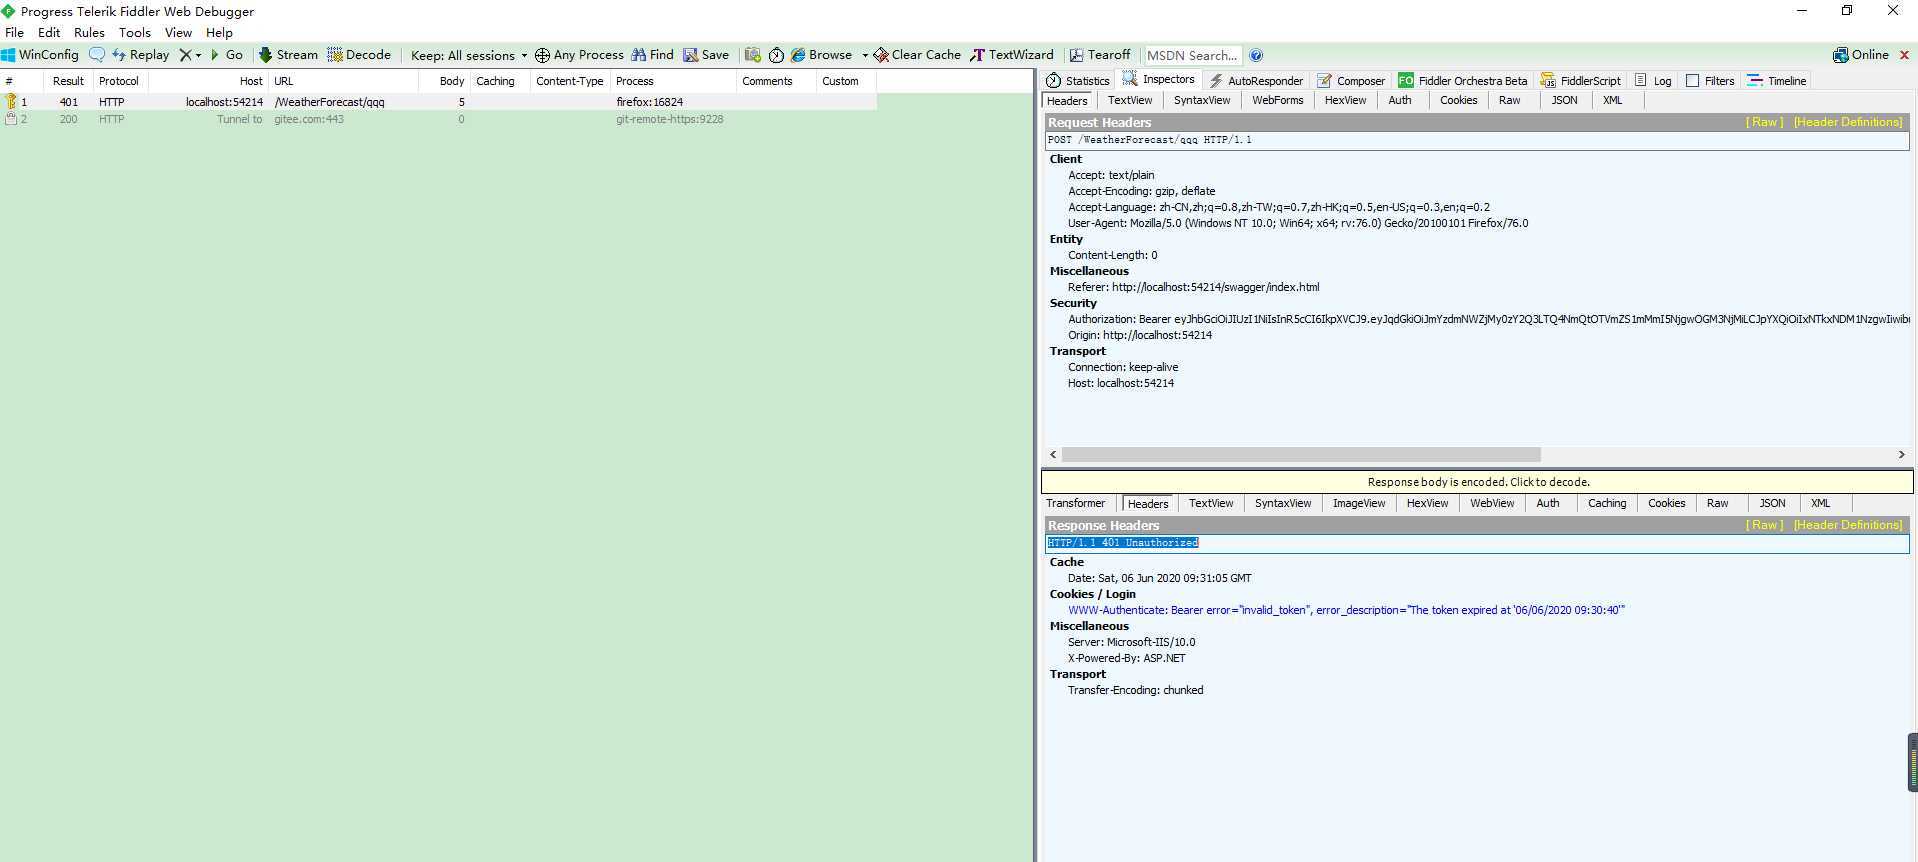
expires:JWT过期时间,经过测试,JWT过期时间=expires + ClockSkew。并不是claims中的JwtRegisteredClaimNames.Exp去控制的过期时间
        public static string IssueJWT(TokenModel tokenModel, TimeSpan expiresSliding, TimeSpan expiresAbsoulte)
        {
            var Issuer = "Blog.Core";
            var Audience = "wr";
            var Secret = "sdfsdfsrty45634kkhllghtdgdfss345t678fs";

            var dateTime = DateTime.UtcNow;

            var claims = new Claim[]
                {
                    //下边为Claim的默认配置
                new Claim(JwtRegisteredClaimNames.Jti, Guid.NewGuid().ToString()),
                new Claim(JwtRegisteredClaimNames.Iat, $"{new DateTimeOffset(DateTime.Now).ToUnixTimeSeconds()}"),
                new Claim(JwtRegisteredClaimNames.Nbf,$"{new DateTimeOffset(DateTime.Now).ToUnixTimeSeconds()}") ,
                //这个就是过期时间,目前是过期100秒,可自定义,注意JWT有自己的缓冲过期时间
                new Claim (JwtRegisteredClaimNames.Exp,$"{new DateTimeOffset(DateTime.Now.AddSeconds(180)).ToUnixTimeSeconds()}"),
                new Claim(JwtRegisteredClaimNames.Iss,Issuer),
                new Claim(JwtRegisteredClaimNames.Aud,Audience),
                //这个Role是官方UseAuthentication要要验证的Role,我们就不用手动设置Role这个属性了
                new Claim(ClaimTypes.Role,tokenModel.Role),
                new Claim(ClaimTypes.Name, tokenModel.Uname),
                new Claim(JwtRegisteredClaimNames.Email, tokenModel.EMail),
                new Claim(JwtRegisteredClaimNames.Sub,tokenModel.Sub),
               };

            //秘钥
            var key = new SymmetricSecurityKey(Encoding.UTF8.GetBytes(Secret));

            var jwt = new JwtSecurityToken(
                issuer: Issuer,
                audience: Audience,
                claims: claims,
                expires: DateTime.Now.AddMinutes(1),
                signingCredentials: new SigningCredentials(key, SecurityAlgorithms.HmacSha256)
                );
            var encodedJwt = new JwtSecurityTokenHandler().WriteToken(jwt);

            return encodedJwt;
        }

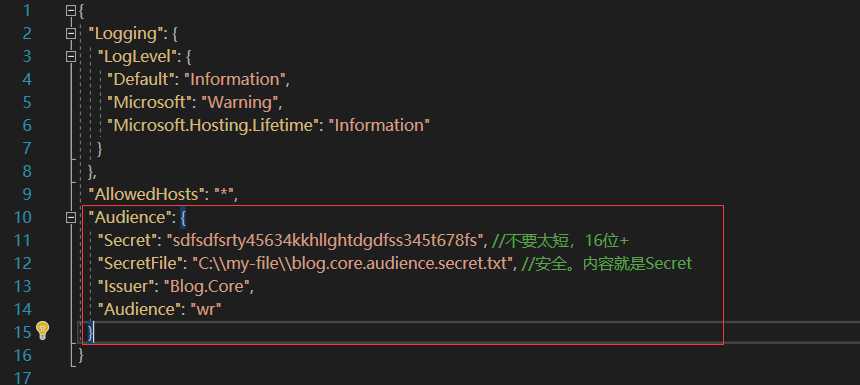
  "Audience": {
    "Secret": "sdfsdfsrty45634kkhllghtdgdfss345t678fs", //不要太短,16位+
    "SecretFile": "C:\\my-file\\blog.core.audience.secret.txt", //安全。内容就是Secret
    "Issuer": "Blog.Core",
    "Audience": "wr"
  }
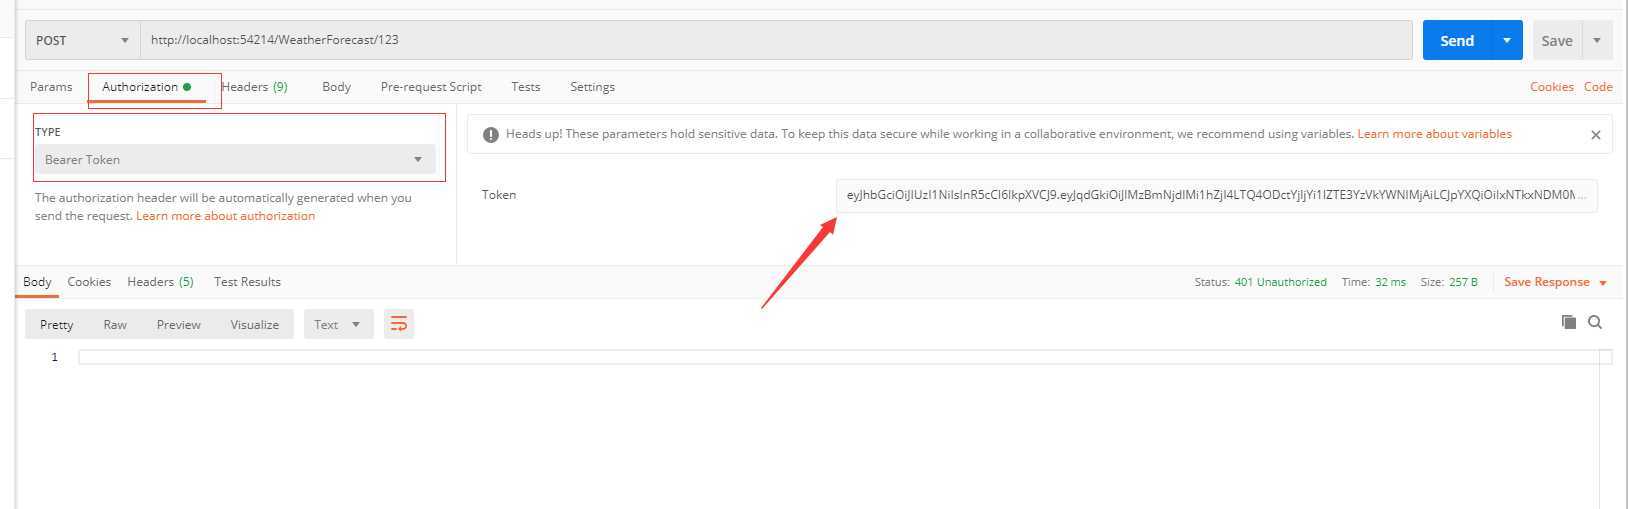
Authorization => Bearer Token => Token,这里输入登录时生成的Token值,不需要带Bearer 前缀
原文:https://www.cnblogs.com/masonblog/p/13055540.html