public static void main(String[] args) throws InterruptedException {
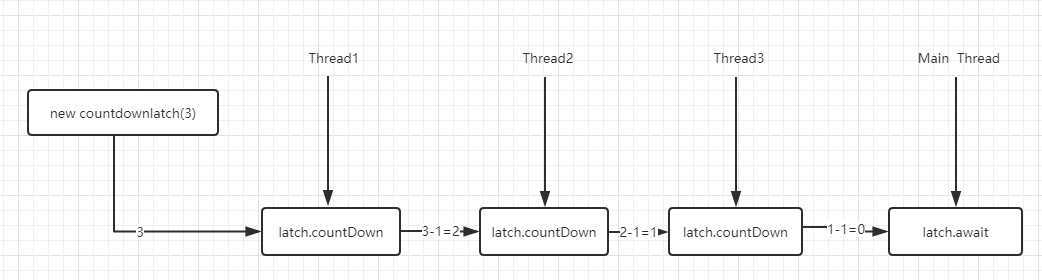
CountDownLatch countDownLatch=new CountDownLatch(3);
new Thread(()->{
System.out.println(""+Thread.currentThread().getName()+"-执行中");
countDownLatch.countDown();
System.out.println(""+Thread.currentThread().getName()+"-执行完毕");
},"t1").start();
new Thread(()->{
System.out.println(""+Thread.currentThread().getName()+"-执行中");
countDownLatch.countDown();
System.out.println(""+Thread.currentThread().getName()+"-执行完毕");
},"t2").start();
new Thread(()->{
System.out.println(""+Thread.currentThread().getName()+"-执行中");
countDownLatch.countDown();
System.out.println(""+Thread.currentThread().getName()+"-执行完毕");
},"t3").start();
countDownLatch.await();
System.out.println("所有线程执行完毕");
}
模拟高并发场景
static CountDownLatch
  countDownLatch=new CountDownLatch(1);

@Override
public void run() {
try {
  countDownLatch.await();
} catch (InterruptedException e) {
  e.printStackTrace();
}

System.out.println("ThreadName:" + Thread.currentThread().getName());
}

public static void main(String[] args) throws InterruptedException {
  for (int i = 0; i < 1000; i++) {
    new Demo().start();
  }
  countDownLatch.countDown();
}
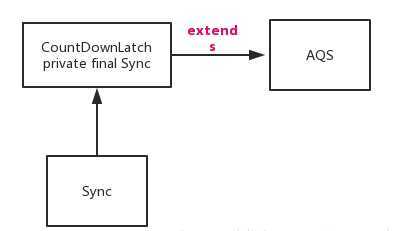
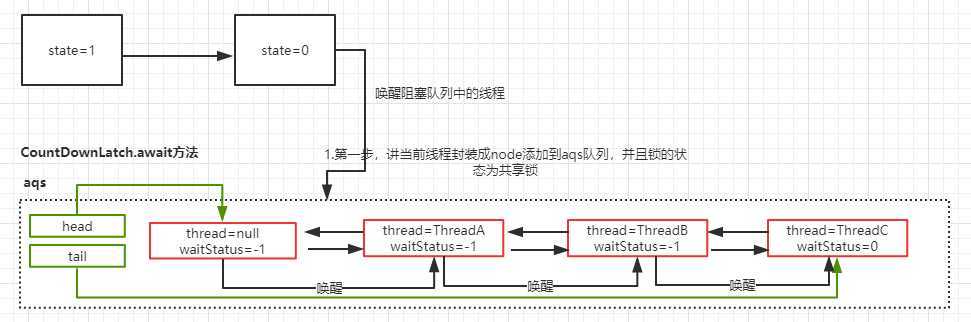
对于 CountDownLatch,我们仅仅需要关心两个方法,一个是 countDown() 方法,另一个是 await() 方法。countDown() 方法每次调用都会将 state 减 1,直到state 的值为 0;而 await 是一个阻塞方法,当 state 减为 0 的时候,await 方法才会返回。await 可以被多个线程调用,大家在这个时候脑子里要有个图:所有调用了await 方法的线程阻塞在 AQS 的阻塞队列中,等待条满足(state == 0),将线程从队列中一个个唤醒过来。acquireSharedInterruptiblycountdownlatch 也用到了 AQS,在 CountDownLatch 内部写了一个 Sync 并且继承了 AQS 这个抽象类重写了 AQS中的共享锁方法。首先看到下面这个代码,这块代码主要是 判 断 当 前 线 程 是 否 获 取 到 了 共 享 锁 ; ( 在CountDownLatch 中 , 使 用 的 是 共 享 锁 机 制 ,因为CountDownLatch 并不需要实现互斥的特性) 。
public final void acquireSharedInterruptibly(int arg) throws InterruptedException {
  if (Thread.interrupted()) throw new InterruptedException();
  if (tryAcquireShared(arg) < 0) // state 如果不等于 0,说明当前线程需要加入到共享锁队列中
  doAcquireSharedInterruptibly(arg);
}
private void doAcquireSharedInterruptibly(int arg) throws InterruptedException {
  final Node node = addWaiter(Node.SHARED);// 创建一个共享模式的节点添加到队列中
  boolean failed = true;
  try {
    for (;;) {
      final Node p = node.predecessor();
        if (p == head) {
          int r = tryAcquireShared(arg);// 就判断尝试获取锁
        if (r >= 0) {// r>=0 表示获取到了执行权限,这个时候因为 state!=0,所以不会执行这段代码
          setHeadAndPropagate(node, r);
          p.next = null; // help GC
          failed = false;
          return;
        }
    } // 阻塞线程
    if (shouldParkAfterFailedAcquire(p, node) && parkAndCheckInterrupt()) throw new InterruptedException();
    }
     } finally {
       if (failed)
       cancelAcquire(node);
  }
}

public final boolean releaseShared(int arg) {
		if (tryReleaseShared(arg)) {
			doReleaseShared();
			return true;
		}
		return false;
	}

	// 用自旋的方法实现 state 减 1
	protected boolean tryReleaseShared(int releases) {
		// 递减计数;转换为零时的信号
		for (;;) {
			int c = getState();
			if (c == 0)
				return false;
			int nextc = c - 1;
			if (compareAndSetState(c, nextc))
				return nextc == 0;
		}
	}
private void doReleaseShared() {
		for (;;) {
			Node h = head;
			if (h != null && h != tail) {
				int ws = h.waitStatus;
				if (ws == Node.SIGNAL) {
					if (!compareAndSetWaitStatus(h, Node.SIGNAL, 0))
						continue;
					// 循环复查案例
					unparkSuccessor(h);
				}
				// 这个 CAS 失败的场景是:执行到这里的时候,刚好有一个节点入队,入队会将这个 ws 设置为 -1
				else if (ws == 0 && !compareAndSetWaitStatus(h, 0, Node.PROPAGATE))
					continue;
				// 失败的CAS上的循环
			}
			// 如果到这里的时候,前面唤醒的线程已经占领了 head,那么再循环
			// 通过检查头节点是否改变了,如果改变了就继续循环
			if (h == head)
				// loop if head changed
				break;
		}
	}
private void doAcquireSharedInterruptibly(int arg) throws InterruptedException {
		final Node node = addWaiter(Node.SHARED);
		boolean failed = true;
		try {
			for (;;) {// 被唤醒的线程进入下一次循环继续判断
				final Node p = node.predecessor();
				if (p == head) {
					int r = tryAcquireShared(arg);
					if (r >= 0) {

						setHeadAndPropagate(node, r);
						p.next = null; // 把当前节点移除 aqs 队列
						failed = false;
						return;
					}
				}
				if (shouldParkAfterFailedAcquire(p, node) && parkAndCheckInterrupt())
					throw new InterruptedException();
			}
		} finally {
			if (failed)
				cancelAcquire(node);
		}
	}
private void setHeadAndPropagate(Node node, int propagate) {
		Node h = head; // 记录旧head以便检查
		setHead(node);
		if (propagate > 0 || h == null || h.waitStatus < 0 || (h = head) == null || h.waitStatus < 0) {
			Node s = node.next;
			if (s == null || s.isShared())
				doReleaseShared();
		}
	}
至此,CountDownLatch讲解完毕,如有错误和不足,请留言指正。
原文:https://www.cnblogs.com/47Gamer/p/13062917.html