snowflake算法是这种场景下的一个典型解法。先来看看snowflake是怎么一回事,见下图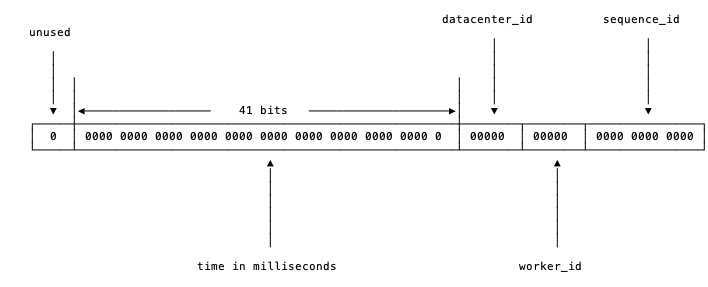
2 ^ 12 = 4096条消息。一秒共409.6万条消息。从值域上来讲完全够用了。timestamp的41位,可以支持我们使用69年。当然,我们的时间毫秒计数不会真的从1970年开始记,那样我们的系统跑到2039/9/7 23:47:35就不能用了,所以这里的timestamp只是相对于某个时间的增量,比如我们的系统上线是2018-08-01,那么我们可以把这个timestamp当作是从2018-08-01 00:00:00.000的偏移量。timestamp,datacenter_id,worker_id和sequence_id这四个字段中,timestamp和sequence_id是由程序在运行期生成的。但datacenter_id和worker_id需要我们在部署阶段就能够获取得到,并且一旦程序启动之后,就是不可更改的了(想想,如果可以随意更改,可能被不慎修改,造成最终生成的id有冲突)。datacenter_id我们可以在部署阶段轻松地获取到。而worker_id是我们逻辑上给机器分配的一个id,这个要怎么办呢?比较简单的想法是由能够提供这种自增id功能的工具来支持,比如MySQL:mysql> insert into a (ip) values("10.1.2.101");
Query OK, 1 row affected (0.00 sec)
mysql> select last_insert_id();
+------------------+
| last_insert_id() |
+------------------+
| 2 |
+------------------+
1 row in set (0.00 sec)
worker_id之后,就把这个worker_id直接持久化到本地,以避免每次上线时都需要获取新的worker_id。让单实例的worker_id可以始终保持不变。worker_id直接写在worker的配置中,上线时,由部署脚本完成worker_id字段替换。github.com/bwmarrin/snowflake 是一个相当轻量化的snowflake的Go实现。其文档对各位使用的定义见下图
package main

import (
    "fmt"
    "os"

    "github.com/bwmarrin/snowflake"
)

func main() {
    n, err := snowflake.NewNode(1)
    if err != nil {
        println(err)
        os.Exit(1)
    }

    for i := 0; i < 3; i++ {
        id := n.Generate()
        fmt.Println("id", id)
        fmt.Println(
            "node: ", id.Node(),
            "step: ", id.Step(),
            "time: ", id.Time(),
            "\n",
        )
    }
}
// Epoch is set to the twitter snowflake epoch of Nov 04 2010 01:42:54 UTC
    // You may customize this to set a different epoch for your application.
    Epoch int64 = 1288834974657

    // Number of bits to use for Node
    // Remember, you have a total 22 bits to share between Node/Step
    NodeBits uint8 = 10

    // Number of bits to use for Step
    // Remember, you have a total 22 bits to share between Node/Step
    StepBits uint8 = 12
Epoch就是本节开头讲的起始时间,NodeBits指的是机器编号的位长,StepBits指的是自增序列的位长。
Sequence ID和之前的定义一致,Machine ID其实就是节点id。sonyflake与众不同的地方在于其在启动阶段的配置参数:func NewSonyflake(st Settings) *Sonyflake
Settings数据结构如下:type Settings struct {
StartTime time.Time
MachineID func() (uint16, error)
CheckMachineID func(uint16) bool
}
StartTime选项和我们之前的Epoch差不多,如果不设置的话,默认是从2014-09-01 00:00:00 +0000 UTC开始。可以由用户自定义的函数,如果用户不定义的话,会默认将本机IP的低16位作为machine id```。CheckMachineID是由用户提供的检查MachineID是否冲突的函数。这里的设计还是比较巧妙的,如果有另外的中心化存储并支持检查重复的存储,那我们就可以按照自己的想法随意定制这个检查MachineID是否冲突的逻辑。如果公司有现成的Redis集群,那么我们可以很轻松地用Redis的集合类型来检查冲突。redis 127.0.0.1:6379> SADD base64_encoding_of_last16bits MzI0Mgo=
(integer) 1
redis 127.0.0.1:6379> SADD base64_encoding_of_last16bits MzI0Mgo=
(integer) 0
package main

import (
    "fmt"
    "os"
    "time"

    "github.com/sony/sonyflake"
)

func getMachineID() (uint16, error) {
    var machineID uint16
    var err error
    machineID = readMachineIDFromLocalFile()
    if machineID == 0 {
        machineID, err = generateMachineID()
        if err != nil {
            return 0, err
        }
    }

    return machineID, nil
}

func checkMachineID(machineID uint16) bool {
    saddResult, err := saddMachineIDToRedisSet()
    if err != nil || saddResult == 0 {
        return true
    }

    err := saveMachineIDToLocalFile(machineID)
    if err != nil {
        return true
    }

    return false
}

func main() {
    t, _ := time.Parse("2006-01-02", "2018-01-01")
    settings := sonyflake.Settings{
        StartTime:      t,
        MachineID:      getMachineID,
        CheckMachineID: checkMachineID,
    }

    sf := sonyflake.NewSonyflake(settings)
    id, err := sf.NextID()
    if err != nil {
        fmt.Println(err)
        os.Exit(1)
    }

    fmt.Println(id)
}
package main

import (
    "sync"
)

// 全局变量
var counter int

func main() {
    var wg sync.WaitGroup
    for i := 0; i < 1000; i++ {
        wg.Add(1)
        go func() {
        defer wg.Done()
            counter++
        }()
    }

    wg.Wait()
    println(counter)
}
$ go run local_lock.go
945
$ go run local_lock.go
937
$ go run local_lock.go
959
package main

import (
	"sync"
)

// 全局变量
var counter int

func main() {
	var wg sync.WaitGroup
	var l sync.Mutex
	for i := 0; i < 1000; i++ {
		wg.Add(1)
		go func() {
			defer wg.Done()
			l.Lock()
			defer l.Unlock()
			counter++
		}()
	}
	wg.Wait()
	println(counter)
}
$ go run local_lock.go
1000
package main

import (
    "sync"
)

// Lock try lock
type Lock struct {
    c chan struct{}
}

// NewLock generate a try lock
func NewLock() Lock {
    var l Lock
    l.c = make(chan struct{}, 1)
    // 初始时默认channel是满的了
    l.c <- struct{}{}
    return l
}

// Lock try lock, return lock result
func (l Lock) Lock() bool {
    lockResult := false
    select {
    case <-l.c:
        lockResult = true
    default:
    }
    return lockResult
}

// Unlock , Unlock the try lock
func (l Lock) Unlock() {
    l.c <- struct{}{}
}

var counter int

func main() {
    var l = NewLock()
    var wg sync.WaitGroup
    for i := 0; i < 10; i++ {
        wg.Add(1)
        go func() {
            defer wg.Done()
            if !l.Lock() {
                // log error
                println("lock failed")
                return
            }
            counter++
            println("current counter", counter)
            l.Unlock()
        }()
    }
    wg.Wait()
}
CAS来实现相同的功能且成本更低,读者可以自行尝试。setnx命令:package main
import (
"fmt"
"sync"
"time"
"github.com/go-redis/redis"
)
func incr() {
client := redis.NewClient(&redis.Options{
Addr: "localhost:6379",
Password: "", // no password set
DB: 0, // use default DB
})
var lockKey = "counter_lock"
var counterKey = "counter"
// lock
resp := client.SetNX(lockKey, 1, time.Second*5)
lockSuccess, err := resp.Result()
if err != nil || !lockSuccess {
fmt.Println(err, "lock result: ", lockSuccess)
return
}
// counter ++
getResp := client.Get(counterKey)
cntValue, err := getResp.Int64()
if err == nil || err == redis.Nil {
cntValue++
resp := client.Set(counterKey, cntValue, 0)
_, err := resp.Result()
if err != nil {
// log err
println("set value error!")
}
}
println("current counter is ", cntValue)
delResp := client.Del(lockKey)
unlockSuccess, err := delResp.Result()
if err == nil && unlockSuccess > 0 {
println("unlock success!")
} else {
println("unlock failed", err)
}
}
func main() {
var wg sync.WaitGroup
for i := 0; i < 10; i++ {
wg.Add(1)
go func() {
defer wg.Done()
incr()
}()
}
wg.Wait()
}
$ go run redis_setnx.go
<nil> lock result:  false
<nil> lock result:  false
<nil> lock result:  false
<nil> lock result:  false
<nil> lock result:  false
<nil> lock result:  false
<nil> lock result:  false
<nil> lock result:  false
<nil> lock result:  false
current counter is  2028
unlock success!
setnx很适合在高并发场景下,用来争抢一些“唯一”的资源。比如交易撮合系统中卖家发起订单,而多个买家会对其进行并发争抢。这种场景我们没有办法依赖具体的时间来判断先后,因为不管是用户设备的时间,还是分布式场景下的各台机器的时间,都是没有办法在合并后保证正确的时序的。哪怕是我们同一个机房的集群,不同的机器的系统时间可能也会有细微的差别。package main
import (
"time"
"github.com/samuel/go-zookeeper/zk"
)
func main() {
c, _, err := zk.Connect([]string{"127.0.0.1"}, time.Second) //*10)
if err != nil {
panic(err)
}
l := zk.NewLock(c, "/lock", zk.WorldACL(zk.PermAll))
err = l.Lock()
if err != nil {
panic(err)
}
println("lock succ, do your business logic")
time.Sleep(time.Second * 10)
// do some thing
l.Unlock()
println("unlock succ, finish business logic")
}
mutex.Lock很相似。/lock节点。Lock会在该节点下的节点列表中插入自己的值,只要节点下的子节点发生变化,就会通知所有watch该节点的程序。这时候程序会检查当前节点下最小的子节点的id是否与自己的一致。如果一致,说明加锁成功了。package main
import (
"log"
"github.com/zieckey/etcdsync"
)
func main() {
m, err := etcdsync.New("/lock", 10, []string{"http://127.0.0.1:2379"})
if m == nil || err != nil {
log.Printf("etcdsync.New failed")
return
}
err = m.Lock()
if err != nil {
log.Printf("etcdsync.Lock failed")
return
}
log.Printf("etcdsync.Lock OK")
log.Printf("Get the lock. Do something here.")
err = m.Unlock()
if err != nil {
log.Printf("etcdsync.Unlock failed")
} else {
log.Printf("etcdsync.Unlock OK")
}
}
etcd中没有像ZooKeeper那样的Sequence节点。所以其锁实现和基于ZooKeeper实现的有所不同。在上述示例代码中使用的etcdsync的Lock流程是:1、先检查/lock路径下是否有值,如果有值,说明锁已经被别人抢了
2、如果没有值,那么写入自己的值。写入成功返回,说明加锁成功。写入时如果节点被其它节点写入过了,那么会导致加锁失败,这时候到 3
3、watch /lock下的事件,此时陷入阻塞
4、当/lock路径下发生事件时,当前进程被唤醒。检查发生的事件是否是删除事件(说明锁被持有者主动unlock),或者过期事件(说明锁过期失效)。如果是的话,那么回到 1,走抢锁流程。
setnx的简单锁。etcd或者ZooKeeper这种通过一致性协议保证数据可靠性的锁方案。但可靠的背面往往都是较低的吞吐量和较高的延迟。需要根据业务的量级对其进行压力测试,以确保分布式锁所使用的etcd或ZooKeeper集群可以承受得住实际的业务请求压力。需要注意的是,etcd和Zookeeper集群是没有办法通过增加节点来提高其性能的。要对其进行横向扩展,只能增加搭建多个集群来支持更多的请求。这会进一步提高对运维和监控的要求。多个集群可能需要引入proxy,没有proxy那就需要业务去根据某个业务id来做分片。如果业务已经上线的情况下做扩展,还要考虑数据的动态迁移。这些都不是容易的事情。1、实现一套类似crontab的分布式定时任务管理系统。
2、实现一个支持定时发送消息的消息队列。
SetReadDeadline()函数,就是在本地创建了一个定时器,在到达指定的时间后,我们会收到定时器的通知,告诉我们时间已到。这时候如果读取还没有完成的话,就可以认为发生了网络问题,从而中断读取。
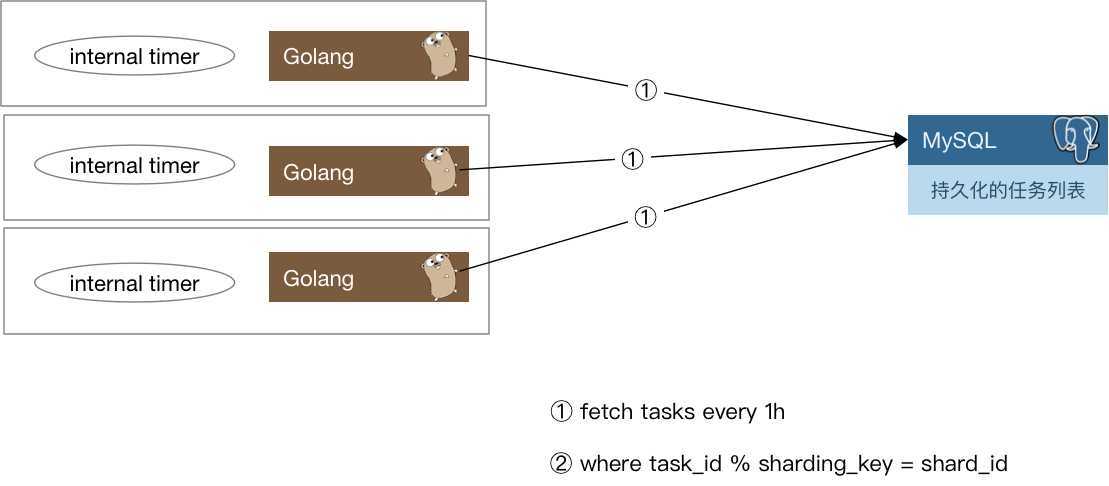
1、将任务被触发的信息封装为一条消息,发往消息队列,由用户侧对消息队列进行监听。
2、对用户预先配置的回调函数进行调用。

exactly once的语义的,这种情况下我们需要让用户自己来负责消息的去重或者消费的幂等处理。在线交易处理(OLTP, Online transaction processing)是指透过信息系统、电脑网络及数据库,以线上交易的方式处理一般即时性的作业数据,和更早期传统数据库系统大量批量的作业方式并不相同。OLTP通常被运用于自动化的数据处理工作,如订单输入、金融业务…等反复性的日常性交易活动。和其相对的是属于决策分析层次的联机分析处理(OLAP)。
仓库id,入库时间,库位分区id,储存货架id,入库操作员id,出库操作员id,库存数量,过期时间,SKU类型,产品品牌,产品分类,内件数量
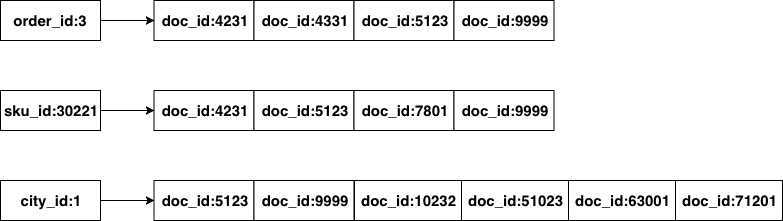
bi-gram分词。什么是bi-gram分词呢:Ti和T(i+1)组成一个词(在Elasticsearch中叫term),然后再编排其倒排列表,这样我们的倒排列表大概就是这样的:
func equal() {
    if postEntry.docID of ‘天气‘ == postEntry.docID of ‘气很‘ &&
        postEntry.offset + 1 of ‘天气‘ == postEntry.offset of ‘气很‘ {
            return true
    }

    if postEntry.docID of ‘气很‘ == postEntry.docID of ‘很好‘ &&
        postEntry.offset + 1 of ‘气很‘ == postEntry.offset of ‘很好‘ {
        return true
    }

    if postEntry.docID of ‘天气‘ == postEntry.docID of ‘很好‘ &&
        postEntry.offset + 2 of ‘天气‘ == postEntry.offset of ‘很好‘ {
        return true
    }

    return false
}
{
  "query": {
    "bool": {
      "must": [
        {
          "match": {
            "field_1": {
              "query": "1",
              "type": "phrase"
            }
          }
        },
        {
          "match": {
            "field_2": {
              "query": "2",
              "type": "phrase"
            }
          }
        },
        {
          "match": {
            "field_3": {
              "query": "3",
              "type": "phrase"
            }
          }
        },
        {
          "match": {
            "field_4": {
              "query": "4",
              "type": "phrase"
            }
          }
        }
      ]
    }
  },
  "from": 0,
  "size": 1
}
if field_1 == 1 && field_2 == 2 && field_3 == 3 && field_4 == 4 {
    return true
}
{
  "query": {
    "bool": {
      "should": [
        {
          "match": {
            "field_1": {
              "query": "1",
              "type": "phrase"
            }
          }
        },
        {
          "match": {
            "field_2": {
              "query": "3",
              "type": "phrase"
            }
          }
        }
      ]
    }
  },
  "from": 0,
  "size": 1
}
if field_1 == 1 || field_2 == 2 {
    return true
}
if后面跟着的表达式在编程语言中有专有名词来表达Boolean Expression:4 > 1
5 == 2
3 < i && x > 10
// 选用 elastic 版本时
// 注意与自己使用的 elasticsearch 要对应
import (
    elastic "gopkg.in/olivere/elastic.v3"
)

var esClient *elastic.Client

func initElasticsearchClient(host string, port string) {
    var err error
    esClient, err = elastic.NewClient(
        elastic.SetURL(fmt.Sprintf("http://%s:%s", host, port)),
        elastic.SetMaxRetries(3),
    )

    if err != nil {
        // log error
    }
}
func insertDocument(db string, table string, obj map[string]interface{}) {

    id := obj["id"]

    var indexName, typeName string
    // 数据库中的 database/table 概念,可以简单映射到 es 的 index 和 type
    // 不过需要注意,因为 es 中的 _type 本质上只是 document 的一个字段
    // 所以单个 index 内容过多会导致性能问题
    // 在新版本中 type 已经废弃
    // 为了让不同表的数据落入不同的 index,这里我们用 table+name 作为 index 的名字
    indexName = fmt.Sprintf("%v_%v", db, table)
    typeName = table

    // 正常情况
    res, err := esClient.Index().Index(indexName).Type(typeName).Id(id).BodyJson(obj).Do()
    if err != nil {
        // handle error
    } else {
        // insert success
    }
}
func query(indexName string, typeName string) (*elastic.SearchResult, error) {
    // 通过 bool must 和 bool should 添加 bool 查询条件
    q := elastic.NewBoolQuery().Must(elastic.NewMatchPhraseQuery("id", 1),
    elastic.NewBoolQuery().Must(elastic.NewMatchPhraseQuery("male", "m")))

    q = q.Should(
        elastic.NewMatchPhraseQuery("name", "alex"),
        elastic.NewMatchPhraseQuery("name", "xargin"),
    )

    searchService := esClient.Search(indexName).Type(typeName)
    res, err := searchService.Query(q).Do()
    if err != nil {
        // log error
        return nil, err
    }

    return res, nil
}
func deleteDocument(
    indexName string, typeName string, obj map[string]interface{},
) {
    id := obj["id"]

    res, err := esClient.Delete().Index(indexName).Type(typeName).Id(id).Do()
    if err != nil {
        // handle error
    } else {
        // delete success
    }
}
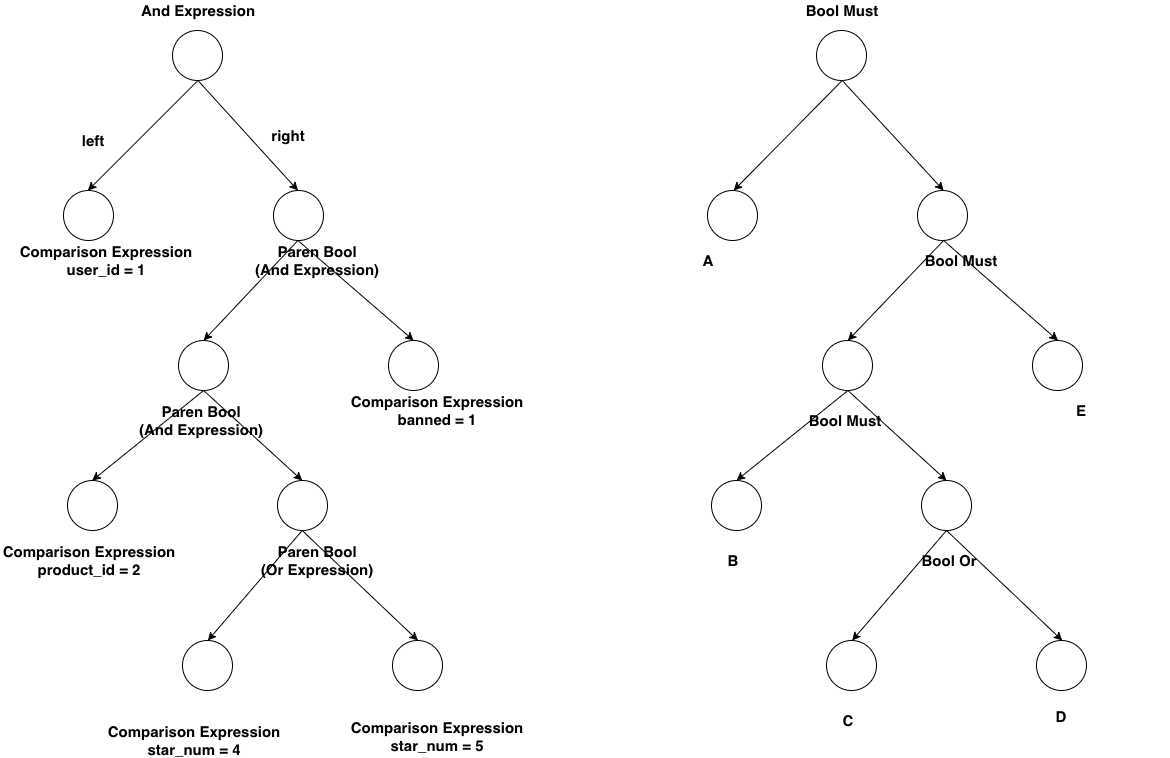
user_id = 1 and (product_id = 1 and (star_num = 4 or star_num = 5) and banned = 1),写成SQL是如下形式:select * from xxx where user_id = 1 and (
product_id = 1 and (star_num = 4 or star_num = 5) and banned = 1
)
{
  "query": {
    "bool": {
      "must": [
        {
          "match": {
            "user_id": {
              "query": "1",
              "type": "phrase"
            }
          }
        },
        {
          "match": {
            "product_id": {
              "query": "1",
              "type": "phrase"
            }
          }
        },
        {
          "bool": {
            "should": [
              {
                "match": {
                  "star_num": {
                    "query": "4",
                    "type": "phrase"
                  }
                }
              },
              {
                "match": {
                  "star_num": {
                    "query": "5",
                    "type": "phrase"
                  }
                }
              }
            ]
          }
        },
        {
          "match": {
            "banned": {
              "query": "1",
              "type": "phrase"
            }
          }
        }
      ]
    }
  },
  "from": 0,
  "size": 1
}
github.com/cch123/elasticsql

select * from wms_orders where update_time >= date_sub(now(), interval 10 minute);
select * from wms_orders where update_time >= date_sub(
    now(), interval 11 minute
);
1、按顺序挑: 例如上次选了第一台,那么这次就选第二台,下次第三台,如果已经到了最后一台,那么下一次从第一台开始。这种情况下我们可以把服务节点信息都存储在数组中,每次请求完成下游之后,将一个索引后移即可。在移到尽头时再移回数组开头处。
2、随机挑一个: 每次都随机挑,真随机伪随机均可。假设选择第 x 台机器,那么x可描述为rand.Intn()%n。
3、根据某种权重,对下游节点进行排序,选择权重最大/小的那一个。
var endpoints = []string {
    "100.69.62.1:3232",
    "100.69.62.32:3232",
    "100.69.62.42:3232",
    "100.69.62.81:3232",
    "100.69.62.11:3232",
    "100.69.62.113:3232",
    "100.69.62.101:3232",
}

// 重点在这个 shuffle
func shuffle(slice []int) {
    for i := 0; i < len(slice); i++ {
        a := rand.Intn(len(slice))
        b := rand.Intn(len(slice))
        slice[a], slice[b] = slice[b], slice[a]
    }
}

func request(params map[string]interface{}) error {
    var indexes = []int {0,1,2,3,4,5,6}
    var err error

    shuffle(indexes)
    maxRetryTimes := 3

    idx := 0
    for i := 0; i < maxRetryTimes; i++ {
        err = apiRequest(params, endpoints[idx])
        if err == nil {
            break
        }
        idx++
    }

    if err != nil {
        // logging
        return err
    }

    return nil
}
1、没有随机种子。在没有随机种子的情况下,rand.Intn()返回的伪随机数序列是固定的。
2、洗牌不均匀,会导致整个数组第一个节点有大概率被选中,并且多个节点的负载分布不均衡。
func shuffle(indexes []int) {
    for i:=len(indexes); i>0; i-- {
        lastIdx := i - 1
        idx := rand.Int(i)
        indexes[lastIdx], indexes[idx] = indexes[idx], indexes[lastIdx]
    }
}
func shuffle(n int) []int {
    b := rand.Perm(n)
    return b
}
rand.Perm就可以得到我们想要的索引数组了。rand.Seed(time.Now().UnixNano())
package main

import (
    "fmt"
    "math/rand"
    "time"
)

func init() {
    rand.Seed(time.Now().UnixNano())
}

func shuffle1(slice []int) {
    for i := 0; i < len(slice); i++ {
        a := rand.Intn(len(slice))
        b := rand.Intn(len(slice))
        slice[a], slice[b] = slice[b], slice[a]
    }
}

func shuffle2(indexes []int) {
    for i := len(indexes); i > 0; i-- {
        lastIdx := i - 1
        idx := rand.Intn(i)
        indexes[lastIdx], indexes[idx] = indexes[idx], indexes[lastIdx]
    }
}

func main() {
    var cnt1 = map[int]int{}
    for i := 0; i < 1000000; i++ {
        var sl = []int{0, 1, 2, 3, 4, 5, 6}
        shuffle1(sl)
        cnt1[sl[0]]++
    }

    var cnt2 = map[int]int{}
    for i := 0; i < 1000000; i++ {
        var sl = []int{0, 1, 2, 3, 4, 5, 6}
        shuffle2(sl)
        cnt2[sl[0]]++
    }

    fmt.Println(cnt1, "\n", cnt2)
}
map[0:224436 1:128780 5:129310 6:129194 2:129643 3:129384 4:129253]
map[6:143275 5:143054 3:143584 2:143031 1:141898 0:142631 4:142527]
etcdctl get /configs/remote_config.json
{
    "addr" : "127.0.0.1:1080",
    "aes_key" : "01B345B7A9ABC00F0123456789ABCDAF",
    "https" : false,
    "secret" : "",
    "private_key_path" : "",
    "cert_file_path" : ""
}
cfg := client.Config{
    Endpoints:               []string{"http://127.0.0.1:2379"},
    Transport:               client.DefaultTransport,
    HeaderTimeoutPerRequest: time.Second,
}
resp, err = kapi.Get(context.Background(), "/path/to/your/config", nil)
if err != nil {
    log.Fatal(err)
} else {
    log.Printf("Get is done. Metadata is %q\n", resp)
    log.Printf("%q key has %q value\n", resp.Node.Key, resp.Node.Value)
}
Get()方法,比较简单。kapi := client.NewKeysAPI(c)
w := kapi.Watcher("/path/to/your/config", nil)
go func() {
for {
resp, err := w.Next(context.Background())
log.Println(resp, err)
log.Println("new values is ", resp.Node.Value)
}
}()
package main

import (
    "log"
    "time"

    "golang.org/x/net/context"
    "github.com/coreos/etcd/client"
)

var configPath =  `/configs/remote_config.json`
var kapi client.KeysAPI

type ConfigStruct struct {
    Addr           string `json:"addr"`
    AesKey         string `json:"aes_key"`
    HTTPS          bool   `json:"https"`
    Secret         string `json:"secret"`
    PrivateKeyPath string `json:"private_key_path"`
    CertFilePath   string `json:"cert_file_path"`
}

var appConfig ConfigStruct

func init() {
    cfg := client.Config{
        Endpoints:               []string{"http://127.0.0.1:2379"},
        Transport:               client.DefaultTransport,
        HeaderTimeoutPerRequest: time.Second,
    }

    c, err := client.New(cfg)
    if err != nil {
        log.Fatal(err)
    }
    kapi = client.NewKeysAPI(c)
    initConfig()
}

func watchAndUpdate() {
    w := kapi.Watcher(configPath, nil)
    go func() {
        // watch 该节点下的每次变化
        for {
            resp, err := w.Next(context.Background())
            if err != nil {
                log.Fatal(err)
            }
            log.Println("new values is ", resp.Node.Value)

            err = json.Unmarshal([]byte(resp.Node.Value), &appConfig)
            if err != nil {
                log.Fatal(err)
            }
        }
    }()
}

func initConfig() {
    resp, err = kapi.Get(context.Background(), configPath, nil)
    if err != nil {
        log.Fatal(err)
    }

    err := json.Unmarshal(resp.Node.Value, &appConfig)
    if err != nil {
        log.Fatal(err)
    }
}

func getConfig() ConfigStruct {
    return appConfig
}

func main() {
    // init your app
}
watch响应,json解析,这些操作都不具备原子性。当单个业务请求流程中多次获取config时,有可能因为中途config发生变化而导致单个请求前后逻辑不一致。因此,在使用类似这样的方式来更新配置时,需要在单个请求的生命周期内使用同样的配置。具体实现方式可以是只在请求开始的时候获取一次配置,然后依次向下透传等等,具体情况具体分析。原文:https://www.cnblogs.com/binHome/p/13074233.html