Maven+Nexus安装配置
jdk1.7+环境 可以通过
>java -version查看java环境
下载及安装nexus2
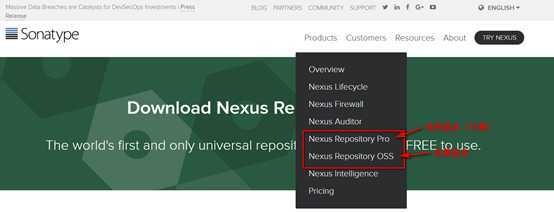
1. 下载nexus:
2. 解压安装包,会生成两个文件夹

3. 设置环境变量NEXUS_HOME和PATH

Path=%NEXUS_HOME%\bin
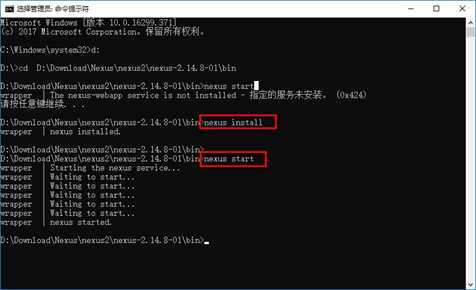
4. 以管理员身份打开cmd,安装nexus(>nexus install),启动(>nexus start)
(win10:开始>Windows系统>命令提示符>右击“以管理员身份运行”)
5. 打开网站http://localhost:8081/nexus/,登录admin/admin123
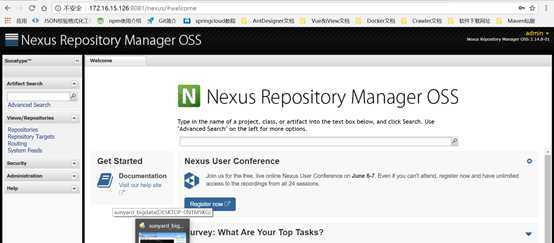
*nexus2安装成功!
注:Repository类型:
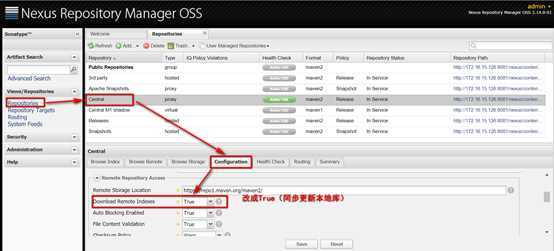
1. 在admin登录状态下,Repositories中会有默认的几个库:
2. 找到本地库位置(此处以IF库为例),将本地库内所有文件拷贝到nexus中
[Nexus安装目录]\sonatype-work\nexus\storage\[要导入的库名,如‘central’]
3. 刷新nexus管理器,在Browse Storage中会有拷贝的本地库文件
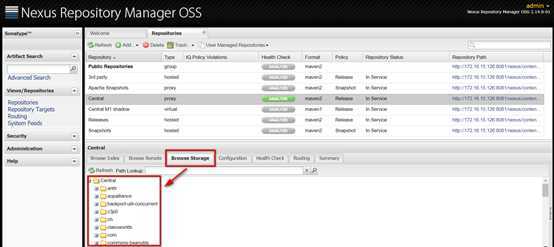
*nexus本地maven库导入成功!
使用默认的“3rd party”库,步骤如图,添加所需jar包
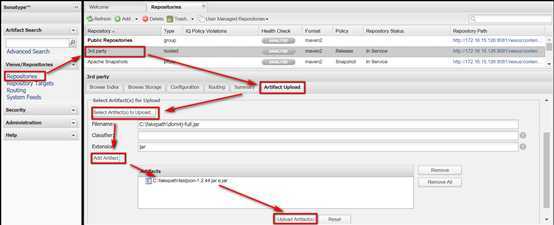
* Nexus2第三方jar导入成功!
1. 添加group组,(group类型:即组中可以包含多个nexus库)
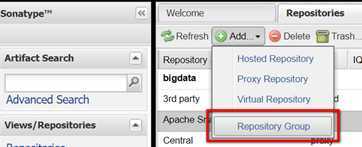
2.配置Repository
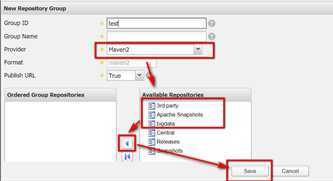
*添加group成功!
1. 下载maven安装包,并解压

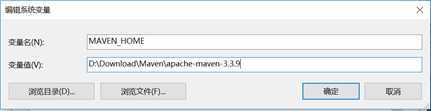
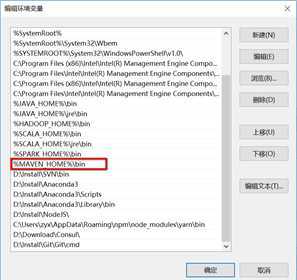
2. 配置maven环境,Maven_HOME和PATH
3. Cmd查看maven配置成功,>mvn -v
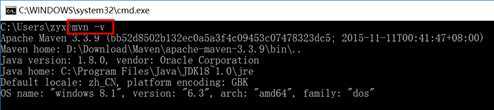
*maven配置成功!
1. 打开$Maven_path/conf/settings.xml 文件,配置相关内容

设置本地仓库<localRepository>
2. 配置<server>
|
<servers> <server> <id>bigdata</id> #Id:私服的唯一键 <username>admin</username> #Username:登录nexus管理界面的用户名 <password>admin123</password> #Password:登录nexus管理界面的密码 </server> </servers> |
3. 配置<mirror>
|
<mirror> <id>nexus</id> <mirrorOf>*</mirrorOf> #mirrirOf:*为过滤全部 <url>http://172.16.15.126:8081/nexus/content/groups/sunyard/</url> #url:到私服的地址,即nexus库的地址 </mirror> |

4. 设置<profile>
|
<profile> <id>nexus</id> <repositories> <repository> <id>bigdata</id> <url>http://172.16.15.126:8081/nexus</url> <releases><enabled>true</enabled><updatePolicy>always</updatePolicy></releases> <snapshots><enabled>true</enabled><updatePolicy>always</updatePolicy></snapshots> </repository> </repositories> <pluginRepositories> <pluginRepository> <id>bigdata</id> <url>http://172.16.15.126:8081/nexus</url> <releases><enabled>true</enabled></releases> <snapshots><enabled>true</enabled></snapshots> </pluginRepository> </pluginRepositories> </profile> |
5. 设置<activeProfiles>
|
<activeProfiles> <activeProfile>nexus</activeProfile> </activeProfiles> |
*完成私服的配置!
1. 本地仓库中相应文件夹中是否有此jar包,一般对于本成功的下载,本机仓库会有会在{MAVEN_repo}/{groupid}/{artifactid}/{version}路径下面生成 *.lastUpdated 文件。
2. 查看Nexus中是否有此jar包
① 如果没有,则调整setting.xml文件的下载路径,改为从全球仓库中下载;下载完成后本地库会自动更新到私服中(注意:此时可能有一个网络的问题,下载全球包的网络和私服的网络不是一个网络,即,对于公司建的私服ip是内网的,由于公司网络有时链接不上全球库,所以可能会切换非公司内网,这时链接外网时是无法链接到私服的,所以可能会存在无法同步更新的问题,解决:全球仓库下载完手动添加私服的相关包,步骤如“nexus2导入本地maven库”)
② 如果有,则删除*.lastUpdated 文件重新Maven upload重新下载,重新下载还不成功,则检查私服访问路径是否有错
1.在path中配置maven环境变量到 …/bin目录
2.cmd中执行>mvn install:install-file -Dfile= fink-deppendencies-1.0.0.jar -DgroupId=com.sunyard -DartifactId=fink-deppendencies -Dversion=1.0.0 -Dpackaging=jar
3.在pom.xml中加入包信息
|
<dependency> <groupId>com.sunyard</groupId> <artifactId>fink-deppendencies</artifactId> <version>1.0.0</version> </dependency> |
原文:https://www.cnblogs.com/xin-xing/p/13110287.html