上一节学习到的ThreadPoolExecutor在并发编程中更为适用,故知己知彼方能百战不殆,这次的学习目的只要有如下几个:
1、了解源码,能更加灵活使用线程池
2、看看大神是如何设计一个线程池的
话说了解ThreadPoolExecutor的话,为啥又要说道AbstractOwnableSynchronizer呢。
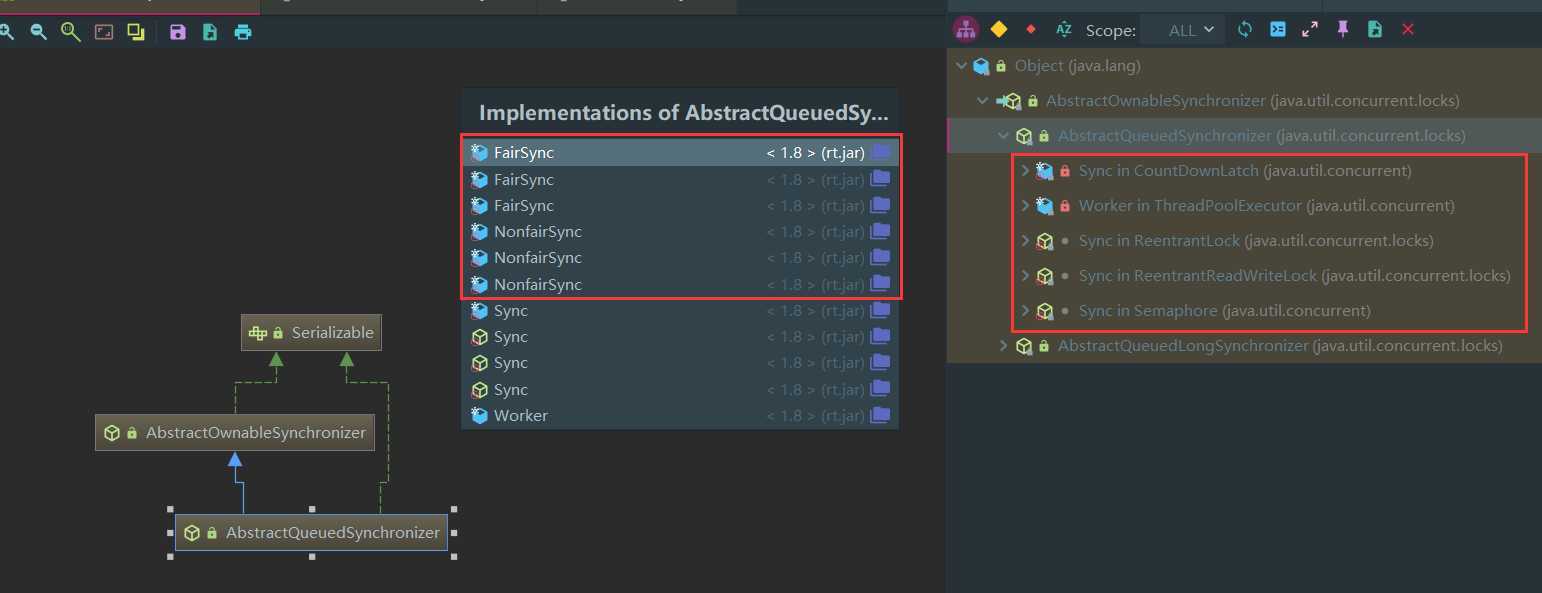
因为线程池中的线程有点特殊,它们都是AQS的子类(AbstractQueuedSynchronizer),而AQS的父类又是AbstractOwnableSynchronizer。
我们可以从ThreadPoolExecutor中的Worker中看出。


所以要了解ThreadPoolExecutor的工作原理,首先就需要知道他们的父类AbstractOwnableSynchronizer。
——————————————————————————————————————————————————————————————————————
源码非常简单,你可以轻松的看懂:
 1 public abstract class AbstractOwnableSynchronizer
 2     implements java.io.Serializable {
 3
 4     /** Use serial ID even though all fields transient. */
 5     private static final long serialVersionUID = 3737899427754241961L;
 6
 7     /**
 8      * Empty constructor for use by subclasses.
 9      */
10     protected AbstractOwnableSynchronizer() { }
11
12     /**
13      * 独占模式下,同步器的当前拥有者(一个线程对象)
14      */
15     private transient Thread exclusiveOwnerThread;
16
17     /**
18      * exclusiveOwnerThread getter方法
19      */
20     protected final void setExclusiveOwnerThread(Thread thread) {
21         exclusiveOwnerThread = thread;
22     }
23
24     /**
25      * exclusiveOwnerThread setter方法
26      */
27     protected final Thread getExclusiveOwnerThread() {
28         return exclusiveOwnerThread;
29     }
30 }
我们可以借助IDEA看出其结构:

AQS有很多子类,如下
而且ReentrantLock、ReentrantReadWriteLock、Semaphore还有自己的公平锁,非公平锁(FairSync,NonFairSync)。
综上,如此多重要的类都是基于AQS实现,你说重要不。
——————————————————————————————————————————————————————————————————————
ASQ内部类Node源码解析:
 1 /**
 2  * 等待队列的节点类
 3  */
 4 static final class Node {
 5     /** 标识节点当前在共享模式下 */
 6     static final Node SHARED = new Node();
 7     /** 标识节点当前在独占模式下 */
 8     static final Node EXCLUSIVE = null;
 9
10     /** 下面的常量是waitStatus的枚举值 */
11     /** 标识此线程已取消 */
12     static final int CANCELLED =  1;
13     /** 标识当前node后继节点所对应的节点线程“需要被唤醒” */
14     static final int SIGNAL    = -1;
15     /** 线程在等待condition条件 */
16     static final int CONDITION = -2;
17     /** 共享模式下node可能处于此状态,表示锁的下一次获取可以“无条件传播” */
18     static final int PROPAGATE = -3;
19
20     /**
21      * 线程等待状态
22      * 范围只可能是上面四种,CANCELLED、SIGNAL、CONDITION、PROPAGATE
23      * 以及0,0是正常的同步节点,此字段初始值也就是0
24      */
25     volatile int waitStatus;
26
27     /**
28      * 前驱节点,用于检查waitStatus
29      * 若当前节点取消,就需要前驱结点和后继节点来完成连接
30      */
31     volatile Node prev;
32
33     /**
34      * 后继节点,指向当前节点在释放时唤醒的后继节点
35      */
36     volatile Node next;
37
38     /**
39      * 入队是的当前线程
40      */
41     volatile Thread thread;
42
43     /**
44      * 存储condition队列中的后继节点
45      */
46     Node nextWaiter;
47
48     /**
49      * 若是共享模式下等待,则返回true
50      */
51     final boolean isShared() {
52         return nextWaiter == SHARED;
53     }
54
55     /**
56      * 返回当前节点的前驱结点
57      */
58     final Node predecessor() throws NullPointerException {
59         Node p = prev;
60         if (p == null)
61             throw new NullPointerException();
62         else
63             return p;
64     }
65
66     Node() {    // Used to establish initial head or SHARED marker
67     }
68
69     Node(Thread thread, Node mode) {     // Used by addWaiter
70         this.nextWaiter = mode;
71         this.thread = thread;
72     }
73
74     Node(Thread thread, int waitStatus) { // Used by Condition
75         this.waitStatus = waitStatus;
76         this.thread = thread;
77     }
78 }
此Node便是ThreadPoolExecutor入参的workQueue,通过一个双向链表实现的一个等待队列;定义了共享、独占模式,以及五种等待状态。
——————————————————————————————————————————————————————————————————————
ASQ实例属性源码解析:
 1 /**
 2  * 等待队列头结点
 3  */
 4 private transient volatile Node head;
 5
 6 /**
 7  * 等待队列尾结点
 8  */
 9 private transient volatile Node tail;
10
11 /**
12  * 同步状态
13  */
14 private volatile int state;
15
16 /**
17  * state getter方法
18  */
19 protected final int getState() {
20     return state;
21 }
22
23 /**
24  * state setter方法
25  */
26 protected final void setState(int newState) {
27     state = newState;
28 }
在了解了AQS的Node以及基本的属性后就可以开始学习独占锁的加锁过程了。
首先既然是锁的话,那肯定就分为加锁和解锁两个功能:
——————————————————————————————————————————————————————————————————————
那么这里先看下AQS独占锁的加锁逻辑。
1 public final void acquire(int arg) {
2     if (!tryAcquire(arg) &&
3         acquireQueued(addWaiter(Node.EXCLUSIVE), arg))
4         selfInterrupt();
5 }
方法很简单,只有几行代码,我们来一步步的分析。
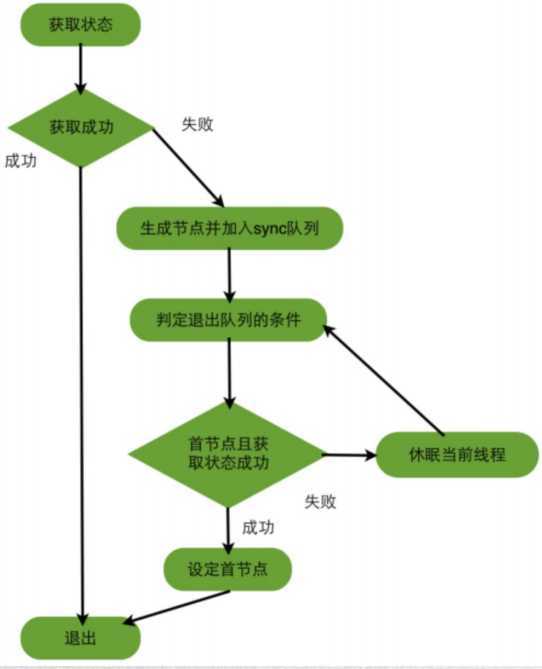
首先从方法及其示意上来看,ASQ独占锁的加锁逻辑大致流程如下:

——————————————————————————————————————————————————————————————————————
上面将大致流程梳理了下,现在来说说具体步骤是如何实现的。
1、tryAcquire():尝试获取锁。
1 protected boolean tryAcquire(int arg) {
2     throw new UnsupportedOperationException();
3 }
它的实现是抛出异常,所以我们可以推断出,其真正的实现是委托给子类的,为了开发者误用所以才抛出异常。
那为啥需要子类实现,而又不定义为abstract方法呢,这也是Doug Lea大佬站在开发者角度考虑的。
参数arg,则是一个预定义,你可以自行维护,干啥都可以;比较常用的就是定义为状态。
2、addWaiter():将未获取到锁的线程加入队尾。
 1 private Node addWaiter(Node mode) {
 2     // 创建一个当前线程的节点;thread = currentThread,nextWaiter = Node.EXCLUSIVE(null)
 3     Node node = new Node(Thread.currentThread(), mode);
 4     // 先尝试快速加入队列,若失败则采用自旋的方式加入节点
 5     Node pred = tail;
 6     if (pred != null) {
 7         node.prev = pred;
 8         if (compareAndSetTail(pred, node)) {
 9             pred.next = node;
10             return node;
11         }
12     }
13     // 若队尾为null,或CAS进入队尾失败(存在竞争),则通过enq方法自旋
14     enq(node);
15     return node;
16 }
关于上面这段代码你需要了解如下几个点:
自旋:
 1 private Node enq(final Node node) {
 2     // 死循环,直到node成功进入队尾(因为存在竞争,所以并不会一次成功,故才死循环)
 3     for (;;) {
 4         Node t = tail;
 5         // t的指针已经指向尾结点,t == null说明队列是空的
 6         if (t == null) { // Must initialize
 7             // 空队列,则创建一个新的节点,并将尾结点指向头结点
 8             if (compareAndSetHead(new Node()))
 9                 tail = head;
10         } else {
11             // t != null,队列非空;则将node的前驱结点指向为t,t的后继节点指向为自己
12             // 也就是将自己放入队尾,并改变自己的前驱与原来队尾的后继节点
13             node.prev = t;
14             if (compareAndSetTail(t, node)) {
15                 t.next = node;
16                 return t;
17             }
18         }
19     }
20 }
3、acquireQueued():线程阻塞,持续获取锁。
 1 /**
 2  * 节点加入队列后,尝试在等待队列中自旋的获取资源
 3  */
 4 final boolean acquireQueued(final Node node, int arg) {
 5     // 标记表示是否成功拿到资源
 6     boolean failed = true;
 7     try {
 8         // 标记是否被中断
 9         boolean interrupted = false;
10         for (;;) {
11             // 获取前驱节点,前驱节点为null则抛出异常
12             final Node p = node.predecessor();
13             // 若node的驱节点是头结点,且获取锁成功则自旋结束
14             // p == head:仅执行队列的队头线程,保证自旋效率,不做耗时的等待操作(如尝试获取锁)
15             if (p == head && tryAcquire(arg)) {
16                 setHead(node);
17                 p.next = null; // help GC
18                 failed = false;
19                 return interrupted;
20             }
21             // 若node前驱节点不是头节点head,或node节点尝试获取资源失败,则:
22             // 1、检查并更新无法获取资源的节点状态,若当前线程阻塞则返回true
23             // 2、阻塞线程,并检查中断状态
24             if (shouldParkAfterFailedAcquire(p, node) &&
25                 parkAndCheckInterrupt())
26                 interrupted = true;
27         }
28     } finally {
29         // 如果node前驱节点为null时,则抛出空指针,此时便会进入此分支
30         if (failed)
31             // 取消对资源的获取
32             cancelAcquire(node);
33     }
34 }
4、selfInterrupt():中断线程,但不对中断做出响应。
1 static void selfInterrupt() {
2     Thread.currentThread().interrupt();
3 }
原文:https://www.cnblogs.com/bzfsdr/p/13122011.html