伴随着前端各种框架的出现,SPA(single page web application)应用势不可挡,伴随着的就是前端路由了
SPA最主要的特点就是在前后端分离的基础上加了一层前端路由
改变URL, 但是页面不进行整体的刷新。那问题就来了,我该怎么做?
URL的hash也就是锚点(#),本质上是改变window.location的href属性。
我们可以通过直接赋值location.hash来改变href,但是页面不发生刷新

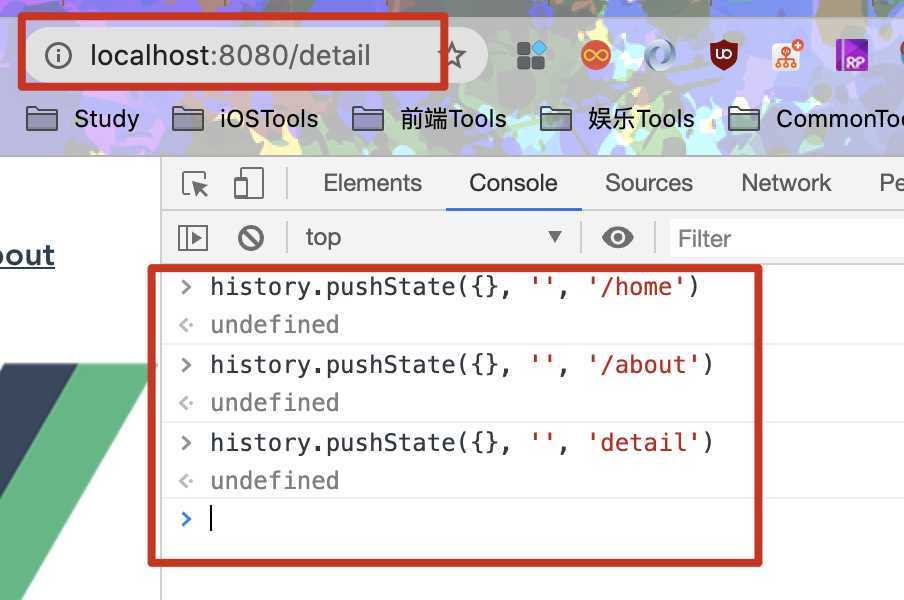
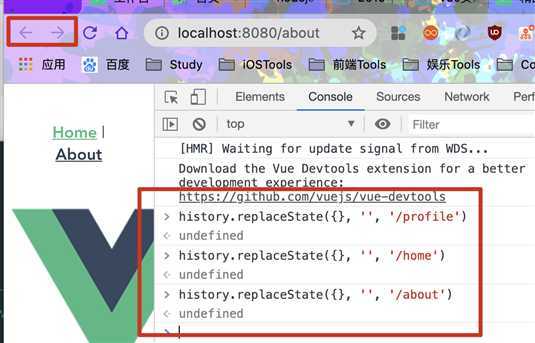
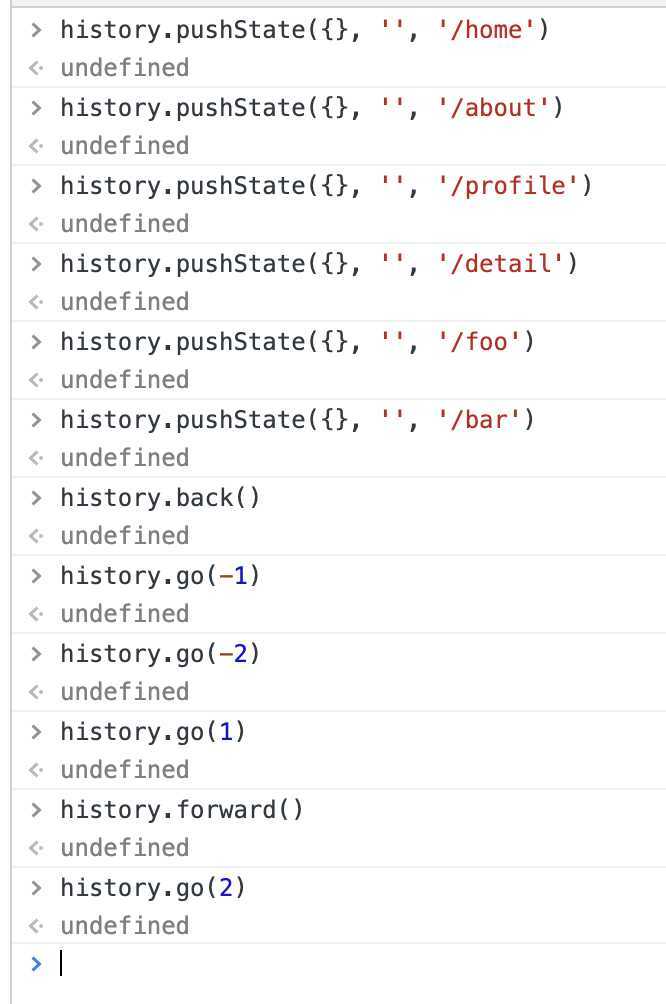
HTML5的history模式:pushState
history接口是HTML5新增的, 他有5种模式改变URL而不刷新页面
history.pushState()
history.replaceState()
history.back() | history.forward() | history.go()
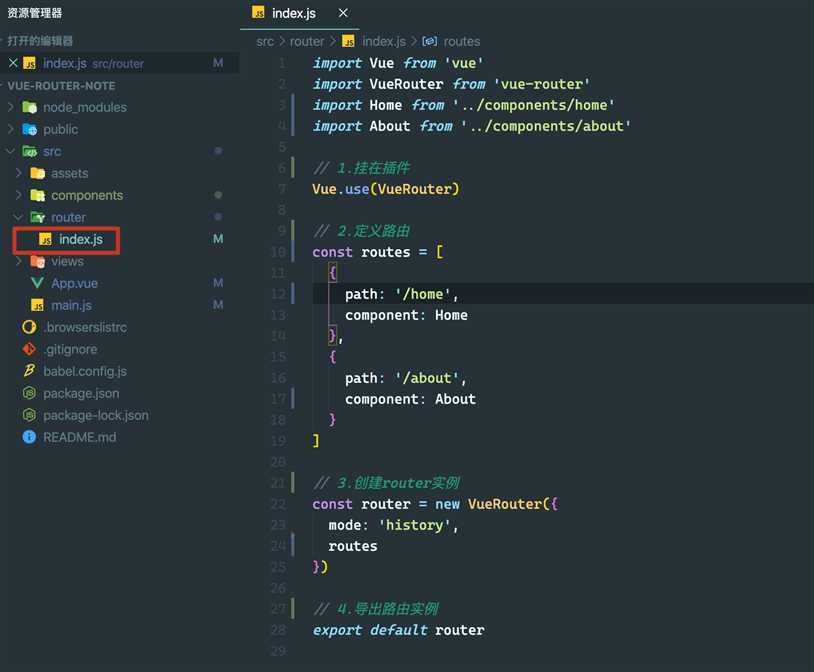
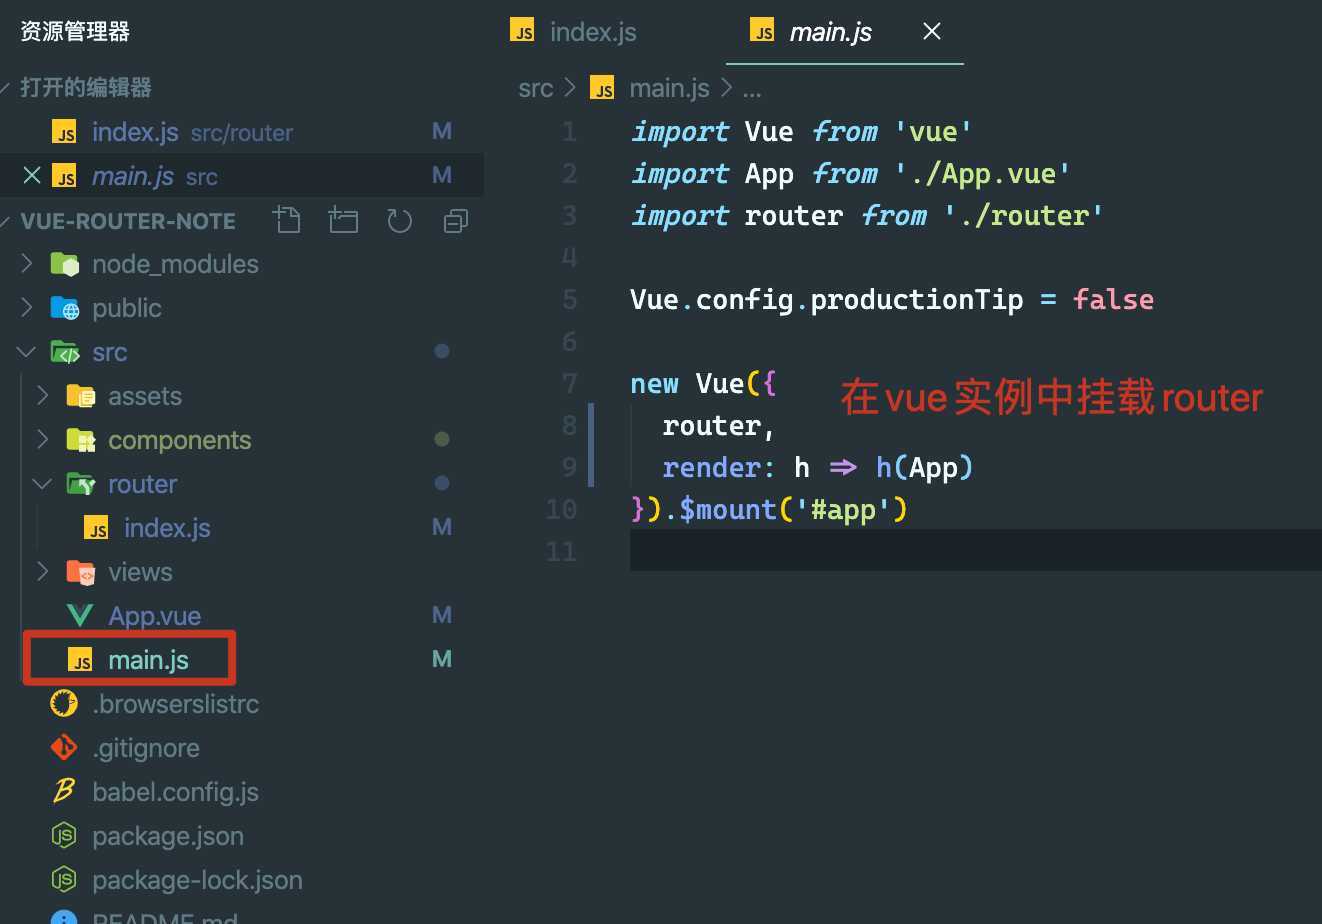
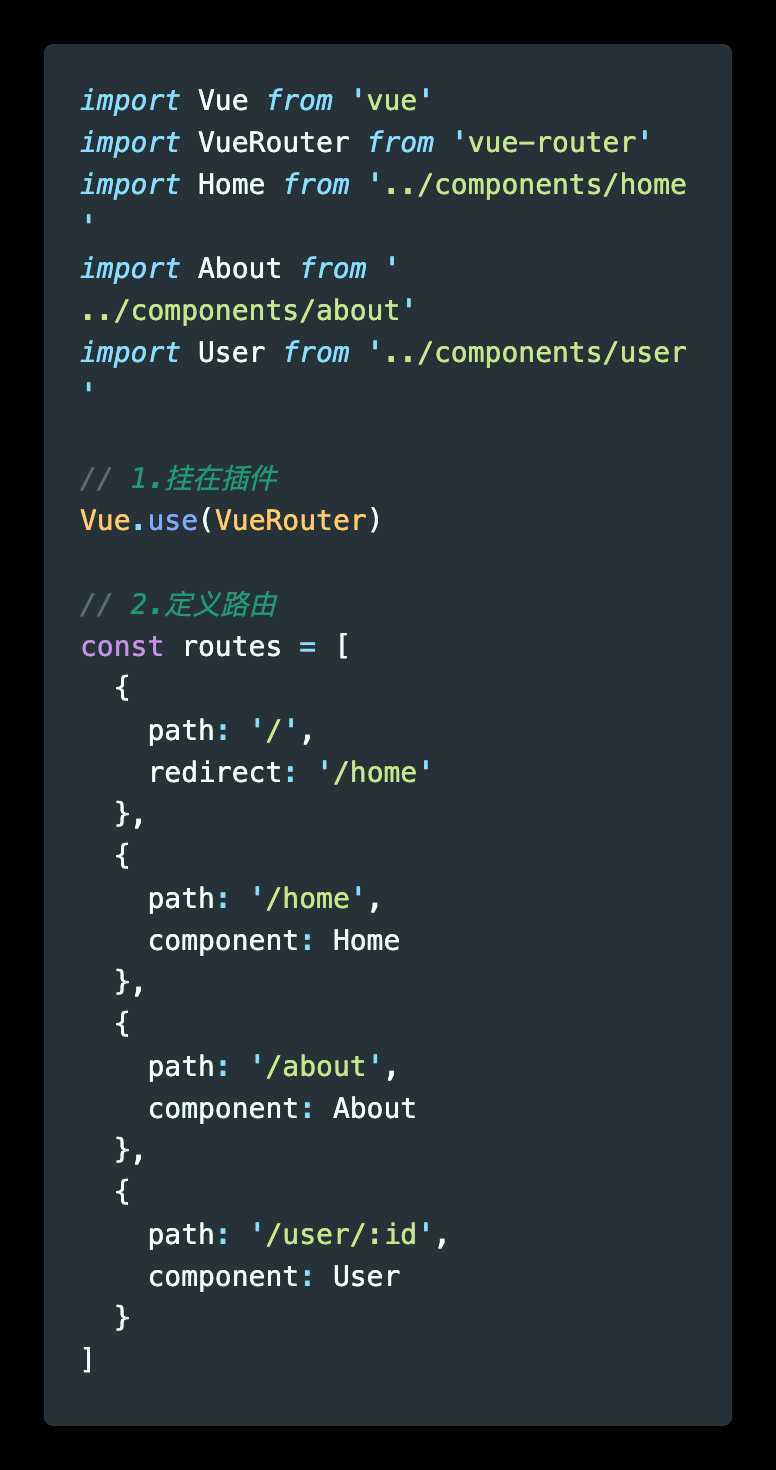
在讲解vue中使用vue-router改变URL不刷新页面之前,先看一下
npm install vue-router --save
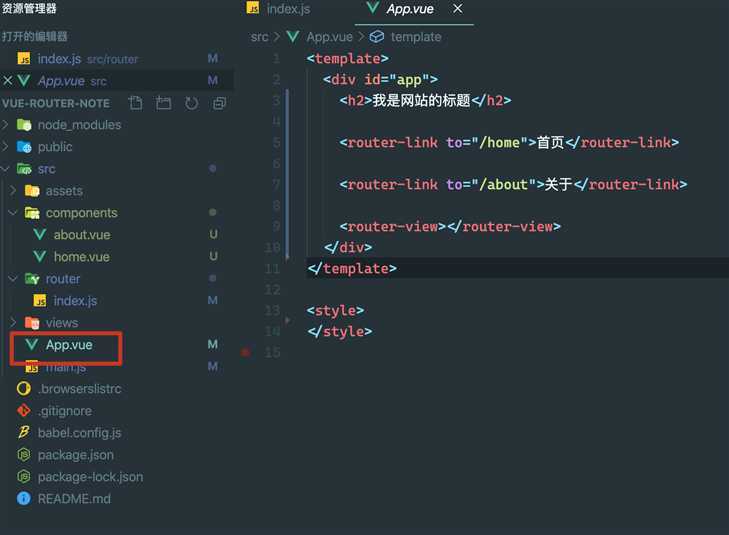
<router-link>该标签是一个vue-router中已经内置的组件,他会被渲染成一个<a>标签<router-view>该标签会根据当前的路径,动态渲染出不同的组件<router-view>挂载的组件,其他内容不会发生改变默认情况下,进入网站的首页,我们希望<router-view>渲染首页的内容。但是我们的实现中,默认没有显示首页组件,必须让用户点击才可以

//home的路径下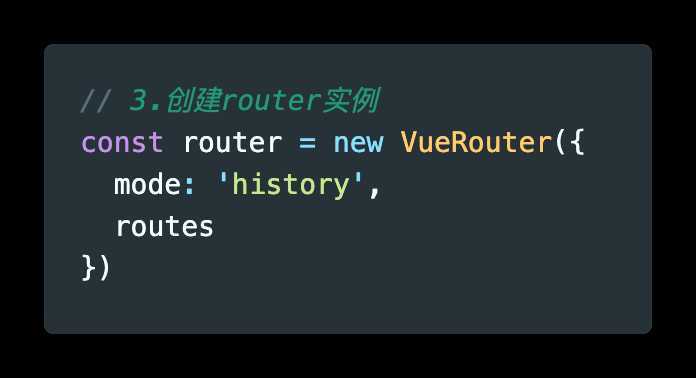
前面的<router-link>中,我们只是使用了一个属性to,用于指定跳转的路径
<router-link>还有一些其他属性:
<router-link>之后渲染成什么组件,比如<router-link to=‘/home‘ tag=‘li‘>会渲染成一个<li>元素,而不是<a><router-link>对应的路由匹配成功时,会自动给当前元素设置一个router-link-active的class,设置active-class可以修改默认的名称
在进行高亮显示的导航菜单或者底部tabbar时,会使用该类
但是通常不会修改类的属性,会直接使用默认的router-link-active即可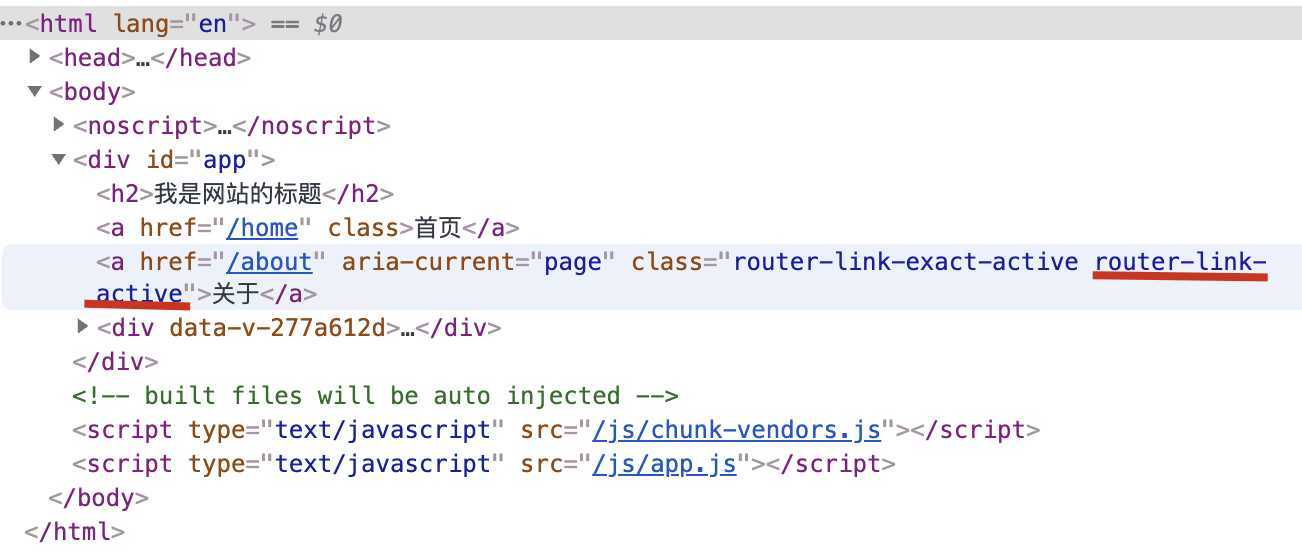
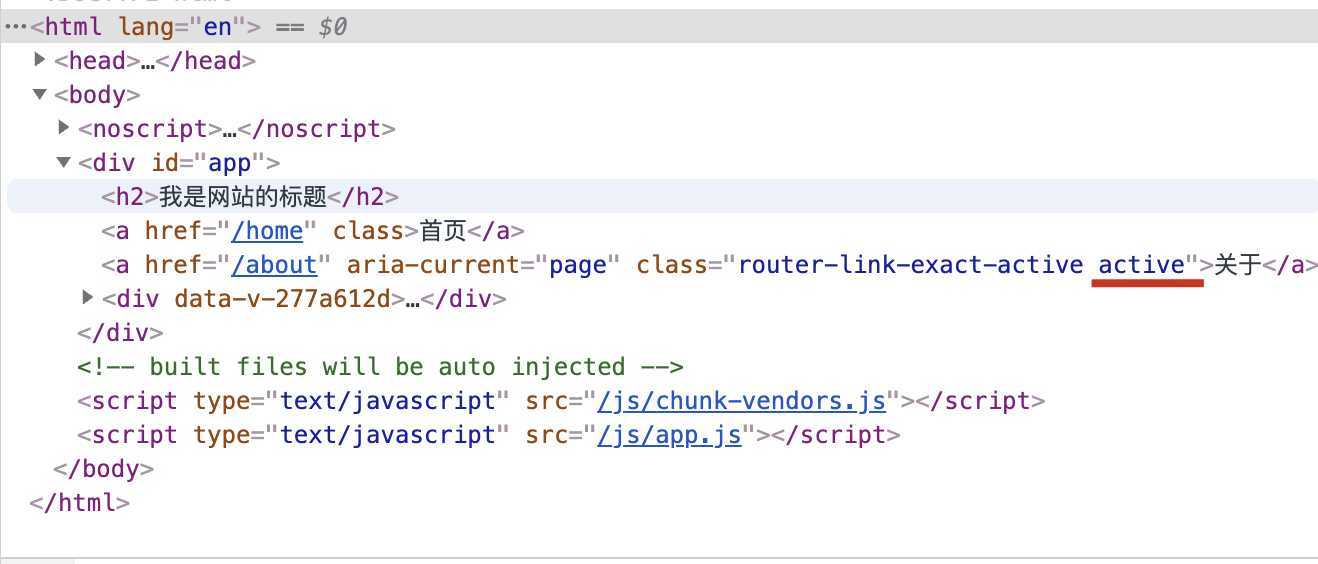
修改linkActiveClass,可以通过router实例的属性进行修改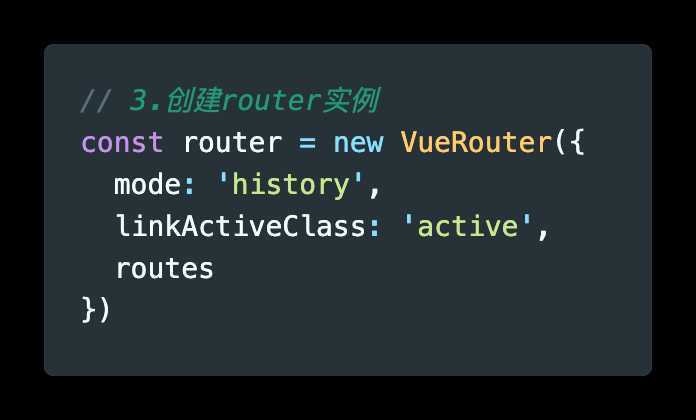
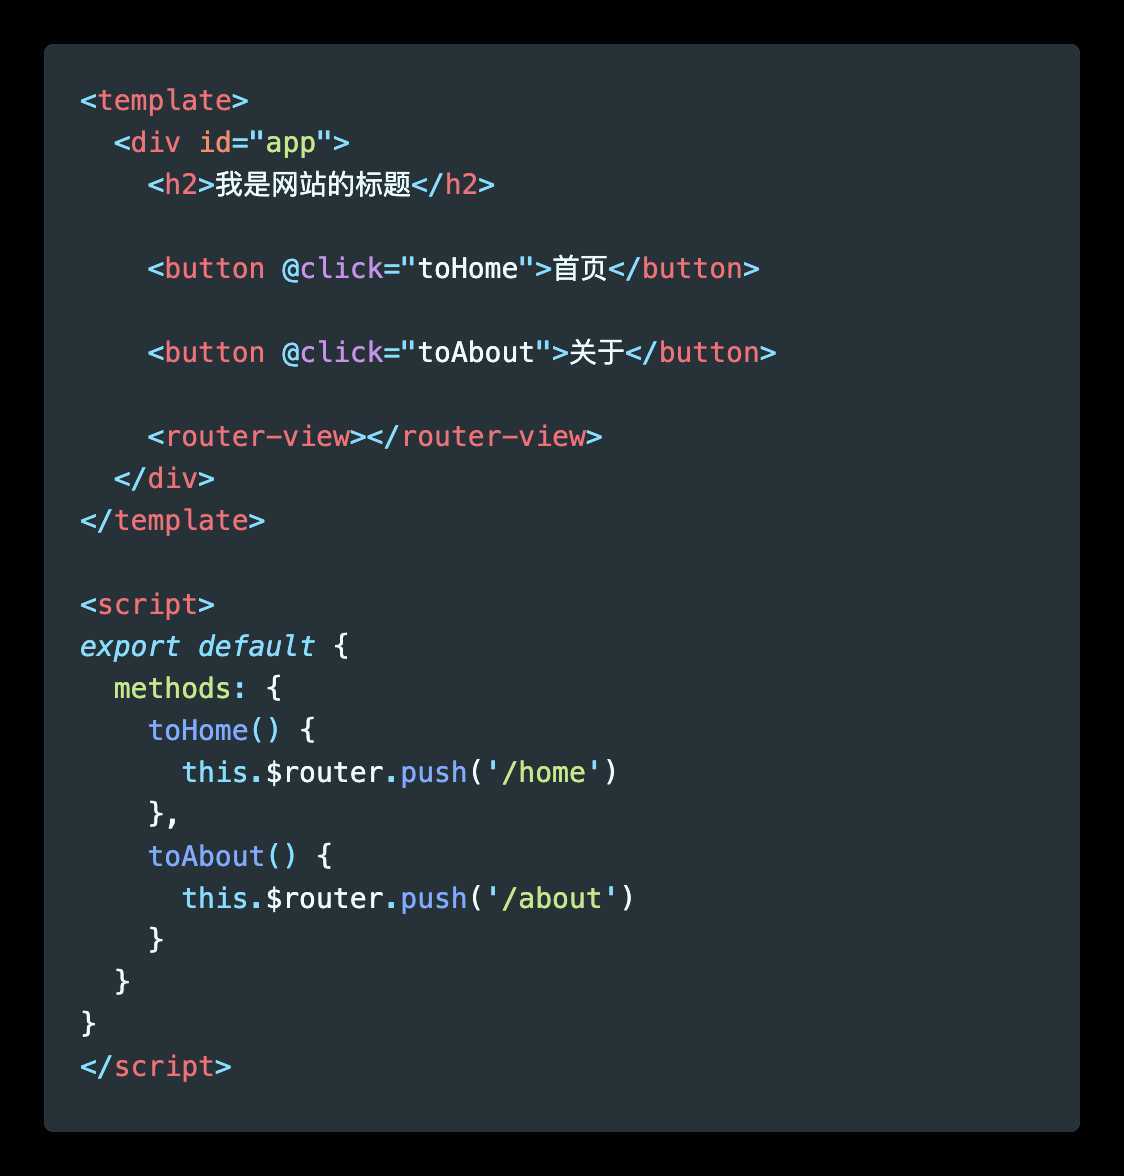
有时候,页面的跳转可能需要执行对应的JavaScript代码,这个时候,就可以使用第二种跳转方式了
代码修改如下图
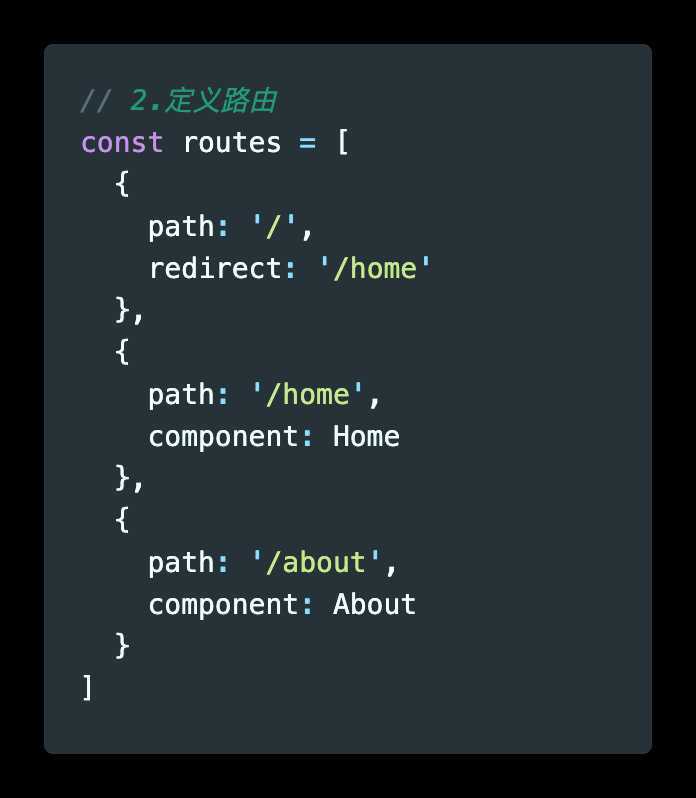
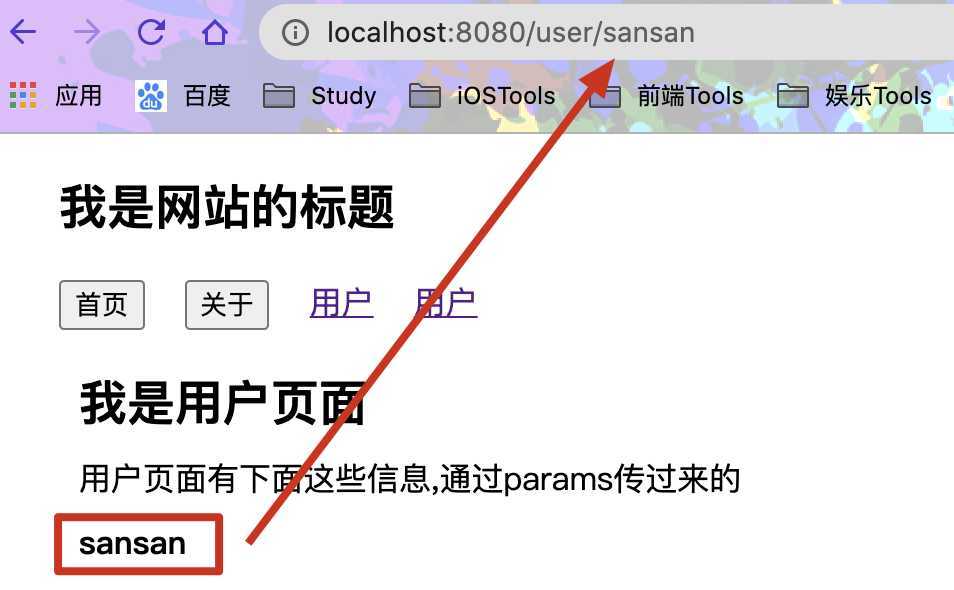
在某些情况下,一个页面的path路径可能是不确定的,比如我们进入用户界面时,希望是这样的路径/user/aaa或、user/mmm
这种path和Component的匹配关系,我们称之为动态路由(也是路由传递数据的一种方式)
  {
    path: ‘/user/:id‘,
    component: User
  }
<template>
  <div>
    <h2>我是用户页面</h2>
    <p>用户页面有下面这些信息,通过params传过来的</p>
    <h4>{{$route.params.id}}</h4>
  </div>
</template>
<router-link :to="‘/user/‘ + id">用户</router-link>
或者
<router-link to="/user/zhangsan">用户</router-link>
效果图
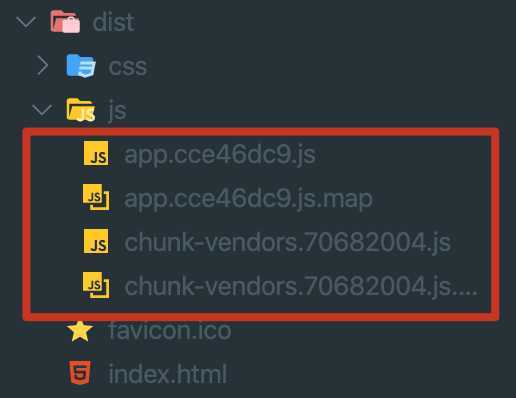
如图:没有使用懒加载,最终编译的文件只有四个(使用vue4.0)
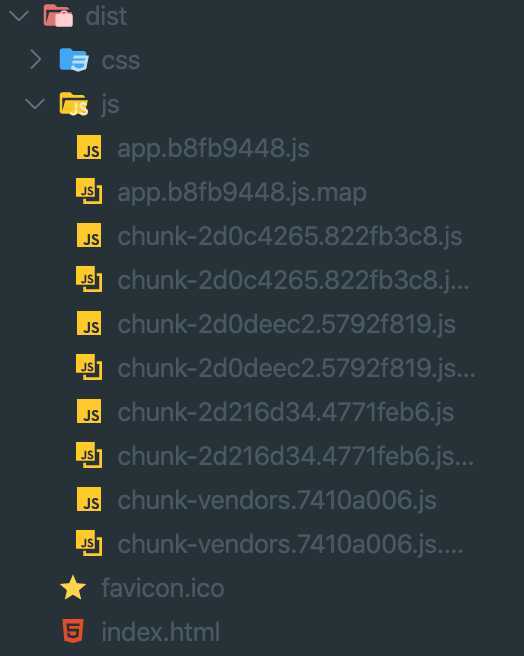
如图:使用了路由懒加载,每个路由文件都会单独编译成一个文件
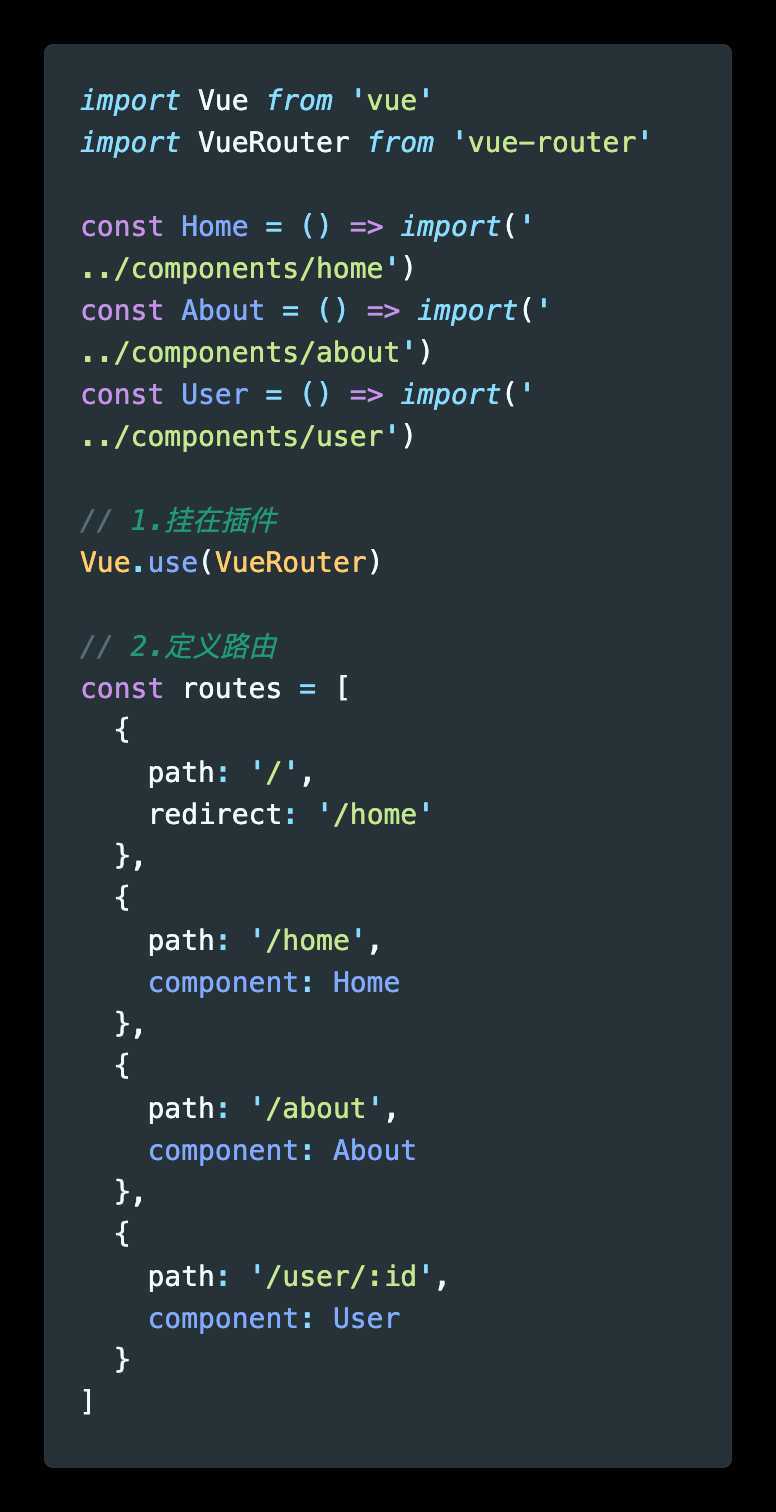
懒加载的方式
const Home = resolve => { require.ensure([‘../components/Home.vue‘], () => { resolve(require(‘../components/Home.vue‘)) })};
const About = resolve => require([‘../components/About.vue‘], resolve);
const Home = () => import(‘../components/Home.vue‘)
注意点:
/<router-link to="/home/news"></router-link> // 路由配置
{
path: ‘/home‘,
component: Home,
children: [
{
path: ‘‘,
redirect: ‘message‘
},
{
path: ‘message‘,
component: Message
},
{
path: ‘news‘,
component: News
}
]
}
<template>
  <div>
    <h2>我是首页</h2>
    <p>我是首页的内容</p>
    <router-link to="/home/message">未读消息</router-link>
    <router-link to="/home/news">整点新闻</router-link>

    <router-view></router-view>
  </div>
</template>
传递参数主要有两种类型:params和query
params的类型
/router/:id/router/123abquery的类型
/router,也就是普通配置/router?id=123&age=23方式一:<router-link>
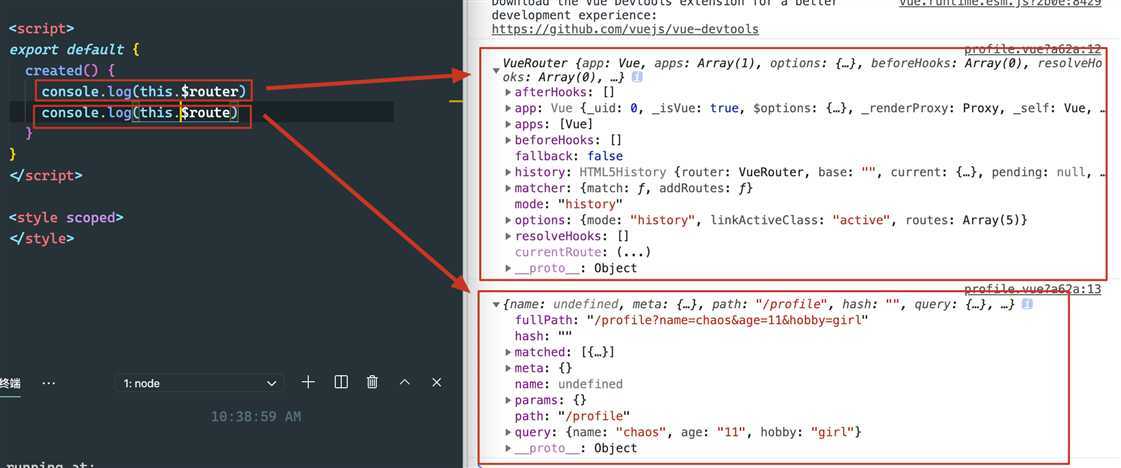
<router-link :to="{ path: ‘/profile‘, query: { name: ‘chaos‘, age: 11, hobby: ‘music‘ } }">档案</router-link>
    toProfile() {
      this.$router.push({
        path: ‘/profile‘,
        query: {
          name: ‘chaos‘,
          age: 11,
          hobby: ‘girl‘
        }
      })
    }
<template>
  <div>
    <h2>我是档案页面,我会将传递过来的参数展示到下面</h2>
    <p>这是通过params传递过来的参数{{$route.params}}</p>
    <p>这是通过query传递过来的参数{{$route.query}}</p>
  </div>
</template>

vue-router提供的导航守卫主要用来监听路由的进入和离开的
vue-router提供了beforeEach和afterEach的钩子函数,他们会在路由即将改变前和改变后触发
我们可以利用beforeEach来完成标题的修改
  {
    path: ‘/home‘,
    component: Home,
    meta: {
      title: ‘首页‘
    },
    children: [
      {
        path: ‘‘,
        redirect: ‘message‘
      },
      {
        path: ‘message‘,
        component: Message
      },
      {
        path: ‘news‘,
        component: News
      }
    ]
  },
  {
    path: ‘/about‘,
    component: About,
    meta: {
      title: ‘关于‘
    }
  },
router.beforeEach((to, from, next) => {
  console.log(to)
  document.title = to.matched[0].meta.title
  next()
})
导航钩子的三个参数解析
原文:https://www.cnblogs.com/gchlcc/p/13153580.html