首先在pom.xml里面导入依赖:
    <dependencies>

        <!--要使用spring需要添加4个包但是maven会把他的几个依赖包同时下好-->
        <dependency>
            <groupId>org.springframework</groupId>
            <artifactId>spring-context</artifactId>
            <version>5.1.6.RELEASE</version>
        </dependency>


    </dependencies>
配置applicationContext.xml:
 1 <?xml version="1.0" encoding="UTF-8"?>
 2 <beans xmlns="http://www.springframework.org/schema/beans"
 3        xmlns:xsi="http://www.w3.org/2001/XMLSchema-instance"
 4        xmlns:context="http://www.springframework.org/schema/context"
 5        xsi:schemaLocation="http://www.springframework.org/schema/beans
 6        http://www.springframework.org/schema/beans/spring-beans.xsd
 7        http://www.springframework.org/schema/context
 8        http://www.springframework.org/schema/context/spring-context.xsd">
 9
10     <!--基于注解的方式我们的spring来实现控制反转以及依赖注入,扫描study下面的所有的包
11         包下面的所有的类但是符合条件的类是上面必须要带一个注解
12     -->
13     <context:component-scan base-package="com.lv.study"></context:component-scan>
14
15 </beans>
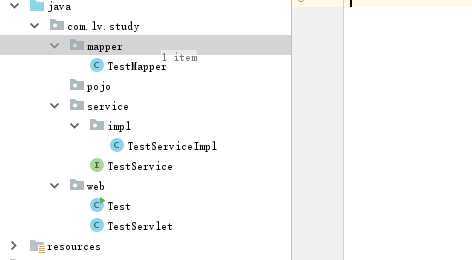
项目结构:

测试接口:
public interface TestService {

    //用来测试的
    public  void  show();

}
测试的实现类:
 1 @Component
 2 public class TestServiceImpl implements TestService {
 3
 4     TestMapper testMapper;
 5
 6     public void show() {
 7
 8         System.out.println("this is show time");
 9     }
10 }
测试的servlet:
 1 @Component//代表当前类被spring去管理
 2 public class TestServlet {
 3
 4     //核心部分就是:IOC(现在都是基于注解的方式)
 5     //1: spring 帮我们创建对象; 控制反转IOC
 6     //2: spring 帮我们赋值;依赖注入DI
 7
 8
 9     @Autowired//将我们spring控制的testService的实现类,对这个属性进行依赖注入(赋值)
10     TestService testService;
11
12
13     public  void test(){
14
15         testService.show();
16     }
测试结果类:
 1 public class Test {
 2
 3     public static void main(String[] args) {
 4
 5         //如何获取testservlet类
 6         //根据spring提供给我们的实例获取xml文件里面的所有的bean
 7         //在spring里面吧每一个交给spring管理的对象(类)都叫一个bean
 8         ApplicationContext ac=new ClassPathXmlApplicationContext("applicationContext.xml");
 9         TestServlet testServlet = (TestServlet) ac.getBean("testServlet");
10
11         testServlet.test();
12
13     }
14 }
测试结果:

原文:https://www.cnblogs.com/dabu/p/13159507.html