https://www.cnblogs.com/linhaifeng/articles/6384466.html
# 时间模块优先掌握的操作:
# 一: time
import time
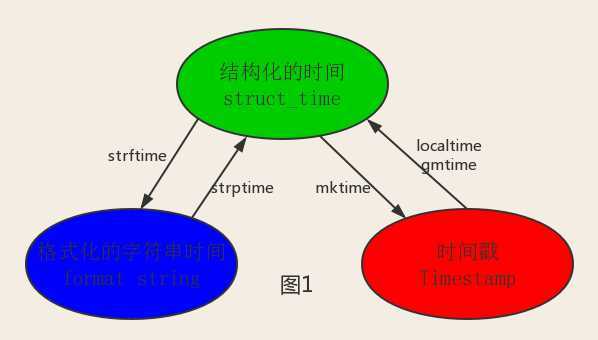
# 时间分为三种格式:
# 1. 时间戳: 从1970年到现在经过的秒数
# 作用: 用于时间间隔的计算
print(time.time())  # 结果: 1593429802.622998

# 2. 按照某种格式显示的时间:
# 作用: 用于展示时间
print(time.strftime(‘%Y-%m-%d %H:%M:%S %p‘))  # 结果: 2020-06-29 19:26:55 PM
print(time.strftime(‘%Y-%m-%d %X‘))  # 结果: 2020-06-29 19:26:55
# 3. 结构化时间
# 作用: 用于单独获取时间的某一部分
res = time.localtime()
print(res)
# 结果: time.struct_time(tm_year=2020, tm_mon=6, tm_mday=29, tm_hour=19, tm_min=33, tm_sec=5, tm_wday=0, tm_yday=181, tm_isdst=0)
# 其中, tm_wday表示一周中的第几天, tm_yday表示一年中的第几天, tm_isdist表示夏令时
print(res.tm_year)  # 结果: 2020
# 结构化时间中还有gmtime, 表示国际时间.


# 二: datetime
import datetime
res1 = datetime.datetime.now()
print(res1)  # 结果: 2020-06-29 20:02:09.299896
res2 = datetime.datetime.now() + datetime.timedelta(days=3)
print(res2)  # 结果: 2020-07-02 20:02:09.299896, 计算的是三天后的时间
res3 = datetime.datetime.now() + datetime.timedelta(days=-3)
print(res3)  # 结果: 2020-06-26 20:02:09.299896, 计算的是三天前的时间
res4 = datetime.datetime.now() - datetime.timedelta(days=3)
print(res4)  # 结果: 2020-06-26 20:02:09.299896, 计算的是三天前的时间
# 可以加减的有: days, seconds, microseconds, milliseconds, minutes, hours, weeks, 没有years.
# 时间模块需要掌握的操作
# 1. 时间格式的转换
# struct_time >>> timestamp
import time
print(time.mktime(time.localtime()))
# 结果: 1593478596.0

# timestamp >>> struct_time
print(time.localtime(time.time()))
# 结果: time.struct_time(tm_year=2020, tm_mon=6, tm_mday=30, tm_hour=9, tm_min=0, tm_sec=11, tm_wday=1, tm_yday=182, tm_isdst=0)
# 结构化时间包含两种, 一种是当地时间, 即localtime, 另一种是世界标准时间, 即gmtime.
# 所以在timestamp转化为struc_time时, 也有两种方法, 一种是localtime, 另一种是gmtime.

# sturct_time >>> format string
print(time.strftime(‘%Y-%m-%d %H:%M:%S‘, time.localtime()))
# 结果: 2020-06-30 09:12:53
# format string >>> struct_time
print(time.strptime(‘2020-03-04 01:11:12‘, ‘%Y-%m-%d %H:%M:%S‘))
# 结果: time.struct_time(tm_year=2020, tm_mon=3, tm_mday=4, tm_hour=1, tm_min=11, tm_sec=12, tm_wday=2, tm_yday=64, tm_isdst=-1)
# 真正需要掌握的只有一条: format string >>> struct_time >>> timestamp

# 示例: 计算‘2020-6-30 09:28:00‘7天之后的时间
strftime = ‘2020-6-30 09:28:00‘
struct_time = time.strptime(strftime, ‘%Y-%m-%d %H:%M:%S‘)
timestamp = time.mktime(struct_time) + 7*86400
new_struct_time = time.localtime(timestamp)
new_strftime = time.strftime(‘%Y-%m-%d %H:%M:%S‘, new_struct_time)
print(new_strftime)
# 结果: 2020-07-07 09:28:00

import time
time.sleep(3)
#了解:
print(time.asctime())  # 结果: Fri Jul  3 09:38:09 2020
# asctime()相当于strftime, 只不过不用再填写时间格式了.
# 这种格式的时间在linux系统中比较常见.

import datetime
print(datetime.datetime.now())  # 结果: 2020-07-03 09:41:43.807904
print(datetime.datetime.utcnow())  # 世界标准时间  结果: 2020-07-03 01:41:43.857939
print(datetime.datetime.fromtimestamp(33333444))  # 将时间戳转化为时间的格式  结果: 1971-01-22 03:17:24
import time
t = time.time()
import datetime
t1 = datetime.datetime.fromtimestamp(t)
print(t1)  # 结果: 2020-07-03 11:17:11.794048
1 import random
 2
 3 print(random.random())#(0,1)----float    大于0且小于1之间的小数
 4
 5 print(random.randint(1,3))  #[1,3]    大于等于1且小于等于3之间的整数
 6
 7 print(random.randrange(1,3)) #[1,3)    大于等于1且小于3之间的整数
 8
 9 print(random.choice([1,‘23‘,[4,5]]))#1或者23或者[4,5]
10
11 print(random.sample([1,‘23‘,[4,5]],2))#列表元素任意2个组合
12
13 print(random.uniform(1,3))#大于1小于3的小数,如1.927109612082716
14
15
16 item=[1,3,5,7,9]
17 random.shuffle(item) #打乱item的顺序,相当于"洗牌"
18 print(item)
# 随机生成6位验证码
import random
def make_code(size=4):
    res = ‘‘
    for i in range(6):
        s1 = chr(random.randint(65, 90))
        s2 = chr(random.randint(97, 122))
        d = str(random.randint(0,9))
        res += random.choice([s1, s2, d])
    return res
code = make_code(6)
print(code)
# 注意: ord(‘a‘)可查看a对应的数字, chr(65)可以将数字65转化为字母a.
os.getcwd() 获取当前工作目录,即当前python脚本工作的目录路径
os.chdir("dirname")  改变当前脚本工作目录;相当于shell下cd
os.curdir  返回当前目录: (‘.‘)
os.pardir  获取当前目录的父目录字符串名:(‘..‘)
os.makedirs(‘dirname1/dirname2‘)    可生成多层递归目录
os.removedirs(‘dirname1‘)    若目录为空,则删除,并递归到上一级目录,如若也为空,则删除,依此类推
os.mkdir(‘dirname‘)    生成单级目录;相当于shell中mkdir dirname
os.rmdir(‘dirname‘)    删除单级空目录,若目录不为空则无法删除,报错;相当于shell中rmdir dirname
os.listdir(‘dirname‘)    列出指定目录下的所有文件和子目录,包括隐藏文件,并以列表方式打印
os.remove()  删除一个文件
os.rename("oldname","newname")  重命名文件/目录
os.stat(‘path/filename‘)  获取文件/目录信息
os.sep    输出操作系统特定的路径分隔符,win下为"\\",Linux下为"/"
os.linesep    输出当前平台使用的行终止符,win下为"\r\n",Linux下为"\n"
os.pathsep    输出用于分割文件路径的字符串 win下为;,Linux下为:
os.name    输出字符串指示当前使用平台。win->‘nt‘; Linux->‘posix‘
os.system("bash command")  运行shell命令,直接显示
os.environ  获取系统环境变量
os.path.abspath(path)  返回path规范化的绝对路径
os.path.split(path)  将path分割成目录和文件名二元组返回
os.path.dirname(path)  返回path的目录。其实就是os.path.split(path)的第一个元素
os.path.basename(path)  返回path最后的文件名。如何path以/或\结尾,那么就会返回空值。即os.path.split(path)的第二个元素
os.path.exists(path)  如果path存在,返回True;如果path不存在,返回False
os.path.isabs(path)  如果path是绝对路径,返回True
os.path.isfile(path)  如果path是一个存在的文件,返回True。否则返回False
os.path.isdir(path)  如果path是一个存在的目录,则返回True。否则返回False
os.path.join(path1[, path2[, ...]])  将多个路径组合后返回,第一个绝对路径之前的参数将被忽略
os.path.getatime(path)  返回path所指向的文件或者目录的最后存取时间
os.path.getmtime(path)  返回path所指向的文件或者目录的最后修改时间
os.path.getsize(path) 返回path的大小
注意: 不要轻易执行删除操作. shift+delete会永久删除. linux系统中的rm命令轻易不要用.
在Linux和Mac平台上,该函数会原样返回path,在windows平台上会将路径中所有字符转换为小写,并将所有斜杠转换为饭斜杠。
>>> os.path.normcase(‘c:/windows\\system32\\‘)
‘c:\\windows\\system32\\‘


规范化路径,如..和/
>>> os.path.normpath(‘c://windows\\System32\\../Temp/‘)
‘c:\\windows\\Temp‘

>>> a=‘/Users/jieli/test1/\\\a1/\\\\aa.py/../..‘
>>> print(os.path.normpath(a))
/Users/jieli/test1
os路径处理
#方式一:不推荐使用
import os
#具体应用
import os,sys
possible_topdir = os.path.normpath(os.path.join(
    os.path.abspath(__file__),
    os.pardir, #上一级
    os.pardir,
    os.pardir
))
sys.path.insert(0,possible_topdir)


#方式二:推荐使用
os.path.dirname(os.path.dirname(os.path.dirname(os.path.abspath(__file__))))
# 课件笔记:
import os
# 获取某一个文件夹下所有的子文件或子文件夹的名字
res1 = os.listdir(‘F:\python全栈开发\python\day22‘)
print(res1)
# 结果: [‘os模块.py‘, ‘random模块.py‘, ‘time与datatime模块.py‘]
res2 = os.listdir(‘.‘)
print(res2)
# 结果: [‘os模块.py‘, ‘random模块.py‘, ‘time与datatime模块.py‘], .表示查看的是当前文件夹

print(os.environ)
# 涉及到环境变量的有PATH, sys.path, os.environ, 其中, PATH供执行系统命令时使用, sys.path在导入模块时使用, os.environ是添加变量, 以供整个环境使用.
# os.environ结果是字典, 且key和value都必须是字符串. 在添加变量时也要遵循这一原则.

print(os.path.dirname(r‘F:\python全栈开发\python\day22‘))  # 结果: F:\python全栈开发\python
print(os.path.basename(r‘F:\python全栈开发\python\day22‘))  # 结果: day22

print(os.path.isfile(r‘F:\python全栈开发\python\day22‘))  # 结果: False
print(os.path.isfile(r‘F:\python全栈开发\python\day22\os模块.py‘))  # 结果: True

print(os.path.isdir(r‘F:\python全栈开发\python\day22‘))  # 结果: True
print(os.path.isdir(r‘F:\python全栈开发\python\day22\os模块.py‘))  # 结果: False

print(os.path.join(‘a‘, ‘b‘, ‘c‘, ‘d‘))  # 结果: a\b\c\d
print(os.path.join(‘a‘, ‘b‘, ‘c‘, ‘d‘))  # 结果: a\b\c\d

print(os.path.getsize(r‘F:\python全栈开发\python\day22‘))  # 结果: 0
print(os.path.getsize(r‘F:\python全栈开发\python\day22\os模块.py‘))  # 结果: 1419

# 以后获取文件的上一级目录推荐使用以下方法:
BASE_DIR = os.path.dirname(__file__)
print(BASE_DIR)  # 结果: F:/python全栈开发/python/day22
# python3.5以后, 推出了一个新的模块pathlib
from pathlib import Path
res = Path(__file__).parent.parent
print(res)   # 结果: F:\python全栈开发\python
res1 = Path(r‘F:\python全栈开发\python\day22‘) / ‘a/e.txt‘
print(res1)  # 结果: F:\python全栈开发\python\day22\a\e.txt, 用于路径拼接
1 sys.argv           命令行参数List,第一个元素是程序本身路径
2 sys.exit(n)        退出程序,正常退出时exit(0)
3 sys.version        获取Python解释程序的版本信息
4 sys.maxint         最大的Int值
5 sys.path           返回模块的搜索路径,初始化时使用PYTHONPATH环境变量的值
6 sys.platform       返回操作系统平台名称

# 重点是: sys.argv和sys.path
打印进度条
...
引言:
需求: 将bool值True写入到文件中.
如果预先不将True转化为字符串, 直接使用write进行写入, 则会报错, 且用t/b模式写都会报错:
with open(‘a‘, mode=‘w‘, encoding=‘utf-8‘) as f:
    f.write(True)
TypeError: write() argument must be str, not bool
with open(‘a‘, mode=‘wb‘) as f:
    f.write(True.encode(‘utf-8‘))
    # AttributeError: ‘bool‘ object has no attribute ‘encode‘
提示write()中的参数必须是字符串类型. 那么如果想把bool, list, dict, tuple, int, float, set类型的数据存到硬盘上, 则必须先将其转化为str类型的数据, 然后再写入.
当然, 从硬盘中读取出来的数据也是字符串类型, 这就需要将字符串类型的数据转化为数据原来的类型.
土方法(str+eval):
# str()可以将其他数据类型转化为str类型, eval()可以将str类型还原回原来的类型
with open(‘a‘, mode=‘w‘, encoding=‘utf-8‘) as f:
    f.write(str(22)+‘\n‘)
    f.write(str(22.2)+‘\n‘)
    f.write(str([1, 2, ‘中国‘])+‘\n‘)
    f.write(str({‘name‘: ‘小明‘})+‘\n‘)
    f.write(str((22.2, ‘啊啊‘))+‘\n‘)
    f.write(str({1, ‘bb‘})+‘\n‘)
    f.write(str(True)+‘\n‘)
with open(‘a‘, mode=‘r‘, encoding=‘utf-8‘) as f:
    for line in f:
        line = eval(line)
        print(line, type(line))
‘‘‘
结果:
22 <class ‘int‘>
22.2 <class ‘float‘>
[1, 2, ‘中国‘] <class ‘list‘>
{‘name‘: ‘小明‘} <class ‘dict‘>
(22.2, ‘啊啊‘) <class ‘tuple‘>
{1, ‘bb‘} <class ‘set‘>
True <class ‘bool‘>
‘‘‘
1. 什么是序列化和反序列化
序列化指的是把内存的数据类型转换成一个特定的格式的内容, 该格式的内容可用于存储或传输给其他平台使用
内存中的数据类型----->序列化----->特定的格式(jason格式或pickle格式)
内存中的数据类型<-----反序列化<-----特定的格式(jason格式或pickle格式)
土办法:
文本文件中只能存储字符串, 对于像字典类型的数据, 如果想永久存储起来, 则需要先转化为字符串
{‘aa‘:11}----->序列化str({‘aa‘:11})----->‘{‘aa‘:11}‘
{‘aa‘:11}<-----反序列化eval({‘aa‘:11})<-----‘{‘aa‘:11}‘
2. 为何要序列化
序列化得到的特定格式的内容有两种用途
1. 可用于存储=>用于存档, 仅供自己的程序使用
2. 可用于传输给其他平台使用=>跨平台数据交互, 供其他语言使用
python java
列表 特定的格式 数组
强调:
针对用途1的特定格式: 可以是一种专用的格式, 即pickle, 只有python可以识别,
当然也可以jason进行, 但是有局限性, 因为json不适用于所有的数据类型, 例如不适用于集合
(TypeError: Object of type set is not JSON serializable)
针对用途2的特定格式: 应该是一种通用, 能够被所有语言识别的格式, 即jason格式

# json的使用
import json
with open(‘a‘, mode=‘w‘, encoding=‘utf-8‘) as f:
    f.write(json.dumps(1)+‘\n‘)
    f.write(json.dumps(1.111)+‘\n‘)
    f.write(json.dumps(True)+‘\n‘)
    f.write(json.dumps(False)+‘\n‘)
    f.write(json.dumps(‘中国‘)+‘\n‘)
    f.write(json.dumps([1, ‘中国‘])+‘\n‘)
    f.write(json.dumps((1, False))+‘\n‘)  # tuple类型不会报错. 但是使用loads反转出来是list类型.
    f.write(json.dumps({‘name‘: ‘小明‘})+‘\n‘)
    # f.write(json.dumps({1, True})+‘\n‘)  # set类型会报错. TypeError: Object of type set is not JSON serializable
with open(‘a‘, mode=‘r‘, encoding=‘utf-8‘) as f:
    for line in f:
        # print(type(line))  # 结果: <class ‘str‘>
        res = json.loads(line)
        print(res, type(res))
‘‘‘
结果:
1 <class ‘int‘>
1.111 <class ‘float‘>
True <class ‘bool‘>
False <class ‘bool‘>
中国 <class ‘str‘>
[1, ‘中国‘] <class ‘list‘>
[1, False] <class ‘list‘>
{‘name‘: ‘小明‘} <class ‘dict‘>
‘‘‘
为确保中文字符的正常显示, 需要用到ensure_ascii = False
import json
r1 = json.dumps([1, 2, True, ‘中国‘])
print(r1)  # 结果: [1, 2, true, "\u4e2d\u56fd"]
r2 = json.dumps([1, 2, True, ‘中国‘], ensure_ascii=False)
print(r2)  # 结果: [1, 2, true, "中国"]
# pickle的使用
import pickle
with open(‘a‘, mode=‘wb‘) as f:
    f.write(pickle.dumps(1)+‘\n‘.encode(‘utf-8‘))
    f.write(pickle.dumps(1.111)+‘\n‘.encode(‘utf-8‘))
    f.write(pickle.dumps(True)+‘\n‘.encode(‘utf-8‘))
    f.write(pickle.dumps(False)+‘\n‘.encode(‘utf-8‘))
    f.write(pickle.dumps(‘中国‘)+‘\n‘.encode(‘utf-8‘))
    f.write(pickle.dumps([1, ‘中国‘])+‘\n‘.encode(‘utf-8‘))
    f.write(pickle.dumps((1, False))+‘\n‘.encode(‘utf-8‘))  # tuple类型可以正常转换.
    f.write(pickle.dumps({‘name‘: ‘小明‘})+‘\n‘.encode(‘utf-8‘))
    f.write(pickle.dumps({1, ‘aaa‘})+‘\n‘.encode(‘utf-8‘))  # 报错:_pickle.UnpicklingError: pickle data was truncated
with open(‘a‘, mode=‘rb‘) as f:
    for line in f:
        # print(type(line))  # 结果: <class ‘str‘>
        res = pickle.loads(line)
        print(res, type(res))
‘‘‘
结果:
1 <class ‘int‘>
1.111 <class ‘float‘>
True <class ‘bool‘>
False <class ‘bool‘>
中国 <class ‘str‘>
[1, ‘中国‘] <class ‘list‘>
(1, False) <class ‘tuple‘>
{‘name‘: ‘小明‘} <class ‘dict‘>
‘‘‘
综上, 可以看出, jason和pickle都无法正常转换集合, json会将元祖反转成列表, pickle可以将元祖反转成元祖.
import json

# 序列化
res3 = json.dumps([1, 1.33, ‘a‘, True, False])
print(res3, type(res3))  # 结果: [1, 1.33, "a", true, false] <class ‘str‘>
# 反序列化
res4 = json.loads(res3)
print(res4, type(res4))  # 结果: [1, 1.33, ‘a‘, True, False] <class ‘list‘>

# 将序列化结果写入文件的复杂方法
res1 = json.dumps(True)
print(res1, type(res1))  # 结果: true <class ‘str‘>
with open(‘test1.json‘, mode=‘w‘, encoding=‘utf-8‘) as f:
    f.write(res1)
# 注意: 使用json文件, 通常不会重复写, 只是写一次.

# 从文件读取json格式的字符串进行反序列化操作的复杂方法
with open(‘test1.json‘, mode=‘r‘, encoding=‘utf-8‘) as f:
    res11=f.read()
    print(res11, type(res11))  # 结果: true <class ‘str‘>
    res111 = json.loads(res11)
    print(res111, type(res111))  # 结果: True <class ‘bool‘>


# 将序列化的结果写入文件的简单方法
with open(‘test2.json‘, mode=‘w‘, encoding=‘utf-8‘) as f:
    json.dump([1, 1.33, ‘a‘, True, False], f)

# 从文件读取json格式的字符串进行反序列化操作的简单方法
with open(‘test2.json‘, mode=‘r‘, encoding=‘utf-8‘) as f:
    res5 = json.load(f)
    print(res5, type(res5))  # 结果: [1, 1.33, ‘a‘, True, False] <class ‘list‘>

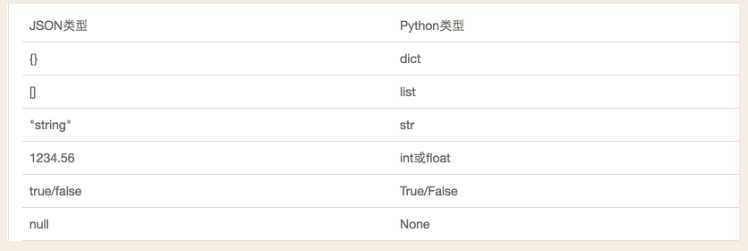
# 注意: json格式兼容的是所有语言通用的数据类型, 不能识别某一语言所独有的类型
# json强调: json中字符串使用的是双引号, 没有单引号.
res6 = json.loads(‘[1, 1.33, "a", true, false]‘)
print(res6, type(res6))  # 结果: [1, 1.33, ‘a‘, True, False] <class ‘list‘>

res7 = json.loads(b‘[1, 1.33, "a", true, false]‘)
print(res7, type(res7))  # 结果: [1, 1.33, ‘a‘, True, False] <class ‘list‘>
# 在python解释器2.7与3.6之后都可以json.loads(bytes类型),但唯独3.5不可以
# 在python2中, str就是bytes.
注意:通常, 一个json文件放一个对象. 如果想多放对象, 应该在外边套个列表.
pickle模块的用法同json模块
import pickle
res8 = pickle.dumps({1, 2, 3, 4})
print(res8, type(res8))
# 结果: b‘\x80\x03cbuiltins\nset\nq\x00]q\x01(K\x01K\x02K\x03K\x04e\x85q\x02Rq\x03.‘ <class ‘bytes‘>
res9 = pickle.loads(res8)
print(res9, type(res9))  # 结果: {1, 2, 3, 4} <class ‘set‘>
# 如果集合中含有bool, 转化的过程中bool会丢失.

# 了解: pickle中作用的是中文, 如果在python3中进行了pickle的dump序列化操作, 产生的结果想要在python2中进行反序列化,
# 则在python3中进行dump操作时, 需要指定protoco=2
import pickle
with open(‘a‘, mode=‘wb‘) as f:
    pickle.dump([‘a‘, 1, True], f)
with open(‘a‘, mode=‘rb‘) as f:
    r = pickle.load(f)
    print(r, type(r))  # 结果[‘a‘, 1, True] <class ‘list‘>
python2与pyhon3的pickle兼容问题:
# coding:utf-8
import pickle

with open(‘a.pkl‘,mode=‘wb‘) as f:
    # 一:在python3中执行的序列化操作如何兼容python2
    # python2不支持protocol>2,默认python3中protocol=4
    # 所以在python3中dump操作应该指定protocol=2
    pickle.dump(‘你好啊‘,f,protocol=2)

with open(‘a.pkl‘, mode=‘rb‘) as f:
    # 二:python2中反序列化才能正常使用
    res=pickle.load(f)
    print(res)os路径处理
#方式一:推荐使用 import os #具体应用 import os,sys possible_topdir = os.path.normpath(os.path.join( os.path.abspath(__file__), os.pardir, #上一级 os.pardir, os.pardir )) sys.path.insert(0,possible_topdir) #方式二:不推荐使用 os.path.dirname(os.path.dirname(os.path.dirname(os.path.abspath(__file__))))
如果在使用别人的模块时, 发现别人的模块不是很完美, 需要对使用的模块进行改进完善, 则叫做打补丁.
如果文件好多处都导入了该模块, 应该在首次导入的位置进行打补丁, 后续导入的直接引用内存结果, 都会跟着改变, 就是在运行文件打补丁.
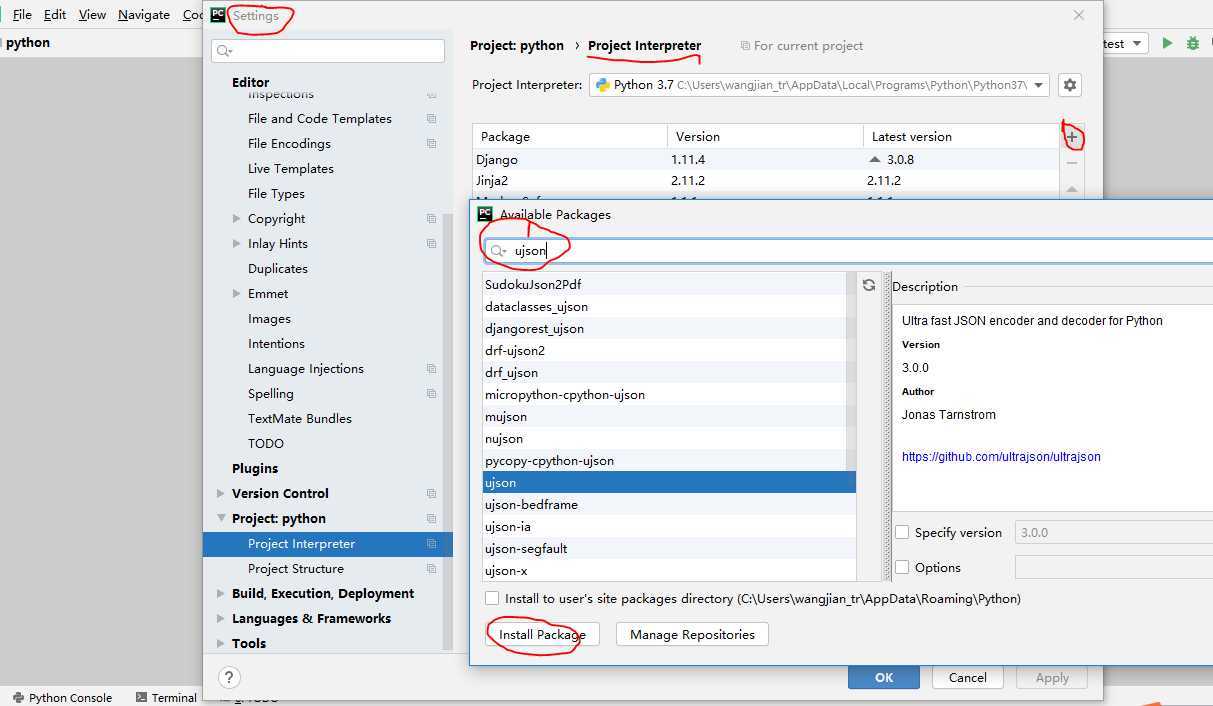
扩展:
有一种模块叫ujson, 它比json的效率更高.
可以通过两种方式进行安装:
方式一:
pip3 install ujson
方式二:

ujson的用法和json一样, ujson的效率更高.
# 一.什么是猴子补丁?
      猴子补丁的核心就是用自己的代码替换所用模块的源代码,详细地如下
  1,这个词原来为Guerrilla Patch,杂牌军、游击队,说明这部分不是原装的,在英文里guerilla发音和gorllia(猩猩)相似,再后来就写了monkey(猴子)。
  2,还有一种解释是说由于这种方式将原来的代码弄乱了(messing with it),在英文里叫monkeying about(顽皮的),所以叫做Monkey Patch。


# 二. 猴子补丁的功能(一切皆对象)
  1.拥有在模块运行时替换的功能, 例如: 一个函数对象赋值给另外一个函数对象(把函数原本的执行的功能给替换了)
class Monkey:
    def hello(self):
        print(‘hello‘)

    def world(self):
        print(‘world‘)


def other_func():
    print("from other_func")


monkey = Monkey()
monkey.hello = monkey.world
monkey.hello()
monkey.world = other_func
monkey.world()

# 三.monkey patch的应用场景
如果我们的程序中已经基于json模块编写了大量代码了,发现有一个模块ujson比它性能更高,
但用法一样,我们肯定不会想所有的代码都换成ujson.dumps或者ujson.loads,那我们可能
会想到这么做
import ujson as json,但是这么做的需要每个文件都重新导入一下,维护成本依然很高
此时我们就可以用到猴子补丁了
只需要在入口处加上
, 只需要在入口加上:

import json
import ujson

def monkey_patch_json():
    json.__name__ = ‘ujson‘  # 此处可以不写
    json.dumps = ujson.dumps
    json.loads = ujson.loads

monkey_patch_json() # 之所以在入口处加,是因为模块在导入一次后,后续的导入便直接引用第一次的成果

#其实这种场景也比较多, 比如我们引用团队通用库里的一个模块, 又想丰富模块的功能, 除了继承之外也可以考虑用Monkey
Patch.采用猴子补丁之后,如果发现ujson不符合预期,那也可以快速撤掉补丁。个人感觉Monkey
Patch带了便利的同时也有搞乱源代码的风险!
xml是实现不同语言或程序之间进行数据交换的协议,跟json差不多,但json使用起来更简单,不过,古时候,在json还没诞生的黑暗年代,大家只能选择用xml呀,至今很多传统公司如金融行业的很多系统的接口还主要是xml。
xml的格式如下,就是通过<>节点来区别数据结构的:
<?xml version="1.0"?>
<data>
    <country name="Liechtenstein">
        <rank updated="yes">2</rank>
        <year>2008</year>
        <gdppc>141100</gdppc>
        <neighbor name="Austria" direction="E"/>
        <neighbor name="Switzerland" direction="W"/>
    </country>
    <country name="Singapore">
        <rank updated="yes">5</rank>
        <year>2011</year>
        <gdppc>59900</gdppc>
        <neighbor name="Malaysia" direction="N"/>
    </country>
    <country name="Panama">
        <rank updated="yes">69</rank>
        <year>2011</year>
        <gdppc>13600</gdppc>
        <neighbor name="Costa Rica" direction="W"/>
        <neighbor name="Colombia" direction="E"/>
    </country>
</data>
xml协议在各个语言里的都 是支持的,在python中可以用以下模块操作xml:
# print(root.iter(‘year‘)) #全文搜索
# print(root.find(‘country‘)) #在root的子节点找,只找一个
# print(root.findall(‘country‘)) #在root的子节点找,找所有
import xml.etree.ElementTree as ET

tree = ET.parse("xmltest.xml")
root = tree.getroot()
print(root.tag)

#遍历xml文档
for child in root:
    print(‘========>‘,child.tag,child.attrib,child.attrib[‘name‘])
    for i in child:
        print(i.tag,i.attrib,i.text)

#只遍历year 节点
for node in root.iter(‘year‘):
    print(node.tag,node.text)
#---------------------------------------

import xml.etree.ElementTree as ET

tree = ET.parse("xmltest.xml")
root = tree.getroot()

#修改
for node in root.iter(‘year‘):
    new_year=int(node.text)+1
    node.text=str(new_year)
    node.set(‘updated‘,‘yes‘)
    node.set(‘version‘,‘1.0‘)
tree.write(‘test.xml‘)


#删除node
for country in root.findall(‘country‘):
   rank = int(country.find(‘rank‘).text)
   if rank > 50:
     root.remove(country)

tree.write(‘output.xml‘)
复制代码
复制代码
#在country内添加(append)节点year2
import xml.etree.ElementTree as ET
tree = ET.parse("a.xml")
root=tree.getroot()
for country in root.findall(‘country‘):
    for year in country.findall(‘year‘):
        if int(year.text) > 2000:
            year2=ET.Element(‘year2‘)
            year2.text=‘新年‘
            year2.attrib={‘update‘:‘yes‘}
            country.append(year2) #往country节点下添加子节点

tree.write(‘a.xml.swap‘)
自己创建xml文档:
import xml.etree.ElementTree as ET


new_xml = ET.Element("namelist")
name = ET.SubElement(new_xml,"name",attrib={"enrolled":"yes"})
age = ET.SubElement(name,"age",attrib={"checked":"no"})
sex = ET.SubElement(name,"sex")
sex.text = ‘33‘
name2 = ET.SubElement(new_xml,"name",attrib={"enrolled":"no"})
age = ET.SubElement(name2,"age")
age.text = ‘19‘

et = ET.ElementTree(new_xml) #生成文档对象
et.write("test.xml", encoding="utf-8",xml_declaration=True)

ET.dump(new_xml) #打印生成的格式
shelve模块比pickle模块简单,只有一个open函数,返回类似字典的对象,可读可写;key必须为字符串,而值可以是python所支持的数据类型
import shelve

f=shelve.open(r‘sheve.txt‘)
# f[‘stu1_info‘]={‘name‘:‘egon‘,‘age‘:18,‘hobby‘:[‘piao‘,‘smoking‘,‘drinking‘]}
# f[‘stu2_info‘]={‘name‘:‘gangdan‘,‘age‘:53}
# f[‘school_info‘]={‘website‘:‘http://www.pypy.org‘,‘city‘:‘beijing‘}

print(f[‘stu1_info‘][‘hobby‘])
f.close()
在python3中采用configparser的格式, 在python2中采用ConfigParser的格式
作用: 用来加载某种特定格式的配置文件
原文:https://www.cnblogs.com/libyan/p/13210173.html