Spring-IOC
ioc概念
控制反转
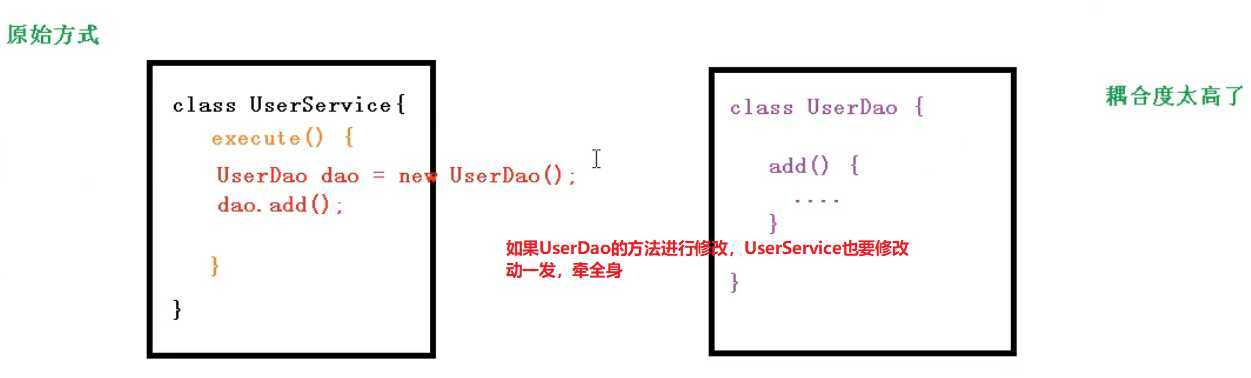
把对象创建和对象之间的调用过程,交给Spring 进行管理。
目的就是,为了降低耦合度,因为当你想在一个类当中调用另外一个类的方法,你需要获得另外一个类的实例
IOC的底层原理:
包括xml解析,工厂模式,反射
引入工厂模式之后:
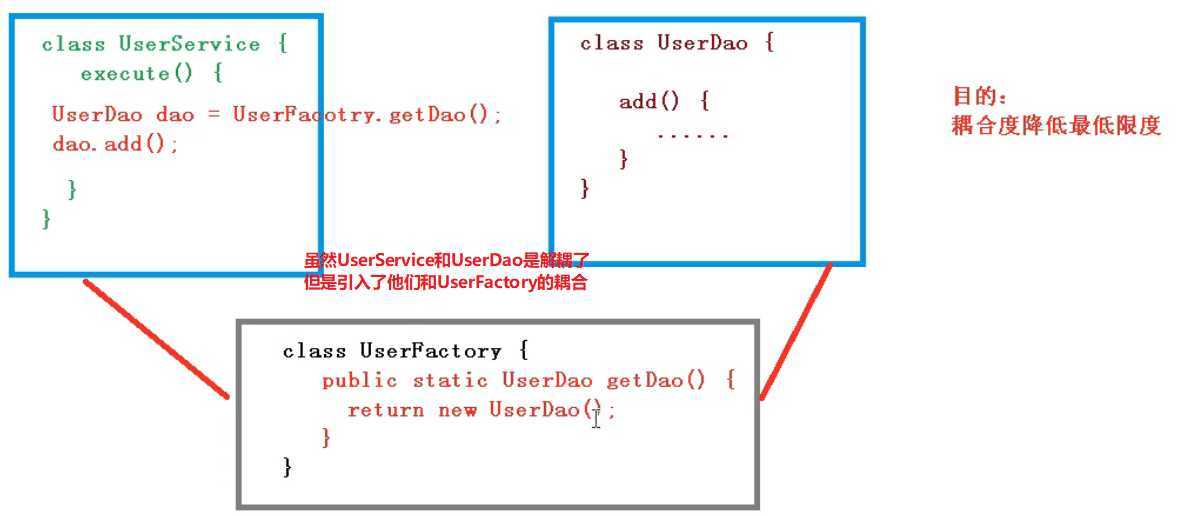
IOC解耦过程

IOC接口:
1Ioc思想基于IOC容器完成,IO容器底层就是对象工厂
2Spring提供IOC容器实习两种方式:两个接口

1)BeanFactory :IOC容器基本实现,Spring内部的使用接口,不提供给开发人员进行使用

2)ApplicationContext :BeanFactory接口的子接口,提供更强大的功能,一般开发人员使用


区别:
BeanFactory 加载配置文件的时候不会创建对象,在获取对象的时候才创建。

ApplicationContext ,加载文件的时候,会将配置文件里面的对象进行创建。
获取IOC容器的方式
通过beanFactory

通过applicationContext获取

3 ApplicationContext接口实现类
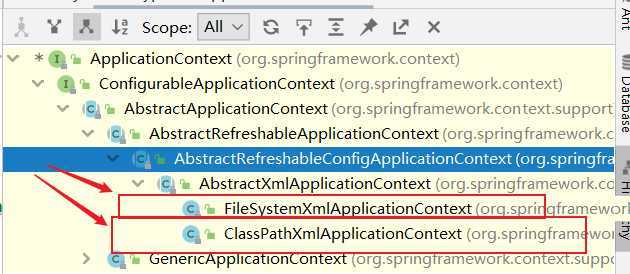
FileSystemXmlApplicationContext从盘符路径开始查找配置文件,绝对路径
ClassPathXmlApplicationContext项目路径下查找-----一般使用
IOC操作Bean管理
Bean管理是什么:
1Spring创建对象
2Spring注入属性
Bean管理操作两种方式
基于xml配置文件方式实现
基于注解方式实现
JOC操作Bean管理--基于xml方式
基于xml方式创建对象
</bean>
<bean id="usert" class="com.quan.Usert" >
</bean>
1)在sprin配置文件中,使用bean标签,标签理添加相应的属性,就可以实现对象创建
2)bean标签的属性
id:属性 =唯一标识
class属性=类的全路径
3)默认使用无参构造方法完成对象的创建
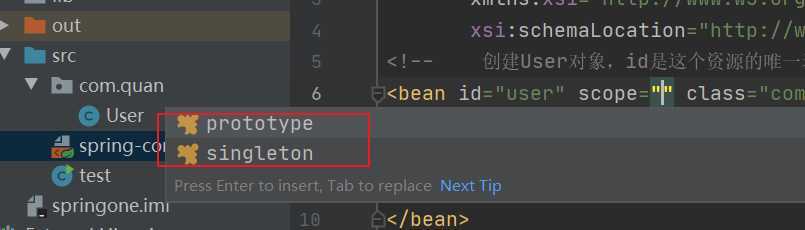
bean的作用域
单例 - 每个Spring IoC 容器返回一个bean实例 singleton
原型- 当每次请求时返回一个新的bean实例 prototype
请求 - 返回每个HTTP请求的一个Bean实例
会话 - 返回每个HTTP会话的一个bean实例
全局会话- 返回全局HTTP会话的一个bean实例

默认是单例
     ApplicationContext ac = new ClassPathXmlApplicationContext("spring-config.xml");
        for (int i = 0; i < 3; i++) {
            User user = (User)ac.getBean("user");
            System.out.println(user);
        }
singleton作用域
共享一个实例bean,只创建一个实例,
结果为:
/*socpe为sigleon的时候
com.quan.User@67784306
com.quan.User@67784306
com.quan.User@67784306
 */
prototype作用域
每次注入这个类的时候,都创建一个实例
v/*socpe为prototype的时候
com.quan.User@63753b6d
com.quan.User@6b09bb57
com.quan.User@6536e911
 */
bean标签的属性init-method= destroy-method=
先说两个接口先:
InitializingBean DisposableBean 标记接口 ,
主要实现Spring 执行bean时的初始化和销毁时某些方法
实现InitializingBean ,需要实现afterPropertiesSet,就是设置所有的属性之后做什么
实现DisposableBean 实现destory(),就是Spring 容器释放该bean之后做些什么
public class InitialDisp implements InitializingBean, DisposableBean {

    public void destroy() throws Exception {
        System.out.println("destroy");
    }

    public void afterPropertiesSet() throws Exception {
        System.out.println("afterProper");
    }
}
执行:
public class BETest {
    public static void main(String[] args) {
        /*
        ConfigurableApplicationContext extends ApplicationContext, Lifecycle, Closeable
        ApplicationContext:应用上下文
        Lifecycle:负责context的生命周期进行管理,提供start(),stop() 以及isRunning()
        Closeable:用于关闭组件,释放资源
        ConfigurableApplicationContext 接口的作用就是设置上下文 ID,设置父应用上下文,添加监听器,刷新容器,关闭,判断是否活跃等方法
         */
        ConfigurableApplicationContext ac = new ClassPathXmlApplicationContext("spring-config.xml");
        InitialDisp id = (InitialDisp)ac.getBean("initdesp");
        System.out.println(id);
        ac.close();
    }
}
/*
re:
afterProper
com.quan.hll.InitialDisp@1f36e637
destroy
 */
但是不建议使用这两个接口
可以指定类中的某个方法为两个阶段的方法:init-method= destroy-method=
上面的类不在继承那两个接口
再bean配置文件当中:
<bean id="initdesp" class="com.quan.hll.InitialDisp" init-method="afterPropertiesSet" destroy-method="destroy"></bean>
设置bean加载和销毁所调用的方法
</bean>
<bean id="usert" class="com.quan.Usert" init-method="init" destroy-method="destroy">
</bean>
test;
      ApplicationContext ac = new ClassPathXmlApplicationContext("spring-config.xml");

        Usert usert = (Usert)ac.getBean("usert");
        usert.say();
        //关闭ioc容器
        ((ClassPathXmlApplicationContext) ac).close();

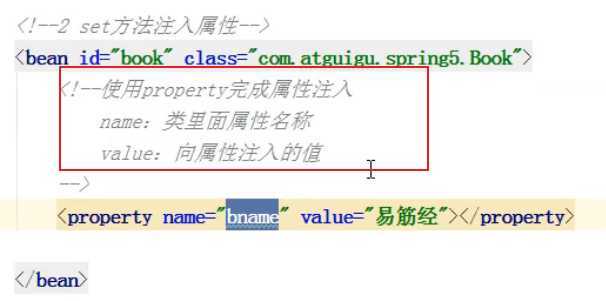
基于xml方式注入属性
1)DI: 依赖注入,就是注入属性,是IOC的一种实现方式
依赖注入-setter方法;
11类需要各个属性的set方法
22配置文件中先创建对象,再注入属性
依赖注入---构造方法
1)需要创建有参构造函数
2)配置文件中使用constructor-arg标签
第一个类:
 View Code
第二个类:
View Codespring-config.xml配置
<!--    创建User对象,id是这个资源的唯一表示-->
<bean id="user" scope="prototype" class="com.quan.User">
<!--    通过构造方法注入-->
    <constructor-arg index="0" value="QQgou"/>
    <constructor-arg index="1" ref="usert"/>
<!--    这里的user实例里面的name属性会被下面的设置替代,如果没有就是构造器的值-->
    <property name="name">
        <value>QQSpring</value>
    </property>
<!--  name这里是指User类里面的属性usert  这里的ref是指下面的bean-->
    <property name="usert" ref="usert">
    </property>
</bean>
<bean id="usert" class="com.quan.Usert" init-method="init" destroy-method="destroy">
</bean>
re;
init see you
how to sayQQSpring
see you
注:加颜色就是通过构造方法注入的形式,里面还有属性是其他类的设置
IOC操作Bean管理-xml注入其他类型属性
字面量
null值
再熟悉值里面不要设置value属性,直接加入null标签
    <bean id="user" class="com.quan.hlll.User">
        <property name="name">
            <null></null>
        </property>
    </bean>
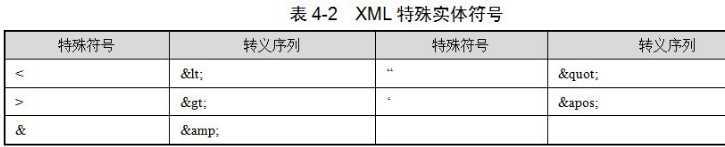
特殊符号<<>>
进行转义操作
<bean id="user" class="com.quan.hlll.User"> <property name="name" value="<><<南京>>"></property> </bean>
把带特殊符号内容写到CDATA
    <property name="name">
            <value><![CDATA[<<南京>>]]></value>
        </property>
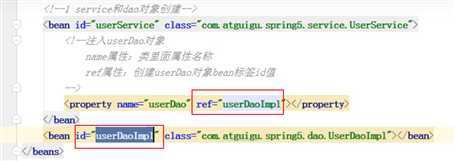
注入属性-外部bean
person累有一个属性为hello对象类型
     <bean id="person" class="com.quan.hll.javaConfig.Person.Person">
          <constructor-arg index="0" value="QQQ"/>
          <constructor-arg index="1" ref="hello" />
     </bean>
     <bean id="hello" class="com.quan.hll.javaConfig.Hello.Hello"></bean>
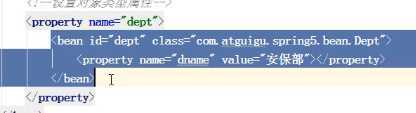
注意属性-内部bean和级联赋值
View Code
通过构造函数(其实set方法也是可以的)
     <bean id="person" class="com.quan.hll.javaConfig.Person.Person">
          <constructor-arg index="0" value="QQQ"/>
          <constructor-arg index="1" >
               <bean class="com.quan.hll.javaConfig.Hello.Hello"></bean>
          </constructor-arg>
     </bean>
内部定义的累有属性的时候
注意:建议在类的内部进行内部类的定义:
 <bean id="person" class="com.quan.hll.javaConfig.Person.Person">
          <constructor-arg index="0" value="QQQ"/>
          <constructor-arg index="1" >
              <bean class="com.quan.hll.javaConfig.Hello.Hello">
                   <property name="msg">
                        <value>ourmsg</value>
                   </property>
              </bean>
          </constructor-arg>
     </bean>
bean属性值的注入两种xml格式
类
View Code
<!--     使用属性标签property其的下级value属性进行值的注入,-->
     <bean id="mconstructor" class="com.quan.hll.manyConstruntor.MConstructor" >
          <property name="name" >
               <value>quan</value>
          </property>
          <property name="addr">
               <value>gd</value>
          </property>
          <property name="age">
               <value>23</value>
          </property>
     </bean>
<!--     使用快捷方式进行值的注入,-->
     <bean id="mconstructor" class="com.quan.hll.manyConstruntor.MConstructor" >
          <property name="age" value="23"/>
          <property name="addr" value="gd"/>
          <property name="name" value="q1234"/>
     </bean>
IOC操作Bean管理(xml-注入集合属性)
格式:
<list value-type="java.lang.String">
    <value>list里面的元素</value>
        ...
</list>

<set>
    <value>set元素</value>
            ...
</set>


<map>
    <entry key=key值 value=key值对应的value/>
    ....
</map>


<props>
    <prop key=key值>value值写这里</prop>
            .....
</props>
eg
<bean id="springlist" class="com.quan.hll.List.SpringList">
<!--          list-->
          <property name="lists" >
               <list value-type="java.lang.String">
                    <value>quan</value>
                    <value>quan</value>
                    <value>quan2</value>
               </list>
          </property>
<!--          set-->
          <property name="sets">
               <set>
<!--                    因为set属性不允许重复,只保留一个-->
                    <value>quan</value>
                    <value>quan</value>
                    <value>quan2</value>
               </set>
          </property>
<!--          Map-->
          <property name="maps">
               <map>
<!--                    同样只保留后者-->
                    <entry key="one" value="QQQ"/>
                    <entry key="one" value="ZZZ"/>
                    <entry key="two" value="ZZZ"/>
               </map>
          </property>
<!--          properties-->
          <property name="properties">
               <props>
                    <prop key="quan">shige213</prop>
                    <prop key="zhi">shige321</prop>
               </props>
          </property>
     </bean>
类:
package com.quan.hll.List;

import java.util.List;
import java.util.Map;
import java.util.Properties;
import java.util.Set;

public class SpringList {
    private List<Object> lists;
    private Set<Object> sets;
    private Map<Object,Object> maps;
    private Properties  properties;

    public List<Object> getLists() {
        return lists;
    }

    public void setLists(List<Object> lists) {
        this.lists = lists;
    }

    public Set<Object> getSets() {
        return sets;
    }

    public void setSets(Set<Object> sets) {
        this.sets = sets;
    }

    public Map<Object, Object> getMaps() {
        return maps;
    }

    public void setMaps(Map<Object, Object> maps) {
        this.maps = maps;
    }

    public Properties getProperties() {
        return properties;
    }

    public void setProperties(Properties properties) {
        this.properties = properties;
    }
}
打印类:
[quan, quan, quan2]
{one=ZZZ, two=ZZZ}
{quan=shige213, zhi=shige321}
[quan, quan2]
spring注入日期:
     <bean id="sdate" class="com.quan.hll.List.Sdate">
<!--          使用下面会报错,必须使用格式话进行格式话-->
<!--          <property name="date" value="2020-12-20"/>-->
<!--          Cannot convert value of type [java.lang.String] to required type -->
<!--          [java.util.Date] for property ‘date‘: no matching edit-->
               <property name="date">
                    <bean factory-bean="dataFormat" factory-method="parse">
                         <constructor-arg value="2020-12-20"></constructor-arg>
                    </bean>
               </property>
     </bean>

     <bean id="dataFormat" class="java.text.SimpleDateFormat">
          <constructor-arg value="yyyy-MM-dd"/>
     </bean>
re:Sdate{date=Sun Dec 20 00:00:00 CST 2020}
PropertyPlaceholderConfigurer映射
用于配置文件的管理,
datasource.properties
driver=com.jdbc.mysql.connection
url=jdbc:mysql:localhost:3306
username=root
password=2009
<!--     加载PropertyPlaceholderConfigurerbean,并指定文件位置-->
     <bean  class="org.springframework.beans.factory.config.PropertyPlaceholderConfigurer">
          <property name="location">
               <value>datasource.properties</value>
          </property>
     </bean>

     <bean id="dataSource" class="org.springframework.jdbc.datasource.DriverManagerDataSource">
         <property name="driverClassName" value="${driver}"/>
         <property name="username" value="${username}"/>
         <property name="password" value="${password}"/>
         <property name="url" value="${url}"/>
     </bean>
spring-bean的继承
这里不是在java下创建类去extend而是通过bean的配置文件去实现
主要是bean父设置一个模板或者属性,子bean公用这个属性或者模板
类:
public class BasePlace  {
    private String place;
    private String name;
下面父bean只是共享自己的name的属性值
    <bean id="base" class="com.quan.hll.expand.BasePlace" >
        <property name="name" value="Q"/>
    </bean>

    <bean id="expandbase" parent="base">
        <property name="place" value="sz"/>

    </bean>
注意:其实expandbase这个bean也是com.quan.hll.expand.BasePlace类
加入下面的这个bean标签的属性是说明父bean不可被实例化:
 <bean id="base" class="com.quan.hll.expand.BasePlace" abstract="true">

如果调用:
BasePlace bb = (BasePlace)ac.getBean("base");

报错
加入下面一句,子类bean新设置的属性值会覆盖父bean
<property name="name" value="QQ"/>
BasePlace{place=‘sz‘, name=‘Q‘}
@Required注解依赖检查,指定类中的属性检查,部分!!!
单单加入这个还是不生效,需要在bean.xml文件里面引入解析注解的bean
适用于bean属性setter方法,并表示受影响的bean属性必须在XML配置文件在配置时进行填充。否则,容器会抛出一个BeanInitializationException异常。
public class BasePlace  {
    private String place;
    private String name;


    @Required
    public void setName(String name) {
        this.name = name;
    }
bean。xml
    <bean id="base" class="com.quan.hll.expand.BasePlace" >
        <property name="place" value="ShenZhen"/>
    </bean>
baocuo
org.springframework.beans.factory.BeanInitializationException:
 Property ‘name‘ is required for bean ‘base‘
注册一个RequiredAnnotationBeanPostProcessor以了解在bean配置文件@Required注解
111
设置context:
<context:annotation-config/>
22设置bean
<bean class="org.springframework.beans.factory.annotation.RequiredAnnotationBeanPostProcessor"/>
自定义@required注解名字(换名字)
编写注解:
@Retention(RetentionPolicy.RUNTIME)
@Target(ElementType.METHOD)
public @interface MyRequired {
}
注册注解:
<bean class="org.springframework.beans.factory.annotation.RequiredAnnotationBeanPostProcessor">
    <property name="requiredAnnotationType" value="com.quan.hll.MyRequired"></property>
</bean>
使用即可:
public class BasePlace  {
    private String place;
    private String name;


    @MyRequired
    public void setName(String name) {
        this.name = name;
    }
使用javaConfig(注解)代替spring-config.xml来配置bean
/*
通过java类来加载bean,注解
 */

import org.springframework.context.annotation.Bean;
import org.springframework.context.annotation.Configuration;

@Configuration
public class HelloConfig {
    @Bean(name = "hello")
    public Hello hello(){
        return new Hello();
    }
}
相当于:
<bean id="hello" class="com.quan.hll.javaConfig.Hello" ></bean>
        //通过JavaConfig的类对象来获取ApplicationConext
//        ApplicationContext ac = new AnnotationConfigApplicationContext(HelloConfig.class);
        //通过spring-config.xml配置文件来进行bean加载
        ApplicationContext ac =  new ClassPathXmlApplicationContext("spring-config.xml");
多个bean模块化设置配置文件

多个构造函数的歧义
package com.quan.hll.manyConstruntor;

public class MConstructor{
    private  String name;
    private int age;
    private String addr;

    /*
    两个构造函数,可能会出现起义
     */
    public MConstructor(int age, String name,  String addr) {
        this.name = name;
        this.age = age;
        this.addr = addr;
    }

    public MConstructor(String name, int age, String addr) {
        this.name = name;
        this.age = age;
        this.addr = addr;
    }


    @Override
    public String toString() {
        return "MConstructor{" +
                "name=‘" + name + ‘\‘‘ +
                ", age=" + age +
                ", addr=‘" + addr + ‘\‘‘ +
                ‘}‘;
    }
}

/*
第一次没有指定类型出现这个结果:
MConstructor{name=‘23‘, age=199, addr=‘123‘}
 */
<!--     两个构造函数,可能会出现起义-->
<!--     <bean id="mconstructor" class="com.quan.hll.manyConstruntor.MConstructor" >-->
<!--          <constructor-arg >-->
<!--               <value>199</value>-->
<!--          </constructor-arg>-->
<!--          <constructor-arg>-->
<!--               <value>23</value>-->
<!--          </constructor-arg>-->
<!--          <constructor-arg>-->
<!--               <value>123</value>-->
<!--          </constructor-arg>-->
<!--     </bean>-->

<!--     为构造函数指定的确切数据类型,-->
     <bean id="mconstructor" class="com.quan.hll.manyConstruntor.MConstructor" >
          <constructor-arg type="java.lang.String" >
               <value>199</value>
          </constructor-arg>
          <constructor-arg type="int">
               <value>23</value>
          </constructor-arg>
          <constructor-arg type="java.lang.String">
               <value>123</value>
          </constructor-arg>
     </bean>
多个配置文件归结到一个配置文件
     <import resource="hello-config.xml"/>
     <import resource="person-config.xml"/>
SpEL(Spring Expression Language),
原文:https://www.cnblogs.com/java-quan/p/13226782.html
