需求:根据 flume 监控 exec 文件的追加数据,写入 kafka 的 test-demo 分区,然后启用 kafka-consumer 消费 test-demo 分区数据。
需求分析

1)flume的配置文件
在hadoop102上创建flume的配置文件
# define
a1.sources = r1
a1.sinks = k1
a1.channels = c1

# source
a1.sources.r1.type = exec
a1.sources.r1.command = tail -F  /opt/module/testdata/3.txt

# sink
a1.sinks.k1.type = org.apache.flume.sink.kafka.KafkaSink
#kafka的broker主机和端口
a1.sinks.k1.kafka.bootstrap.servers = hadoop102:9092,hadoop103:9092,hadoop104:9092
#kafka sink发送数据的topic
a1.sinks.k1.kafka.topic = test-demo
a1.sinks.k1.kafka.flumeBatchSize = 20
a1.sinks.k1.kafka.producer.acks = 1
a1.sinks.k1.kafka.producer.linger.ms = 1

# channel
a1.channels.c1.type = memory
a1.channels.c1.capacity = 1000
a1.channels.c1.transactionCapacity = 100

# bind
a1.sources.r1.channels = c1
a1.sinks.k1.channel = c1
2)启动 zk、kafka集群
3)创建 test-demo 主题
bin/kafka-topics.sh --create --bootstrap-server hadoop102:9092 --topic test-demo --partitions 2 --replication-factor 2
4)启动 kafka consumer 去消费 test-demo 主题
bin/kafka-console-consumer.sh --bootstrap-server hadoop102:9092 --topic test-demo
5)启动 flume,并且往 3.txt 中追加数据
 bin/flume-ng agent -c conf/ -f job/flume-kafka/flume-exec-kafka.conf -n a1

 echo hello >> /opt/module/testdata/3.txt

6)观察 kafka consumer 的消费情况

需求:flume监控 exec 文件的追加数据,将flume采集的数据按照不同的类型输入到不同的topic中
? 将日志数据中带有的 hello 的,输入到kafka的 first 主题中,
? 将日志数据中带有 good 的,输入到kafka的 second 主题中,
? 其他的数据输入到kafka的 third 主题中
需求分析
通过自定义 flume 的拦截器,往 header 增加 topic 信息 ,配置文件中 kafka sink 增加 topic 配置,实现将数据按照指定 topic 发送。

1)自定义 flume 拦截器
创建工程,pom依赖
    <dependencies>
        <dependency>
            <groupId>org.apache.flume</groupId>
            <artifactId>flume-ng-core</artifactId>
            <version>1.9.0</version>
        </dependency>
    </dependencies>
    <build>
        <plugins>
            <plugin>
                <artifactId>maven-compiler-plugin</artifactId>
                <version>2.3.2</version>
                <configuration>
                    <source>1.8</source>
                    <target>1.8</target>
                </configuration>
            </plugin>
        </plugins>
    </build>
自定义拦截器类,并打包上传至/opt/module/flume/lib包下
package com.bigdata.intercepter;

import org.apache.flume.Context;
import org.apache.flume.Event;
import org.apache.flume.interceptor.Interceptor;
import java.util.ArrayList;
import java.util.List;
import java.util.Map;

/**
 * @description: TODO 自定义flume拦截器
 * @author: HaoWu
 * @create: 2020/7/7 20:32
 */
public class FlumeKafkaInterceptorDemo implements Interceptor {
    private List<Event> events;

    //初始化
    @Override
    public void initialize() {
        events = new ArrayList<>();
    }

    @Override
    public Event intercept(Event event) {
        // 获取event的header
        Map<String, String> header = event.getHeaders();
        // 获取event的boby
        String body = new String(event.getBody());
        // 根据body中的数据设置header
        if (body.contains("hello")) {
            header.put("topic", "first");
        } else if (body.contains("good")) {
            header.put("topic", "second");
        }
        return event;
    }

    @Override
    public List<Event> intercept(List<Event> events) {
        // 对每次批数据进来清空events
        events.clear();
        // 循环处理单个event
        for (Event event : events) {
            events.add(intercept(event));
        }

        return events;
    }

    @Override
    public void close() {

    }
    // 静态内部类创建自定义拦截器对象
    public static class Builder implements Interceptor.Builder{
        @Override
        public Interceptor build() {
            return new FlumeKafkaInterceptorDemo();
        }

        @Override
        public void configure(Context context) {

        }
    }
}
2)编写 flume 的配置文件
? flume-netstat-kafka.conf
# Name the components on this agent
a1.sources = r1
a1.sinks = k1
a1.channels = c1

# Describe/configure the source
a1.sources.r1.type = netcat
a1.sources.r1.bind = localhost
a1.sources.r1.port = 44444

#Interceptor
a1.sources.r1.interceptors = i1
#自定义拦截器全类名+$Builder
a1.sources.r1.interceptors.i1.type = com.bigdata.intercepter.FlumeKafkaInterceptorDemo$Builder

# Describe the sink
a1.sinks.k1.type = org.apache.flume.sink.kafka.KafkaSink
#默认发往的topic
a1.sinks.k1.kafka.topic = third
a1.sinks.k1.kafka.bootstrap.servers = hadoop102:9092,hadoop103:9092,hadoop104:9092
a1.sinks.k1.kafka.flumeBatchSize = 20
a1.sinks.k1.kafka.producer.acks = 1
a1.sinks.k1.kafka.producer.linger.ms = 1

# # Use a channel which buffers events in memory
a1.channels.c1.type = memory
a1.channels.c1.capacity = 1000
a1.channels.c1.transactionCapacity = 100

# Bind the source and sink to the channel
a1.sources.r1.channels = c1
a1.sinks.k1.channel = c1
3)在kafka中创建 first , second , third 这3个topic
[hadoop@hadoop102 kafka]$  bin/kafka-topics.sh --list --bootstrap-server hadoop102:9092
__consumer_offsets
first
second
test-demo
third
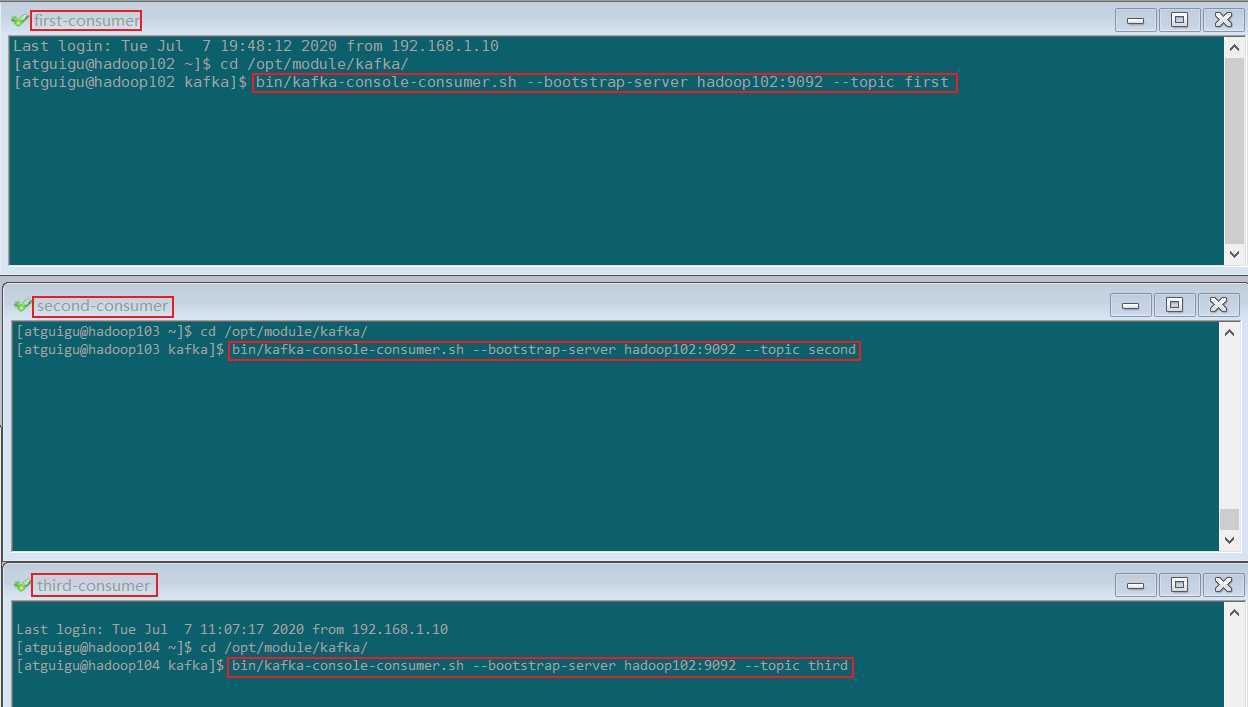
4)启动3个 kafka consumer 分别消费 first , second , third 中的数据
bin/kafka-console-consumer.sh --bootstrap-server hadoop102:9092 --topic first
bin/kafka-console-consumer.sh --bootstrap-server hadoop102:9092 --topic second
bin/kafka-console-consumer.sh --bootstrap-server hadoop102:9092 --topic third

5)启动 flume,通过netstat发送数据到flume
bin/flume-ng agent -c conf/ -f job/flume-kafka/flume-netstat-kafka.conf -n a1
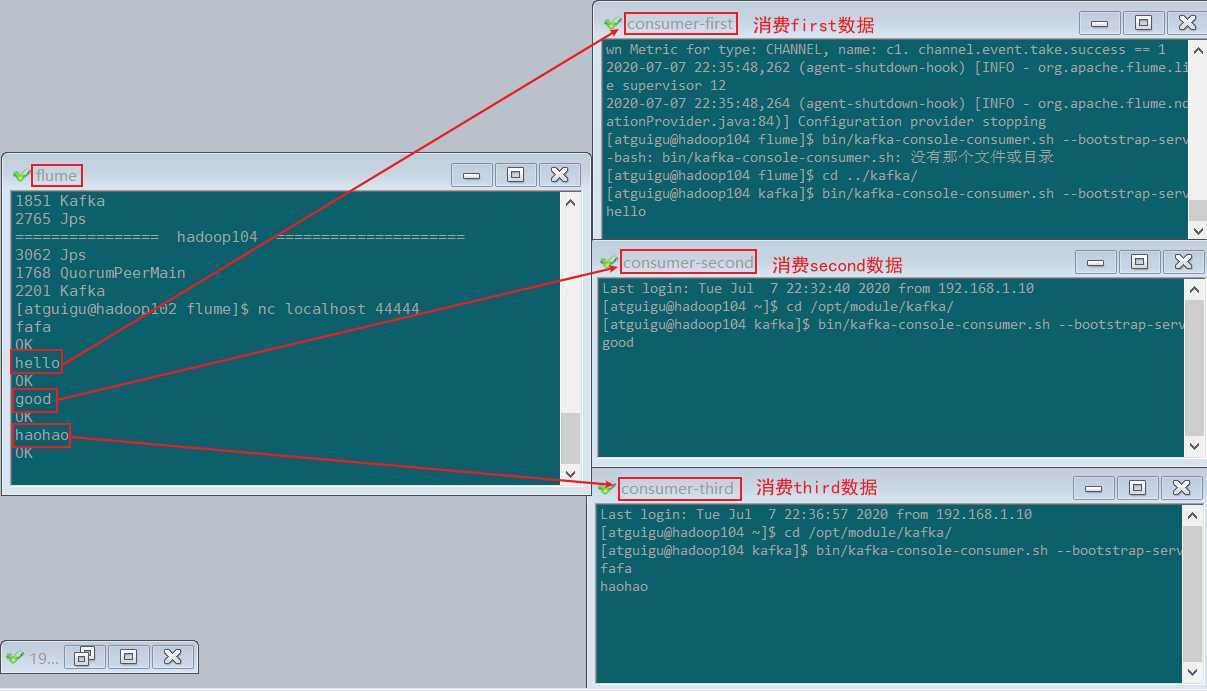
nc localhost 44444
6)观察消费者的消费情况

原文:https://www.cnblogs.com/wh984763176/p/13264086.html