centos7已经预安装了chrony软件包,centos6默认没有安装,需要使用epel源安装,我使用的是centos7系统
使用一台centos7作为ntpserver,ip地址为192.168.10.130
在服务器端和客户端都要检查
# 检查时区是否是shanghai
[root@ntpserver ~]# timedatectl
      Local time: Sat 2020-07-11 11:17:50 CST
  Universal time: Sat 2020-07-11 03:17:50 UTC
        RTC time: Sat 2020-07-11 03:17:50
       Time zone: Asia/Shanghai (CST, +0800)
     NTP enabled: no
NTP synchronized: yes
 RTC in local TZ: no
      DST active: n/a

# 可以使用下面的命令修改时区
[root@ntpserver ~]# timedatectl set-timezone Asia/Shanghai
# 把原来的自带ntp服务器注释掉,添加一台aliyun的ntp服务器,也可以添加多台
[root@ntpserver ~]# vim /etc/chrony.conf
 3 #server 0.centos.pool.ntp.org iburst
 4 #server 1.centos.pool.ntp.org iburst
 5 #server 2.centos.pool.ntp.org iburst
 6 #server 3.centos.pool.ntp.org iburst
 7 server ntp1.aliyun.com iburst

# 修改第29行,写上需要时间同步的网段
 29 allow 192.168.10.0/24

# 取消第32行注释,作用是如果无法连接到aliyun的ntp服务器,自己仍然可以为网络内的设备同步时间
 32 local stratum 10
[root@ntpserver ~]# systemctl start chronyd
[root@ntpserver ~]# systemctl enable chronyd
Created symlink from /etc/systemd/system/multi-user.target.wants/chronyd.service to /usr/lib/systemd/system/chronyd.service.
这里先不启动服务,等测试时启动服务,效果比较明显
# 注释掉原来的ntp服务器配置,添加上自己配置的ntp服务器地址
[root@ntpclient ~]#vim /etc/chrony.conf
  3 #server 0.centos.pool.ntp.org iburst
  4 #server 1.centos.pool.ntp.org iburst
  5 #server 2.centos.pool.ntp.org iburst
  6 #server 3.centos.pool.ntp.org iburst
  7 server 192.168.10.130 iburst

[root@ntpclient ~]#systemctl enable chronyd
Created symlink from /etc/systemd/system/multi-user.target.wants/chronyd.service to /usr/lib/systemd/system/chronyd.service.
测试结果的一点反馈:在chronyd服务启动之后,我把系统时间再改为1年后,等了很长时间都没有同步,需要重启chronyd服务才能同步;如果把时间改为几分钟后,则大概等了一两分钟,时间同步成功;如果是相差几秒钟应该同步更快。看来如果不是故意修改时间,实时同步应该是可以保证的。
# 修改系统时间为1年后,然后启动chronyd服务,可以看到时间同步成功
[root@ntpclient ~]#date -s ‘1 year‘
Sun Jul 11 11:39:29 CST 2021

[root@ntpclient ~]#systemctl start chronyd
[root@ntpclient ~]#date
Sun Jul 11 11:39:39 CST 2021
[root@ntpclient ~]#date
Sun Jul 11 11:39:41 CST 2021
[root@ntpclient ~]#date
Sat Jul 11 11:39:43 CST 2020

# 可以使用chronyc sources -v命令查看同步信息,如果时间服务器前面带“*”,则说明同步成功
[root@ntpclient ~]#chronyc sources -v
210 Number of sources = 1

  .-- Source mode  ‘^‘ = server, ‘=‘ = peer, ‘#‘ = local clock.
 / .- Source state ‘*‘ = current synced, ‘+‘ = combined , ‘-‘ = not combined,
| /   ‘?‘ = unreachable, ‘x‘ = time may be in error, ‘~‘ = time too variable.
||                                                 .- xxxx [ yyyy ] +/- zzzz
||      Reachability register (octal) -.           |  xxxx = adjusted offset,
||      Log2(Polling interval) --.      |          |  yyyy = measured offset,
||                                \     |          |  zzzz = estimated error.
||                                 |    |           MS Name/IP address         Stratum Poll Reach LastRx Last sample
===============================================================================
^* 192.168.10.130                3   6   177    24    -33us[ -107us] +/-   19ms
实验环境:一台centos7,关闭网络中的其他dhcp,关闭防火墙和selinux
安装cobbler软件包需要启用epel源
cobbler软件包会把相关的http、tftp、syslinux软件包安装上,但是dhcp需要单独安装
[root@server ~]# yum install cobbler dhcp
先启动cobbler、httpd和tftp,dhcp需要配置之后才可以启动
网络中的其他dhcp都要关闭
[root@server ~]# systemctl start cobblerd httpd tftp
[root@server ~]# systemctl enable cobblerd httpd tftp
cobbler check命令,可以检查操作环境和查看操作步骤
在centos7的系统环境中,只需要做1、2、4、7
[root@server ~]# cobbler check
The following are potential configuration items that you may want to fix:

1 : The ‘server‘ field in /etc/cobbler/settings must be set to something other than localhost, or kickstarting features will not work.  This should be a resolvable hostname or IP for the boot server as reachable by all machines that will use it.
2 : For PXE to be functional, the ‘next_server‘ field in /etc/cobbler/settings must be set to something other than 127.0.0.1, and should match the IP of the boot server on the PXE network.
3 : change ‘disable‘ to ‘no‘ in /etc/xinetd.d/tftp
4 : Some network boot-loaders are missing from /var/lib/cobbler/loaders, you may run ‘cobbler get-loaders‘ to download them, or, if you only want to handle x86/x86_64 netbooting, you may ensure that you have installed a *recent* version of the syslinux package installed and can ignore this message entirely.  Files in this directory, should you want to support all architectures, should include pxelinux.0, menu.c32, elilo.efi, and yaboot. The ‘cobbler get-loaders‘ command is the easiest way to resolve these requirements.
5 : enable and start rsyncd.service with systemctl
6 : debmirror package is not installed, it will be required to manage debian deployments and repositories
7 : The default password used by the sample templates for newly installed machines (default_password_crypted in /etc/cobbler/settings) is still set to ‘cobbler‘ and should be changed, try: "openssl passwd -1 -salt ‘random-phrase-here‘ ‘your-password-here‘" to generate new one
8 : fencing tools were not found, and are required to use the (optional) power management features. install cman or fence-agents to use them

Restart cobblerd and then run ‘cobbler sync‘ to apply changes.
# 通过openssl生成一个md5的密码,这个密码用于安装好系统后的用户密码
[root@server ~]# openssl passwd -1
Password:
Verifying - Password:
$1$vAMs7hlD$JRSj8wKKBG74ie6zP/Y/51

# 修改settings文件,default_password_crypted写刚才生成的密码,server和next_server都写成本机的ip地址,manage_dhcp改为1是可以自动生成dhcp的配置文件
[root@server ~]# vim /etc/cobbler/settings
101 default_password_crypted: "$1$vAMs7hlD$JRSj8wKKBG74ie6zP/Y/51"
242 manage_dhcp: 1
278 next_server: 192.168.10.130
390 server: 192.168.10.130

# 重启cobbler服务
[root@server ~]# systemctl restart cobblerd
# 修改模板文件中的网段为自己所在的实际网段
[root@server ~]# vim /etc/cobbler/dhcp.template
subnet 192.168.10.0 netmask 255.255.255.0 {
     option routers             192.168.10.2;
     option domain-name-servers 192.168.10.2;
     option subnet-mask         255.255.255.0;
     range dynamic-bootp        192.168.10.100 192.168.10.254;
这一步需要连外网
[root@server ~]# cobbler get-loaders

# 执行同步命令,可以把下载的文件拷贝到/var/lib/tftpboot/对应的目录中,同时通过dhcp模板文件生成dhcp的配置文件
[root@server ~]# cobbler sync

# 由于已经生成了dhcp的配置文件,此时可以启动dhcp服务了
[root@server ~]# systemctl start dhcpd
[root@server ~]# systemctl enable dhcpd
需要先挂载centos的光盘,我是自动挂载在/misc/cd目录中
执行cobbler import命令就是把光盘中的内容拷贝到/var/www/cobbler/ks_mirror/Centos-x86_64/目录中
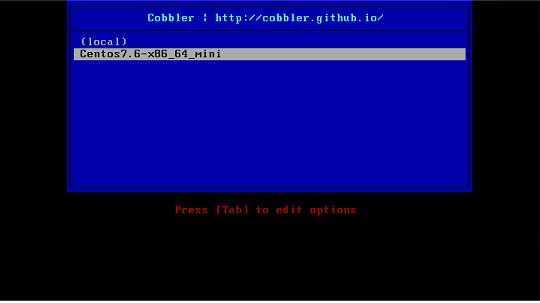
导入完成之后,/var/lib/tftpboot/pxelinux.cfg/default文件中就会产生一个名字为Centos7.6-x86_64的启动菜单选项
# 导入安装光盘,指定挂载的路径/misc/cd,指定启动菜单对应的名称Centos7.6-x86_64,指定系统架构为x86_64
[root@server ~]# cobbler import --path=/misc/cd --name=Centos7.6-x86_64 --arch=x86_64
此时已经可以安装了系统了,cobbler会自动生成一个最小化安装的应答文件,如果没有特别要求直接安装即可,如果有系统安装要求,需要自己制作应答文件
# 把自己准备的应答文件拷贝到/var/lib/cobbler/kickstarts/目录下
[root@server ~]# cp ks7_mini.cfg /var/lib/cobbler/kickstarts/

# 修改应答文件的url路径为$tree
[root@server ~]# vim /var/lib/cobbler/kickstarts/ks7_mini.cfg
url --url=$tree
自己定制的应答文件需要关联yum源,才可以使用
# 查看当前已经存在的yum源名称
[root@server ~]# cobbler distro list
   Centos7.6-x86_64

# 管理yum源和应答文件,菜单名称命名为Centos7.6-x86_64_mini,关联的yum源为Centos7.6-x86_64,应答文件为/var/lib/cobbler/kickstarts/ks7_mini.cfg,这里应答文件路径要写绝对路径
[root@server ~]# cobbler profile add --name Centos7.6-x86_64_mini --distro=Centos7.6-x86_64 --kickstart=/var/lib/cobbler/kickstarts/ks7_mini.cfg

# 现在的启动菜单文件内容如下,Centos7.6-x86_64为cobbler自带的最小化安装,Centos7.6-x86_64_mini为刚才添加的安装菜单
[root@server ~]# cat /var/lib/tftpboot/pxelinux.cfg/default
DEFAULT menu
PROMPT 0
MENU TITLE Cobbler | http://cobbler.github.io/
TIMEOUT 200
TOTALTIMEOUT 6000
ONTIMEOUT local

LABEL local
        MENU LABEL (local)
        MENU DEFAULT
        LOCALBOOT -1

LABEL Centos7.6-x86_64
        kernel /images/Centos7.6-x86_64/vmlinuz
        MENU LABEL Centos7.6-x86_64
        append initrd=/images/Centos7.6-x86_64/initrd.img ksdevice=bootif lang=  kssendmac text  ks=http://192.168.10.130/cblr/svc/op/ks/profile/Centos7.6-x86_64
        ipappend 2

LABEL Centos7.6-x86_64_mini
        kernel /images/Centos7.6-x86_64/vmlinuz
        MENU LABEL Centos7.6-x86_64_mini
        append initrd=/images/Centos7.6-x86_64/initrd.img ksdevice=bootif lang=  kssendmac text  ks=http://192.168.10.130/cblr/svc/op/ks/profile/Centos7.6-x86_64_mini
        ipappend 2


MENU end


# 删除cobbler自动生成的安装菜单Centos7.6-x86_64
[root@server ~]# cobbler profile remove --name=Centos7.6-x86_64
[root@server ~]# cobbler profile list
   Centos7.6-x86_64_mini
新建一台虚拟机,硬盘选择200g,最小化安装内存1g即可,如果带桌面安装需要至少1.5g内存
默认是local启动,选择第二项最小化安装
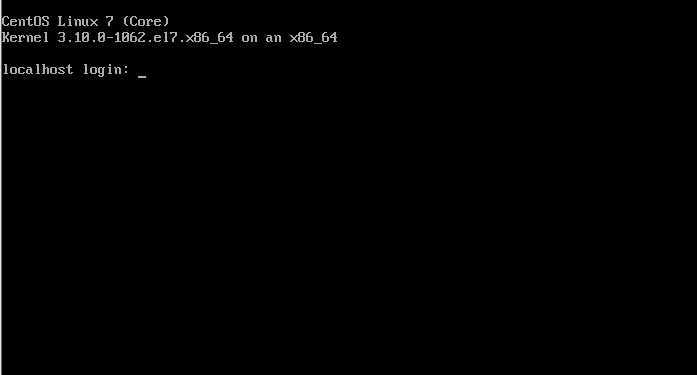
安装过程
安装成功
原文:https://www.cnblogs.com/kfscott/p/13290228.html