- yarn add plop --dev 将plop安装到项目中
- 在项目根目录创建plopfile.js文件
- 在plopfile.js定义脚手架任务
- 编写模板文件
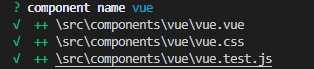
- yarn plop component //用自定义的生成器运行脚手架任务
module.exports = plop => {
    plop.setGenerator(‘component‘, {//这里定义生成器的名字component
      description: ‘application component‘,
      prompts: [
        {
          type: ‘input‘,
          name: ‘name‘,
          message: ‘component name‘
        }
      ],
      actions: [
        {
          type: ‘add‘,//代表添加文件
          path: ‘src/components/{{name}}/{{name}}.vue‘,//生成文件的地址
          templateFile: ‘plop-templates/component.js.hbs‘//添加的模板
        },
        {
          type: ‘add‘,
          path: ‘src/components/{{name}}/{{name}}.css‘,
          templateFile: ‘plop-templates/component.css.hbs‘
        },
        {
          type: ‘add‘,
          path: ‘src/components/{{name}}/{{name}}.test.js‘,
          templateFile: ‘plop-templates/component.test.js.hbs‘
        }
      ]
    })
  }
原文:https://www.cnblogs.com/zhuzy/p/13438538.html