Spring 提供了以下两种不同类型的容器。
| 序号 | 容器 & 描述 |
|---|---|
| 1 | Spring BeanFactory 容器 它是最简单的容器,给 DI 提供了基本的支持,它用 org.springframework.beans.factory.BeanFactory 接口来定义。BeanFactory 或者相关的接口,如 BeanFactoryAware,InitializingBean,DisposableBean,在 Spring 中仍然存在具有大量的与 Spring 整合的第三方框架的反向兼容性的目的。 |
| 2 | Spring ApplicationContext 容器 该容器添加了更多的企业特定的功能,例如从一个属性文件中解析文本信息的能力,发布应用程序事件给感兴趣的事件监听器的能力。该容器是由 org.springframework.context.ApplicationContext 接口定义。 |
ApplicationContext 容器包括 BeanFactory 容器的所有功能,所以通常建议超过 BeanFactory。BeanFactory 仍然可以用于轻量级的应用程序,如移动设备或基于 applet 的应用程序,其中它的数据量和速度是显著。
被称作 bean 的对象是构成应用程序的支柱也是由 Spring IoC 容器管理的。bean 是一个被实例化,组装,并通过 Spring IoC 容器所管理的对象。这些 bean 是由用容器提供的配置元数据创建的,例如,在 XML 的表单中的 定义。
bean 定义包含称为配置元数据的信息,下述容器也需要知道配置元数据:
上述所有的配置元数据转换成一组构成每个 bean 定义的下列属性。
| 属性 | 描述 |
|---|---|
| class | 这个属性是强制性的,并且指定用来创建 bean 的 bean 类。 |
| name | 这个属性指定唯一的 bean 标识符。在基于 XML 的配置元数据中,你可以使用 ID 和/或 name 属性来指定 bean 标识符。 |
| scope | 这个属性指定由特定的 bean 定义创建的对象的作用域,它将会在 bean 作用域的章节中进行讨论。 |
| constructor-arg | 它是用来注入依赖关系的,并会在接下来的章节中进行讨论。 |
| properties | 它是用来注入依赖关系的,并会在接下来的章节中进行讨论。 |
| autowiring mode | 它是用来注入依赖关系的,并会在接下来的章节中进行讨论。 |
| lazy-initialization mode | 延迟初始化的 bean 告诉 IoC 容器在它第一次被请求时,而不是在启动时去创建一个 bean 实例。 |
| initialization 方法 | 在 bean 的所有必需的属性被容器设置之后,调用回调方法。它将会在 bean 的生命周期章节中进行讨论。 |
| destruction 方法 | 当包含该 bean 的容器被销毁时,使用回调方法。它将会在 bean 的生命周期章节中进行讨论。 |
Bean 与 Spring 容器的关系
下图表达了Bean 与 Spring 容器之间的关系: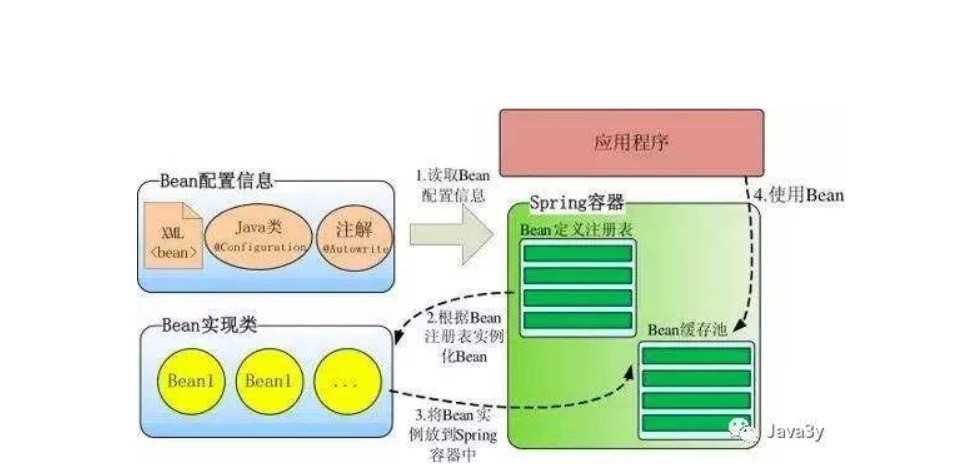
| 作用域 | 描述 |
|---|---|
| singleton | 在spring IoC容器仅存在一个Bean实例,Bean以单例方式存在,默认值 |
| prototype | 每次从容器中调用Bean时,都返回一个新的实例,即每次调用getBean()时,相当于执行newXxxBean()
|
| request | 每次HTTP请求都会创建一个新的Bean,该作用域仅适用于WebApplicationContext环境 |
| session | 同一个HTTP Session共享一个Bean,不同Session使用不同的Bean,仅适用于WebApplicationContext环境 |
| global-session | 一般用于Portlet应用环境,该运用域仅适用于WebApplicationContext环境 |
Beans.xml

<bean id="helloWorld" class="com.demo.HelloWorld" init-method="init" destroy-method="destroy">
        <property name="message" value="Hello World!"/>
</bean>Beans.xml<bean id="helloWorld" class="com.demo.HelloWorld" init-method="init" destroy-method="destroy"> <property name="message" value="Hello World!"/></bean>package com.demo;
public class HelloWorld {
private String message;
public void init(){
System.out.println("welcome to use Helloworld..");
}
public void destroy(){
System.out.println("[Helloworld]:say you again..");
}
public void setMessage(String message) {
this.message = message;
}
public String getMessage() {
return message;
}
}package com.demo;public class HelloWorld { private String message; public void init(){ System.out.println("welcome to use Helloworld.."); } public void destroy(){ System.out.println("[Helloworld]:say you again.."); } public void setMessage(String message) { this.message = message; } public String getMessage() { return message; }}package com.demo;
import org.springframework.context.support.AbstractApplicationContext;
import org.springframework.context.support.ClassPathXmlApplicationContext;
public class MainApp {
public static void main(String[] args) {
// 你需要注册一个在 AbstractApplicationContext 类中声明的关闭 hook 的 registerShutdownHook() 方法。
// 它将确保正常关闭,并且调用相关的 destroy 方法。
AbstractApplicationContext context = new ClassPathXmlApplicationContext("Beans.xml");
HelloWorld obj = (HelloWorld) context.getBean("helloWorld");
String msg = obj.getMessage();
System.out.println("[Your Msg]:" + msg);
context.registerShutdownHook(); // 可以理解为关闭IoC容器的方法
}
}
welcome to use Helloworld..
[Your Msg]:Hello World!
[Helloworld]:say you again..package com.demo;import org.springframework.context.support.AbstractApplicationContext;import org.springframework.context.support.ClassPathXmlApplicationContext;public class MainApp { public static void main(String[] args) { // 你需要注册一个在 AbstractApplicationContext 类中声明的关闭 hook 的 registerShutdownHook() 方法。 // 它将确保正常关闭,并且调用相关的 destroy 方法。 AbstractApplicationContext context = new ClassPathXmlApplicationContext("Beans.xml"); HelloWorld obj = (HelloWorld) context.getBean("helloWorld"); String msg = obj.getMessage(); System.out.println("[Your Msg]:" + msg); context.registerShutdownHook(); // 可以理解为关闭IoC容器的方法 }}welcome to use Helloworld..[Your Msg]:Hello World![Helloworld]:say you again.. Bean 后置处理器允许在调用初始化方法前后对 Bean 进行自定义的处理(eg:注入处理一些统一的属性,而不用在每个bean中注入/日志打印等)。
BeanPostProcessor 接口定义回调方法,你可以实现该方法来提供自己的实例化逻辑,依赖解析逻辑等。你也可以在 Spring 容器通过插入一个或多个 BeanPostProcessor 的实现来完成实例化,配置和初始化一个bean之后实现一些自定义逻辑回调方法。
你可以配置多个 BeanPostProcessor 接口,通过设置 BeanPostProcessor 实现的 Ordered 接口提供的 order 属性来控制这些 BeanPostProcessor 接口的执行顺序。
BeanPostProcessor 可以对 bean(或对象)实例进行操作,这意味着 Spring IoC 容器实例化一个 bean 实例,然后 BeanPostProcessor 接口进行它们的工作。
ApplicationContext 会自动检测由 BeanPostProcessor 接口的实现定义的 bean,注册这些 bean 为后置处理器,然后通过在容器中创建 bean,在适当的时候调用它。
备注:
通俗点讲就是在bean初始化函数(init-method指定的方法)前后执行实现BeanPostProcessor 接口的两个方法:
postProcessBeforeInitialization
postProcessAfterInitializationpackage com.demo;
public class HelloWorld {
private String message;
public void init(){
System.out.println("welcome to use Helloworld..");
}
public void destroy(){
System.out.println("[Helloworld]:say you again..");
}
public void setMessage(String message) {
this.message = message;
}
public String getMessage() {
return message;
}
}package com.demo;public class HelloWorld { private String message; public void init(){ System.out.println("welcome to use Helloworld.."); } public void destroy(){ System.out.println("[Helloworld]:say you again.."); } public void setMessage(String message) { this.message = message; } public String getMessage() { return message; }}package com.demo;
public class HelloSpring {
private String springdata;
public void init(){
System.out.println("welcome to use HelloSpring..");
}
public void destroy(){
System.out.println("[HelloSpring]:say you again..");
}
public void setSpringdata(String springdata) {
this.springdata = springdata;
}
public String getSpringdata() {
return springdata;
}
}package com.demo;public class HelloSpring { private String springdata; public void init(){ System.out.println("welcome to use HelloSpring.."); } public void destroy(){ System.out.println("[HelloSpring]:say you again.."); } public void setSpringdata(String springdata) { this.springdata = springdata; } public String getSpringdata() { return springdata; }}package com.demo;
import org.springframework.beans.BeansException;
import org.springframework.beans.factory.config.BeanPostProcessor;
public class InitHelloworld implements BeanPostProcessor {
public Object postProcessBeforeInitialization(Object bean, String beanName) throws BeansException {
System.out.println("BeforeInitialization:"+beanName);
return bean;
}
public Object postProcessAfterInitialization(Object bean, String beanName) throws BeansException {
System.out.println("AfterInitialization:"+beanName);
return bean;
}
}package com.demo;import org.springframework.beans.BeansException;import org.springframework.beans.factory.config.BeanPostProcessor;public class InitHelloworld implements BeanPostProcessor { public Object postProcessBeforeInitialization(Object bean, String beanName) throws BeansException { System.out.println("BeforeInitialization:"+beanName); return bean; } public Object postProcessAfterInitialization(Object bean, String beanName) throws BeansException { System.out.println("AfterInitialization:"+beanName); return bean; }}package com.demo;
import org.springframework.context.support.AbstractApplicationContext;
import org.springframework.context.support.ClassPathXmlApplicationContext;
public class MainApp {
public static void main(String[] args) {
AbstractApplicationContext context = new ClassPathXmlApplicationContext("Beans.xml");
HelloWorld obj = (HelloWorld) context.getBean("helloWorld");
String msg = obj.getMessage();
System.out.println("[Your Msg]:" + msg);
HelloSpring objsp = (HelloSpring) context.getBean("helloSpring");
msg = objsp.getSpringdata();
System.out.println("[Your Msg]:" + msg);
context.registerShutdownHook();
}
}
package com.demo;import org.springframework.context.support.AbstractApplicationContext;import org.springframework.context.support.ClassPathXmlApplicationContext;public class MainApp { public static void main(String[] args) { AbstractApplicationContext context = new ClassPathXmlApplicationContext("Beans.xml"); HelloWorld obj = (HelloWorld) context.getBean("helloWorld"); String msg = obj.getMessage(); System.out.println("[Your Msg]:" + msg); HelloSpring objsp = (HelloSpring) context.getBean("helloSpring"); msg = objsp.getSpringdata(); System.out.println("[Your Msg]:" + msg); context.registerShutdownHook(); }}<?xml version="1.0" encoding="UTF-8"?>
<beans xmlns="http://www.springframework.org/schema/beans"
xmlns:xsi="http://www.w3.org/2001/XMLSchema-instance"
xsi:schemaLocation="http://www.springframework.org/schema/beans
http://www.springframework.org/schema/beans/spring-beans-3.0.xsd">
<bean id="helloWorld" class="com.demo.HelloWorld" init-method="init" destroy-method="destroy">
<property name="message" value="Hello World!"/>
</bean>
<bean id="helloSpring" class="com.demo.HelloSpring" init-method="init" destroy-method="destroy">
<property name="springdata" value="Hello Spring!"/>
</bean>
<bean id="initHelloworld" class="com.demo.InitHelloworld" />
</beans> <beans xmlns="http://www.springframework.org/schema/beans" xmlns:xsi="http://www.w3.org/2001/XMLSchema-instance" xsi:schemaLocation="http://www.springframework.org/schema/beans http://www.springframework.org/schema/beans/spring-beans-3.0.xsd"> <bean id="helloWorld" class="com.demo.HelloWorld" init-method="init" destroy-method="destroy"> <property name="message" value="Hello World!"/> </bean> <bean id="helloSpring" class="com.demo.HelloSpring" init-method="init" destroy-method="destroy"> <property name="springdata" value="Hello Spring!"/> </bean> <bean id="initHelloworld" class="com.demo.InitHelloworld" /></beans>BeforeInitialization:helloWorld
welcome to use Helloworld..
AfterInitialization:helloWorld
BeforeInitialization:helloSpring
welcome to use HelloSpring..
AfterInitialization:helloSpring
[Your Msg]:Hello World!
[Your Msg]:Hello Spring!
[HelloSpring]:say you again..
[Helloworld]:say you again..BeforeInitialization:helloWorldwelcome to use Helloworld..AfterInitialization:helloWorldBeforeInitialization:helloSpringwelcome to use HelloSpring..AfterInitialization:helloSpring[Your Msg]:Hello World![Your Msg]:Hello Spring![HelloSpring]:say you again..[Helloworld]:say you again..<?xml version="1.0" encoding="UTF-8"?>
<beans xmlns="http://www.springframework.org/schema/beans"
xmlns:xsi="http://www.w3.org/2001/XMLSchema-instance"
xsi:schemaLocation="http://www.springframework.org/schema/beans
http://www.springframework.org/schema/beans/spring-beans-3.0.xsd">
<!--仅仅作为一个模板,不和任何类绑定,且声明为抽象bean-->
<bean id="module" abstract="true">
<property name="msg0" value="this is msg0"/>
<property name="msg1" value="this is msg1"/>
</bean>
<!--helloWorldA 继承于module-->
<bean id="helloWorldA" class="com.v20191215.HelloWorldA" parent="module">
<property name="msg1" value="hello msg1"/>
<property name="msg2" value="hello msg2"/>
</bean>
</beans> <beans xmlns="http://www.springframework.org/schema/beans" xmlns:xsi="http://www.w3.org/2001/XMLSchema-instance" xsi:schemaLocation="http://www.springframework.org/schema/beans http://www.springframework.org/schema/beans/spring-beans-3.0.xsd"> <!--仅仅作为一个模板,不和任何类绑定,且声明为抽象bean--> <bean id="module" abstract="true"> <property name="msg0" value="this is msg0"/> <property name="msg1" value="this is msg1"/> </bean> <!--helloWorldA 继承于module--> <bean id="helloWorldA" class="com.v20191215.HelloWorldA" parent="module"> <property name="msg1" value="hello msg1"/> <property name="msg2" value="hello msg2"/> </bean></beans>package com.v20191215;
public class HelloWorldA {
private String msg0; // 虽然bean中定义没有msg0,但是bean的父类中有该属性,被继承过来了
private String msg1;
private String msg2;
public String getMsg0() {
System.out.println(msg0);
return msg0;
}
public String getMsg1() {
System.out.println(msg1);
return msg1;
}
public String getMsg2() {
System.out.println(msg2);
return msg2;
}
public void setMsg0(String msg0) {
this.msg0 = msg0;
}
public void setMsg1(String msg1) {
this.msg1 = msg1;
}
public void setMsg2(String msg2) {
this.msg2 = msg2;
}
}package com.v20191215;public class HelloWorldA { private String msg0; // 虽然bean中定义没有msg0,但是bean的父类中有该属性,被继承过来了 private String msg1; private String msg2; public String getMsg0() { System.out.println(msg0); return msg0; } public String getMsg1() { System.out.println(msg1); return msg1; } public String getMsg2() { System.out.println(msg2); return msg2; } public void setMsg0(String msg0) { this.msg0 = msg0; } public void setMsg1(String msg1) { this.msg1 = msg1; } public void setMsg2(String msg2) { this.msg2 = msg2; }}package com.v20191215;
import org.springframework.context.support.AbstractApplicationContext;
import org.springframework.context.support.ClassPathXmlApplicationContext;
public class MainApp {
public static void main(String[] args) {
AbstractApplicationContext context = new ClassPathXmlApplicationContext("Beans.xml");
HelloWorldA obj = (HelloWorldA) context.getBean("helloWorldA");
obj.getMsg0();
obj.getMsg1();
obj.getMsg2();
}
}
/**
*输出结果如下:
*this is msg0
*hello msg1
*hello msg2
*
*Process finished with exit code 0
*/package com.v20191215;import org.springframework.context.support.AbstractApplicationContext;import org.springframework.context.support.ClassPathXmlApplicationContext;public class MainApp { public static void main(String[] args) { AbstractApplicationContext context = new ClassPathXmlApplicationContext("Beans.xml"); HelloWorldA obj = (HelloWorldA) context.getBean("helloWorldA"); obj.getMsg0(); obj.getMsg1(); obj.getMsg2(); }}/***输出结果如下:*this is msg0*hello msg1*hello msg2**Process finished with exit code 0*/
- 基于构造函数实现依赖注入
- 基于设置方法(setter)实现依赖注入
package com.v20191215;

public class TextEditor {
    private SpellChecker spellChecker;

    public TextEditor(SpellChecker spellChecker){
        this.spellChecker = spellChecker;
    }

    public void  spellChecker() {
        spellChecker.checkSpelling();
    }

    public SpellChecker getSpellChecker() {
        return spellChecker;
    }

    public void setSpellChecker(SpellChecker spellChecker) {
        this.spellChecker = spellChecker;
    }
}package com.v20191215;public class TextEditor { private SpellChecker spellChecker; public TextEditor(SpellChecker spellChecker){ this.spellChecker = spellChecker; } public void spellChecker() { spellChecker.checkSpelling(); } public SpellChecker getSpellChecker() { return spellChecker; } public void setSpellChecker(SpellChecker spellChecker) { this.spellChecker = spellChecker; }}package com.v20191215;
import static com.utils.Print.println;
public class SpellChecker {
public void SpellChecker(){
println("SpellChecker constructor...");
}
public void checkSpelling(){
println("use checkSpelling ");
}
}
package com.v20191215;import static com.utils.Print.println;public class SpellChecker { public void SpellChecker(){ println("SpellChecker constructor..."); } public void checkSpelling(){ println("use checkSpelling "); }}package com.v20191215;
import org.springframework.context.support.AbstractApplicationContext;
import org.springframework.context.support.ClassPathXmlApplicationContext;
public class MainApp {
public static void main(String[] args) {
AbstractApplicationContext context = new ClassPathXmlApplicationContext("Beans.xml");
TextEditor textEditor = (TextEditor) context.getBean("textEditor");
textEditor.spellChecker();
}
}
package com.v20191215;import org.springframework.context.support.AbstractApplicationContext;import org.springframework.context.support.ClassPathXmlApplicationContext;public class MainApp { public static void main(String[] args) { AbstractApplicationContext context = new ClassPathXmlApplicationContext("Beans.xml"); TextEditor textEditor = (TextEditor) context.getBean("textEditor"); textEditor.spellChecker(); }}<?xml version="1.0" encoding="UTF-8"?>
<beans xmlns="http://www.springframework.org/schema/beans"
xmlns:xsi="http://www.w3.org/2001/XMLSchema-instance"
xsi:schemaLocation="http://www.springframework.org/schema/beans
http://www.springframework.org/schema/beans/spring-beans-3.0.xsd">
<bean id="testEditor" class="com.v20191215.TextEditor" >
<constructor-arg ref="spellChecker"/> <!--通过构造器参数注入bean-->
</bean>
<bean id="spellChecker" class="com.v20191215.SpellChecker" />
</beans> <beans xmlns="http://www.springframework.org/schema/beans" xmlns:xsi="http://www.w3.org/2001/XMLSchema-instance" xsi:schemaLocation="http://www.springframework.org/schema/beans http://www.springframework.org/schema/beans/spring-beans-3.0.xsd"> <bean id="testEditor" class="com.v20191215.TextEditor" > <constructor-arg ref="spellChecker"/> <!--通过构造器参数注入bean--> </bean> <bean id="spellChecker" class="com.v20191215.SpellChecker" /></beans>package com.v20191215;
import static com.utils.Print.println;
public class TextEditor {
private SpellChecker spellChecker;
public void spellChecker() {
spellChecker.checkSpelling();
}
public SpellChecker getSpellChecker() {
return spellChecker;
}
public void setSpellChecker(SpellChecker spellChecker) {
this.spellChecker = spellChecker;
}
}
package com.v20191215;import static com.utils.Print.println;public class TextEditor { private SpellChecker spellChecker; public void spellChecker() { spellChecker.checkSpelling(); } public SpellChecker getSpellChecker() { return spellChecker; } public void setSpellChecker(SpellChecker spellChecker) { this.spellChecker = spellChecker; }}<?xml version="1.0" encoding="UTF-8"?>
<beans xmlns="http://www.springframework.org/schema/beans"
xmlns:xsi="http://www.w3.org/2001/XMLSchema-instance"
xsi:schemaLocation="http://www.springframework.org/schema/beans
http://www.springframework.org/schema/beans/spring-beans-3.0.xsd">
<bean id="testEditor" class="com.v20191215.TextEditor" >
<property name="spellChecker" ref="spellChecker"/> <!--通过set传参的方式注入依赖-->
</bean>
<bean id="spellChecker" class="com.v20191215.SpellChecker" />
</beans><?xml version="1.0" encoding="UTF-8"?><beans xmlns="http://www.springframework.org/schema/beans" xmlns:xsi="http://www.w3.org/2001/XMLSchema-instance" xsi:schemaLocation="http://www.springframework.org/schema/beans http://www.springframework.org/schema/beans/spring-beans-3.0.xsd"> <bean id="testEditor" class="com.v20191215.TextEditor" > <property name="spellChecker" ref="spellChecker"/> <!--通过set传参的方式注入依赖--> </bean> <bean id="spellChecker" class="com.v20191215.SpellChecker" /></beans>use checkSpelling use checkSpelling <?xml version="1.0" encoding="UTF-8"?>
<beans xmlns="http://www.springframework.org/schema/beans"
xmlns:xsi="http://www.w3.org/2001/XMLSchema-instance"
xsi:schemaLocation="http://www.springframework.org/schema/beans
http://www.springframework.org/schema/beans/spring-beans-3.0.xsd">
<bean id="testEditor" class="com.v20191215.TextEditor" >
<property name="spellChecker">
<bean id="spellChecker" class="com.v20191215.SpellChecker" />
</property>
</bean>
</beans><?xml version="1.0" encoding="UTF-8"?><beans xmlns="http://www.springframework.org/schema/beans" xmlns:xsi="http://www.w3.org/2001/XMLSchema-instance" xsi:schemaLocation="http://www.springframework.org/schema/beans http://www.springframework.org/schema/beans/spring-beans-3.0.xsd"> <bean id="testEditor" class="com.v20191215.TextEditor" > <property name="spellChecker"> <bean id="spellChecker" class="com.v20191215.SpellChecker" /> </property> </bean></beans>use checkSpelling use checkSpelling <property>标签的 ref 属性来配置对象的引用package com.v20191215;
import java.util.List;
import java.util.Map;
import java.util.Properties;
import java.util.Set;
import static com.utils.Print.println;
public class Address {
private List addressList;
private Set addressSet;
private Map addressMap;
private Properties addressProp;
public List getAddressList() {
println("List: "+addressList);
return addressList;
}
public void setAddressList(List addressList) {
this.addressList = addressList;
}
public Set getAddressSet() {
println("Set: "+addressSet);
return addressSet;
}
public void setAddressSet(Set addressSet) {
this.addressSet = addressSet;
}
public Map getAddressMap() {
println("Map: "+addressMap);
return addressMap;
}
public void setAddressMap(Map addressMap) {
this.addressMap = addressMap;
}
public Properties getAddressProp() {
println("Prop: "+addressProp);
return addressProp;
}
public void setAddressProp(Properties addresProp) {
this.addressProp = addresProp;
}
}
package com.v20191215;import java.util.List;import java.util.Map;import java.util.Properties;import java.util.Set;import static com.utils.Print.println;public class Address { private List addressList; private Set addressSet; private Map addressMap; private Properties addressProp; public List getAddressList() { println("List: "+addressList); return addressList; } public void setAddressList(List addressList) { this.addressList = addressList; } public Set getAddressSet() { println("Set: "+addressSet); return addressSet; } public void setAddressSet(Set addressSet) { this.addressSet = addressSet; } public Map getAddressMap() { println("Map: "+addressMap); return addressMap; } public void setAddressMap(Map addressMap) { this.addressMap = addressMap; } public Properties getAddressProp() { println("Prop: "+addressProp); return addressProp; } public void setAddressProp(Properties addresProp) { this.addressProp = addresProp; }}package com.v20191215;
public class People {
public String getName() {
return name;
}
public void setName(String name) {
this.name = name;
}
private String name;
}
package com.v20191215;public class People { public String getName() { return name; } public void setName(String name) { this.name = name; } private String name;}<?xml version="1.0" encoding="UTF-8"?>
<beans xmlns="http://www.springframework.org/schema/beans"
xmlns:xsi="http://www.w3.org/2001/XMLSchema-instance"
xsi:schemaLocation="http://www.springframework.org/schema/beans
http://www.springframework.org/schema/beans/spring-beans-3.0.xsd">
<bean id="address" class="com.v20191215.Address">
<!-- 注入list-->
<property name="addressList">
<list>
<value>INDIA</value>
<value>Pakistan</value>
<value>USA</value>
<value>USA</value>
</list>
</property>
<property name="addressSet">
<set>
<value>INDIA</value>
<value>Pakistan</value>
<value>USA</value>
<value>USA</value>
</set>
</property>
<property name="addressMap">
<map>
<entry key="1" value="INDIA"/> <!-- 注入基础值-->
<entry key="2" value="Pakistan"/>
<entry key="3" value="USA"/>
<entry key="4" value-ref="people"/> <!-- 注入对象-->
</map>
</property>
<property name="addressProp">
<props>
<prop key="one">INDIA</prop>
<prop key="two">Pakistan</prop>
<prop key="three">USA</prop>
<prop key="four">USA</prop>
</props>
</property>
</bean>
<bean id="people" class="com.v20191215.People">
<property name="name" value="fireMan"/>
</bean>
</beans><?xml version="1.0" encoding="UTF-8"?><beans xmlns="http://www.springframework.org/schema/beans" xmlns:xsi="http://www.w3.org/2001/XMLSchema-instance" xsi:schemaLocation="http://www.springframework.org/schema/beans http://www.springframework.org/schema/beans/spring-beans-3.0.xsd"> <bean id="address" class="com.v20191215.Address"> <!-- 注入list--> <property name="addressList"> <list> <value>INDIA</value> <value>Pakistan</value> <value>USA</value> <value>USA</value> </list> </property> <property name="addressSet"> <set> <value>INDIA</value> <value>Pakistan</value> <value>USA</value> <value>USA</value> </set> </property> <property name="addressMap"> <map> <entry key="1" value="INDIA"/> <!-- 注入基础值--> <entry key="2" value="Pakistan"/> <entry key="3" value="USA"/> <entry key="4" value-ref="people"/> <!-- 注入对象--> </map> </property> <property name="addressProp"> <props> <prop key="one">INDIA</prop> <prop key="two">Pakistan</prop> <prop key="three">USA</prop> <prop key="four">USA</prop> </props> </property> </bean> <bean id="people" class="com.v20191215.People"> <property name="name" value="fireMan"/> </bean></beans>package com.v20191215;
import org.springframework.context.support.AbstractApplicationContext;
import org.springframework.context.support.ClassPathXmlApplicationContext;
public class MainApp {
public static void main(String[] args) {
AbstractApplicationContext context = new ClassPathXmlApplicationContext("Beans.xml");
Address address = (Address) context.getBean("address");
address.getAddressList();
address.getAddressSet();
address.getAddressMap();
address.getAddressProp();
}
}
/**
* 输出结果:
* List: [INDIA, Pakistan, USA, USA]
* Set: [INDIA, Pakistan, USA]
* Map: {1=INDIA, 2=Pakistan, 3=USA, 4=com.v20191215.People@148080bb} // 可以看出第四个值是对象的引用被成功的注入
* Prop: {two=Pakistan, one=INDIA, three=USA, four=USA}
*/package com.v20191215;import org.springframework.context.support.AbstractApplicationContext;import org.springframework.context.support.ClassPathXmlApplicationContext;public class MainApp { public static void main(String[] args) { AbstractApplicationContext context = new ClassPathXmlApplicationContext("Beans.xml"); Address address = (Address) context.getBean("address"); address.getAddressList(); address.getAddressSet(); address.getAddressMap(); address.getAddressProp(); }}/** * 输出结果: * List: [INDIA, Pakistan, USA, USA] * Set: [INDIA, Pakistan, USA] * Map: {1=INDIA, 2=Pakistan, 3=USA, 4=com.v20191215.People@148080bb} // 可以看出第四个值是对象的引用被成功的注入 * Prop: {two=Pakistan, one=INDIA, three=USA, four=USA} */<bean>元素来声明 bean <constructor-arg>和<property>元素来注入 依赖,也可以使用自动装配进行依赖的注入<bean>元素的 autowire 属性为一个 bean 定义指定自动装配模式。| 模式 | 描述 |
|---|---|
| no | 这是默认的设置,它意味着没有自动装配。 |
| byName | 由属性名自动装配。Spring 容器看到在 XML 配置文件中 bean 的自动装配的属性设置为 byName。 然后尝试匹配,并且将它的属性与在配置文件中被定义为相同名称的 beans 的属性进行连接。 |
| byType | 由属性数据类型自动装配。Spring 容器看到在 XML 配置文件中 bean 的自动装配的属性设置为 byType。 然后如果它的类型匹配配置文件中的一个确切的 bean 名称,它将尝试匹配和连接属性的类型。 如果存在不止一个这样的 bean,则一个致命的异常将会被抛出。 |
| constructor | 类似于 byType,但该类型适用于构造函数参数类型。 如果在容器中没有一个构造函数参数类型的 bean,则一个致命错误将会发生。 |
| autodetect | Spring首先尝试通过 constructor 使用自动装配来连接,如果它不执行,Spring 尝试通过 byType 来自动装配。 |
eg:
正常情况下的配置文件:
<?xml version="1.0" encoding="UTF-8"?>

<beans xmlns="http://www.springframework.org/schema/beans"
    xmlns:xsi="http://www.w3.org/2001/XMLSchema-instance"
    xsi:schemaLocation="http://www.springframework.org/schema/beans
    http://www.springframework.org/schema/beans/spring-beans-3.0.xsd">

   <!-- Definition for textEditor bean -->
   <bean id="textEditor" class="com.tutorialspoint.TextEditor">
       <property name="spellChecker" ref="spellChecker" />
       <property name="name" value="Generic Text Editor" />
   </bean>

   <!-- Definition for spellChecker bean -->
   <bean id="spellChecker" class="com.tutorialspoint.SpellChecker">
   </bean>

</beans><?xml version="1.0" encoding="UTF-8"?><beans xmlns="http://www.springframework.org/schema/beans" xmlns:xsi="http://www.w3.org/2001/XMLSchema-instance" xsi:schemaLocation="http://www.springframework.org/schema/beans http://www.springframework.org/schema/beans/spring-beans-3.0.xsd"> <!-- Definition for textEditor bean --> <bean id="textEditor" class="com.tutorialspoint.TextEditor"> <property name="spellChecker" ref="spellChecker" /> <property name="name" value="Generic Text Editor" /> </bean> <!-- Definition for spellChecker bean --> <bean id="spellChecker" class="com.tutorialspoint.SpellChecker"> </bean></beans><?xml version="1.0" encoding="UTF-8"?>
<beans xmlns="http://www.springframework.org/schema/beans"
xmlns:xsi="http://www.w3.org/2001/XMLSchema-instance"
xsi:schemaLocation="http://www.springframework.org/schema/beans
http://www.springframework.org/schema/beans/spring-beans-3.0.xsd">
<!-- Definition for textEditor bean -->
<bean id="textEditor" class="com.tutorialspoint.TextEditor" autowire="byName">
<property name="name" value="Generic Text Editor" />
</bean>
<!-- Definition for spellChecker bean -->
<bean id="spellChecker" class="com.tutorialspoint.SpellChecker">
</bean>
</beans><?xml version="1.0" encoding="UTF-8"?><beans xmlns="http://www.springframework.org/schema/beans" xmlns:xsi="http://www.w3.org/2001/XMLSchema-instance" xsi:schemaLocation="http://www.springframework.org/schema/beans http://www.springframework.org/schema/beans/spring-beans-3.0.xsd"> <!-- Definition for textEditor bean --> <bean id="textEditor" class="com.tutorialspoint.TextEditor" autowire="byName"> <property name="name" value="Generic Text Editor" /> </bean> <!-- Definition for spellChecker bean --> <bean id="spellChecker" class="com.tutorialspoint.SpellChecker"> </bean></beans><?xml version="1.0" encoding="UTF-8"?>
<beans xmlns="http://www.springframework.org/schema/beans"
xmlns:xsi="http://www.w3.org/2001/XMLSchema-instance"
xsi:schemaLocation="http://www.springframework.org/schema/beans
http://www.springframework.org/schema/beans/spring-beans-3.0.xsd">
<!-- Definition for textEditor bean -->
<bean id="textEditor" class="com.tutorialspoint.TextEditor"
autowire="byType">
<property name="name" value="Generic Text Editor" />
</bean>
<!-- Definition for spellChecker bean -->
<bean id="SpellChecker" class="com.tutorialspoint.SpellChecker">
</bean>
</beans><?xml version="1.0" encoding="UTF-8"?><beans xmlns="http://www.springframework.org/schema/beans" xmlns:xsi="http://www.w3.org/2001/XMLSchema-instance" xsi:schemaLocation="http://www.springframework.org/schema/beans http://www.springframework.org/schema/beans/spring-beans-3.0.xsd"> <!-- Definition for textEditor bean --> <bean id="textEditor" class="com.tutorialspoint.TextEditor" autowire="byType"> <property name="name" value="Generic Text Editor" /> </bean> <!-- Definition for spellChecker bean --> <bean id="SpellChecker" class="com.tutorialspoint.SpellChecker"> </bean></beans><?xml version="1.0" encoding="UTF-8"?>
<beans xmlns="http://www.springframework.org/schema/beans"
xmlns:xsi="http://www.w3.org/2001/XMLSchema-instance"
xsi:schemaLocation="http://www.springframework.org/schema/beans
http://www.springframework.org/schema/beans/spring-beans-3.0.xsd">
<!-- Definition for textEditor bean -->
<bean id="textEditor" class="com.tutorialspoint.TextEditor"
autowire="constructor">
<constructor-arg value="Generic Text Editor"/>
</bean>
<!-- Definition for spellChecker bean -->
<bean id="SpellChecker" class="com.tutorialspoint.SpellChecker">
</bean>
</beans><?xml version="1.0" encoding="UTF-8"?><beans xmlns="http://www.springframework.org/schema/beans" xmlns:xsi="http://www.w3.org/2001/XMLSchema-instance" xsi:schemaLocation="http://www.springframework.org/schema/beans http://www.springframework.org/schema/beans/spring-beans-3.0.xsd"> <!-- Definition for textEditor bean --> <bean id="textEditor" class="com.tutorialspoint.TextEditor" autowire="constructor"> <constructor-arg value="Generic Text Editor"/> </bean> <!-- Definition for spellChecker bean --> <bean id="SpellChecker" class="com.tutorialspoint.SpellChecker"> </bean></beans>| 序号 | 注解 & 描述 |
|---|---|
| 1 | @Required @Required 注解应用于 bean 属性的 setter 方法。 |
| 2 | @Autowired @Autowired 注解可以应用到 bean 属性的 setter 方法,非 setter 方法,构造函数和属性。 |
| 3 | @Qualifier 通过指定确切的将被连线的 bean,@Autowired 和 @Qualifier 注解可以用来删除混乱。 |
| 4 | JSR-250 Annotations Spring 支持 JSR-250 的基础的注解,其中包括了 @Resource,@PostConstruct 和 @PreDestroy 注解。 |
应用于 bean 属性的 setter 方法,它表明受影响的 bean 属性在 XML 配置文件中必须进行显示配置,否则容器就会抛出一个 BeanInitializationException 异常。
package com.tutorialspoint;
import org.springframework.beans.factory.annotation.Required;
public class Student {
   private Integer age;
   private String name;
   @Required
   public void setAge(Integer age) {
      this.age = age;
   }
   public Integer getAge() {
      return age;
   }
   @Required
   public void setName(String name) {
      this.name = name;
   }
   public String getName() {
      return name;
   }
}package com.tutorialspoint;import org.springframework.beans.factory.annotation.Required;public class Student { private Integer age; private String name; public void setAge(Integer age) { this.age = age; } public Integer getAge() { return age; } public void setName(String name) { this.name = name; } public String getName() { return name; }}<?xml version="1.0" encoding="UTF-8"?>
<beans xmlns="http://www.springframework.org/schema/beans"
xmlns:xsi="http://www.w3.org/2001/XMLSchema-instance"
xmlns:context="http://www.springframework.org/schema/context"
xsi:schemaLocation="http://www.springframework.org/schema/beans
http://www.springframework.org/schema/beans/spring-beans-3.0.xsd
http://www.springframework.org/schema/context
http://www.springframework.org/schema/context/spring-context-3.0.xsd">
<context:annotation-config/>
<!-- Definition for student bean -->
<bean id="student" class="com.tutorialspoint.Student">
<property name="name" value="Zara" />
<property name="age" value="11"/>
</bean><?xml version="1.0" encoding="UTF-8"?><beans xmlns="http://www.springframework.org/schema/beans" xmlns:xsi="http://www.w3.org/2001/XMLSchema-instance" xmlns:context="http://www.springframework.org/schema/context" xsi:schemaLocation="http://www.springframework.org/schema/beans http://www.springframework.org/schema/beans/spring-beans-3.0.xsd http://www.springframework.org/schema/context http://www.springframework.org/schema/context/spring-context-3.0.xsd"> <context:annotation-config/> <!-- Definition for student bean --> <bean id="student" class="com.tutorialspoint.Student"> <property name="name" value="Zara" /> <property name="age" value="11"/> </bean>package com.tutorialspoint;
import org.springframework.context.ApplicationContext;
import org.springframework.context.support.ClassPathXmlApplicationContext;
public class MainApp {
public static void main(String[] args) {
ApplicationContext context = new ClassPathXmlApplicationContext("Beans.xml");
Student student = (Student) context.getBean("student");
System.out.println("Name : " + student.getName() );
System.out.println("Age : " + student.getAge() );
}
}package com.tutorialspoint;import org.springframework.context.ApplicationContext;import org.springframework.context.support.ClassPathXmlApplicationContext;public class MainApp { public static void main(String[] args) { ApplicationContext context = new ClassPathXmlApplicationContext("Beans.xml"); Student student = (Student) context.getBean("student"); System.out.println("Name : " + student.getName() ); System.out.println("Age : " + student.getAge() ); }}package com.tutorialspoint;
import org.springframework.beans.factory.annotation.Autowired;
public class TextEditor {
@Autowired
private SpellChecker spellChecker;
public TextEditor() {
System.out.println("Inside TextEditor constructor." );
}
public SpellChecker getSpellChecker( ){
return spellChecker;
}
public void spellCheck(){
spellChecker.checkSpelling();
}
}package com.tutorialspoint;import org.springframework.beans.factory.annotation.Autowired;public class TextEditor { private SpellChecker spellChecker; public TextEditor() { System.out.println("Inside TextEditor constructor." ); } public SpellChecker getSpellChecker( ){ return spellChecker; } public void spellCheck(){ spellChecker.checkSpelling(); }}<?xml version="1.0" encoding="UTF-8"?>
<beans xmlns="http://www.springframework.org/schema/beans"
xmlns:xsi="http://www.w3.org/2001/XMLSchema-instance"
xmlns:context="http://www.springframework.org/schema/context"
xsi:schemaLocation="http://www.springframework.org/schema/beans
http://www.springframework.org/schema/beans/spring-beans-3.0.xsd
http://www.springframework.org/schema/context
http://www.springframework.org/schema/context/spring-context-3.0.xsd">
<context:annotation-config/>
<!-- Definition for textEditor bean -->
<bean id="textEditor" class="com.tutorialspoint.TextEditor">
</bean>
<!-- Definition for spellChecker bean -->
<bean id="spellChecker" class="com.tutorialspoint.SpellChecker">
</bean>
</beans> <beans xmlns="http://www.springframework.org/schema/beans" xmlns:xsi="http://www.w3.org/2001/XMLSchema-instance" xmlns:context="http://www.springframework.org/schema/context" xsi:schemaLocation="http://www.springframework.org/schema/beans http://www.springframework.org/schema/beans/spring-beans-3.0.xsd http://www.springframework.org/schema/context http://www.springframework.org/schema/context/spring-context-3.0.xsd"> <context:annotation-config/> <!-- Definition for textEditor bean --> <bean id="textEditor" class="com.tutorialspoint.TextEditor"> </bean> <!-- Definition for spellChecker bean --> <bean id="spellChecker" class="com.tutorialspoint.SpellChecker"> </bean></beans>package com.tutorialspoint;
import org.springframework.beans.factory.annotation.Autowired;
public class TextEditor {
@Autowired
@Qualifier("spellChecker1")
private SpellChecker spellChecker;
public TextEditor() {
System.out.println("Inside TextEditor constructor." );
}
public SpellChecker getSpellChecker( ){
return spellChecker;
}
public void spellCheck(){
spellChecker.checkSpelling();
}
}package com.tutorialspoint;import org.springframework.beans.factory.annotation.Autowired;public class TextEditor { ("spellChecker1") private SpellChecker spellChecker; public TextEditor() { System.out.println("Inside TextEditor constructor." ); } public SpellChecker getSpellChecker( ){ return spellChecker; } public void spellCheck(){ spellChecker.checkSpelling(); }}原文:https://www.cnblogs.com/jfxu/p/13444296.html