八月 06, 2020 3:52:33 下午 org.springframework.context.support.AbstractApplicationContext refresh
警告: Exception encountered during context initialization - cancelling refresh attempt:
org.springframework.beans.factory.UnsatisfiedDependencyException: Error creating bean with name ‘bookService‘: Unsatisfied dependency expressed through field ‘bookDao‘;
nested exception is org.springframework.beans.factory.CannotLoadBeanClassException:
Cannot find class [com.alibaba.druid.pool.DruidDataSuorce] for bean with name ‘DataSource‘ defined in class path resource [Beans1.xml];
nested exception is java.lang.ClassNotFoundException: com.alibaba.druid.pool.DruidDataSuorce
(这是我在自学spring整合JdbcTemplate时,运行了一个例子出现的错误,花了两天才解决,仅供参考)
1、出现这种错误首先你要去检查你有没有导入druid的jar包
阿里巴巴druid.jar包下载地址:https://mvnrepository.com/artifact/com.alibaba/druid
2、如果jar包导入没问题,你先去查看你的MySQL版本是不是5+的
如果版本是5的话你应该导入和版本一致的mysql-connector的jar包,例如:mysql-connector-java-5.1.39-bin.jar
而如果你的MySQL版本是5+新版本的话那你就要导入新版本的mysql-connector的jar包,例如:mysql-connector-java-8.0.19.jar
3、如果还是没用的话,那你就要去检查你的spring配置了(也就是xml文件),比如你的配置中有某段代码是复制粘贴过来的,那你最好自己重新敲一遍,复制粘贴有可能会导致空格出错,不懂的话可以看下我下面的这个小例子(我就是因为这个原因,搞了两天才搞出来 =_=......)
mysql8.0新版本如何配置连接池(一个简单的JdbcTemplate小例子来说明)
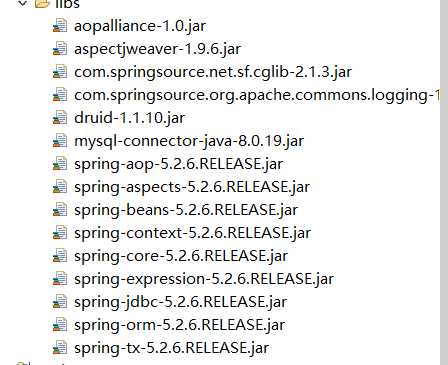
(1)引入jar包,这些jar包有一部分要用到(在这个例子)

(2)打开数据库(我这里的数据库是spring_jdbctemplate_demo1,其中有一个表teacher)
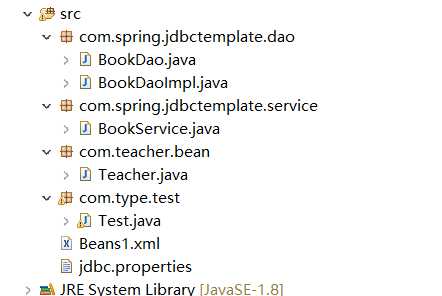
(3)创建这些类、xml和外部属性文件

创建BookService类
 1 @Service  //使用注解方式创建对象
 2 public class BookService {
 3
 4     //注入dao
 5     @Autowired  //注解注入属性
 6     private BookDao bookDao;
 7
 8     //插入方法
 9     public void addTeacher(Teacher teacher) {
10         bookDao.add(teacher);
11     }
12 }
创建BookDao接口
1 public interface BookDao {
2
3     //插入方法
4     void add(Teacher teacher);
5
6 }
创建BookDaoImpl实现类
 1 @Repository  //使用注解方式创建对象
 2 public class BookDaoImpl implements BookDao{
 3
 4     //注入JdbcTemplate
 5     @Autowired  //注解注入属性
 6     private JdbcTemplate jdbcTemplate;
 7
 8     //插入方法
 9     @Override
10     public void add(Teacher teacher) {
11
12         //1、创建sql语句
13         String sql = "insert into teacher values(?,?,?)";
14
15         //2、调用方法实现
16         Object[] array = {teacher.getTeacherId(), teacher.getTeacherName(),
17                 teacher.getDepartmentID()};
18         int update = jdbcTemplate.update(sql, array);
19         System.out.println(update);
20     }
21 }
创建表teacher的专门类,类里面有表teacher中的全部属性以及属性对应的get或set方法
 1 public class Teacher {
 2
 3     private String ID;
 4     private String name;
 5     private String address;
 6
 7     public String getTeacherId() {
 8         return ID;
 9     }
10     public void setTeacherId(String ID) {
11         this.ID = ID;
12     }
13     public String getTeacherName() {
14         return name;
15     }
16     public void setTeacherName(String name) {
17         this.name = name;
18     }
19     public String getDepartmentID() {
20         return address;
21     }
22     public void setDepartmentID(String address) {
23         this.address = address;
24     }
25 }
创建测试类
 1 public class Test {
 2
 3     @org.junit.Test
 4     public void test() {
 5         ApplicationContext context =
 6                          new ClassPathXmlApplicationContext("Beans1.xml");
 7         BookService bookService = context.getBean("bookService", BookService.class);
 8         System.out.println(bookService);
 9         Teacher teacher = new Teacher();
10         teacher.setTeacherId("2022");
11         teacher.setTeacherName("佳奥");
12         teacher.setDepartmentID("004");
13
14         bookService.addTeacher(teacher);
15     }
16 }
创建xml配置文件
 1 <?xml version="1.0" encoding="UTF-8"?>
 2 <beans xmlns="http://www.springframework.org/schema/beans"
 3        xmlns:xsi="http://www.w3.org/2001/XMLSchema-instance"
 4        xmlns:context="http://www.springframework.org/schema/context"
 5        xsi:schemaLocation="http://www.springframework.org/schema/beans
 6                               http://www.springframework.org/schema/beans/spring-beans.xsd
 7                               http://www.springframework.org/schema/context
 8                               http://www.springframework.org/schema/context/spring-context.xsd">
 9
10     <!-- 组件扫描 -->
11     <context:component-scan base-package="com.spring.jdbctemplate.service,
12                                           com.spring.jdbctemplate.dao">
13
14     </context:component-scan>
15
16
17     <!-- 引入外部属性文件 -->
18     <context:property-placeholder location="classpath:jdbc.properties"/>
19
20
21     <!-- 直接配置连接池 -->
22     <bean id="DataSource" class="com.alibaba.druid.pool.DruidDataSource" destroy-method="close">
23
24         <property name="url" value="${prop.url}" />
25
26         <property name="username" value="${prop.username}" />
27
28         <property name="password" value="${prop.password}" />
29
30
31         <property name="driverClassName" value="${prop.driverClass}" />
32     </bean>
33
34
35     <!-- JdbcTemplate对象 -->
36     <bean id="jdbcTemplate1" class="org.springframework.jdbc.core.JdbcTemplate">
37
38         <!-- 注入dataSource -->
39         <property name="dataSource" ref="DataSource"></property>
40     </bean>
41
42
43 </beans>
创建一个外部属性文件,点击src(因为我是用eclipse),右键-->NEW-->Flie-->Finish,然后在文件里面写下连接连接数据库的代
连接数据库代码如下:
1 prop.driverClass = com.mysql.cj.jdbc.Driver  //这个可配置也可不配置
2 prop.url = jdbc:mysql:///spring_jdbcTemplate_demo1?useSSL=false&serverTimezone=UTC&useUnicode=true&characterEncoding=utf-8
3 prop.username = *******
4 prop.password = *******
(OK,你可以去尝试了,我也是小白,希望能帮到你,加油)
Cannot find class [com.alibaba.druid.pool.DruidDataSuorce]
原文:https://www.cnblogs.com/zz-newbie/p/13448188.html