上一篇博客介绍了springboot自动装配的原理。springboot本身有丰富的spring-boot-starter-xx集成组件,这一篇趁热打铁加深理解,我们利用springboot自动装配的机制,从零开始制作一个属于自己的starter包。
?这一篇博客我制作一个上传图片第三方图床的starter,集成常见的第三方图床sm.ms、imgur、github图床等。
?本教程不会具体的讲解图床上传相关的代码,而是主要分析封装此starter的思路。
? 这里主要引入spring-boot-starter包,spring-boot-configuration-processor其他依赖主要为上传到第三方图床发送Http请求依赖包。
<?xml version="1.0" encoding="UTF-8"?>
<project xmlns="http://maven.apache.org/POM/4.0.0"
	xmlns:xsi="http://www.w3.org/2001/XMLSchema-instance"
	xsi:schemaLocation="http://maven.apache.org/POM/4.0.0 http://maven.apache.org/xsd/maven-4.0.0.xsd">
	<modelVersion>4.0.0</modelVersion>

	<groupId>vip.codehome</groupId>
	<artifactId>imghost-spring-boot-starter</artifactId>
	<version>1.0-SNAPSHOT</version>
	<parent>
		<groupId>org.springframework.boot</groupId>
		<artifactId>spring-boot-starter-parent</artifactId>
		<version>2.1.0.RELEASE</version>
	</parent>
	<dependencies>
		<dependency>
			<groupId>org.springframework.boot</groupId>
			<artifactId>spring-boot-starter</artifactId>
		</dependency>
		      <dependency>
                <groupId>org.projectlombok</groupId>
                <artifactId>lombok</artifactId>
                <version>1.18.12</version>
                <scope>compile</scope>
            </dependency>
		<dependency>
			<groupId>org.springframework.boot</groupId>
			<artifactId>spring-boot-configuration-processor</artifactId>
			<optional>true</optional>
		</dependency>
		<dependency>
			<groupId>org.springframework.boot</groupId>
			<artifactId>spring-boot-starter-json</artifactId>
		</dependency>
		<!-- https://mvnrepository.com/artifact/com.squareup.okhttp3/okhttp -->
		<dependency>
			<groupId>com.squareup.okhttp3</groupId>
			<artifactId>okhttp</artifactId>
			<version>3.14.9</version>
		</dependency>
	</dependencies>
    <build>
        <resources>
            <resource>
                <directory>src/main/java</directory>
                <includes>
                    <include>**/spring.factories</include>
                </includes>
                <filtering>false</filtering>
            </resource>
        </resources>
        <plugins>
            <plugin>
                <groupId>org.apache.maven.plugins</groupId>
                <artifactId>maven-compiler-plugin</artifactId>
                <version>3.5.1</version>
                <configuration>
                    <source>1.8</source>
                    <target>1.8</target>
                </configuration>
            </plugin>
            <!--把注释源码也打入基础包中-->
            <plugin>
                <groupId>org.apache.maven.plugins</groupId>
                <artifactId>maven-source-plugin</artifactId>
                <version>3.0.1</version>
                <executions>
                    <execution>
                        <phase>compile</phase>
                        <goals>
                            <goal>jar-no-fork</goal>
                        </goals>
                    </execution>
                </executions>
            </plugin>
        </plugins>
    </build>
</project>
? 上传到SM.MS的API需要上传的token,在sm.ms网站注册获取个人的私钥,后面如果上传到imgur同样可以在此类中加入对应的配置类。
@Data
@ConfigurationProperties(prefix = "imghost")
public class ImgHostProperties {
    SMMS smms;
    @Data
    public static class SMMS{
        String token;
    }
}
当imghost.smms.token使用者配置时,我们生成一个SMMSImgHostService的图床上传服务类。
@Configuration
@EnableConfigurationProperties(ImgHostProperties.class)
@ConditionalOnProperty(prefix = "imghost",name = "enabled",havingValue = "true",matchIfMissing = true)
public class ImgHostAutoConfiguration {
	private final ImgHostProperties imgHostProperties;

	public ImgHostAutoConfiguration(ImgHostProperties imgHostProperties) {
		this.imgHostProperties = imgHostProperties;
	}

	@ConditionalOnMissingBean
	@ConditionalOnProperty(prefix="imghost.smms",name="token")
	@Bean
	public SMMSImgHostService imgHostService() {
		return new SMMSImgHostService(imgHostProperties);
	}
}
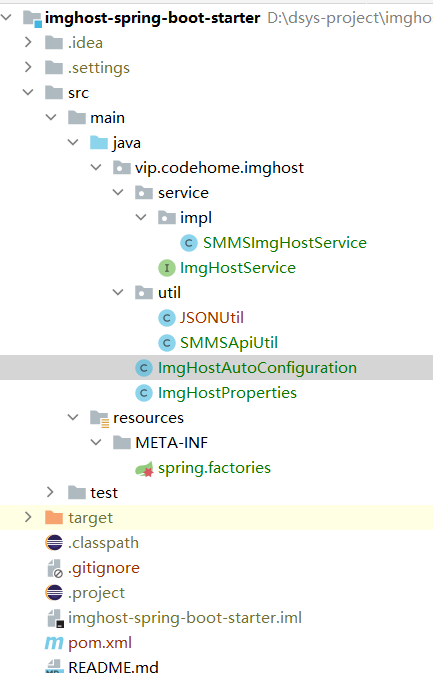
? 最后在项目的src/main/resource上加入META-INF/spring.factories中引入我们自定义的ImgHostAutoConfiguration配置类。
org.springframework.boot.autoconfigure.EnableAutoConfiguration=vip.codehome.imghost.ImgHostAutoConfiguration
<dependency>
	<groupId>vip.codehome</groupId>
	<artifactId>imghost-spring-boot-starter</artifactId>
	<version>1.0-SNAPSHOT</version>
</dependency>
在springboot项目中加入如下配置

项目使用
	@Autowired
	SMMSImgHostService smms;
	public void upload() {
		System.out.println(smms.upload(newFile("D:\\test.jpg")));
	}
? 千里之行,始于足下。这里是SpringBoot教程系列第十八篇。以上就是我们自己动手制作一个starter包的全过程,是不是很简单。此项目在github可下载源码
? 当前只是实现了上传到SM.MS图床,后期会逐渐迭代一个上传到sm.ms,imgur,github各种图床的通用工具类,敬请期待。如果觉得不错,点赞、评论、关注三连击
springboot2.x基础教程:动手制作一个starter包
原文:https://www.cnblogs.com/codhome/p/13655839.html