一: 登录微信公众平台:进行注册
(注意:请通读整篇文章后,再进行实操,免走弯路)
https://mp.weixin.qq.com/ ,点击立即注册,选择你需要的账号类型,
这个是各种类型的区分:https://kf.qq.com/faq/170815aUZjeQ170815mU7bI7.htm,
大致总结:订阅号没有服务号权限多,类型个人没有类型企业注册麻烦,个人无法认证,企业可认证
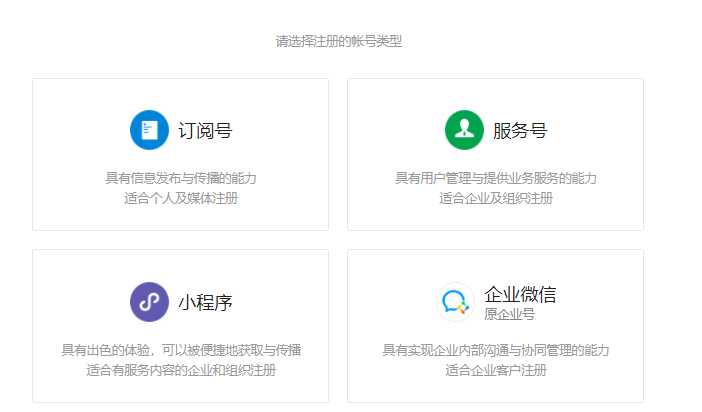
注册过程中,可分为:个人/企业等(企业,自媒体等注册时,需要组织代号,经营许可证,对公账户等),这块我选择注册的是个人账号(需要上传手持身份证的照片)
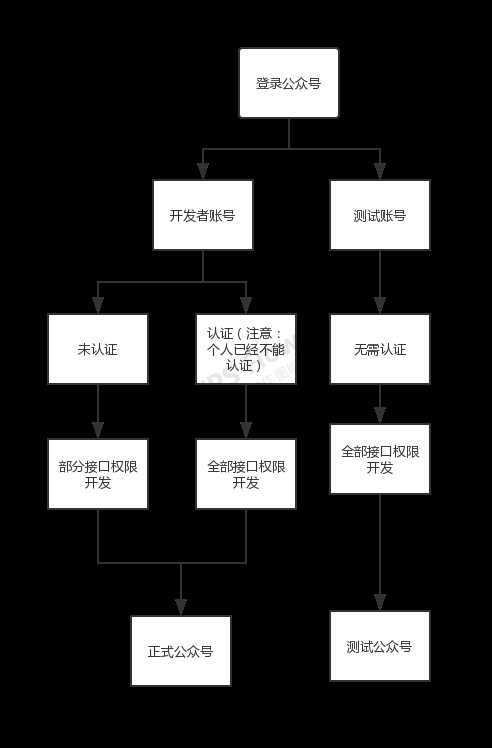
二:微信公众号基础操作
1:首先,了解一下整个工作流程(开发-->接口权限,可看见开发者的接口权限)
2:开发前的准备
开发前,必须设置好 开发-->基础配置-->【服务器配置】
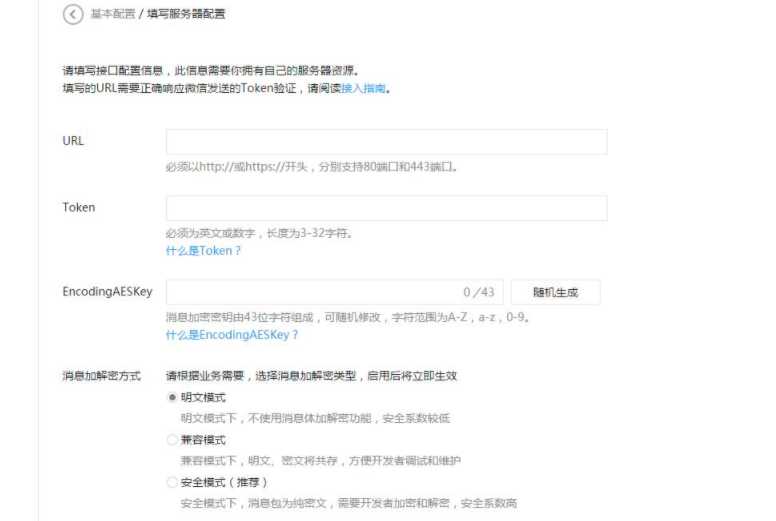
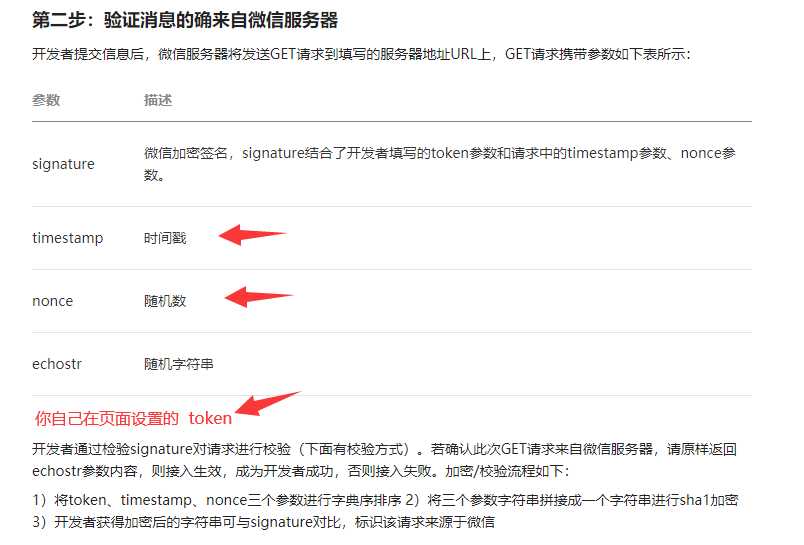
如上图所示:何进行服务器验证呢?
前提:
a: 一个对外的接口(微信服务器会通过该接口,传递给你4个参数:加密签名,时间戳,随机数,随机字符串)
b:页面填写时,还会有个:Token
接口处理逻辑:
  wechat server ---> url :  传入【加密签名,时间戳,随机数,随机字符串】--> 将【Token,时间戳,随机数】排序并连接成一个字符串

          进行sha1加密,得到的字符串 与 【加密签名】进行对比,一致则表示通过,并返回【随机字符串】
代码:

 1         [Route("wechat")]
 2         [HttpGet]
 3         public ActionResult WechatValidation(string echoStr,string signature,string timestamp,string nonce)
 4         {
 5             string filename = "1.text";
 6             string webRootPath = _hostingEnvironment.WebRootPath;
 7             string contentRootPath = _hostingEnvironment.ContentRootPath;
 8             string fullpath = Path.Combine(webRootPath, filename);
 9             if (!System.IO.File.Exists(fullpath))
10             {
11                 System.IO.File.Create(fullpath).Close();
12             }
13
14             System.IO.File.AppendAllText(fullpath, $"\r\nTime:{DateTime.Now},string echoStr:{echoStr},string signature:{signature},string timestamp:{timestamp},string nonce:{nonce}");
15
16             var token = "wechat";
17             var checkResult = CheckSignature(token, signature, timestamp, nonce);
18             return Content(echoStr);
19         }
20
21
22         private bool CheckSignature(string token, string signature, string timestamp, string nonce)
23         {
24
25             //创建数组,将 Token, timestamp, nonce 三个参数加入数组
26             string[] array = { token, timestamp, nonce };
27             //进行排序
28             Array.Sort(array);
29             //拼接为一个字符串
30             var  tempStr = String.Join("", array);
31             //对字符串进行 SHA1加密
32             tempStr = Get_SHA1_Method2(tempStr);
33             //判断signature 是否正确
34             if (tempStr.Equals(signature))
35             {
36                 return true;
37             }
38             else
39             {
40                 return false;
41             }
42         }
43
44         public string Get_SHA1_Method2(string strSource)
45         {
46             string strResult = "";
47
48             //Create
49             System.Security.Cryptography.SHA1 md5 = System.Security.Cryptography.SHA1.Create();
50
51             //注意编码UTF8、UTF7、Unicode等的选择
52             byte[] bytResult = md5.ComputeHash(System.Text.Encoding.UTF8.GetBytes(strSource));
53
54             //字节类型的数组转换为字符串
55             for (int i = 0; i < bytResult.Length; i++)
56             {
57                 //16进制转换
58                 strResult = strResult + bytResult[i].ToString("X");
59             }
60             return strResult.ToLower();
61         }
c:接口写完,即可部署服务器
原文:https://www.cnblogs.com/hanliping/p/13684343.html
