那么进入某个路由对应的组件的时候,我们会触发哪些类型的周期呢?
根实例的加载相关的生命周期(beforeCreate、created、beforeMount、mounted)
组件实例的加载相关的生命周期(beforeCreate、created、beforeMount、mounted)
全局路由勾子(router.beforeEach)
组件路由勾子(beforeRouteEnter)
组件路由勾子的next里的回调(beforeRouteEnter)
指令的周期(bind,inserted)
nextTick方法的回调
接下来,让我们用vue-cli简单改造后的项目,做一个测试,看看各个声明周期的触发顺序是怎样的
main.js:
router.beforeEach((to, from, next) => {
  console.log(‘路由全局勾子:beforeEach‘)
  next()
})

router.afterEach((to, from) => {
  console.log(‘路由全局勾子:afterEach‘)
})

new Vue({
  beforeCreate () {
    console.log(‘根组件:beforeCreate‘)
  },
  created () {
    console.log(‘根组件:created‘)
  },
  beforeMount () {
    console.log(‘根组件:beforeMount‘)
  },
  mounted () {
    console.log(‘根组件:mounted‘)
  }
  el: ‘#app‘,
  router,
  template: ‘<App/>‘,
  components: { App }
})
test.vue
<template>
  <h1 v-ooo @click = "$router.push(‘/‘)">test</h1>
</template>
<script>
export default {
  beforeRouteEnter (to, from, next) {
    console.log(‘组件路由勾子:beforeRouteEnter‘)
    next(vm => {
      console.log(‘组件路由勾子beforeRouteEnter的next‘)
    })
  },
  beforeCreate () {
    console.log(‘组件:beforeCreate‘)
  },
  created () {
    this.$nextTick(() => {
      console.log(‘nextTick‘)
    })
    console.log(‘组件:created‘)
  },
  beforeMount () {
    console.log(‘组件:beforeMount‘)
  },
  mounted () {
    console.log(‘组件:mounted‘)
  },
  directives: {
    ooo: {
      bind (el, binding, vnode) {
        console.log(‘指令binding‘)
      },
      inserted (el, binding, vnode) {
        console.log(‘指令inserted‘)
      }
    }
  }
}
</script>
接下来,直接进入test.vue对应的路由。在控制台,我们看到如下的输出
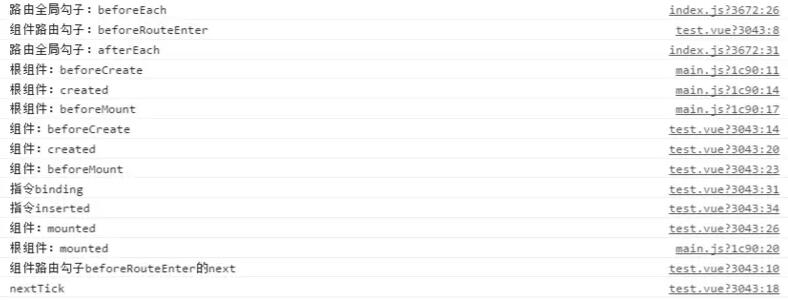
我们看到执行的顺序为
路由勾子 (beforeEach、beforeRouteEnter、afterEach)
根组件 (beforeCreate、created、beforeMount)
组件 (beforeCreate、created、beforeMount)
指令 (bind、inserted)
组件 mounted
根组件 mounted
beforeRouteEnter的next的回调
nextTick
路由勾子执行周期非常早,甚至在根实例的渲染之前。
具体的顺序 router.beforeEach > beforeRouteEnter > router.afterEach
tip:在进行路由拦截的时候要避免使用实例内部的方法或属性。 在开发项目时候,我们脑门一拍把,具体拦截的程序,写在了根实例的方法上了,到beforeEach去调用。 结果导致整个拦截的周期,推迟到实例渲染的之后。 因此对于一些路由组件的beforeRouteEnter里的请求并无法拦截,页面看上去好像已经拦截下来了。 实际上请求依然发了出去,beforeRouteEnter内的函数依然执行了。
指令的绑定在组件mounted之前,组件的beforeMount之后
不得不提的, beforeRouteEnter的next勾子
beforeRouteEnter的执行顺序是如此靠前,而其中next的回调勾子的函数,执行则非常靠后,在mounted之后!!
我们通常是在beforeRouteEnter中加载一些首屏用数据,待数据收到后,再调用next勾子,通过回调的参数vm将数据绑定到实例上。
因此,请注意next的勾子是非常靠后的。
vi设计http://www.maiqicn.com 办公资源网站大全https://www.wode007.com
越早注册的nextTick触发越早。
原文:https://www.cnblogs.com/xiaonian8/p/13714401.html