设计模式(Design pattern)是一套被反复使用、多数人知晓的、经过分类编目的、代码设计经验的总结。使用设计模式是为了可重用代码、让代码更容易被他人理解、保证代码可靠性。 毫无疑问,设计模式于己于他人于系统都是多赢的,设计模式使代码编制真正工程化,设计模式是软件工程的基石,如同大厦的一块块砖石一样。项目中合理的运用设计模式可以完美的解决很多问题,每种模式在现在中都有相应的原理来与之对应,每一个模式描述了一个在我们周围不断重复发生的问题,以及该问题的核心解决方案,这也是它能被广泛应用的原因。可以理解为:
模式:在某些场景下,针对某类问题的某种通用的解决方案。
场景:项目所在的环境
问题:约束条件,项目目标等
解决方案:通用、可复用的设计,解决约束达到目标。
创建型模式:对象实例化的模式,创建型模式用于解耦对象的实例化过程。
结构型模式:把类或对象结合在一起形成一个更大的结构。
行为型模式:类和对象如何交互,及划分责任和算法。
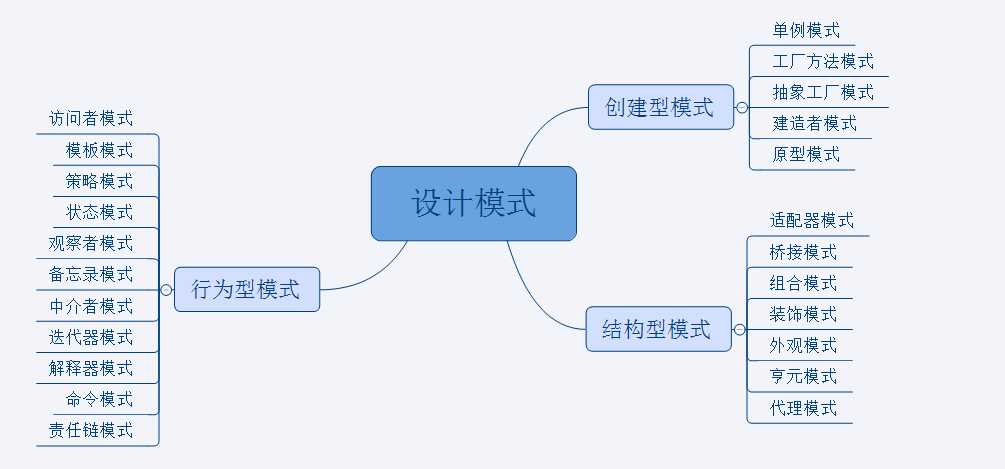
创建型模式:
单例模式:某个类只能有一个实例,提供一个全局的访问点。
简单工厂:一个工厂类根据传入的参量决定创建出那一种产品类的实例。
工厂方法:定义一个创建对象的接口,让子类决定实例化那个类。
抽象工厂:创建相关或依赖对象的家族,而无需明确指定具体类。
建造者模式:封装一个复杂对象的构建过程,并可以按步骤构造。
原型模式:通过复制现有的实例来创建新的实例。
结构型模式:
适配器模式:将一个类的方法接口转换成客户希望的另外一个接口。
桥接模式:将抽象部分和它的实现部分分离,使它们都可以独立的变化。
组合模式:将对象组合成树形结构以表示“”部分-整体“”的层次结构。
装饰模式:动态的给对象添加新的功能。
外观模式:对外提供一个统一的方法,来访问子系统中的一群接口。
亨元(蝇量)模式:通过共享技术来有效的支持大量细粒度的对象。
代理模式:为其他对象提供一个代理以便控制这个对象的访问。
行为型模式:
访问者模式:在不改变数据结构的前提下,增加作用于一组对象元素的新功能。
模板模式:定义一个算法结构,而将一些步骤延迟到子类实现。
策略模式:定义一系列算法,把他们封装起来,并且使它们可以相互替换。
状态模式:允许一个对象在其对象内部状态改变时改变它的行为。
观察者模式:对象间的一对多的依赖关系。
备忘录模式:在不破坏封装的前提下,保持对象的内部状态。
中介者模式:用一个中介对象来封装一系列的对象交互。
迭代器模式:一种遍历访问聚合对象中各个元素的方法,不暴露该对象的内部结构。
解释器模式:给定一个语言,定义它的文法的一种表示,并定义一个解释器。
命令模式:将命令请求封装为一个对象,使得可以用不同的请求来进行参数化。
责任链模式:将请求的发送者和接收者解耦,使的多个对象都有处理这个请求的机会。
单例模式,它的定义就是确保某一个类只有一个实例,并且提供一个全局访问点。
因此当系统中只需要一个实例对象或者系统中只允许一个公共访问点,除了这个公共访问点外,不能通过其他访问点访问该实例时,可以使用单例模式。
单例模式的优点:
单例模式的缺点:
单例模式的使用场景:
单例模式的实现举例如下:

// 饿汉式单例
public class Singleton {

    // 指向自己实例的私有静态引用,主动创建
    private static Singleton singleton = new Singleton();

    // 私有的构造方法
    private Singleton(){}

    // 以自己实例为返回值的静态的公有方法,静态工厂方法
    public static Singleton getSingleton(){
        return singleton;
    }
}
类加载的方式是按需加载,且加载一次。上述单例类被加载时,就会实例化一个对象并交给自己的引用,供系统使用;而且,由于这个类在整个生命周期中只会被加载一次,因此只会创建一个实例,即能够充分保证单例。
// 懒汉式单例
public class Singleton {

    // 指向自己实例的私有静态引用
    private static Singleton singleton;

    // 私有的构造方法
    private Singleton(){}

    // 以自己实例为返回值的静态的公有方法,静态工厂方法
    public static Singleton getSingleton(){
        // 被动创建,在真正需要使用时才去创建
        if (singleton == null) {
            singleton = new Singleton();
        }
        return singleton;
    }
}
从懒汉式单例可以看到,单例实例被延迟加载,即只有在真正使用的时候才会实例化一个对象并交给自己的引用。
这种写法起到了Lazy Loading的效果,但是只能在单线程下使用。如果在多线程下,一个线程进入了if (singleton == null)判断语句块,还未来得及往下执行,另一个线程也通过了这个判断语句,这时便会产生多个实例。所以在多线程环境下不可使用这种方式。
//双重加锁创建单例
public class Singleton{
    private static Singleton instance;
    //程序运行时创建一个静态只读的进程辅助对象
    private static readonly object syncRoot = new object();
    private Singleton() { }
    public static Singleton GetInstance(){
        //先判断是否存在,不存在再加锁处理
        if (instance == null){
            //在同一个时刻加了锁的那部分程序只有一个线程可以进入
            synchronized(syncRoot){
                if (instance == null){
                    instance = new Singleton();
                }
            }
        }
        return instance;
    }
}
如代码中所示,我们进行了两次if (singleton == null)检查,这样就可以保证线程安全了。这样,实例化代码只用执行一次,后面再次访问时,判断if (singleton == null),直接return实例化对象。
使用双重检测同步延迟加载去创建单例的做法是一个非常优秀的做法,其不但保证了单例,而且切实提高了程序运行效率
优点:线程安全;延迟加载;效率较高。
//静态代码块实现线程单例
public class SingletonUtils{
    //在第一次引用类的任何成员时创建实例,公共语言运行库负责处理变量初始化
    private static Queue<Bean> queue = new ConcurrentLinkedQueue<Bean>();
    static {
        new Thread(new Runnable() {
            public void run() {
                SingletonUtils.start();
            }
        }).start();
    }
    public static void addData(Bean bean) {
        queue.add(bean);
    }
    private static void start() {
        while (true) {
            while (!queue.isEmpty()) {
                try {
                    //处理数据方法
                    handleData(queue.poll());
                    Thread.yield();
                    Thread.sleep(10);
                } catch (Exception e) {
                    e.printStackTrace();
                }
            }
            Thread.yield();
            Thread.sleep(1000);
        }
    }
}
单例模式的实现方法还有很多。但是,这四种是比较经典的实现,也是我们应该掌握的几种实现方式。从这四种实现中,我们可以总结出,要想实现效率高的线程安全的单例,我们必须注意以下两点:
简单工厂,它的定义就是提供一个创建对象实例的功能,而无须关心其具体实现。被创建实例的类型可以是接口、抽象类,也可以是具体的类。
简单工厂就相当于创建实例对象的new,我们经常要根据类Class生成实例对象,如A a=new A() 工厂模式也是用来创建实例对象的,所以以后new时就要多个心眼,是否可以考虑实用工厂模式,虽然这样做,可能多做一些工作,但会给你系统带来更大的可扩展性和尽量少的修改量。
简单工厂的优点:
简单工厂的缺点:
简单工厂的使用场景:
简单工厂的实现举例如下:
/*抽象接口
 */
interface Colour {
    /*获得相应的颜色
     */
    public void get();
}
/*红色对抽象接口的实现
 */
class RedColour implements Colour{
    //获取一份红色的颜料
    public void get(){
        System.out.println("我要一份红色的颜料");
    }
}
/*黄色对抽象接口的实现
 */
class YellowColour implements Colour{
    //获取一份黄色的颜料
    public void get(){
        System.out.println("我要一份黄色的颜料");
    }
}
class ColourFactory {
    public static Colour getColour(String type){
        try {
            if(type.equalsIgnoreCase("redColour")) {
                return RedColour.class.newInstance();
            } else if(type.equalsIgnoreCase("yellowColour")) {
                return YellowColour.class.newInstance();
            } else {
                System.out.println("找不到相应的实例化类!");
                return null;
            }
        } catch (Exception e) {
            System.out.println("实例化类出现异常,异常原因为:"+e.getMessage());
            e.printStackTrace();
            return null;
        }
    }
}

public class Test{
    public static void main(String[] args) {
        //实例化各种颜料
        Colour redColour = ColourFactory.getColour("redColour");
        Colour yellowColour = ColourFactory.getColour("yellowColour");
        //获取颜料
        if(redColour!=null){
            redColour.get();
        }
        if(yellowColour!=null){
            yellowColour.get();
        }
    }
}
运行结果
我要一份红色的颜料
我要一份黄色的颜料
简单工厂模式相对于23种设计模式来说要简单一些,在我们不知不觉中可能已经用过很多次简单工厂模式——尽管我们当初并不知道。
工厂方法,它的定义就是定义了一个创建对象的接口,但由子类决定要实例化的类是哪一个,也就是说工厂方法模式让实例化推迟到子类。
工厂方法模式中,工厂父类负责定义创建产品对象的公共接口,而工厂子类负责生成具体的产品对象,这样做的目的是将产品类的实例操作延迟到工厂子类中完成,即通过工厂子类来确定究竟应该实例化哪一个具体产品类。
工厂方法的优点:
工厂方法的缺点:
工厂方法的使用场景:
工厂方法的实现举例如下:
/**抽象接口
 */
interface Sender {
    //发送信息
    public void Send();
}
/**发送eEmail对抽象接口的实现
 */
class EmailSender implements Sender {
    public void Send() {
        System.out.println("this is eMailsender!");
    }
}
/**发送短信对抽象接口的实现
 */
class SmsSender implements Sender {
    public void Send() {
        System.out.println("this is sms sender!");
    }
}
/**抽象工厂接口
 */
interface Provider {
    public Sender produce();
}
/**发送邮件工厂子类
 */
class SendEmailFactory implements Provider {
    public Sender produce(){
        return new EmailSender();
    }
}
/**发送短信工厂子类
 */
class SendSmsFactory implements Provider{
    public Sender produce() {
        return new SmsSender();
    }
}

public class Test{
    public static void main(String[] args) {
        Provider provider = null;
        provider = new SendEmailFactory();
        Sender sender = provider.produce();
        sender.Send();

        provider = new SendSmsFactory();
        sender = provider.produce();
        sender.Send();
    }
}
运行结果
this is eMailsender!
this is sms sender!
这个模式的好处就是,如果你现在想增加一个功能:发及时信息,则只需做一个实现类,实现Sender接口,同时做一个工厂类,实现Provider接口,就OK了,无需去改动现成的代码。这样做,拓展性较好!
工厂方法的特点:
抽象工厂,它的定义就是提供一个接口,用于创建相关或者依赖对象的家族,而不需要明确指定具体类。
抽象工厂的优点:
抽象工厂的缺点:
抽象工厂的使用场景:
抽象工厂的实现举例如下:
/**抽象接口
 */
interface Fruit {
    public void get();
}
/**苹果抽象类
 */
abstract class Apple implements Fruit{
    public abstract void get();
}
/**香蕉抽象类
 */
abstract class Banana implements Fruit{
    public abstract void get();
}
/**中国苹果抽象类
 */
class ChinaApple extends Apple {
    public void get() {
        System.out.println("中国的苹果...");
    }
}
/**英国苹果抽象类
 */
class EnglandApple extends Apple {
    public void get() {
        System.out.println("英国的苹果...");
    }
}
/**中国香蕉抽象类
 */
class ChinaBanana extends Banana {
    public void get() {
        System.out.println("中国的香蕉...");
    }
}
/**英国香蕉抽象类
 */
class EnglandBanana extends Banana {
    public void get() {
        System.out.println("英国的香蕉...");
    }
}
/**抽象工厂接口
 */
interface FruitFactory {
    //实例化苹果
    public Fruit getApple();
    //实例化香蕉
    public Fruit getBanana();
}
/**中国的工厂实现类
 */
class ChinaFactory implements FruitFactory {
    public Fruit getApple() {
        return new ChinaApple();
    }
    public Fruit getBanana() {
        return new ChinaBanana();
    }
}
/**英国的工厂实现类
 */
class EnglandFactory implements FruitFactory {
    public Fruit getApple() {
        return new EnglandApple();
    }
    public Fruit getBanana() {
        return new EnglandBanana();
    }
}
public class Test{
    public static void main(String[] args) {
        //创建中国工厂
        FruitFactory chinaFactory = new ChinaFactory();
        //通过中国工厂生产中国苹果实例
        Fruit apple = chinaFactory.getApple();
        apple.get();
        //通过中国工厂生产中国香蕉实例
        Fruit banana = chinaFactory.getBanana();
        banana.get();

        //创建英国工厂
        FruitFactory englandFactory = new EnglandFactory();
        //通过英国工厂生产英国苹果实例
        apple = englandFactory.getApple();
        apple.get();
        //通过英国工厂生产英国香蕉实例
        banana = englandFactory.getBanana();
        banana.get();
    }
}
建造者模式,它的定义就将一个复杂对象的构建与它表示分离,使得同样的构建过程可以创建不同的表示。
建造者模式的优点:
建造者模式的缺点:
建造者模式的使用场景:
建造者模式的实现举例如下:
/**产品类Product,由多个部件组成
 */
class Product{
  List<String> parts = new ArrayList<String>();
  //添加产品部件
  public void add(String part){
      parts.add(part);
  }
  public void show(){
      System.out.println("创建产品");
      for (String part : parts){
          System.out.println(part);
      }
  }
}
/**抽象建造者类Builder
 */
abstract class Builder{
    public abstract void BuilderPartA();
    public abstract void BuilderPartB();
    public abstract Product GetResult();
}
//具体建造者类ComponentBuilder1
class ComponentBuilder1 extends Builder{
  private Product product = new Product();
  //建造具体的两个部件
  public void BuilderPartA(){
      product.add("部件A");
  }
  public void BuilderPartB(){
      product.add("部件B");
  }
  public Product GetResult(){
      return product;
  }
}
//具体建造者类ComponentBuilder2
class ComponentBuilder2 extends Builder{
  private Product product = new Product();
  //建造具体的两个部件
  public void BuilderPartA(){
      product.add("部件C");
  }
  public void BuilderPartB(){
      product.add("部件D");
  }
  public Product GetResult(){
      return product;
  }
}
/**指挥者类Director
 */
class Director{
    public void Construct(Builder builder){
        //用来指挥建造过程
        builder.BuilderPartA();
        builder.BuilderPartB();
    }
}
public class Test{
    public static void main(String[] args) {
        Director director = new Director();
        Builder b1 = new ComponentBuilder1();
        Builder b2 = new ComponentBuilder2();

        //指挥者用ConcreteBuilder1方法建造产品
        director.Construct(b1);
        Product p1 = b1.GetResult();
        p1.show();

        //指挥者用ConcreteBuilder2方法建造产品
        director.Construct(b2);
        Product p2 = b2.GetResult();
        p2.show();
    }
}
建造者模式的使用场合是当创建复杂对象时,把创建对象成员和装配方法分离出来,放在建造者类中去实现,用户使用该复杂对象时,不用理会它的创建和装配过程,只关心它的表示形式。
建造者模式与抽象工厂模式的比较:
原型模式,它的定义是用原型实例指定创建对象的种类,并通过拷贝这些原型创建新的对象。
原型模式的优点:
原型模式的缺点:
原型模式的使用场景:
原型模式的实现举例如下:
public class Data {
    public static void main(String[] args) {
        CloneComply cloneComply = new CloneComply();
        CloneComply cloneComply2 = cloneComply.clone();
    }
}
/**Cloneable实现类
 */
class CloneComply implements Cloneable {
    public CloneComply(){
        System.out.println("我来了......");
    }
    public void setName(String name) {
        this.setName(name);
    }

    public String getName() {
        return this.getName();
    }

    @Override
    protected CloneComply clone(){
        CloneComply cloneComply = null;
        try {
            cloneComply = (CloneComply) super.clone();
        }catch (CloneNotSupportedException e){
            e.printStackTrace();
        }
        return cloneComply;
    }
}
运行结果
我来了......
可以看到只输出了一次,证明了对象拷贝的时候构造函数是不会执行的,原因在于拷贝是直接在堆中进行,这其实也可以理解,new的时候,JVM要走一趟类加载流程,这个流程非常麻烦,在类加载流程中会调用构造函数,最后生成的对象会放到堆中,而拷贝就是直接拷贝堆中的现成的二进制对象,然后重新一个分配内存块。
public class Test{
    public static void main(String[] args) {
        CloneComply cloneComply = new CloneComply();
        cloneComply.setName("我来了......");
        System.out.println(cloneComply.getName());

        CloneComply cloneComply2 = cloneComply.clone();
        System.out.println(cloneComply2.getName());
    }
}
/**产品类Product
 */
class Product{
    private String name;

    public String getName() {
        return name;
    }

    public void setName(String name) {
        this.name = name;
    }
}
/**Cloneable实现类
 */
class CloneComply implements Cloneable {
    private Product product = new Product();

    public void setName(String name) {
        this.product.setName(name);
    }

    public String getName() {
        return this.product.getName();
    }

    @Override
    protected CloneComply clone(){
        CloneComply cloneComply = null;
        try {
            cloneComply = (CloneComply) super.clone();
        }catch (CloneNotSupportedException e){
            e.printStackTrace();
        }
        return cloneComply;
    }
}
运行结果
我来了......
我来了......
可以看到两次输出结果都是一样的,这就是浅拷贝,浅拷贝是指在拷贝对象时,对于基本数据类型的变量会重新复制一份,而对于引用类型的变量只是对直接引用进行拷贝,没有对直接引用指向的对象进行拷贝。
public class Data {
    public static void main(String[] args) {
        CloneComply cloneComply = new CloneComply();
        cloneComply.setName("我来了......");
        System.out.println(cloneComply.getName());

        CloneComply cloneComply2 = cloneComply.clone();
        System.out.println(cloneComply2.getName());
    }
}
/**产品类Product
 */
class Product{
    private String name;

    public String getName() {
        return name;
    }

    public void setName(String name) {
        this.name = name;
    }
}
/**Cloneable实现类
 */
class CloneComply implements Cloneable {
    private Product product = new Product();

    public void setName(String name) {
        this.product.setName(name);
    }

    public String getName() {
        return this.product.getName();
    }

    @Override
    protected CloneComply clone(){
        CloneComply cloneComply = null;
        try {
            cloneComply = (CloneComply) super.clone();
            cloneComply.product = new Product();
        }catch (CloneNotSupportedException e){
            e.printStackTrace();
        }
        return cloneComply;
    }
}
运行结果
我来了......
null
这样就实现了完全的拷贝,两个对象之间没有任何瓜葛,你改你的,我改我的,互不影响,这种拷贝就叫做深拷贝。
适配器模式,它的定义是将一个类的接口转换成客户希望的另外一个接口,适配器模式使得原本由于接口不兼容而不能在一起工作的那些类可以一起工作。
适配器模式的优点:
适配器模式的缺点:
适配器模式的使用场景:
适配器模式的实现举例如下:
public class Test{
    public static void main(String[] args) {
        // 使用普通功能类
        Target concreteTarget = new ConcreteTarget();// 实例化一个普通类
        concreteTarget.request();

        // 使用特殊功能类,即适配类
        Target adapter = new Adapter();
        adapter.request();
    }
}
// 已存在的、具有特殊功能、但不符合我们既有的标准接口的类
class Adaptee {
    public void specificRequest() {
        System.out.println("被适配类 具有特殊功能...");
    }
}
// 目标接口,或称为标准接口
interface Target {
    public void request();
}
// 具体目标类,只提供普通功能
class ConcreteTarget implements Target {
    public void request() {
        System.out.println("普通类 具有普通功能...");
    }
}
// 适配器类,继承了被适配类,同时实现标准接口
class Adapter extends Adaptee implements Target {
    public void request() {
        super.specificRequest();
    }
}
运行结果
普通类 具有普通功能...
被适配类 具有特殊功能...
上面这种实现的适配器称为类适配器,因为 Adapter 类既继承了 Adaptee (被适配类),也实现了 Target 接口(因为 Java 不支持多继承,所以这样来实现),在 Client 类中我们可以根据需要选择并创建任一种符合需求的子类,来实现具体功能。
public class Test{
    public static void main(String[] args) {
        // 使用普通功能类
        Target concreteTarget = new ConcreteTarget();
        concreteTarget.request();

        // 使用特殊功能类,即适配类,
        // 需要先创建一个被适配类的对象作为参数
        Target adapter = new Adapter(new Adaptee());
        adapter.request();
    }
}
// 已存在的、具有特殊功能、但不符合我们既有的标准接口的类
class Adaptee {
    public void specificRequest() {
        System.out.println("被适配类 具有特殊功能...");
    }
}
// 目标接口,或称为标准接口
interface Target {
    public void request();
}
// 具体目标类,只提供普通功能
class ConcreteTarget implements Target {
    public void request() {
        System.out.println("普通类 具有普通功能...");
    }
}
// 适配器类,直接关联被适配类,同时实现标准接口
class Adapter implements Target {
    // 直接关联被适配类
    private Adaptee adaptee;

    // 可以通过构造函数传入具体需要适配的被适配类对象
    public Adapter(Adaptee adaptee) {
        this.adaptee = adaptee;
    }

    public void request() {
        // 这里是使用委托的方式完成特殊功能
        this.adaptee.specificRequest();
    }
}
输出结果
普通类 具有普通功能...
被适配类 具有特殊功能...
上面这种实现的适配器称为对象适配器,它不是使用多继承或继承再实现的方式,而是使用直接关联,或者称为委托的方式。
桥接模式,它的定义是将抽象部分与它的实现部分分离,使它们都可以独立地变化。它是一种对象结构型模式,又称为柄体(Handle and Body)模式或接口(Interface)模式。
桥接模式的优点:
桥接模式的缺点:
桥接模式的使用场景:
桥接模式的实现举例如下:
public class Test{
    public static void main(String[] args) {
        // 大杯咖啡:原味
        new LargeCoffee(new PlainFlavor()).makeCoffee();
        // 大杯咖啡:加糖
        new LargeCoffee(new SugarFlavor()).makeCoffee();
        // 小杯咖啡:原味
        new SmallCoffee(new PlainFlavor()).makeCoffee();
        // 小杯咖啡:加糖
        new SmallCoffee(new SugarFlavor()).makeCoffee();
    }
}
// Implementor:有无糖
interface ICoffeeFlavor {
    String addWhat();
}
// ConcreteImplementor:原味
class PlainFlavor implements ICoffeeFlavor {
    @Override
    public String addWhat() {
        return "原味";
    }
}
// ConcreteImplementor:加糖
class SugarFlavor implements ICoffeeFlavor {
    @Override
    public String addWhat() {
        return "加糖";
    }
}
// Abstraction:咖啡
abstract class Coffee {
    protected ICoffeeFlavor mFlavor;

    public Coffee(ICoffeeFlavor flavor) {
        this.mFlavor = flavor;
    }

    public abstract void makeCoffee();
}
// RefinedAbstraction:大杯咖啡
class LargeCoffee extends Coffee {
    public LargeCoffee(ICoffeeFlavor flavor) {
        super(flavor);
    }

    @Override
    public void makeCoffee() {
        System.out.println("大杯咖啡: " + this.mFlavor.addWhat());
    }
}
// RefinedAbstraction:小杯咖啡
class SmallCoffee extends Coffee {
    public SmallCoffee(ICoffeeFlavor flavor) {
        super(flavor);
    }

    @Override
    public void makeCoffee() {
        System.out.println("小杯咖啡:" + this.mFlavor.addWhat());
    }
}
上面这个例子,我们采用桥接模式解耦了 “咖啡大小杯” 和 “有无糖(味道)” 这两个独立变化的维度。后续如果咖啡馆提供更多的服务,比如中杯咖啡,那么直接新建一个中杯类继承Coffee即可。如果是咖啡味道更改,比如可以加牛奶,蜂蜜等,那么同样只需新建一个类实现ICoffeeFlavor即可。
桥接模式遵循了设计模式里氏替换原则、依赖倒置原则,最终实现了 开闭原则,对修改关闭,对扩展开放。
组合模式,它的定义是将对象组合成树形结构以表示“部分-整体”的层次结构。组合模式使得用户可以使用一致的方法操作单个对象和组合对象。
组合模式的优点:
组合模式的缺点:
组合模式的使用场景:
组合模式的实现举例如下:
public class Test{
    public static void main(String[] args) {
        // 创建根节点
        Component root = new Composite("root");
        // 创建树枝节点
        Component branchA = new Composite("---branchA");
        Component branchB = new Composite("------branchB");
        // 创建叶子节点
        Component leafA = new Leaf("------leafA");
        Component leafB = new Leaf("---------leafB");
        Component leafC = new Leaf("---leafC");

        root.addChild(branchA);
        root.addChild(leafC);
        branchA.addChild(leafA);
        branchA.addChild(branchB);
        branchB.addChild(leafB);

        String result = root.operation();
        System.out.println(result);
    }
}
// 抽象根节点
abstract class Component {
    protected String name;

    public Component(String name) {
        this.name = name;
    }

    public abstract String operation();

    public boolean addChild(Component component) {
        throw new UnsupportedOperationException("addChild not supported!");
    }

    public boolean removeChild(Component component) {
        throw new UnsupportedOperationException("removeChild not supported!");
    }

    public Component getChild(int index) {
        throw new UnsupportedOperationException("getChild not supported!");
    }
}
// 树节点
class Composite extends Component {
    private List<Component> mComponents;

    public Composite(String name) {
        super(name);
        this.mComponents = new ArrayList<>();
    }

    @Override
    public String operation() {
        StringBuilder builder = new StringBuilder(this.name);
        for (Component component : this.mComponents) {
            builder.append("\n");
            builder.append(component.operation());
        }
        return builder.toString();
    }

    @Override
    public boolean addChild(Component component) {
        return this.mComponents.add(component);
    }

    @Override
    public boolean removeChild(Component component) {
        return this.mComponents.remove(component);
    }

    @Override
    public Component getChild(int index) {
        return this.mComponents.get(index);
    }
}
// 叶子节点
class Leaf extends Component {

    public Leaf(String name) {
        super(name);
    }

    @Override
    public String operation() {
        return this.name;
    }
}
运行结果
root
---branchA
------leafA
------branchB
---------leafB
---leafC
上面这种实现称为透明组合模式把所有公共方法都定义在Component中,这样做的好处是客户端无需分辨是叶子节点(Leaf)和树枝节点(Composite),它们具备完全一致的接口。缺点是叶子节点(Leaf)会继承得到一些它所不需要(管理子类操作的方法)的方法,这与设计模式接口隔离原则相违背。
透明组合模式 中,由于Component 包含叶子节点所不需要的方法,因此,直接将这些方法默认抛出UnsupportedOperationException异常。
public class Test{
    public static void main(String[] args) {
        // 创建根节点
        Composite root = new Composite("root");
        // 创建树枝节点
        Composite branchA = new Composite("---branchA");
        Composite branchB = new Composite("------branchB");
        // 创建叶子节点
        Component leafA = new Leaf("------leafA");
        Component leafB = new Leaf("---------leafB");
        Component leafC = new Leaf("---leafC");

        root.addChild(branchA);
        root.addChild(leafC);
        branchA.addChild(leafA);
        branchA.addChild(branchB);
        branchB.addChild(leafB);

        String result = root.operation();
        System.out.println(result);
    }
}
// 抽象根节点
abstract class Component {
    protected String name;

    public Component(String name) {
        this.name = name;
    }

    public abstract String operation();
}
// 树节点
class Composite extends Component {
    private List<Component> mComponents;

    public Composite(String name) {
        super(name);
        this.mComponents = new ArrayList<>();
    }

    @Override
    public String operation() {
        StringBuilder builder = new StringBuilder(this.name);
        for (Component component : this.mComponents) {
            builder.append("\n");
            builder.append(component.operation());
        }
        return builder.toString();
    }

    public boolean addChild(Component component) {
        return this.mComponents.add(component);
    }

    public boolean removeChild(Component component) {
        return this.mComponents.remove(component);
    }

    public Component getChild(int index) {
        return this.mComponents.get(index);
    }
}
// 叶子节点
class Leaf extends Component {

    public Leaf(String name) {
        super(name);
    }

    @Override
    public String operation() {
        return this.name;
    }
}
运行结果
root
---branchA
------leafA
------branchB
---------leafB
---leafC
上面这种实现称为安全组合模式统一行为(Component)只规定系统各个层次的最基础的一致行为,而把组合(树节点)本身的方法(管理子类对象的添加,删除等)放到自身当中。这样做的好处是接口定义职责清晰,符合设计模式单一职责原则和接口隔离原则。缺点是客户需要区分树枝节点(Composite)和叶子节点(Leaf),这样才能正确处理各个层次的操作,客户端无法依赖抽象(Component),违背了设计模式依赖倒置原则。
装饰模式,它的定义是允许向一个现有的对象添加新的功能,同时又不改变其结构。这种类型的设计模式属于结构型模式,它是作为现有的类的一个包装。
装饰模式的优点:
装饰模式的缺点:
装饰模式的使用场景:
装饰模式的实现举例如下:
public class Test{
    public static void main(String[] args) {
        IPerson person = new Man();
        person.dress();

        System.out.println("----------------------");
        System.out.println("增加裤子适配器");
        person = new TrousersDecorator(person);
        person.dress();
    }
}
// 抽象组件(Component)
interface IPerson {
    void dress();
}
// 具体组件(ConcreteComponent),即被修饰者
class Man implements IPerson {

    @Override
    public void dress() {
        System.out.println("穿了内裤!");
    }
}
// 抽象适配器(Decorator),接收一个具体的Component,本身也是一个Component
abstract class ClothesDecorator implements IPerson {
    protected IPerson mPerson;

    // 构造方法强制子类构造必须传入一个IPerson
    public ClothesDecorator(IPerson person) {
        this.mPerson = person;
    }

    @Override
    public void dress() {
        this.mPerson.dress();
    }
}
// 具体装饰器(ConcreteDecorator):裤子装饰器
class TrousersDecorator extends ClothesDecorator {

    public TrousersDecorator(IPerson person) {
        super(person);
    }

    @Override
    public void dress() {
        super.dress();
        this.dressTrousers();
    }

    private void dressTrousers() {
        System.out.println("穿上裤子了!");
    }
}
运行结果
穿了内裤!
----------------------
增加裤子适配器
穿了内裤!
穿上裤子了!
上面的举例中Man这个IPerson本身只穿了件内裤,衣裳不整,不能出门,因此我们使用装饰器为其增加了穿裤子的功能,最终满足了出门要求。
public class Test{
    public static void main(String[] args) {
        IPerson person = new TrousersDecorator(new Man());
        person.dress();
    }
}
// 抽象组件(Component)
interface IPerson {
    void dress();
}
// 具体组件(ConcreteComponent),即被修饰者
class Man implements IPerson {

    @Override
    public void dress() {
        System.out.println("穿了内裤!");
    }
}
// 抽象适配器(Decorator),接收一个具体的Component,本身也是一个Component
abstract class ClothesDecorator implements IPerson {
    protected IPerson mPerson;

    // 构造方法强制子类构造必须传入一个IPerson
    public ClothesDecorator(IPerson person) {
        this.mPerson = person;
    }

    @Override
    public void dress() {
        this.mPerson.dress();
    }
}
// 具体装饰器(ConcreteDecorator):裤子装饰器
class TrousersDecorator extends ClothesDecorator {

    public TrousersDecorator(IPerson person) {
        super(person);
    }

    @Override
    public void dress() {
        super.dress();
        this.dressTrousers();
    }

    private void dressTrousers() {
        System.out.println("穿上裤子了!");
    }
}
运行结果
穿了内裤!
穿上裤子了!
new Man()这个IPerson一件一件的进行衣服试穿,太浪费时间了,我们完全可以使用装饰器嵌套(因为装饰器接收一个IPerson,而自己同时也是一个IPerson,因此完全支持嵌套)模式,这样一次性就穿完。外观模式,它的定义是隐藏系统的复杂性,并向客户端提供了一个客户端可以访问系统的接口。这种类型的设计模式属于结构型模式,它向现有的系统添加一个接口,来隐藏系统的复杂性。
外观模式的优点:
外观模式的缺点:
外观模式的使用场景:
外观模式的实现举例如下:
public class Test{
    public static void main(String[] args) {
        MobilePhone s10 = new MobilePhone();
        s10.deil();
        s10.takePicture();
    }
}
/**
 * 外观类
 */
class MobilePhone {
    private Phone mPhone = new phoneImpl();
    private Camera mCamera = new CameraImpl();

    public void deil() {
        mPhone.dail();
    }

    public void close() {
        mPhone.hangup();
    }

    public void takePicture() {
        mCamera.takePicture();
    }
}
/**
 * 电话抽象接口
 */
interface Phone {
    // 打电话
    void dail();

    // 挂电话
    void hangup();
}
/**相机抽象接口
 */
interface Camera {
    // 拍照片
    void takePicture();
}
/**电话实现类
 */
class phoneImpl implements Phone {

    @Override
    public void dail() {
        System.out.println("打电话");
    }

    @Override
    public void hangup() {
        System.out.println("挂电话");
    }
}
/**相机实现类
 */
class CameraImpl implements Camera {

    @Override
    public void takePicture() {
        System.out.println("拍照片");
    }
}
亨元模式,它的定义是通过共享方式高效支持大量细粒度对象. 将一个对象抽象出内部属性作为蝇量对象 抽象出外部属性 作为管理外部状态。
亨元模式的优点:
亨元模式的缺点:
亨元模式的使用场景:
亨元模式的实现举例如下:
public class Test{
    public static void main(String[] args) {
        for (int i = 0; i < 4; i++) {
            String key = "test" + i;
            FlyweightFactory.getFlyweight(key);
        }
        Flyweight flyweight = FlyweightFactory.getFlyweight("test0");
        flyweight.operate();
    }
}
/**抽象享元角色
 */
abstract class Flyweight {
    private String intrinsic;
    // 外部状态
    protected final String Extrinsic;

    // 要求享元角色必须接受外部状态
    public Flyweight(String extrinsic) {
        Extrinsic = extrinsic;
    }

    // 定义业务操作
    public abstract void operate();

    // 内部状态的getter/setter
    public String getIntrinsic() {
        return intrinsic;
    }

    public void setIntrinsic(String intrinsic) {
        this.intrinsic = intrinsic;
    }
}
/**具体享元角色A
 */
class ConcreteFlyweightA extends Flyweight {
    // 接受外部状态
    public ConcreteFlyweightA(String extrinsic) {
        super(extrinsic);
    }

    // 根据外部状态进行逻辑处理
    @Override
    public void operate() {
        System.out.println("ConcreteFlyweightA");
    }
}
/**具体享元角色B
 */
class ConcreteFlyweightB extends Flyweight {
    // 接受外部状态
    public ConcreteFlyweightB(String extrinsic) {
        super(extrinsic);
    }

    // 根据外部状态进行逻辑处理
    @Override
    public void operate() {
        System.out.println("ConcreteFlyweightB");
    }
}
/**享元工厂
 */
class FlyweightFactory {
    // 定义一个池容器
    private static Map<String, Flyweight> pool = new HashMap<String, Flyweight>();

    public static Flyweight getFlyweight(String Extrinsic) {
        // 需要返回的对象
        Flyweight flyweight = null;

        // 在池中没有该对象
        if (pool.containsKey(Extrinsic)) {
            flyweight = pool.get(Extrinsic);
        } else {
            // 根据外部状态创建享元对象
            flyweight = new ConcreteFlyweightA(Extrinsic);
            // 放置到池中
            pool.put(Extrinsic, flyweight);
        }
        return flyweight;
    }
}
运行结果
ConcreteFlyweightA
上面的举例可以看出如果未找到匹配的对象,则创建新对象。享元模式(Flyweight Pattern)主要用于减少创建对象的数量,以减少内存占用和提高性能。
代理模式,它的定义是为其他对象提供一种代理以控制对这个对象的访问。
代理模式的优点:
代理模式的缺点:
代理模式的使用场景:
代理模式的实现举例如下:
public class Test{
    public static void main(String[] args) {
        Proxy proxy = new Proxy();
        proxy.request();
    }
}
/**抽象接口
 */
interface Subject {
    void request();
}
/**抽象接口实现类
 */
class RealSubject implements Subject{
    @Override
    public void request() {
        System.out.println("真实请求");
    }
}
/**代理实现类
 */
class Proxy implements Subject{

    private RealSubject realSubject;

    @Override
    public void request() {
        if (realSubject == null) {
            realSubject = new RealSubject();
        }
        realSubject.request();
        System.out.println("代理请求");
    }
}
运行结果
真实请求
代理请求
上面的举例可以看出在不修改目标对象的功能前提下,对目标功能扩展。这种实现称为静态代理,静态代理在使用时,需要定义接口或者父类,被代理对象
与代理对象一起实现相同的接口或者是继承相同父类。这种实现方式的缺点,因为代理对象需要与目标对象实现一样的接口,所以会有很多代理类,类太多。同时,一旦接口增加方法,目标对象与代理对象都要维护。
public class Test{
    public static void main(String[] args) {
        // 目标对象
        Subject target = new RealSubject();
        Subject proxy = (Subject)new ProxyFactory(target).getProxyInstance();
        proxy.request();
    }
}
/**抽象接口
 */
interface Subject {
    void request();
}
/**抽象接口实现类
 */
class RealSubject implements Subject{
    @Override
    public void request() {
        System.out.println("真实请求");
    }
}
/**
 * 创建动态代理对象
 * 动态代理不需要实现接口,但是需要指定接口类型
 */
class ProxyFactory{
    //维护一个目标对象
    private Object target;
    public ProxyFactory(Object target){
        this.target=target;
    }

   //给目标对象生成代理对象
    public Object getProxyInstance(){
        return Proxy.newProxyInstance(
                target.getClass().getClassLoader(),
                target.getClass().getInterfaces(), // 此处可不知道代理对象是什么接口
                new InvocationHandler() {
                    @Override
                    public Object invoke(Object proxy, Method method, Object[] args) throws Throwable {
                        System.out.println("请求前...");
                        //执行目标对象方法
                        Object returnValue = method.invoke(target, args);
                        System.out.println("请求后...");
                        return returnValue;
                    }
                }
        );
    }
}
运行结果
请求前...
真实请求
请求后...
上面的举例可以看出动态代理的关键,在于通过InvocationHandler和Proxy媒介,在运行时动态生成动态代理类,生成的动态代理类依然实现了Subject接口,并在调用方法时回调了InvocationHandler实现类的invoke方法,InvocationHandler实现类的invoke方法通过反射,回调了被代理实体的对应方法。
代理类所在包:java.lang.reflect.Proxy
JDK实现代理只需要使用newProxyInstance方法,但是该方法需要接收三个参数,完整的写法是:
方法内三个参数的意义是:
在Spring的AOP编程中:
pring-core-3.2.5.jar)。访问者模式,它的定义是将数据结构与数据操作分离。
访问者模式的优点:
访问者模式的缺点:
访问者模式的使用场景:
访问者模式的实现举例如下:
/**测试类
 */
public class Test{
    public static void main(String[] args) {
        List<Person> list = Allperson.getList();
        System.out.println("得到名字:");
        for(Person e: list){
            e.accept(new VisitorName());
        }
        System.out.println("得到年龄:");
        for(Person e: list){
            e.accept(new VisitorAge());
        }
    }
}
/**抽象类
 */
abstract class Person {
    public abstract void accept(IVisitor visitor);
}
/**学生类
 */
class Student extends Person {
    private String name;
    private int age;
    public Student(String name,int age){
        this.name = name;
        this.age = age;
    }

    public String getName() {
        return name;
    }

    public int getAge() {
        return age;
    }

    public void accept(IVisitor visitor) {
        visitor.visit(this);
    }
}
/**教师类
 */
class Teacher extends Person {
    private String name;
    private int age;
    public Teacher(String name,int age){
        this.name = name;
        this.age = age;
    }

    public int getAge() {
        return age;
    }

    public String getName() {
        return name;
    }

    public void accept(IVisitor visitor) {
        visitor.visit(this);
    }
}
/**访问者接口
 */
interface IVisitor {
    public void visit(Student student);
    public void visit(Teacher teacher);
}
/**访问者名称实现类
 */
class VisitorName implements IVisitor {

    public void visit(Student student) {
        System.out.println(student.getName());
    }

    public void visit(Teacher teacher) {
        System.out.println(teacher.getName());
    }
}
/**访问者年龄实现类
 */
class VisitorAge implements IVisitor {

    public void visit(Student student) {
        System.out.println(student.getAge());
    }

    public void visit(Teacher teacher) {
        System.out.println(teacher.getAge());
    }
}
/**人员类
 */
class Allperson {
    public static List<Person> getList(){
        List<Person> list = new ArrayList<Person>();
        Student s1 = new Student("路飞",20);
        Student s2 = new Student("索隆",19);
        Teacher t1 = new Teacher("红发",44);
        Teacher t2 = new Teacher("雷利",59);
        list.add(s1);
        list.add(s2);
        list.add(t1);
        list.add(t2);
        return list;
    }
}
运行结果
得到名字:
路飞
索隆
红发
雷利
得到年龄:
20
19
44
59
上面的例子中的策略就相当于依次访问各个元素的访问者,每个元素可以接受(accept)不同访问者作为参数,从而交由访问者做出不同的操作。
模板模式,它的定义是将不变的行为从子类搬到超类,去除了子类中的重复代码。
模板模式的优点:
模板模式的缺点:
模板模式的使用场景:
模板模式的实现举例如下:
/**测试类
 */
public class Test{
    public static void main(String[] args) {
        AbstractClass abstractClass;
        abstractClass = new ConcreteClassA();
        abstractClass.TemplateMethod();

        abstractClass = new ConcreteClassB();
        abstractClass.TemplateMethod();
    }
}
/**抽象模板类
 */
abstract class AbstractClass {
    public abstract void PrimitiveOperation1();
    public abstract void PrimitiveOperation2();

    public void TemplateMethod() {
        PrimitiveOperation1();
        PrimitiveOperation2();
    }
}
/**具体模板类A
 */
class ConcreteClassA extends AbstractClass {

    @Override
    public void PrimitiveOperation1() {
        System.out.println("具体方法A方法1实现");
    }

    @Override
    public void PrimitiveOperation2() {
        System.out.println("具体方法A方法2实现");
    }
}
/**具体模板类B
 */
class ConcreteClassB extends AbstractClass {

    @Override
    public void PrimitiveOperation1() {
        System.out.println("具体方法B方法1实现");
    }

    @Override
    public void PrimitiveOperation2() {
        System.out.println("具体方法B方法2实现");
    }
}
上面的例子中使用模板模式做的,父类中做了算法骨架,子类中具体实现算法中的不同部分。
策略模式,它的定义是对象具备某个行为,但是在不同的场景中,该行为有不同的实现算法。
策略模式的优点:
策略模式的缺点:
策略模式的使用场景:
策略模式的实现举例如下:
/**测试类
 */
public class Test{
    public static void main(String[] args) {
        Context context = new Context(new OperationAdd());
        System.out.println("10 + 5 = " + context.executeStrategy(10, 5));

        context = new Context(new OperationSubtract());
        System.out.println("10 - 5 = " + context.executeStrategy(10, 5));

        context = new Context(new OperationMultiply());
        System.out.println("10 * 5 = " + context.executeStrategy(10, 5));
    }
}
/**策略接口
 */
interface Strategy {
   //算法方法
   public int doOperation(int num1, int num2);
}
/**加法具体策略类
 */
class OperationAdd implements Strategy{
   @Override
   public int doOperation(int num1, int num2) {
      return num1 + num2;
   }
}
/**减法具体策略类
 */
class OperationSubtract implements Strategy{
   @Override
   public int doOperation(int num1, int num2) {
      return num1 - num2;
   }
}
/**乘法具体策略类
 */
class OperationMultiply implements Strategy{
   @Override
   public int doOperation(int num1, int num2) {
      return num1 * num2;
   }
}
/**Context上下文
 */
class Context {
   private Strategy strategy;

   public Context(Strategy strategy){
      this.strategy = strategy;
   }

   public int executeStrategy(int num1, int num2){
      return strategy.doOperation(num1, num2);
   }
}
运行结果
10 + 5 = 15
10 - 5 = 5
10 * 5 = 50
上面的例子中,我们可以看到,我们完全消除了对运算符号进行判断的哪些if...else的冗余代码,取而代之的是客户端直接决定使用哪种算法,然后交由上下文获取结果。
状态模式,它的定义是当一个对象的内在状态改变时允许改变其行为,这个对象看起来像是改变了其类。
状态模式的优点:
状态模式的缺点:
状态模式的使用场景:
状态模式的实现举例如下:
/**测试类
 */
public class Test{
    public static void main(String[] args) {
        Context context = new Context();

        StartState startState = new StartState();
        startState.doAction(context);
        System.out.println(context.getState().toString());

        StopState stopState = new StopState();
        stopState.doAction(context);
        System.out.println(context.getState().toString());
    }
}
/**状态接口
 */
interface State {
   public void doAction(Context context);
}
/**开始状态实现类
 */
class StartState implements State {
   public void doAction(Context context) {
      System.out.println("Player is in start state");
      context.setState(this);
   }

   public String toString(){
      return "Start State";
   }
}
/**停止状态实现类
 */
class StopState implements State {
   public void doAction(Context context) {
      System.out.println("Player is in stop state");
      context.setState(this);
   }

   public String toString(){
      return "Stop State";
   }
}
/**状态类
 */
class Context {
   private State state;

   public Context(){
      state = null;
   }

   public void setState(State state){
      this.state = state;
   }

   public State getState(){
      return state;
   }
}
运行结果
Player is in start state
Start State
Player is in stop state
Stop State
上面的例子中,我们可以看到具体状态由State接口的实现类实现,具体过渡由Context实现,State负责对所有状态的封装,也是依赖倒置原则的体现。
观察者模式,它的定义在对象之间定义了一对多的依赖,这样一来,当一个对象改变状态,依赖它的对象会收到通知并自动更新。
观察者模式的优点:
观察者模式的缺点:
观察者模式的使用场景:
观察者模式的实现举例如下:
/**测试类
 */
public class Test{
    public static void main(String[] args) {
        //前台为通知者
        Secretary secretary = new Secretary();

        StockObserver observer = new StockObserver("adam", secretary);
        StockObserver observer2 = new StockObserver("tom", secretary);

        //前台通知
        secretary.attach(observer);
        secretary.attach(observer2);

        //adam没被前台通知到,所以被老板抓了个现行
        secretary.detach(observer);

        //老板回来了
        secretary.setAction("小心!Boss回来了!");
        //发通知
        secretary.notifyObservers();
    }
}
/**观察者抽象类
 */
abstract class Observer {
    protected String name;
    protected Subject subject;

    public Observer(String name, Subject subject) {
        this.name = name;
        this.subject = subject;
    }

    public abstract void update();
}
/**通知者接口
 */
interface Subject {
    //增加
    public void attach(Observer observer);
    //删除
    public void detach(Observer observer);
    //通知
    public void notifyObservers();

    //状态
    public void setAction(String action);
    public String getAction();
}
/**具体通知者实现类
 */
class Secretary implements Subject {
    //同事列表
    private List<Observer> observers = new LinkedList<>();
    private String action;

    //添加
    @Override
    public void attach(Observer observer) {
        observers.add(observer);
    }

    //删除
    @Override
    public void detach(Observer observer) {
        observers.remove(observer);
    }

    //通知
    @Override
    public void notifyObservers() {
        for(Observer observer : observers) {
            observer.update();
        }
    }

    //前台状态
    @Override
    public String getAction() {
        return action;
    }

    @Override
    public void setAction(String action) {
        this.action = action;
    }
}
/**具体观察者实现类
 */
class StockObserver extends Observer {
    public StockObserver(String name, Subject subject) {
        super(name, subject);
    }

    @Override
    public void update() {
        System.out.println(subject.getAction() + "\n" + name + "关闭股票行情,继续工作");
    }
}
运行结果
小心!Boss回来了!
tom关闭股票行情,继续工作
上面的例子中,我们可以看到,每当被观察者有所举动,且此举动是需要通知的,那么观察者就会收到相应消息,并作出相应的举动。
备忘录模式,它的定义是在不破坏封装性的前提下,捕获一个对象的内部状态,并在该对象之外保存着这个状态。这样,以后就可以将该对象恢复到原先保存的状态。
备忘录模式的优点:
备忘录模式的缺点:
备忘录模式的使用场景:
备忘录模式的实现举例如下:
/**测试类
 */
public class Test{
    public static void main(String[] args) {
        Game game = new Game();
        game.playGame();
        try {
            //玩了一会
            Thread.sleep(1000);
        } catch (InterruptedException e) {
            e.printStackTrace();
        }
        //暂停游戏
        game.exitGame();
        GameManager.getGameManager().saveGameInfo(game.saveGameInfo());

        //恢复游戏
        game.resetGame(GameManager.getGameManager().getGameInfo());
    }
}
/**备忘录类
 */
class GameInfo {
    //开始的总时长
    private int time;
    // 当前的等级
    private int level;

    public GameInfo(int time, int level) {
        this.time = time;
        this.level = level;
    }

    public int getTime() {
        return time;
    }

    public void setTime(int time) {
        this.time = time;
    }

    public int getLevel() {
        return level;
    }

    public void setLevel(int level) {
        this.level = level;
    }
}
/**备忘录管理者类
 */
class GameManager {
    private GameInfo mGameInfo;

    private static volatile GameManager instance;

    private GameManager() {
    }

    public static GameManager getGameManager() {
        if (instance == null) {
            synchronized (GameManager.class) {
                if (instance == null) {
                    instance = new GameManager();
                }
            }
        }
        return instance;
    }

    /**保存游戏信息
     */
    public void saveGameInfo(GameInfo gameInfo) {
        mGameInfo = gameInfo;
    }

    /**读取游戏信息
     */
    public GameInfo getGameInfo() {
        return mGameInfo;
    }
}
/**游戏类
 */
class Game {
    //开始的总时长
    private int time;

    // 当前的等级
    private int level;

    // 是否退出
    private boolean isExit = false;

    /**
     * 开始一把排位
     */
    public void playGame() {
        new Thread(new Runnable() {

            @Override
            public void run() {
                while (!isExit) {
                    System.out.println("游戏开始了:" + time + "分钟,等级:" + level);
                    time++;
                    level++;
                    try {
                        Thread.sleep(100);
                    } catch (InterruptedException e) {
                        e.printStackTrace();
                    }
                }
            }
        }).start();
    }

    /**来电话了,退出当前游戏
     */
    public void exitGame() {
        isExit = true;
        System.out.println("=====来电话了,退出当前游戏=====");
        System.out.println("游戏开始了:" + time + "分钟,等级:" + level);
    }

    /**保存获取当前游戏信息
     */
    public GameInfo saveGameInfo() {
        return new GameInfo(time, level);
    }

    /**重新加载游戏
     */
    public void resetGame(GameInfo gameInfo) {
        time = gameInfo.getTime();
        level = gameInfo.getLevel();
        System.out.println("=====恢复游戏=====");
        System.out.println("游戏开始了:" + time + "分钟,等级:" + level);
    }
}
上面的例子中,我们可以看到,它提供了一种状态恢复的实现机制,使得用户可以方便地回到一个特定的历史步骤,当新的状态无效或者存在问题时,可以使用暂时存储起来的备忘录将状态复原。
中介者模式,它的定义是用一个中介对象来封装一系列的对象交互,中介者使各对象不需要显式地相互引用,从而使其耦合松散,而且可以独立地改变它们之间的交互。
中介者模式的优点:
中介者模式的缺点:
中介者模式的使用场景:
中介者模式的实现举例如下:
/**测试类
 */
public class Test{
    public static void main(String[] args) {
        User robert = new User("Robert");
        User john = new User("John");

        robert.sendMessage("Hi! John!");
        john.sendMessage("Hello! Robert!");
    }
}
/**用户实体类
 */
class User {
   private String name;

   public String getName() {
      return name;
   }

   public void setName(String name) {
      this.name = name;
   }

   public User(String name){
      this.name  = name;
   }

   public void sendMessage(String message){
      ChatRoom.showMessage(this,message);
   }
}
/**中介类
 */
class ChatRoom {
   public static void showMessage(User user, String message){
      System.out.println(new Date().toString()
         + " [" + user.getName() +"] : " + message);
   }
}
运行结果
Thu Jan 31 16:05:46 IST 2020 [Robert] : Hi! John!
Thu Jan 31 16:05:46 IST 2020 [John] : Hello! Robert!
上面的例子中,我们可以看到,中介者模式它会使代码更容易维护。它能够实现类之间的松散耦合。只有中介者这一个类知道所有的类,其他类只需要与中介者进行交互即可,当然更加集中的控制也会带来中枢的庞大,还是需要避免过度的集成。
迭代器模式,它的定义是提供一种方法顺序访问一个聚合对象中的各种元素,而又不暴露该对象的内部表示。
迭代器模式的优点:
迭代器模式的缺点:
迭代器模式的使用场景:
迭代器模式的实现举例如下:
/**测试类
 */
public class Test{
    public static void main(String[] args) {
        NameRepository namesRepository = new NameRepository();
        for(Iterator iter = namesRepository.getIterator(); iter.hasNext();){
            String name = (String)iter.next();
            System.out.println("Name : " + name);
        }
    }
}
/**迭代器接口
 */
interface Iterator {
   public boolean hasNext();//是否存在下一个元素
   public Object next();//下个元素
}
/**返回迭代器接口
 */
interface Container {
   public Iterator getIterator();
}
/**迭代器实现类
 */
class NameRepository implements Container {
   public String names[] = {"Robert" , "John" ,"Julie" , "Lora"};

   @Override
   public Iterator getIterator() {
      return new NameIterator();
   }

   private class NameIterator implements Iterator {
      int index;
      public boolean hasNext() {
         if(index < names.length){
            return true;
         }
         return false;
      }

      public Object next() {
         if(this.hasNext()){
            return names[index++];
         }
         return null;
      }
   }
}
运行结果
Name : Robert
Name : John
Name : Julie
Name : Lora
上面的例子中,我们可以看到,迭代器模式就是抽象一个迭代器类来分离了集合对象的遍历行为,这样既可以做到不暴露集合的内部结构,又可让外部代码透明地访问集合内部的数据。
解释器模式,它的定义是给定一个语言,定义它的文法的一种表示,并定义一个解释器,这个解释器使用该表示来解释语言中的句子。
解释器模式的优点:
解释器模式的缺点:
解释器模式的使用场景:
解释器模式的实现举例如下:
/**测试类
 */
public class Test{
    public static void main(String[] args) {
        String expStr = "a + b - c";
        System.out.println("输入表达式:"+expStr);
        HashMap<String, Integer> var = new HashMap<>();
        var.put("a", 10);
        var.put("b", 5);
        var.put("c", 3);
        System.out.println("a的值:"+var.get("a"));
        System.out.println("b的值:"+var.get("b"));
        System.out.println("c的值:"+var.get("c"));
        Calculator calculator = new Calculator(expStr);
        System.out.println("运算结果:" + expStr + " = " + calculator.run(var));
    }
}
/**表达式接口
 */
interface Expression {
    //解析公式和数值,key是公式中的参数,value是具体的数值
   public int interpreter(HashMap<String, Integer> var);
}
/**变量解析器
 */
class VarExpression implements Expression {
    private String key;
    public VarExpression(String key) {
        this.key = key;
    }
    @Override
    public int interpreter(HashMap<String, Integer> var) {
        return var.get(this.key);
    }
}
/**运算符号解析器
 */
class SymbolExpression implements Expression {
    protected Expression left;
    protected Expression right;

    public SymbolExpression(Expression left, Expression right) {
        this.left = left;
        this.right = right;
    }

    public int interpreter(HashMap<String, Integer> var) {
        return 0;
    }
}
/**加法解析器
 */
class AddExpression extends SymbolExpression {
    public AddExpression(Expression left, Expression right) {
        super(left, right);
    }

    public int interpreter(HashMap<String, Integer> var) {
        return super.left.interpreter(var) + super.right.interpreter(var);
    }
}
/**减法解析器
 */
class SubExpression extends SymbolExpression {
    public SubExpression(Expression left, Expression right) {
        super(left, right);
    }

    public int interpreter(HashMap<String, Integer> var) {
        return super.left.interpreter(var) - super.right.interpreter(var);
    }
}
/**解析器封装类
 */
class Calculator {

    //定义表达式
    private Expression expression;

    //构造函数传参,并解析
    public Calculator(String expStr) {
        //安排运算先后顺序
        Stack<Expression> stack = new Stack<>();
        //表达式拆分为字符数组
        char[] charArray = expStr.replace(" ", "").toCharArray();

        Expression left = null;
        Expression right = null;
        for(int i=0; i<charArray.length; i++) {
            switch (charArray[i]) {
            case ‘+‘:    //加法
                left = stack.pop();
                right = new VarExpression(String.valueOf(charArray[++i]));
                stack.push(new AddExpression(left, right));
                break;
            case ‘-‘:    //减法
                left = stack.pop();
                right = new VarExpression(String.valueOf(charArray[++i]));
                stack.push(new SubExpression(left, right));
                break;
            default:    //公式中的变量
                stack.push(new VarExpression(String.valueOf(charArray[i])));
                break;
            }
        }
        this.expression = stack.pop();
    }

    //计算
    public int run(HashMap<String, Integer> var) {
        return this.expression.interpreter(var);
    }
}
运行结果
输入表达式:a + b - c
a的值:10
b的值:5
c的值:3
运算结果:a + b - c = 12
上面的例子中,我们可以看到,解释器模式的好处就在于,随时可以增加新的解释器而不会影响到现有的结构和类,便于扩展和维护。
命令模式,它的定义是将一个请求封装为一个对象,从而使你可用不同的请求对客户进行参数化,对请求排队或记录请求日志。以及支持可撤销的操作。
命令模式的优点:
命令模式的缺点:
命令模式的使用场景:
命令模式的实现举例如下:
/**测试类
 */
public class Test{
    public static void main(String[] args) {
        Light light = new Light();//灯泡
        TV tv = new TV();//电视机
        LoudspeakerBox loudspeakerBox = new LoudspeakerBox();//音响
        Command lightOn = new LightOnCommand(light);//开启灯泡
        Command lightOff = new LightOffCommand(light);//关闭灯泡
        Command TVOn = new TVOnCommand(tv);//开启电视
        Command TVOff = new TVOffCommand(tv);//关闭电视
        Command LoudspeakerBoxOn = new LoudspeakerBoxOnCommand(loudspeakerBox);//开启音响
        Command LoudspeakerBoxOff = new LoudspeakerBoxOffCommand(loudspeakerBox);//关闭音响

        RemoteController remoteController = new RemoteController(3);
        remoteController.setCommand(0, lightOn, lightOff);
        remoteController.setCommand(1, TVOn, TVOff);
        remoteController.setCommand(2, LoudspeakerBoxOn, LoudspeakerBoxOff);

        remoteController.onButtonPressed(0);
        remoteController.offButtonPressed(0);
        remoteController.onButtonPressed(1);
        remoteController.offButtonPressed(1);
        remoteController.onButtonPressed(2);
        remoteController.offButtonPressed(2);
    }
}
/**命令接口
 */
interface Command {
   void execute();
}
/**灯泡实体类
 */
class Light {
    public void on(){
        System.out.println("打开电灯。。。");
    }

    public void off(){
        System.out.println("关闭电灯。。。");
    }
}
/**电视实体类
 */
class TV {
    public void on(){
        System.out.println("打开电视。。。");
    }

    public void off(){
        System.out.println("关闭电视。。。");
    }
}
/**音箱实体类
 */
class LoudspeakerBox {
    public void on(){
        System.out.println("打开音箱。。。");
    }

    public void off(){
        System.out.println("关闭音箱。。。");
    }
}
/**灯泡开启命令实现类
 */
class LightOnCommand implements Command{
    Light light;
    public LightOnCommand(Light light){
        this.light = light;
    }

    public void execute() {
        light.on();
    }
}
/**灯泡关闭命令实现类
 */
class LightOffCommand implements Command{
    Light light;
    public LightOffCommand(Light light){
        this.light = light;
    }

    public void execute() {
        light.off();
    }
}
/**电视开启命令实现类
 */
class TVOnCommand implements Command{
    TV tv;
    public TVOnCommand(TV tv){
        this.tv = tv;
    }

    public void execute() {
        tv.on();
    }
}
/**电视关闭命令实现类
 */
class TVOffCommand implements Command{
    TV tv;
    public TVOffCommand(TV tv){
        this.tv = tv;
    }

    public void execute() {
        tv.off();
    }
}
/**音箱开启命令实现类
 */
class LoudspeakerBoxOnCommand implements Command{
    LoudspeakerBox loudspeakerBox;
    public LoudspeakerBoxOnCommand(LoudspeakerBox loudspeakerBox){
        this.loudspeakerBox = loudspeakerBox;
    }

    public void execute() {
        loudspeakerBox.on();
    }
}
/**音箱关闭命令实现类
 */
class LoudspeakerBoxOffCommand implements Command{
    LoudspeakerBox loudspeakerBox;
    public LoudspeakerBoxOffCommand(LoudspeakerBox loudspeakerBox){
        this.loudspeakerBox = loudspeakerBox;
    }

    public void execute() {
        loudspeakerBox.off();
    }
}
/**遥控器类
 */
class RemoteController {
    Command[] onCommands;
    Command[] offCommands;

    public RemoteController(int commandSize) {
        this.onCommands = new Command[commandSize];
        this.offCommands = new Command[commandSize];
    }

    public void setCommand(int i, Command onCommand, Command offCommand) {
        onCommands[i] = onCommand;
        offCommands[i] = offCommand;
    }

    // 按下开按钮
    public void onButtonPressed(int i) {
        onCommands[i].execute();
    }

    // 按下关按钮
    public void offButtonPressed(int i) {
        offCommands[i].execute();
    }
}
运行结果
打开电灯。。。
关闭电灯。。。
打开电视。。。
关闭电视。。。
打开音箱。。。
关闭音箱。。。
上面的例子中,我们可以看到,命令模式的简单应用,它允许我们将动作封装成命令对象,然后就可以随心所欲地存储、传递和调用它们了。通过命令对象实现调用者和执行者解耦,两者之间通过命令对象间接地进行沟通。
责任链模式,它的定义是避免请求发送者与接收者耦合在一起,让多个对象都有可能接收请求,将这些对象连接成一条链,并且沿着这条链传递请求,直到有对象处理它为止。
责任链模式的优点:
责任链模式的缺点:
责任链模式的使用场景:
责任链模式的实现举例如下:
/**测试类
 */
public class Test{
    public static void main(String[] args) {
        ApprovalChainHandler h1 = new GroupLeaderChainHandler();
        ApprovalChainHandler h2 = new ExecutiveChainHandler();
        ApprovalChainHandler h3 = new CEOChainHandler();
        h1.setNext(h2);
        h2.setNext(h3);
        String staff1 = "张三";
        String staff2 = "李四";
        String staff3 = "王五";
        System.out.println(staff1+"请假结果:"+h1.handler(staff1));
        System.out.println(staff2+"请假结果:"+h1.handler(staff2));
        System.out.println(staff3+"请假结果:"+h1.handler(staff3));
    }
}
/**请假审批任链抽象类
 */
abstract class ApprovalChainHandler {
    private ApprovalChainHandler next;
    protected abstract  boolean doHandler(String name);
    public boolean handler(String name) {
        boolean result = doHandler(name);
        if (isAccordWith(result) && next != null) {
            return next.handler(name);
        } else {
            return result;
        }
    }

    public void setNext(ApprovalChainHandler next){
        this.next = next;
    }

    /**判断审批是否同意
     */
    protected boolean isAccordWith(boolean t) {
        return t;
    }
}
/**组长审批类
 */
class GroupLeaderChainHandler extends ApprovalChainHandler {
    protected boolean doHandler(String name) {
        boolean result= new Random().nextBoolean();
        System.out.println("组长审批["+ name +"]结果::"+result);
        return result;
    }
}
/**主管审批类
 */
class ExecutiveChainHandler extends ApprovalChainHandler {
   protected boolean doHandler(String name) {
      boolean result= new Random().nextBoolean();
      System.out.println("主管审批["+ name +"]结果: "+result);
      return result;
   }
}
/**老板审批类
 */
class CEOChainHandler extends ApprovalChainHandler {
    protected boolean doHandler(String name) {
        boolean result= new Random().nextBoolean();
        System.out.println("CEO审批["+ name +"]结果:: "+result);
        return result;
    }
}
运行结果
组长审批[张三]结果::false
张三请假结果:false
组长审批[李四]结果::true
主管审批[李四]结果: false
李四请假结果:false
组长审批[王五]结果::true
主管审批[王五]结果: true
CEO审批[王五]结果:: false
王五请假结果:false
上面的例子中,我们可以看到,每一个职责都能被定义成一个处理对象, 使用责任链模式能够帮助我们在业务代码中更优雅地实现非互斥的多if判断,在需要扩展的时候也能更加轻松。
原文:https://www.cnblogs.com/bl123/p/13656315.html
