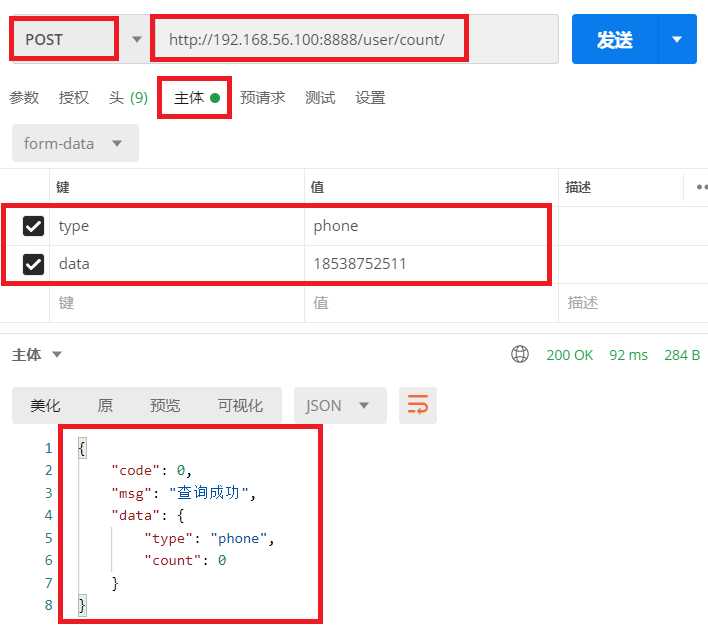
前端函数如下,js方法代码无需更改,前端代码逻辑在components\common\lab_header.vue
只需要修改color="orange">components\axios_api\http.js中调用的后端地址
 // axios.defaults.baseURL =
 "http://127.0.0.1:8000/"
 axios.defaults.baseURL =
 "http://192.168.56.100:8888/"
 // 获取手机验证码
 sendcode() {
   // 0. 判断是否发送中
   if (this.is_send) {
     return
   }
   this.check_phone()
   this.check_imgcode()
   if (this.phone_error ||
this.imgCode_error) {
      return false
     }
   // 3、短信发送
   // imgCode: ‘‘,
   // uuid: ‘‘,
   var data = { phone: this.phone, image_code_uuid: this.uuid, image_code: this.imgCode }
   this.is_send = true
   send_phone_code_post(data).then((res) =>
{
     console.log(res)
     if (res.code != 0) {
       this.errorMsg = res.msg
       return
     }
     let t = 10
     let si = setInterval(() => {
       this.msgButtonText = t
       t = t - 1
       if (t == 0) {
         this.is_send = false
         this.msgButtonText = ‘获取手机验证码‘
         clearInterval(si)
       }
     }, 1000)

       // if (res.data.code == 200) {
       //   console.log(‘短信发送成功‘)
       //   alert(res.data.message)
       // } else {
       //   alert(res.data.message)
       // }
     }).catch((err) => {
       console.log(err)
     })
   },
user/urls.py中添加 urlpatterns = [
path(‘count/‘, views.RegCountView.as_view()), # 查询用户名手机
号使用量的视图, /user/count/
]
user/views.py中添加视图函数 # 查询用户数量接口
class RegCountView(APIView):
# 注册时需要验证的用户名和手机号是否使用
# 自定义权限类
permission_classes = (AllowAny,)
def post(self, request):
# 接收参数: 验证的内容type:
username/phone, data: ‘用户名‘ 或者 ‘手机号‘,
datatype = request.data.get(‘type‘)
data = request.data.get(‘data‘)
if not all([data, datatype]):
return Response({‘code‘: 999, ‘msg‘: ‘参数不完整‘}) if datatype == ‘username‘:
count =
User.objects.filter(username=data).count()
if datatype == ‘phone‘:
count =
User.objects.filter(phone=data).count()
return Response({‘code‘: 0, ‘msg‘: ‘查询成功‘, ‘data‘: {‘type‘: datatype, ‘count‘: count}})
http://192.168.56.100:8888/user/count/

前端函数如下,js方法代码无需更改,前端代码逻辑在components\common\lab_header.vue
只需要修改components\axios_api\http.js中调用的后端地址
 // axios.defaults.baseURL =
 "http://127.0.0.1:8000/"
 axios.defaults.baseURL =
 "http://192.168.56.100:8888/"
// 检查用户名 是否使用
   check_username() {
     console.log(‘判断用户名‘)
     console.log(this.username == ‘‘)
     var reg = new RegExp(/^[a-zA-Z0-9_-]{3,16}$/); //字符串正则表达式 4到14位(字母,数字,下划线,减号)
     if (this.username == ‘‘) {
       this.username_message = ‘用户名不能为空‘
       this.username_error = true
       return false
     }
     if (!reg.test(this.username)) {
       this.username_message = ‘用户名格式不正确‘
       this.username_error = true
       return false
     } else {
       // 去后端检查用户名使用数量
       user_count({ type: ‘username‘, data: this.username }).then((res) => {
         console.log(res)
         if (res.data.count > 0) {
           this.username_message = ‘用户名已存在‘
           this.username_error = true
         } else {
           this.username_message = ‘‘
           this.username_error = false
         }
       })
     }
   },
 // 检查手机号是否使用
   check_phone() {
     console.log(‘检查手机号‘)
     var reg = new RegExp(/^[1]([3-9])[0-9]{9}$/)
     if (this.phone == ‘‘) {
       this.phone_message = ‘手机号不能为空‘
       this.phone_error = true
     }

     if (!reg.test(this.phone)) {
       this.phone_message = ‘手机号格式不正确‘
       this.phone_error = true
       return false
     } else {
       // 去后端查用户数量
       user_count({ type: ‘phone‘, data: this.phone }).then((res) => {
         console.log(res)
         if (res.data.count > 0) {
           this.phone_message = ‘手机号已存在‘
           this.phone_error = true
         } else {
           this.phone_message = ‘‘
           this.phone_error = false
         }
       })
     }
   },
user/views.py中完善视图函数 # 注册接口
class RegisterView(APIView):
"""
用户注册, 权限是: 匿名用户可访问
"""
# 自定义权限类
permission_classes = (AllowAny,)
def post(self, request):
"""
接收用户名,密码,手机号和验证码, 前端校验两遍一致性, 注册成功后返回成功, 然后用户自行登录获取token
1. 用户名
2. 密码
3. 手机号
4. 验证码
:param request:
:return: {‘code‘:0,‘msg‘:‘注册成功‘}
code: "260361"
password: "123123"
phone: "13303479527"
username: "liangxuepeng"
"""
username = request.data.get(‘username‘)
phone = request.data.get(‘phone‘)
code = request.data.get(‘code‘)
passwrod = request.data.get(‘password‘)
if all([username, passwrod, phone, code]):
pass
else:
return Response({‘code‘: 999, ‘msg‘: ‘参数不全‘})
# rand_name = self.randomUsername()
# 验证手机验证码
redis_client = get_redis_connection(‘verify_code‘)
code_redis = redis_client.get(phone)
if code_redis:
code_redis = code_redis.decode()
if not code == code_redis:
return Response({‘code‘: 999, ‘msg‘: ‘手机验证码错误‘})
user = User(username=username, phone=phone)
user.set_password(passwrod)
user.save()
return Response({‘code‘: 0, ‘msg‘: ‘注册成功‘})
原文:https://www.cnblogs.com/ihszg/p/13778792.html