
假如你使用的是spring-cloud-alibaba微服务技术栈
即去除应用程序的状态,配置统一外部化管理,方便进行水平的伸缩。
集成步骤:
假如我有一个应用app-design;
1,引入依赖:
<dependency>
     <groupId>com.alibaba.cloud</groupId>
     <artifactId>spring-cloud-starter-alibaba-nacos-config</artifactId>
     <version>2.2.1.RELEASE</version>
 </dependency>
2, 配置文件;
spring.cloud.nacos.config.enabled=true
spring.cloud.nacos.config.refresh-enabled=true

spring.cloud.nacos.config.server-addr=${spring.cloud.nacos.discovery.server-addr}
spring.cloud.nacos.config.namespace=${spring.cloud.nacos.discovery.namespace}
说明如下:
| 属性 | 说明 |
|---|---|
| spring.cloud.nacos.config.server-addr=${spring.cloud.nacos.discovery.server-addr} | nacos配置中心地址 |
| spring.cloud.nacos.config.namespace=${spring.cloud.nacos.discovery.namespace} | nacos的命名空间,这里跟服务发现的配置一致; |
3,使用配置的方式,同本地配置文件一样。
@Value @PropertyConfiguration 这些注解都是支持的;
4,确认方式,比如把之前的application.properties的配置放到了配置中心;
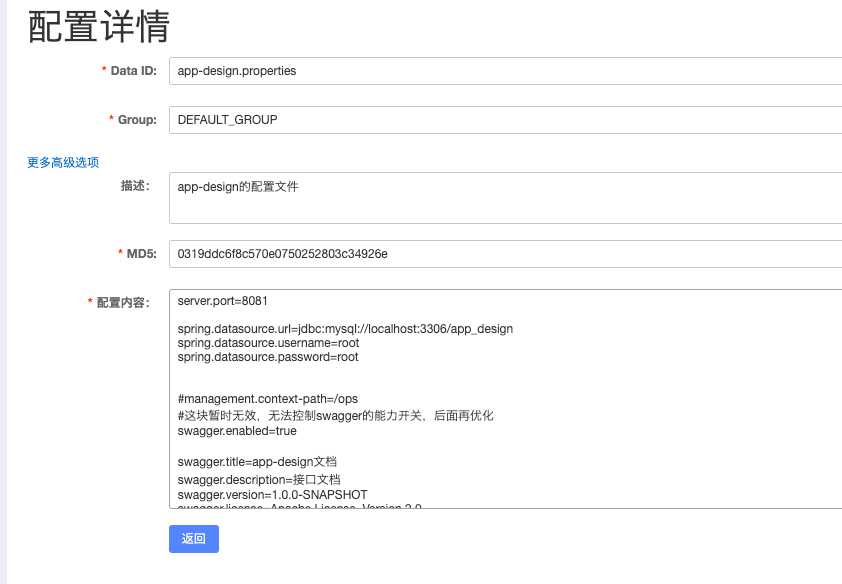
本地启动的时候,读取到了8081端口和数据库连接池的配置;

配置中心的连接原理,后面单独整理出来,知其然并知其所以然。
场景:多个后端微服务,在同一个集群中共用中间件的配置信息。
比如 缓存redis, 消息队列kafka, 文件服务器, 邮件服务器;
那么对应的配置文件没有必要在所有的后端微服务中单独存在,这些配置文件应该放在公共配置文件中,但是也可以被具体的后端微服务自己的独有配置文件覆盖,使用自己的私有配置;
可结合下图理解:
| 问题 | 回答 |
|---|---|
| where are we?现状 | 中间件配置分散在很多服务中,配置繁琐,不方便统一管理 |
| where are we go?目的 | 同一个集群的中间件只维护一份,各服务共享,也可按照需要覆盖共享的配置; |
| how can we go there?实现路径 | 基于nacos已有功能实现 |
下面是实际的coding过程和测试用例;
服务app-file;
在服务对应的nacos的namespace中
#共享中间件的配置
spring.cloud.nacos.config.shared-configs[0].data-id=mid.properties
spring.cloud.nacos.config.shared-configs[0].group=DEFAULT_GROUP
spring.cloud.nacos.config.shared-configs[0].refresh=true
位置: 模块start下的src/main/resources/bootstrap.properties文件中
自描述的配置信息,即引入的共享配置文件列表有哪些,可以按照需要,配置各种中间件的配置信息;
| key | 说明 |
|---|---|
| data-id | _the data id of extended configuration 配置文件名称,带上后缀;翻译:扩展配置文件的数据id |
| group | _the group of extended configuration, the default value is DEFAULT_GROUP 集群名称, 从名字来看,支持多集群的配置文件 翻译:扩展配置文件的集群,默认值是 DEFAULT_GROUP |
| refresh | _whether to support dynamic refresh, the default does not support 是否刷新 翻译:是否支持动态刷新,默认不支持 |
花括号[0] ,里面的0是序号,如果有多个,按照数字自增顺序进行配置;
根据实际场景在nacos的test命名空间中新增配置文件mid.properties
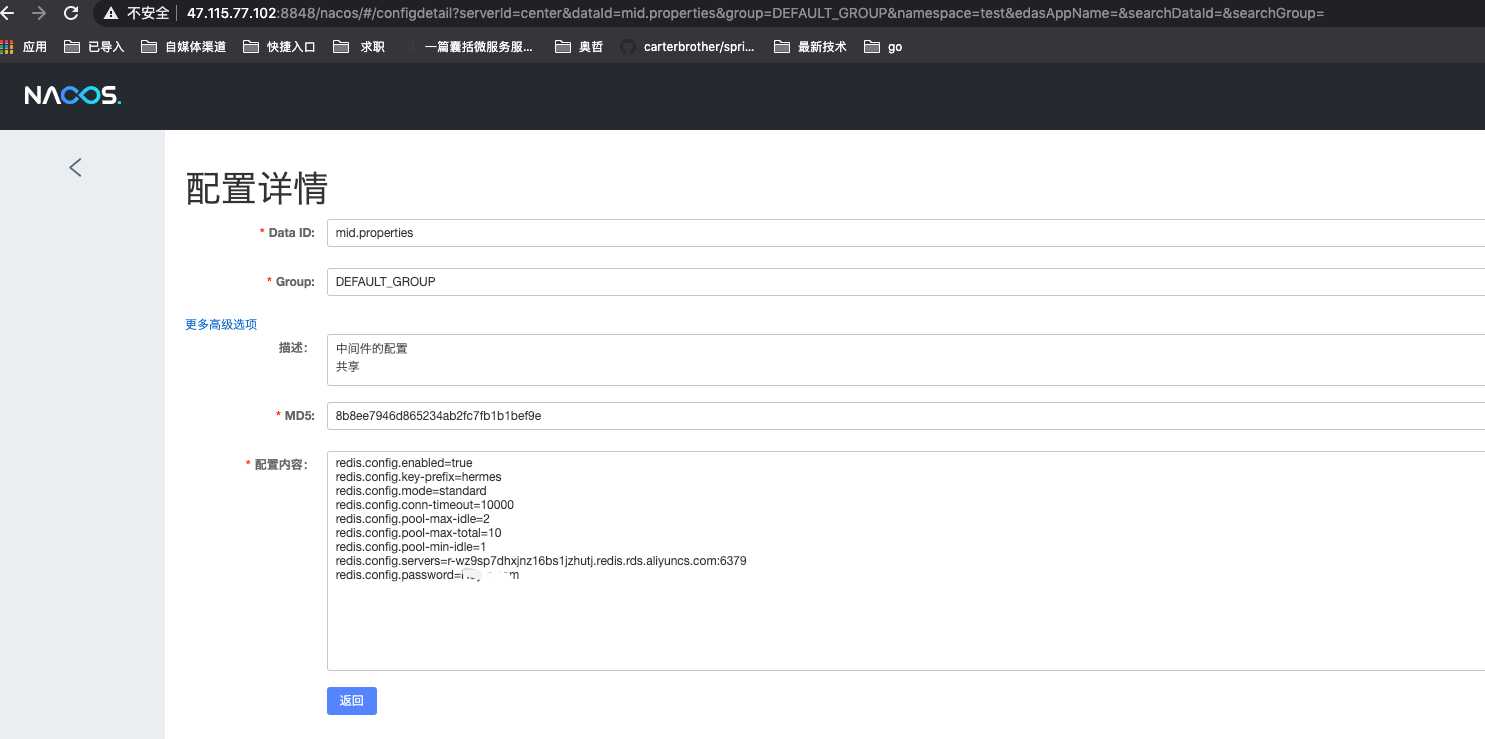
测试接口代码:
 @ApiOperation("测试获取公共配置文件")
    @GetMapping("/config/test")
    public Response config(){
        String redisConfigServers = environment.getProperty("redis.config.servers","null");
        return SingleResponse.of(redisConfigServers);
    }
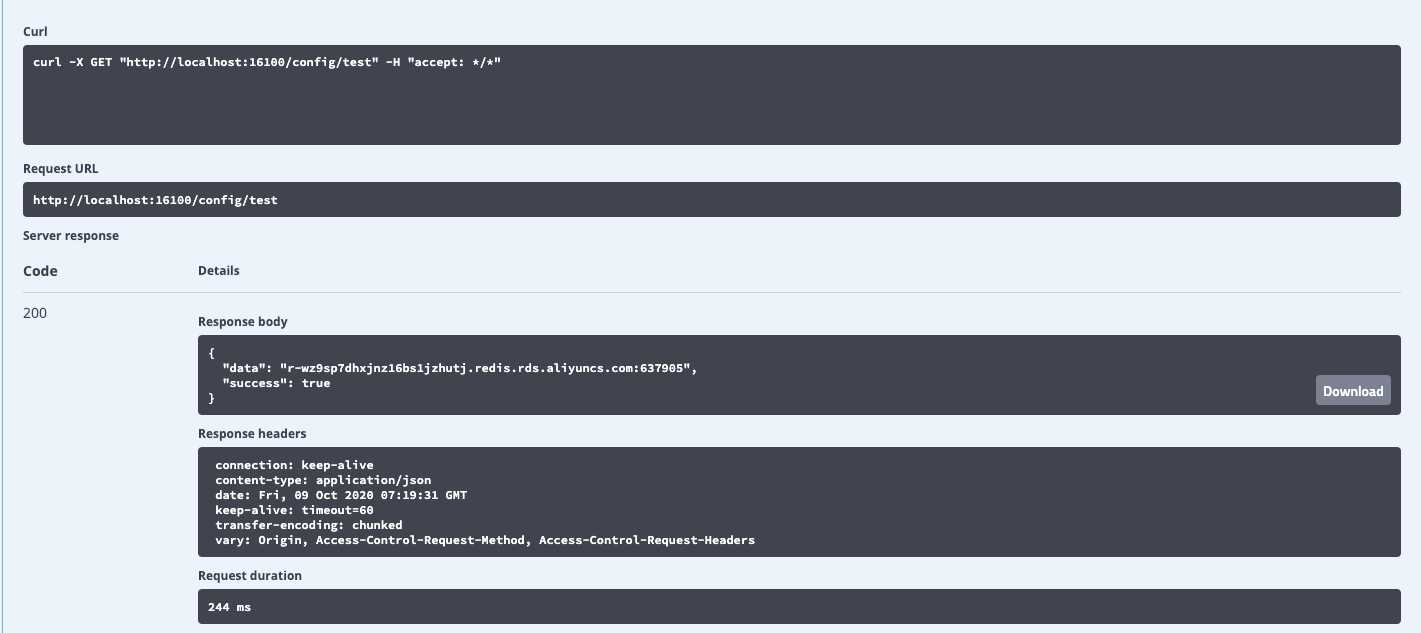
测试用例:
| 场景 | 期望结果 | 实际结果 | 是否符合预期 |
|---|---|---|---|
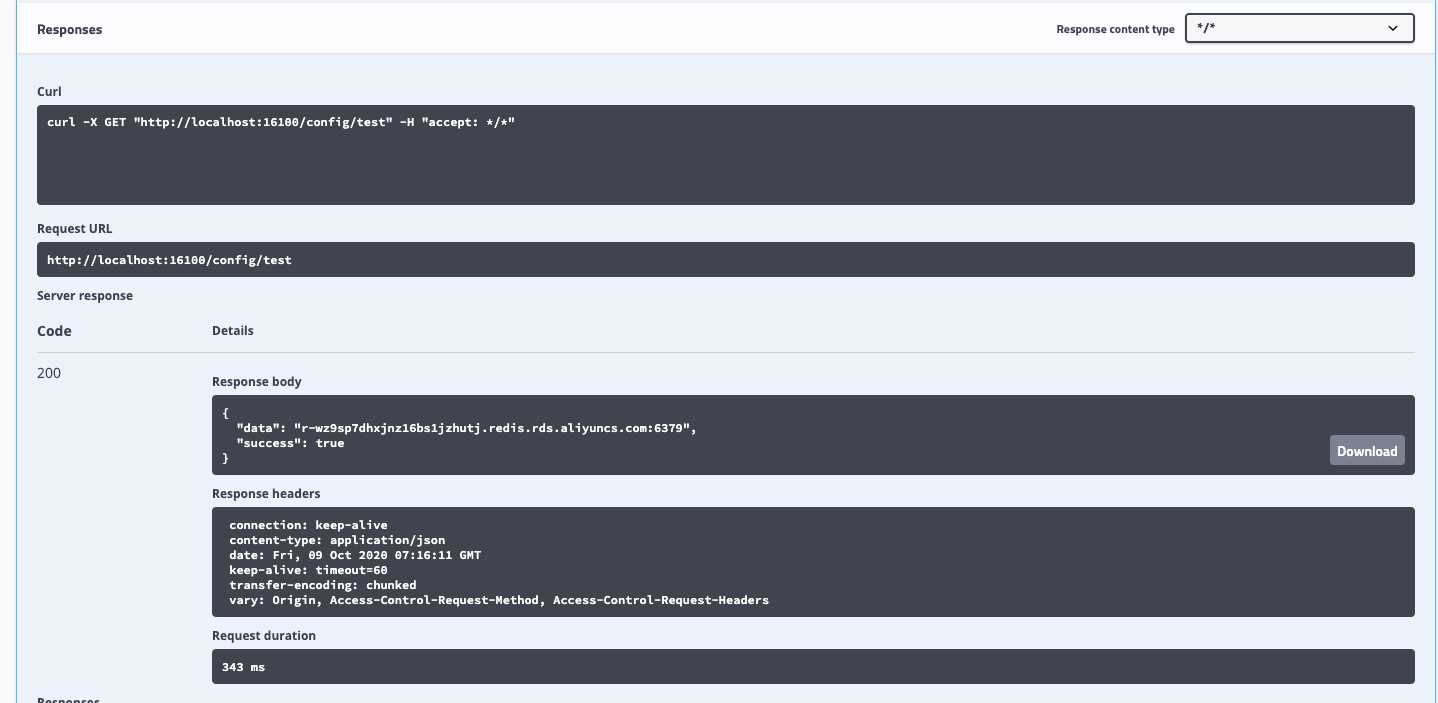
| 获取共享配置文件中的配置 | r-wz9sp7dhxjnz16bs1jzhutj.redis.rds.aliyuncs.com:6379 | r-wz9sp7dhxjnz16bs1jzhutj.redis.rds.aliyuncs.com:6379 | 是 |
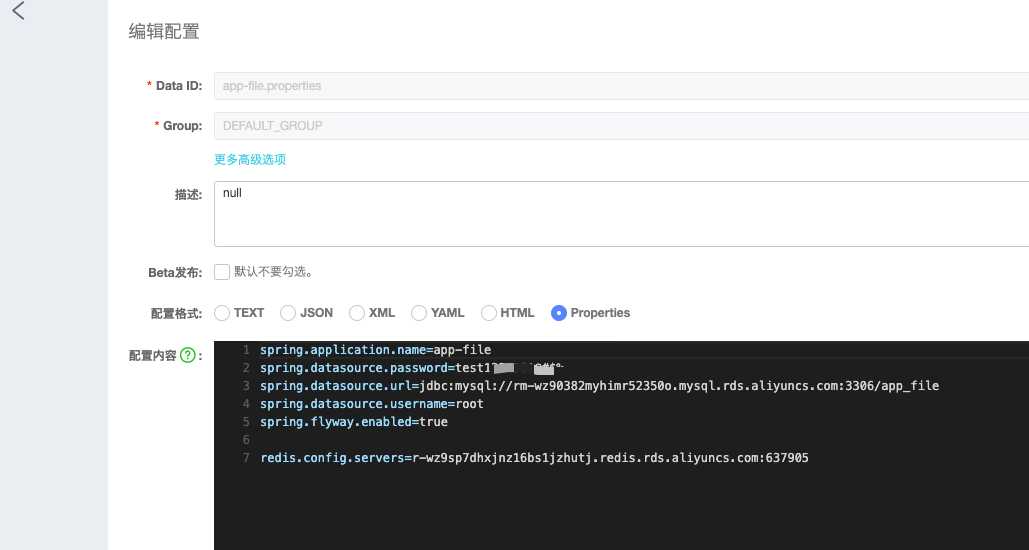
| 在服务独有app-file.properties配置中重写配置redis.config.servers=r-wz9sp7dhxjnz16bs1jzhutj.redis.rds.aliyuncs.com:637905 | r-wz9sp7dhxjnz16bs1jzhutj.redis.rds.aliyuncs.com:637905 | r-wz9sp7dhxjnz16bs1jzhutj.redis.rds.aliyuncs.com:637905 | 是 |
截图如下:
掌握用法之后,深入分析源码,知其然而知其所以然;
使用的starter封装;
版本: 2.2.1.RELEASE
启动的时候自动装配的配置如下:
org.springframework.cloud.bootstrap.BootstrapConfiguration=com.alibaba.cloud.nacos.NacosConfigBootstrapConfiguration

org.springframework.boot.autoconfigure.EnableAutoConfiguration=com.alibaba.cloud.nacos.NacosConfigAutoConfiguration,com.alibaba.cloud.nacos.endpoint.NacosConfigEndpointAutoConfiguration

org.springframework.boot.diagnostics.FailureAnalyzer=com.alibaba.cloud.nacos.diagnostics.analyzer.NacosConnectionFailureAnalyzer
分解一下key,看一下用途:
| key | 说明 |
|---|---|
| org.springframework.cloud.bootstrap.BootstrapConfiguration | A marker interface used as a key in META-INF/spring.factories. Entries in* the factories file are used to create the bootstrap application context. |
翻译:一个标记注解用来作为key 放在META-INF/spring.factories文件中,文件中的条目用来创建启动应用的上下文;
来源:spring-cloud-context-version.jar
value:
com.alibaba.cloud.nacos.NacosConfigBootstrapConfiguration |
| org.springframework.boot.autoconfigure.EnableAutoConfiguration | 注释太长了,不放这里.放到附录中。
来源:spring-boot-autoconfigure-version.jar
com.alibaba.cloud.nacos.NacosConfigAutoConfiguration,\
com.alibaba.cloud.nacos.endpoint.NacosConfigEndpointAutoConfiguration |
| org.springframework.boot.diagnostics.FailureAnalyzer | A {@code FailureAnalyzer} is used to analyze a failure and provide diagnostic* information that can be displayed to the user.
_
翻译: FailureAnalyzer用来分析错误并提供诊断信息展示给到用户
来源: spring-boot-version.jar
com.alibaba.cloud.nacos.diagnostics.analyzer.NacosConnectionFailureAnalyzer |
然后看看都自动装配了什么?以及自动装配的过程。
springboot的方式调用;
源码:
package com.alibaba.cloud.nacos;

import com.alibaba.cloud.nacos.client.NacosPropertySourceLocator;

import org.springframework.boot.autoconfigure.condition.ConditionalOnMissingBean;
import org.springframework.boot.autoconfigure.condition.ConditionalOnProperty;
import org.springframework.context.annotation.Bean;
import org.springframework.context.annotation.Configuration;

/**
 * @author xiaojing
 */
@Configuration(proxyBeanMethods = false)
@ConditionalOnProperty(name = "spring.cloud.nacos.config.enabled", matchIfMissing = true)
public class NacosConfigBootstrapConfiguration {

	@Bean
	@ConditionalOnMissingBean
	public NacosConfigProperties nacosConfigProperties() {
		return new NacosConfigProperties();
	}

	@Bean
	@ConditionalOnMissingBean
	public NacosConfigManager nacosConfigManager(
			NacosConfigProperties nacosConfigProperties) {
		return new NacosConfigManager(nacosConfigProperties);
	}

	@Bean
	public NacosPropertySourceLocator nacosPropertySourceLocator(
			NacosConfigManager nacosConfigManager) {
		return new NacosPropertySourceLocator(nacosConfigManager);
	}

}
自动装配流程:
配置文件组装源码:
@Override
	public PropertySource<?> locate(Environment env) {
		nacosConfigProperties.setEnvironment(env);
		ConfigService configService = nacosConfigManager.getConfigService();

		if (null == configService) {
			log.warn("no instance of config service found, can‘t load config from nacos");
			return null;
		}
		long timeout = nacosConfigProperties.getTimeout();
		nacosPropertySourceBuilder = new NacosPropertySourceBuilder(configService,
				timeout);
		String name = nacosConfigProperties.getName();

		String dataIdPrefix = nacosConfigProperties.getPrefix();
		if (StringUtils.isEmpty(dataIdPrefix)) {
			dataIdPrefix = name;
		}

		if (StringUtils.isEmpty(dataIdPrefix)) {
			dataIdPrefix = env.getProperty("spring.application.name");
		}

		CompositePropertySource composite = new CompositePropertySource(
				NACOS_PROPERTY_SOURCE_NAME);

		loadSharedConfiguration(composite);
		loadExtConfiguration(composite);
		loadApplicationConfiguration(composite, dataIdPrefix, nacosConfigProperties, env);

		return composite;
	}
加载应用配置文件的顺序源码:
private void loadApplicationConfiguration(
			CompositePropertySource compositePropertySource, String dataIdPrefix,
			NacosConfigProperties properties, Environment environment) {
		String fileExtension = properties.getFileExtension();
		String nacosGroup = properties.getGroup();
		// load directly once by default
		loadNacosDataIfPresent(compositePropertySource, dataIdPrefix, nacosGroup,
				fileExtension, true);
		// load with suffix, which have a higher priority than the default
		loadNacosDataIfPresent(compositePropertySource,
				dataIdPrefix + DOT + fileExtension, nacosGroup, fileExtension, true);
		// Loaded with profile, which have a higher priority than the suffix
		for (String profile : environment.getActiveProfiles()) {
			String dataId = dataIdPrefix + SEP1 + profile + DOT + fileExtension;
			loadNacosDataIfPresent(compositePropertySource, dataId, nacosGroup,
					fileExtension, true);
		}

	}
顺序如下:
| 序号 | 说明 |
|---|---|
| 1 | 加载dataIdPrefix对应的配置文件 |
| 2 | 加载dataIdPrefix.fileExtension对应的配置文件 |
| 3 | 加载 dataIdPrefix-activeProfiles.fileExtension对应的配置文件 |
| 序号 | 说明 |
|---|---|
| 1 | NacosConfigProperties nacos配置 |
| 2 | NacosRefreshProperties 已经不建议被使用 |
| 3 | NacosRefreshHistory 刷新历史 |
| 4 | NacosConfigManager 配置 |
| 5 | NacosContextRefresher 注册nacos的监听器到应用 |
NacosConfigEndpoint
本地配置同步逻辑
	@ReadOperation
	public Map<String, Object> invoke() {
		Map<String, Object> result = new HashMap<>(16);
		result.put("NacosConfigProperties", properties);

		List<NacosPropertySource> all = NacosPropertySourceRepository.getAll();

		List<Map<String, Object>> sources = new ArrayList<>();
		for (NacosPropertySource ps : all) {
			Map<String, Object> source = new HashMap<>(16);
			source.put("dataId", ps.getDataId());
			source.put("lastSynced", dateFormat.get().format(ps.getTimestamp()));
			sources.add(source);
		}
		result.put("Sources", sources);
		result.put("RefreshHistory", refreshHistory.getRecords());

		return result;
	}
NacosConfigHealthIndicator
健康检查 UP,DOWN,UNKNOWN ;
连接不上nacos服务端抛出异常
@Override
	protected FailureAnalysis analyze(Throwable rootFailure,
			NacosConnectionFailureException cause) {
		return new FailureAnalysis(
				"Application failed to connect to Nacos server: \""
						+ cause.getServerAddr() + "\"",
				"Please check your Nacos server config", cause);
	}
小结:服务通过集成该starter,通过http请求从nacos的服务端拉取配置数据,并做了 配置刷新历史,注册监听器到spring容器中, 本地缓存,和错误报告;
源码位置:https://github.com/alibaba/nacos/tree/develop/config
应用启动读取配置文件整体调用链:待后续完成;
如果读完本篇文章你只能记住一句话:nacos作为配置中心可为单独的服务提供外部化配置文件,也支持多应用共享配置文件。
从nacos的客户端源码分析中可看到一些配置优先级的顺序。
原创不易,关注诚可贵,转发价更高!转载请注明出处,让我们互通有无,共同进步,欢迎沟通交流。
原文:https://www.cnblogs.com/snidget/p/13789640.html