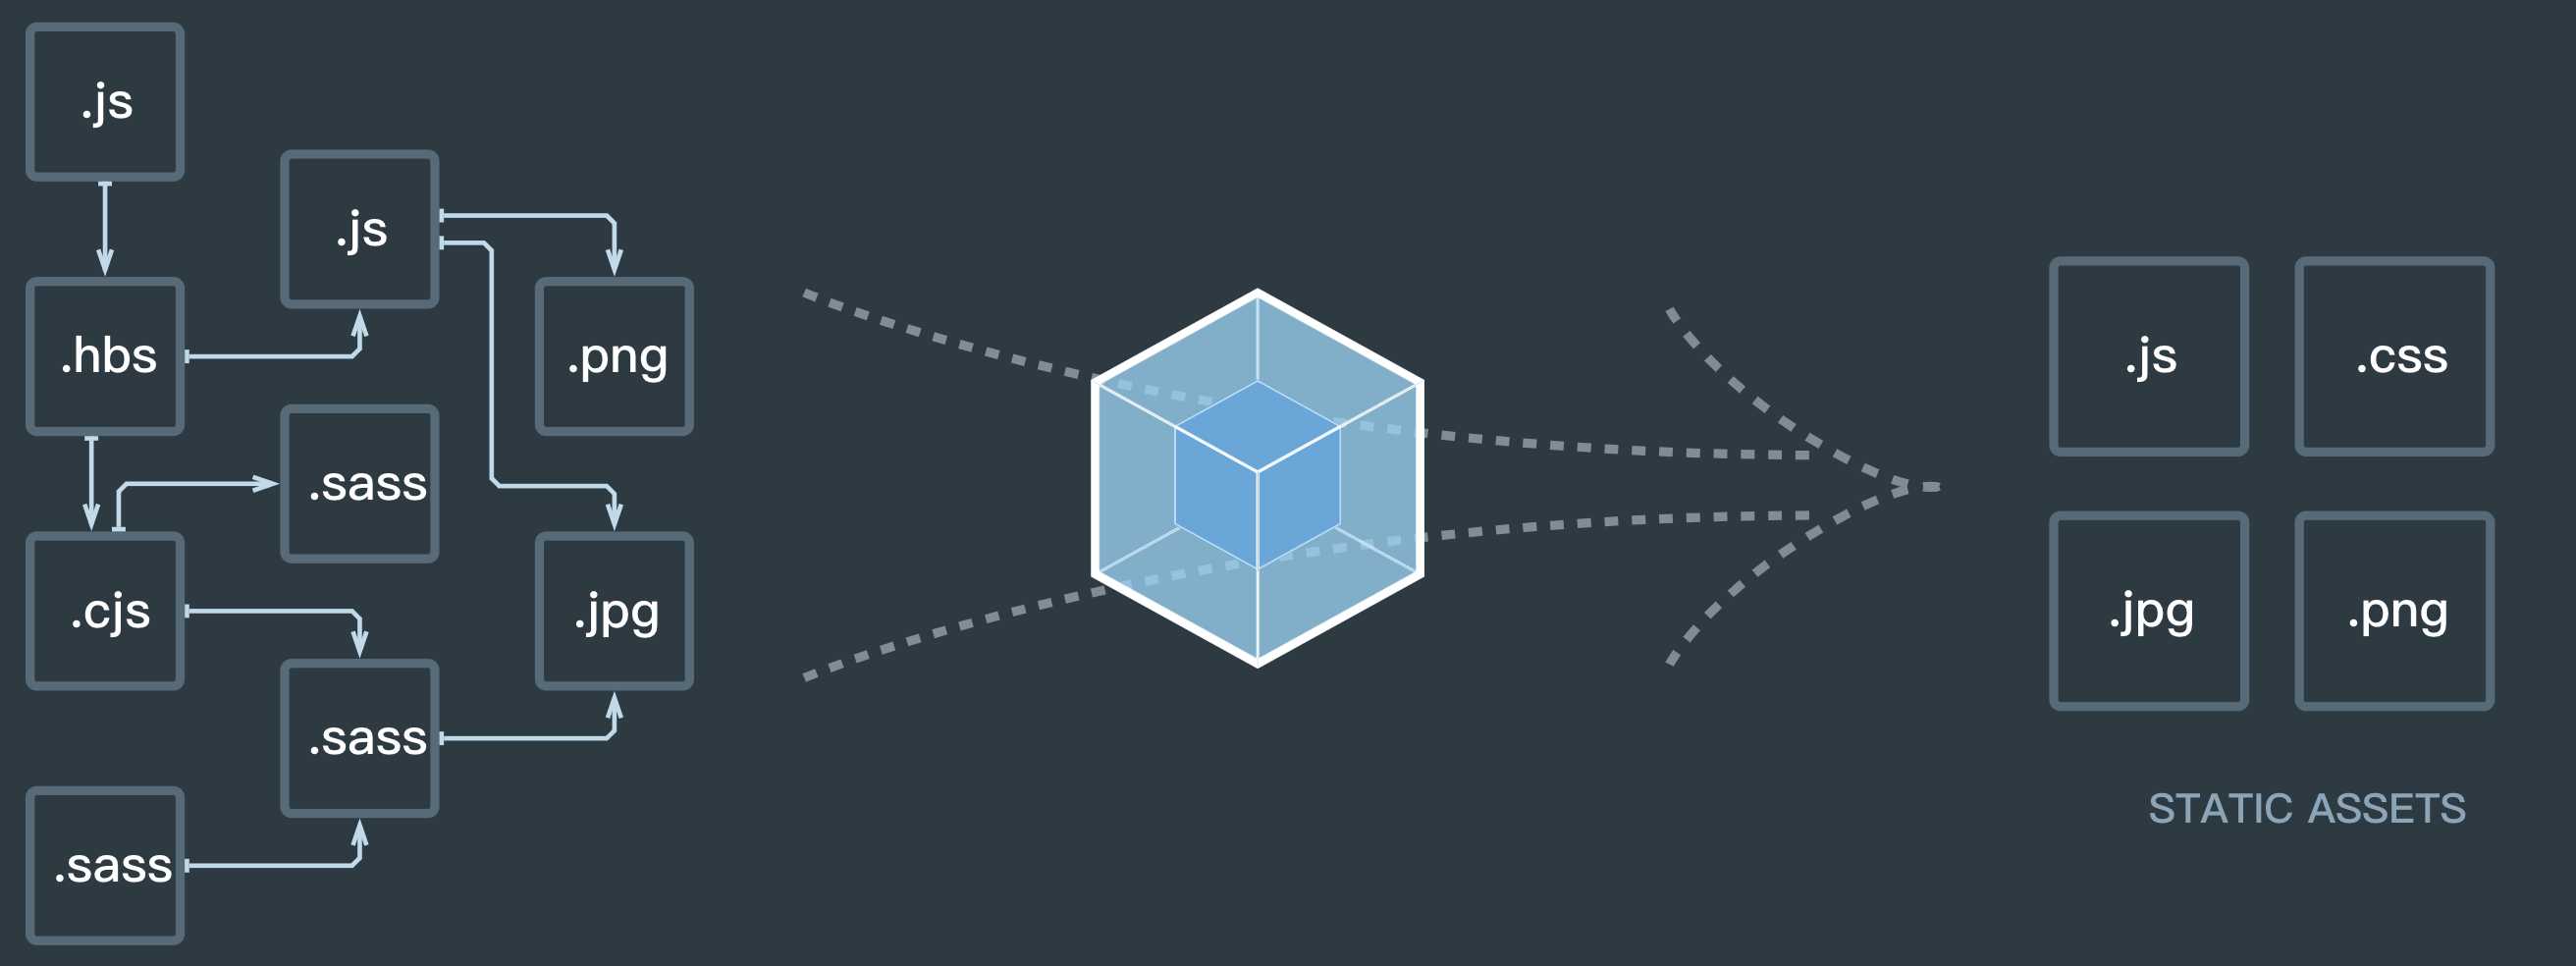
Webpack是一个开源的前端打包工具,可以将多种静态资源 js、css、less 转换成一个静态文件,减少了页面的请求
学习路线
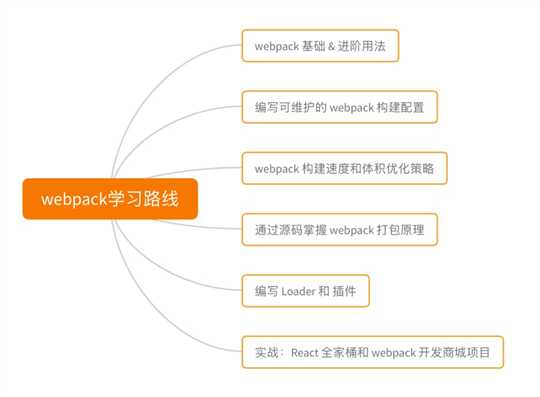
日常开发最直观能用到的(webpack本身只能处理js,如果其他类型就需要loader进行转换)
将js代码转换成浏览器可以支持的es语法(es6、jsx、typescript)
将less转换成浏览器可以识别的css(scss、less)
图片进行base64转码
开发环境热更新
生产环境编译
工作原理
使用
webpack 配置
根据应用程序的特定需求,可以以多种方式配置 entry 属性
// 写法一 字符串,单入口文件,输出一个文件
const config = {
    entry: ‘./path/to/my/entry/file.js‘
};
// 写法二 对象,输出对应多个入口文件
// 提取公共库
const config = {
 entry: {
   app: ‘./src/main.js‘,
   vendor: [‘react‘, ‘redux‘, ‘react-dom‘, ‘react-redux‘, ‘react-router-redux‘]
  },
};


// 多页应用配置,
const config = {
  entry: {
    pageOne: ‘./src/pageOne/index.js‘,
    pageTwo: ‘./src/pageTwo/index.js‘,
    pageThree: ‘./src/pageThree/index.js‘
  }
};

// 写法三 数组,相当于将两个文件打包到一个文件里,输出一个文件
const config = {
    entry: [‘./add.js‘, ‘./index.js‘],
};


// 我们项目配置babel-polyfill用于兼容ie9或低版本浏览器不识别的语法
entry: [
    ‘babel-polyfill‘,
    join(__dirname, ‘src‘, ‘index.js‘),
],
项目中更多的用的是写法一和写法三
在 webpack 中配置 output 属性的最低要求是,将它的值设置为一个对象,包括以下两点
const config = {
  output: {
    filename: ‘bundle.js‘,
    path: ‘/home/proj/public/assets‘
  }
};


const config = {
 output: {
    // 路径
    path: join(__dirname, directory.production.envName),
    //
    publicPath: general.publicPath + ‘/‘,
    // 因为项目有代码分割等插件会分离对应文件,所以使用[name]可以加载对应名称,设置hash可以防止缓存
    filename: directory.production.resource + ‘/‘ + directory.production.javascript + ‘/‘ + ‘[name]-[hash:10].js‘,
    // 每个页面异步加载的js,例如对应页面通过import引入过来的组件、函数打包不是在入口文件指定的,但是又需要引入的,设置hash可以防止缓存
    chunkFilename: directory.production.resource + ‘/‘ + directory.production.javascript + ‘/‘ + ‘[name]-[contenthash:10].js‘,
  },
};
// 方式1
module.exports = {
  mode: ‘production‘
};
// 方式2
webpack --mode=production
// 启用对应开发环境默认的插件
development	会将 process.env.NODE_ENV 的值设为 development。启用 NamedChunksPlugin 和 NamedModulesPlugin。

// 启用对应生产环境默认的插件
production	会将 process.env.NODE_ENV 的值设为 production。启用 FlagDependencyUsagePlugin, FlagIncludedChunksPlugin, ModuleConcatenationPlugin, NoEmitOnErrorsPlugin, OccurrenceOrderPlugin, SideEffectsFlagPlugin 和 UglifyJsPlugin.
loader 用于对模块的源代码进行转换,loader 可以将文件从不同的语言(如 TypeScript)转换为 JavaScript,或将内联图像转换为 data URL。loader 甚至允许你直接在 JavaScript 模块中 import CSS文件
module.exports = {
    module:{
       rules:[{
           test:/\.js$/,
           use:[{
               loader:‘babel-loader‘,
               options:{
                   presets:[‘react‘]
               }
           }]
       }]
    }
}
插件目的在于解决 loader 无法实现的其他事。
const HtmlWebpackPlugin = require(‘html-webpack-plugin‘); //通过 npm 安装
module.exports = {
    plugins: [
        new webpack.optimize.UglifyJsPlugin(),
        new HtmlWebpackPlugin({template: ‘./src/index.html‘})
      ]
}
创建一个文件夹
npm init -y
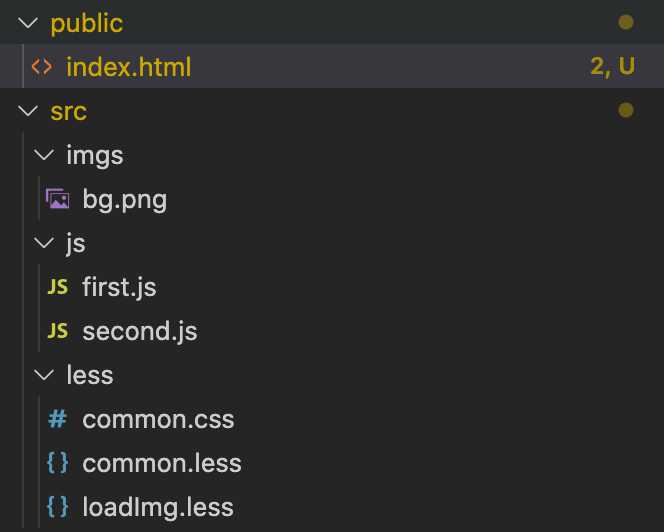
// first.js
module.exports = function () {
    let a = 1;
    let b = 2;
    console.log(a + b);
};

// webpack.config.js
module.exports = {
    entry: ‘./src/js/first.js‘,  //指定打包的入口文件
    output: {
        path: __dirname + ‘/dist‘,  // 注意:__dirname表示webpack.config.js所在目录的绝对路径
        filename: ‘build.js‘        //输出文件
    },
    // 环境
    mode: ‘development‘,
}

// package.json
"scripts": {
    // 默认读取当前目录的webpack.config.js
    "start":"./node_modules/.bin/webpack"
}

// 运行命令
npm start
// webpack.config.js
var htmlwp = require(‘html-webpack-plugin‘);

module.exports = {
    entry: ‘./src/js/second.js‘,  //指定打包的入口文件
    output: {
        path: __dirname + ‘/dist‘,  // 注意:__dirname表示webpack.config.js所在目录的绝对路径
        filename: ‘build.js‘        //输出文件
    },
    module: {
        rules: [
            {
                test: /\.css$/,
                exclude: ‘/node_modules/‘,
                use: [
                    (() => { return ‘style-loader‘; })(),
                    {
                        loader: ‘css-loader‘,
                        options: {
                            importLoaders: 1
                        }
                    },
                ]
            },
        ]
    },
    plugins: [
        new htmlwp({
            title: ‘首页‘,  //生成的页面标题<head><title>首页</title></head>
            filename: ‘index.html‘, //webpack-dev-server在内存中生成的文件名称,自动将build注入到这个页面底部,才能实现自动刷新功能
            template: ‘./public/index.html‘ //根据vue_02.html这个模板来生成(这个文件请程序员自己生成)
        }),
    ],
    // 环境
    mode: ‘development‘,
}


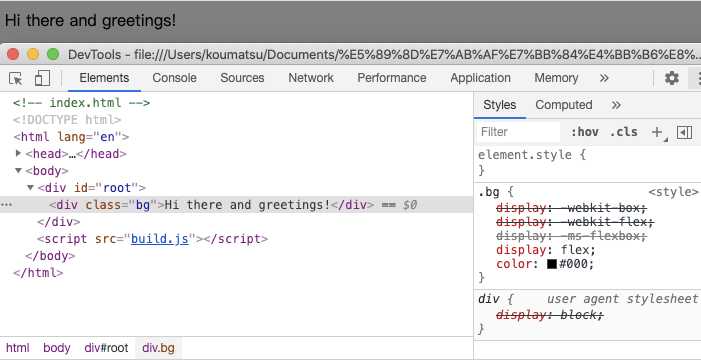
// first.js
module.exports = function () {
    var greet = document.createElement(‘div‘);
    greet.className = "bg";
    greet.textContent = "Hi there and greetings!";
    return greet;
};

// second.js
const greeter = require(‘./first‘);
import ‘../less/common.css‘;
// 获取页面id为root添加元素
document.querySelector("#root").appendChild(greeter());

// common.css
body {
    background: gray;
    display: flex;
}

// npm start
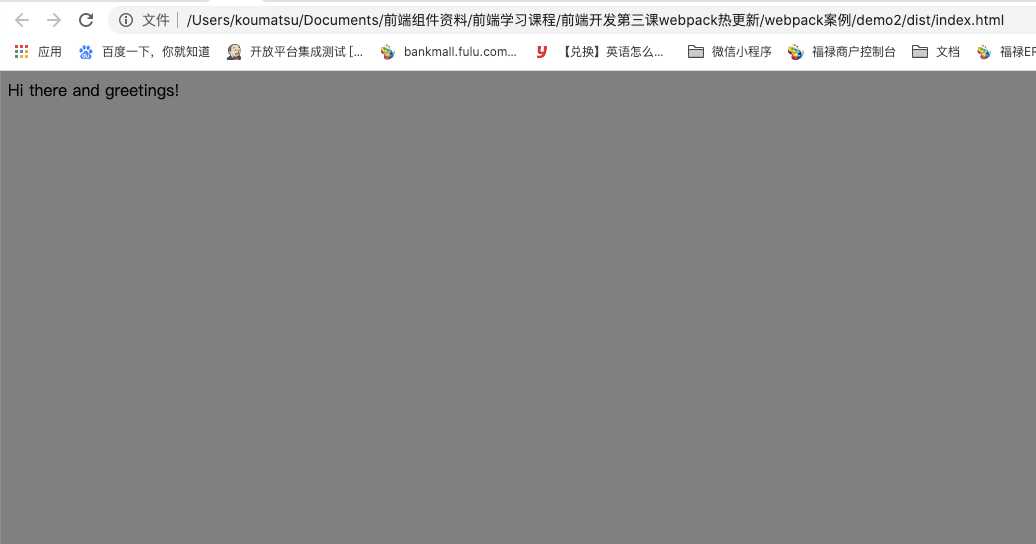
// 添加common.less文件
.bg {
    display: flex;
    color: black;
}


// webpack.config.js添加
{
    test: /\.css$/,
    exclude: ‘/node_modules/‘,
    use: [
        ‘style-loader‘,
        {
            loader: ‘css-loader‘,
            options: {
                importLoaders: 1
            }
        },
        {
            loader: ‘postcss-loader‘,
        }
    ]
},
{
    test: /\.less$/,
    exclude: ‘/node_modules/‘,
    use: [
        ‘style-loader‘,
        {
            loader: ‘css-loader‘,
            options: {
                importLoaders: 1
            }
        },
        {
            loader: ‘postcss-loader‘,
        },
        {
            loader: ‘less-loader‘,  //
            options: {
            }
        }
    ]
},

// 新增 postcss.config.js
module.exports = {
    plugins: {
        ‘postcss-import‘: {},
        ‘postcss-cssnext‘: {},
        ‘cssnano‘: {}
    }
}
// webpack.config.js添加
// 1.引入
var MiniCssExtractPlugin = require(‘mini-css-extract-plugin‘);

// output添加publicPath: ‘‘
output: {
      path: __dirname + ‘/dist‘,  // 注意:__dirname表示webpack.config.js所在目录的绝对路径
      filename: ‘build.js‘,        //输出文件
      publicPath: ‘‘ // output的publicPath是用来给生成的静态资源路径添加前缀的;
  },

// 2.修改loaders里面的style-loader代码
// 注释style-loader
// {
//     loader: ‘style-loader‘
// },

// 修改为
// MiniCssExtractPlugin应该用于生产环境
 (() => { return true ? MiniCssExtractPlugin.loader : ‘style-loader‘; })(),

// 3.loaders添加
{
    test: /\.(png|jpg|gif|jpeg|svg)$/,
    use: [
        {
            loader: "url-loader",
            options: {
                name: "[name].[hash:5].[ext]",
                limit: 1024, // size <= 1kib
                outputPath: "img"
            }
        }
    ]
}

// 4.插件里添加
new MiniCssExtractPlugin({
    filename: ‘[name].css‘,
    chunkFilename: ‘[id].css‘,
}),
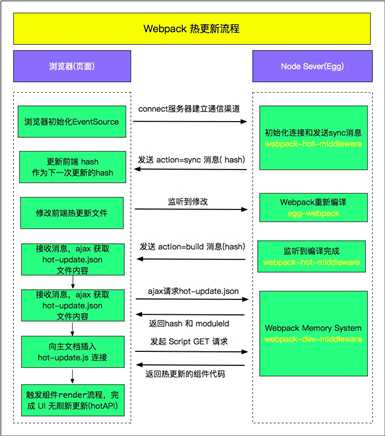
HMR即Hot Module Replacement是指当你对代码修改并保存后,webpack将会对代码进行重新打包,并将改动的模块发送到浏览器端,浏览器用新的模块替换掉旧的模块,去实现局部更新页面而非整体刷新页面
功能讲解
webpack最新版本是5,不兼容之前版本的webpack-dev-server,之前装的是最新版的5,所以要降级
npm i webpack@4.43.0 webpack-cli@3.3.12 webpack-dev-server cross-env -D
// webpack.config.js添加
var webpack = require(‘webpack‘);
// 配置项添加
module.exports = {
    devServer: {
        contentBase: ‘./dist‘,  // 是指定在哪个路径下或者文件夹下中开启服务器;
        open: true, // 开启服务器时,自动打开浏览器
        inline: true,
        hot: true,
        port: 8081 // 开启的服务器的端口
    },
      plugins: [
        // HMR大幅提高了开发体验,只更新变更内容,调整样式迅速,避免了大部分的网络请求、浏览器重新渲染
        new webpack.HotModuleReplacementPlugin(),
    ],
}
原文:https://www.cnblogs.com/Hsong/p/13916594.html