目录:
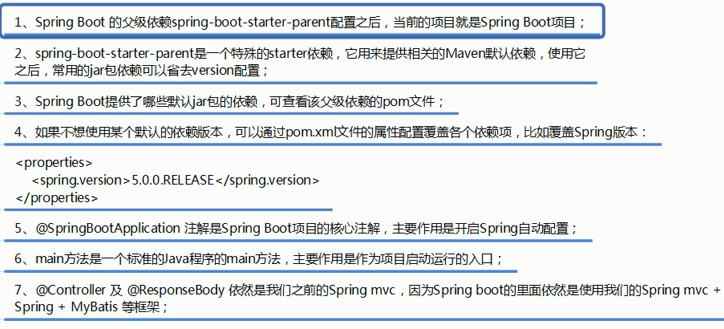
springboot是spring家族中的一个全新的框架,它用来简化spring应用程序的创建和开发过程,也可以说springboot能简化我们之前采用springmvc+spring+mybatis框架进行开发的过程。
在以往我们采用springmvc+spring+mybatis框架进行开发的时候,搭建和整合三大框架,需要做很多工作,比如配置web.xml,配置spring,配置mybatis,并将它们整合在一起等,二springboot框架对此开发过程进行了革命性的颠覆,抛弃了繁琐的xml配置过程,采用大量的默认配置来简化我们的开发过程。
所以采用springboot可以非常容易和快速地创建基于spring框架的应用程序,它让编码变简单了,配置变简单了,部署变简单了,监控变简单了。正因为springboot它划繁为简,让开发变得极其简单和快速,所以在业界备受关注。
1)能够快速创建基于spring的应用程序
2)能够直接使用java main方法启动内嵌的tomcat、jetty服务器运行springboot程序,不需要部署war包文件
3)提供约定的starter pom来简化mven配置,让maven的配置变得简单
4)根据项目的maven依赖配置,springboot自动配置spring、springmvc等
5)提供了程序的健康检查等功能
6)基本可以完全不使用xml配置文件,采用注解配置
1)自动配置:针对很多spring应用程序和常见的应用功能,springboot能自动提供相关配置
2)起步依赖:告诉springboot需要什么功能,它就能引入需要的依赖库
3)Actuator:让你能够深入运行中的springboot应用程序,一探springboot程序的内部信息
4)命令行界面:这是springboot的可选特性,主要针对Groovy语言使用
springboot2.0在2018年3月发布。如果使用eclipse,推荐安装Spring Tool Suite(STS)插件,或者在spring官网下载sts。如果使用IDEA旗舰版,自带了springboot插件。推荐使用maven3.2+。推荐使用java8,虽然springboot也兼容java6。
spring下载Spring Tools for Eclipse(https://spring.io/tools)
步骤:
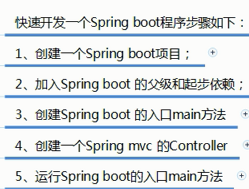
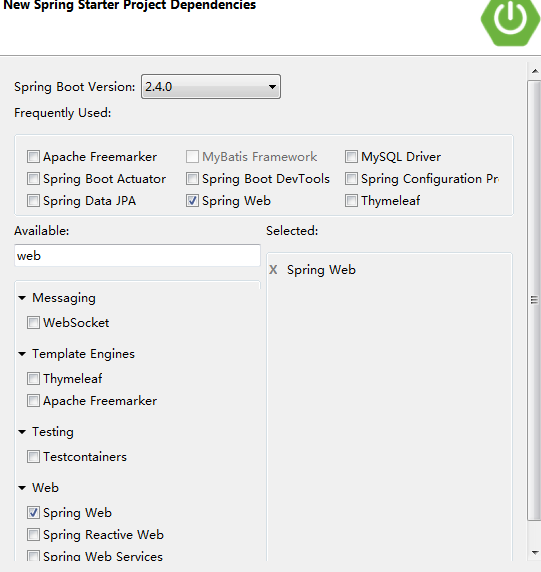
eclipse(安装了sts插件)创建springboot项目:new -> other... -> Spring Starter Project
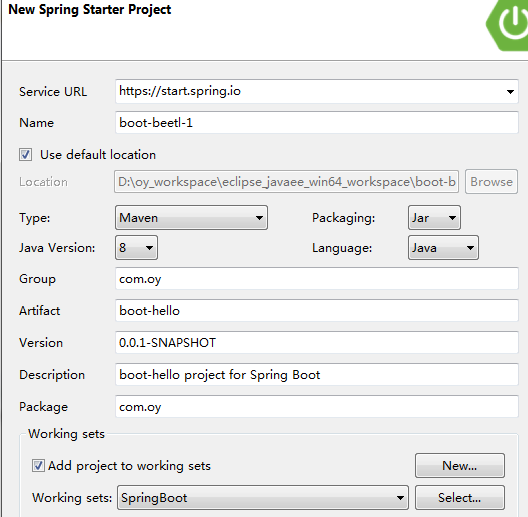
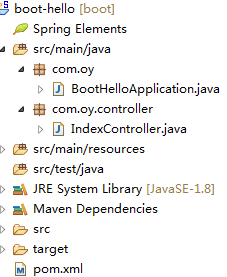
项目结构
在pom.xml将springboot的版本改为了2.1.2.RELEASE。
<?xml version="1.0" encoding="UTF-8"?>
<project xmlns="http://maven.apache.org/POM/4.0.0" xmlns:xsi="http://www.w3.org/2001/XMLSchema-instance"
    xsi:schemaLocation="http://maven.apache.org/POM/4.0.0 https://maven.apache.org/xsd/maven-4.0.0.xsd">
    <modelVersion>4.0.0</modelVersion>
    <parent>
        <groupId>org.springframework.boot</groupId>
        <artifactId>spring-boot-starter-parent</artifactId>
        <version>2.1.2.RELEASE</version>
        <relativePath/> <!-- lookup parent from repository -->
    </parent>
    <groupId>com.oy</groupId>
    <artifactId>boot-hello</artifactId>
    <version>0.0.1-SNAPSHOT</version>
    <name>boot-hello</name>
    <description>boot-hello project for Spring Boot</description>

    <properties>
        <java.version>1.8</java.version>
    </properties>

    <dependencies>
        <dependency>
            <groupId>org.springframework.boot</groupId>
            <artifactId>spring-boot-starter-web</artifactId>
        </dependency>

        <dependency>
            <groupId>org.springframework.boot</groupId>
            <artifactId>spring-boot-starter-test</artifactId>
            <scope>test</scope>
        </dependency>
    </dependencies>

    <build>
        <plugins>
            <plugin>
                <groupId>org.springframework.boot</groupId>
                <artifactId>spring-boot-maven-plugin</artifactId>
            </plugin>
        </plugins>
    </build>

</project>
BootHelloApplication
package com.oy;

import org.springframework.boot.SpringApplication;
import org.springframework.boot.autoconfigure.SpringBootApplication;

@SpringBootApplication
public class BootHelloApplication {

    public static void main(String[] args) {
        SpringApplication.run(BootHelloApplication.class, args);
    }

}
写一个controller类
package com.oy.controller;

import org.springframework.stereotype.Controller;
import org.springframework.web.bind.annotation.RequestMapping;
import org.springframework.web.bind.annotation.ResponseBody;

@Controller
public class IndexController {

    @RequestMapping("hello")
    @ResponseBody
    public String hello() {
        return "hello springboot";
    }

}
启动springboot程序
选中包含main方法的类 -> run as -> Java Application(或 Spring Boot App)。或者直接进入BootHelloApplication类 -> 双击main, run as ->Java Application(或 Spring Boot App)。
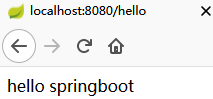
访问http://localhost:8080/hello
springboot核心配置文件有两种格式:application.properties 或 application.yml
配置springboot访问端口和项目路径:
server.port=8081
server.servlet.context-path=/demo
访问 http://localhost:8081/demo/hello。
application.properties
#spring.profiles.active=dev

server.port=8081
server.servlet.context-path=/demo

spring.profiles.active=dev
application-dev.properties
server.port=8082
spring.profiles.active=dev无论是放在最前还是最后,都开启的dev环境的端口。访问 http://localhost:8082/demo/hello。
方式1:@Value读取自定义配置
application-dev.properties自定义配置
boot.name=zs
boot.age=10
使用@Value读取
@Controller
public class IndexController {

    @Value("${boot.name}")
    private String name;

    @RequestMapping("hello")
    @ResponseBody
    public String hello() {
        return "hello " + name;
    }

}
方式2:@ConfigurationProperties读取自定义配置
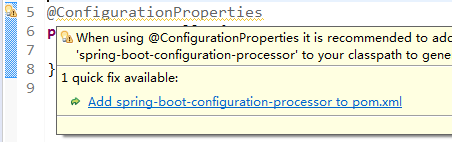
pom.xml添加依赖
<dependency>
    <groupId>org.springframework.boot</groupId>
    <artifactId>spring-boot-configuration-processor</artifactId>
    <optional>true</optional>
</dependency>
java bean 封装自定义属性
package com.oy.controller;

import org.springframework.boot.context.properties.ConfigurationProperties;
import org.springframework.stereotype.Component;

@Component
@ConfigurationProperties(prefix = "boot")
public class Hello {
    private String name;
    private Integer age;
    public String getName() {
        return name;
    }
    public void setName(String name) {
        this.name = name;
    }
    public Integer getAge() {
        return age;
    }
    public void setAge(Integer age) {
        this.age = age;
    }
}
使用 java bean的封装的自定义属性
@Controller
public class IndexController {

    @Autowired
    private Hello hello;

    @RequestMapping("hello")
    @ResponseBody
    public String hello() {
        return "hello " + hello.getName() + "--" + hello.getAge();
    }

}
10、
---
原文:https://www.cnblogs.com/xy-ouyang/p/13974532.html