# Use a descriptive name for your cluster:
# 集群的名称
cluster.name: my_es
#
# ------------------------------------ Node ------------------------------------
#
# Use a descriptive name for the node:
# 节点的名称
node.name: my_node1
#
# Add custom attributes to the node:
#
#node.attr.rack: r1
#
# ----------------------------------- Paths ------------------------------------
#
# Path to directory where to store the data (separate multiple locations by comma):
# 数据的路径需要自己创建在es的目录下
path.data: /usr/local/elasticsearch-7.4.2/data
#
# Path to log files:
# 日志路径
path.logs: /usr/local/elasticsearch-7.4.2/logs
#
# ---------------------------------- Network -----------------------------------
#
# Set the bind address to a specific IP (IPv4 or IPv6):
#
network.host: 0.0.0.0
#
# Set a custom port for HTTP:
#
#http.port: 9200
#
# For more information, consult the network module documentation.
#
# Pass an initial list of hosts to perform discovery when this node is started:
# The default list of hosts is ["127.0.0.1", "[::1]"]
#
#discovery.seed_hosts: ["host1", "host2"]
#
# Bootstrap the cluster using an initial set of master-eligible nodes:
#
cluster.initial_master_nodes: ["my_node1"]
#
# For more information, consult the discovery and cluster formation module documentation.
#
由于es是不允许root来操作的所以我们需要添加用户,并且赋予权限
useradd esuser
chown -R esuser:esuser /usr/local/elasticsearch-7.4.2
su esuser
执行bin目录下的脚本文件
./elasticsearch

# 后台运行
./elasticsearch -d

1.
vim /etc/security/limit.conf
* soft nofile 65536
* hard nofile 131072
* soft nproc 2048
* hard nproc 4096
vim /etc/sysctl.conf
vm.max_map_count=26215
# 刷新
sysctl -p
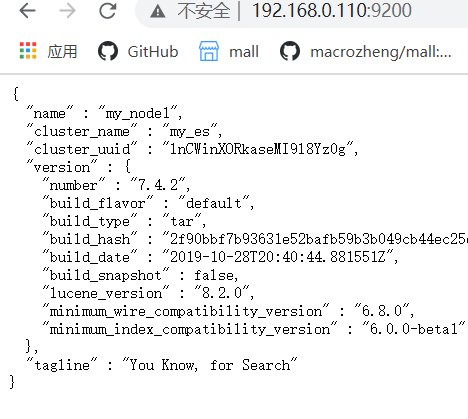
如图则ok,访问9200端口:http://ip:9200/

原文:https://www.cnblogs.com/yjfb/p/13991928.html