hello,大家好,我是小黑,好久不见~~
这是关于配置中心的系列文章,应该会分多篇发布,内容大致包括:
1、Spring 是如何实现 @Value 注入的
2、一个简易版配置中心的关键技术
3、开源主流配置中心相关技术
从一个最简单的程序开始:
@Configuration
@PropertySource("classpath:application.properties")
public class ValueAnnotationDemo {

    @Value("${username}")
    private String username;

    public static void main(String[] args) {
        AnnotationConfigApplicationContext context = new AnnotationConfigApplicationContext(ValueAnnotationDemo.class);

        System.out.println(context.getBean(ValueAnnotationDemo.class).username);

        context.close();
    }
}
application.properties 文件内容:
username=coder-xiao-hei
由 AutowiredAnnotationBeanPostProcessor 负责来处理 @Value ,此外该类还负责处理 @Autowired 和 @Inject。
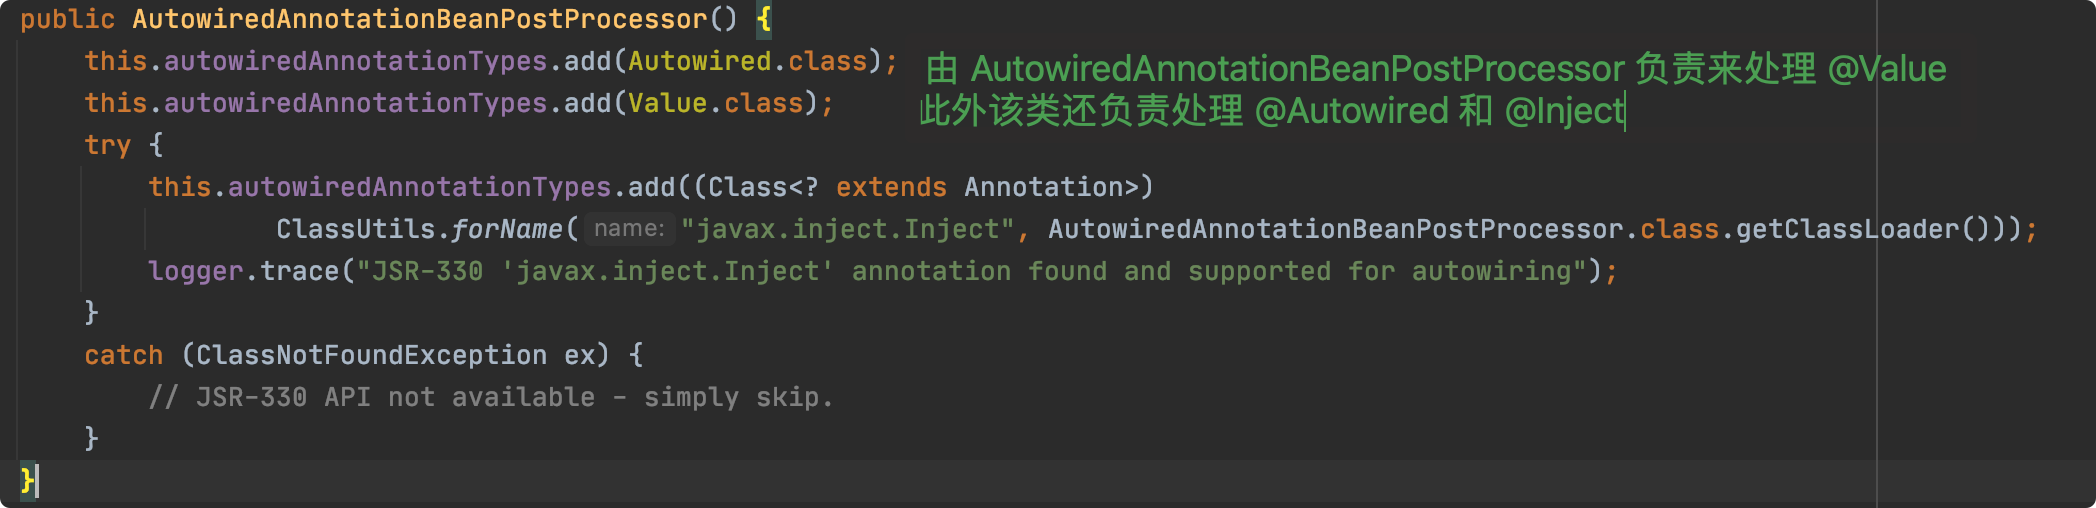
在 AutowiredAnnotationBeanPostProcessor 中有两个内部类:AutowiredFieldElement 和 AutowiredMethodElement。
当前为 Field 注入,定位到 AutowiredAnnotationBeanPostProcessor.AutowiredFieldElement#inject 方法。
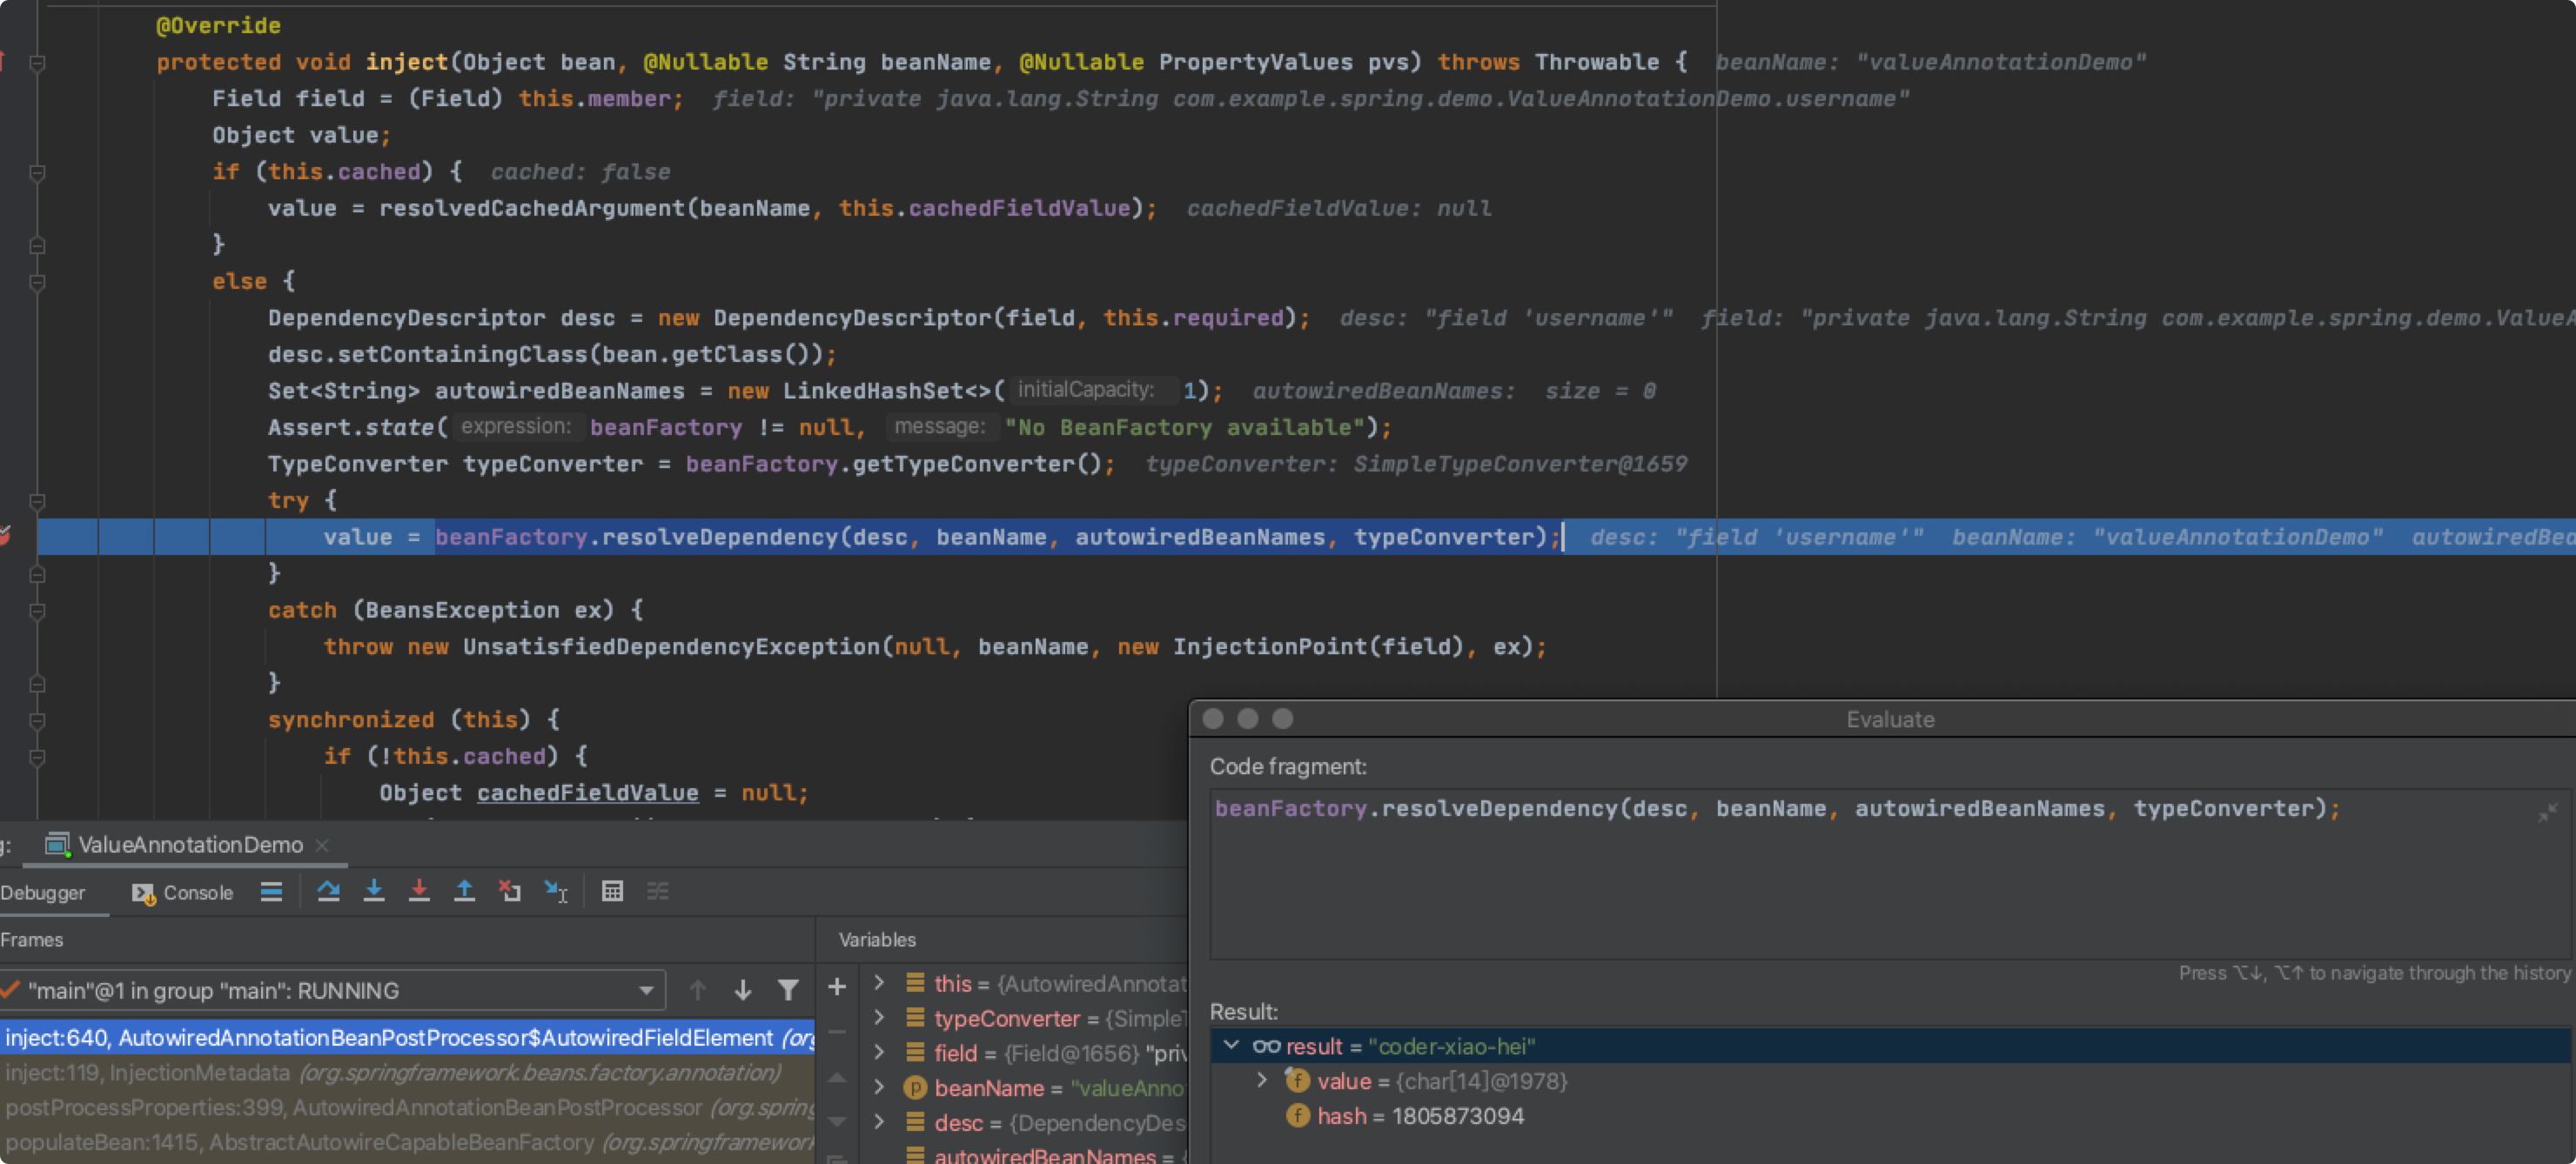
通过 debug 可知,整个调用链如下:
AutowiredFieldElement#inject
DefaultListableBeanFactory#resolveDependency
DefaultListableBeanFactory#doResolveDependency
AbstractBeanFactory#resolveEmbeddedValue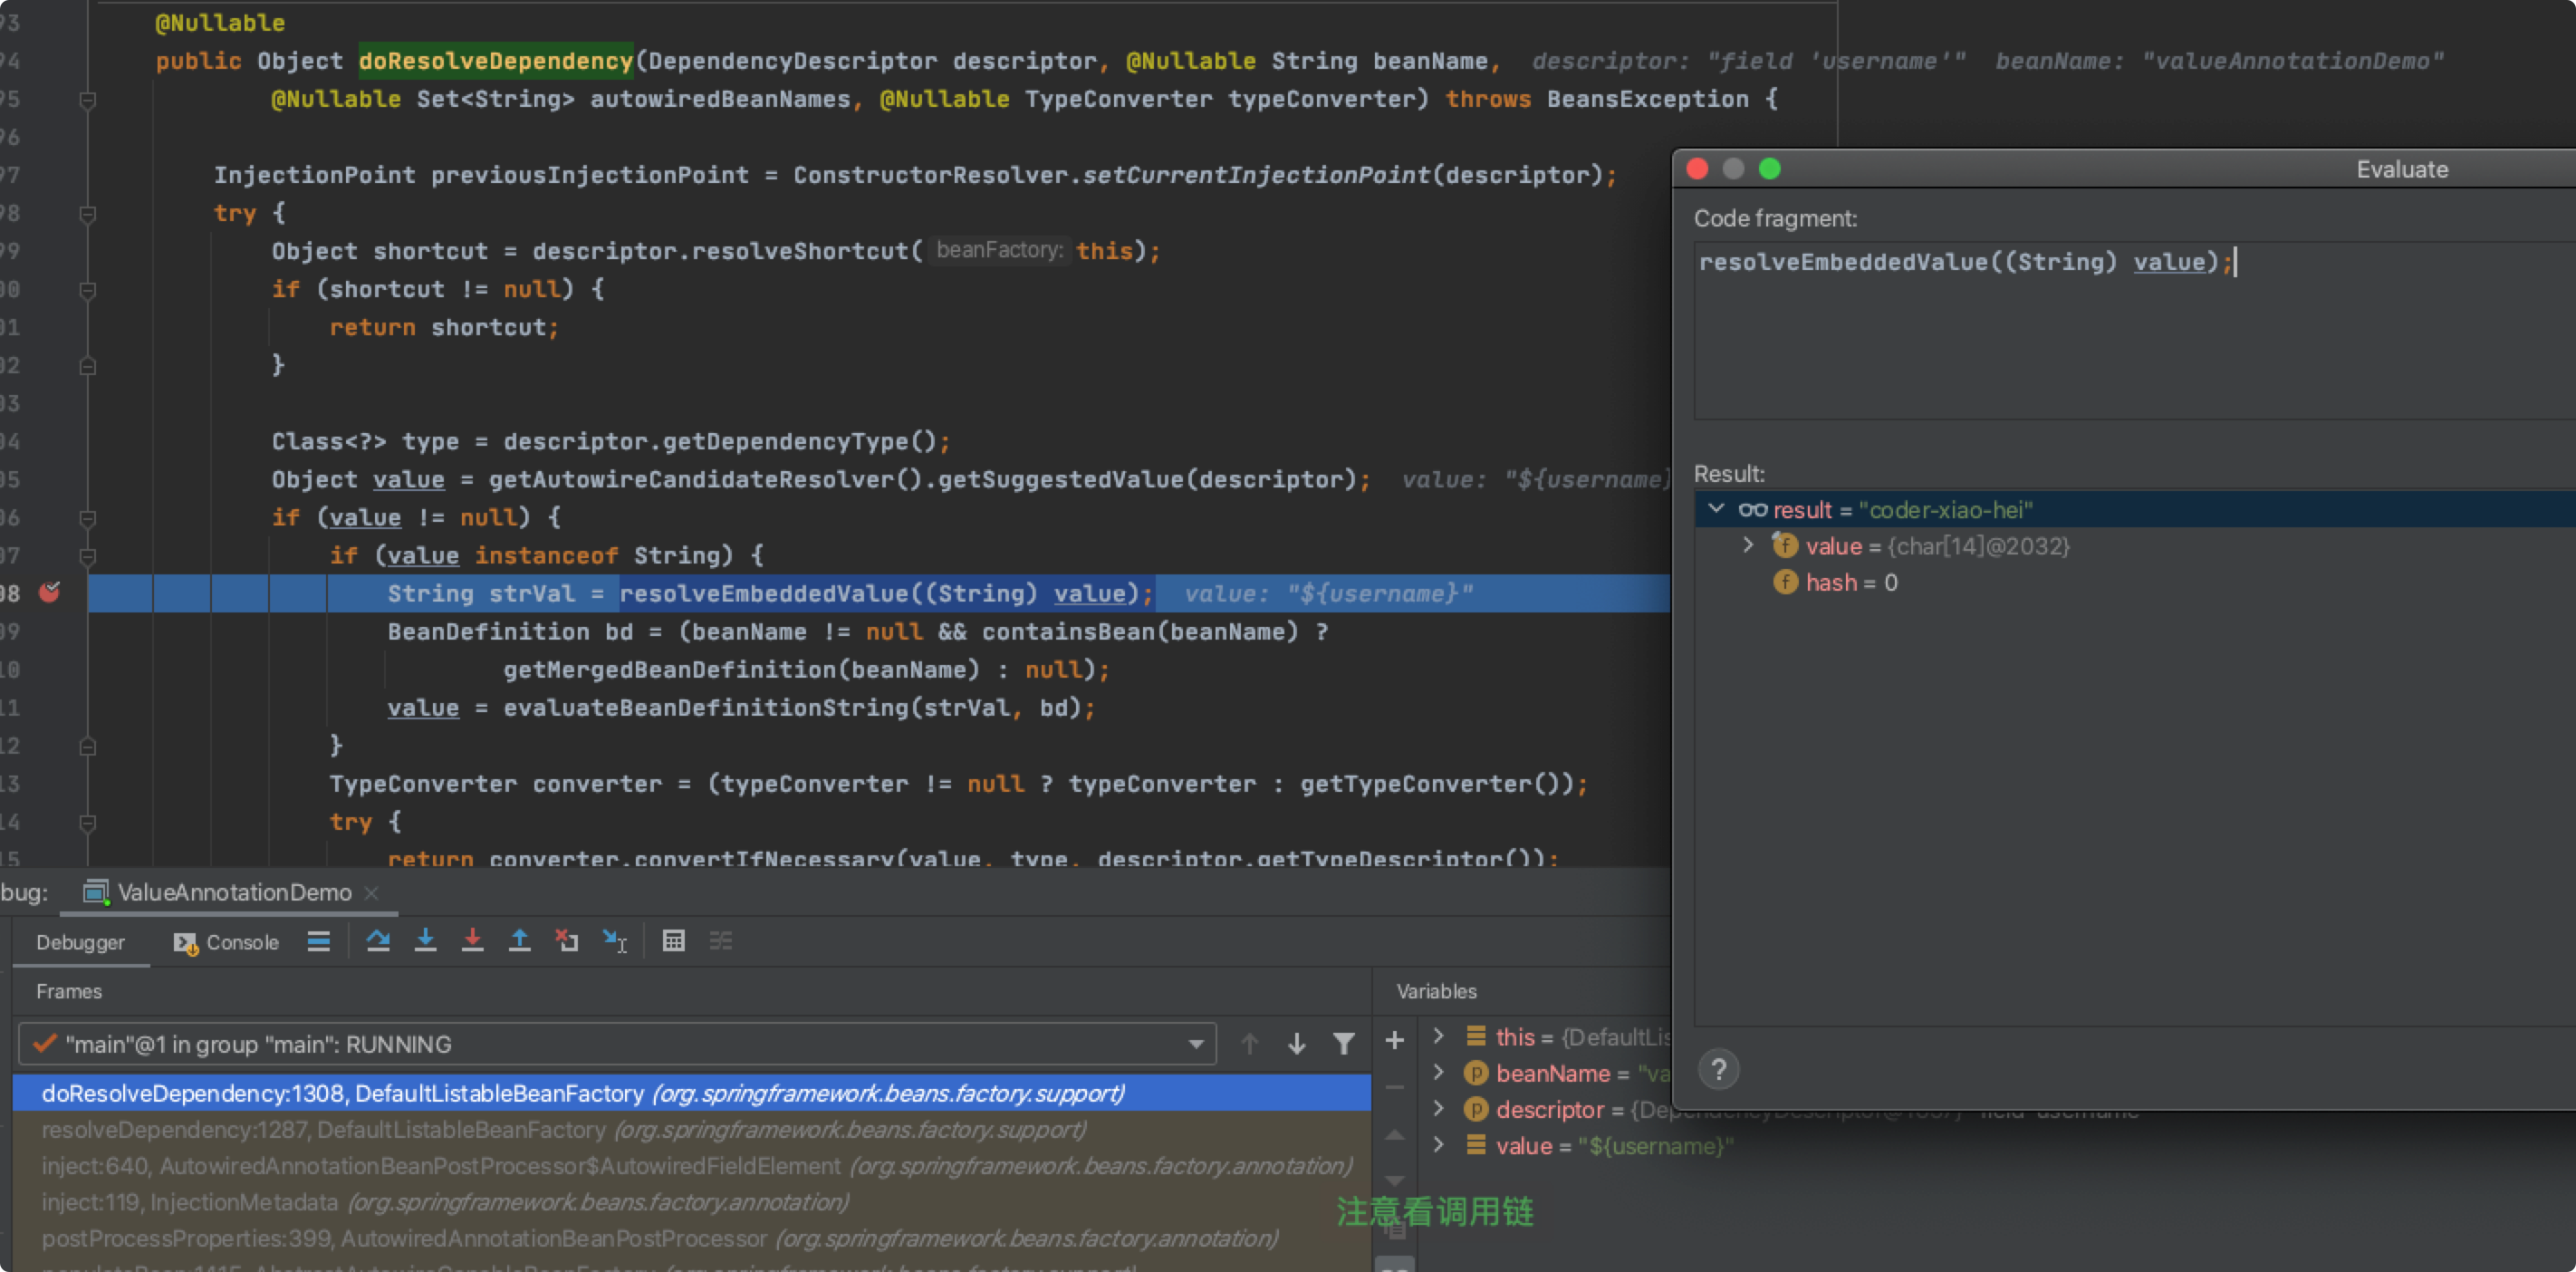
通过上述的 debug 跟踪发现可以通过调用 ConfigurableBeanFactory#resolveEmbeddedValue 方法可以获取占位符的值。
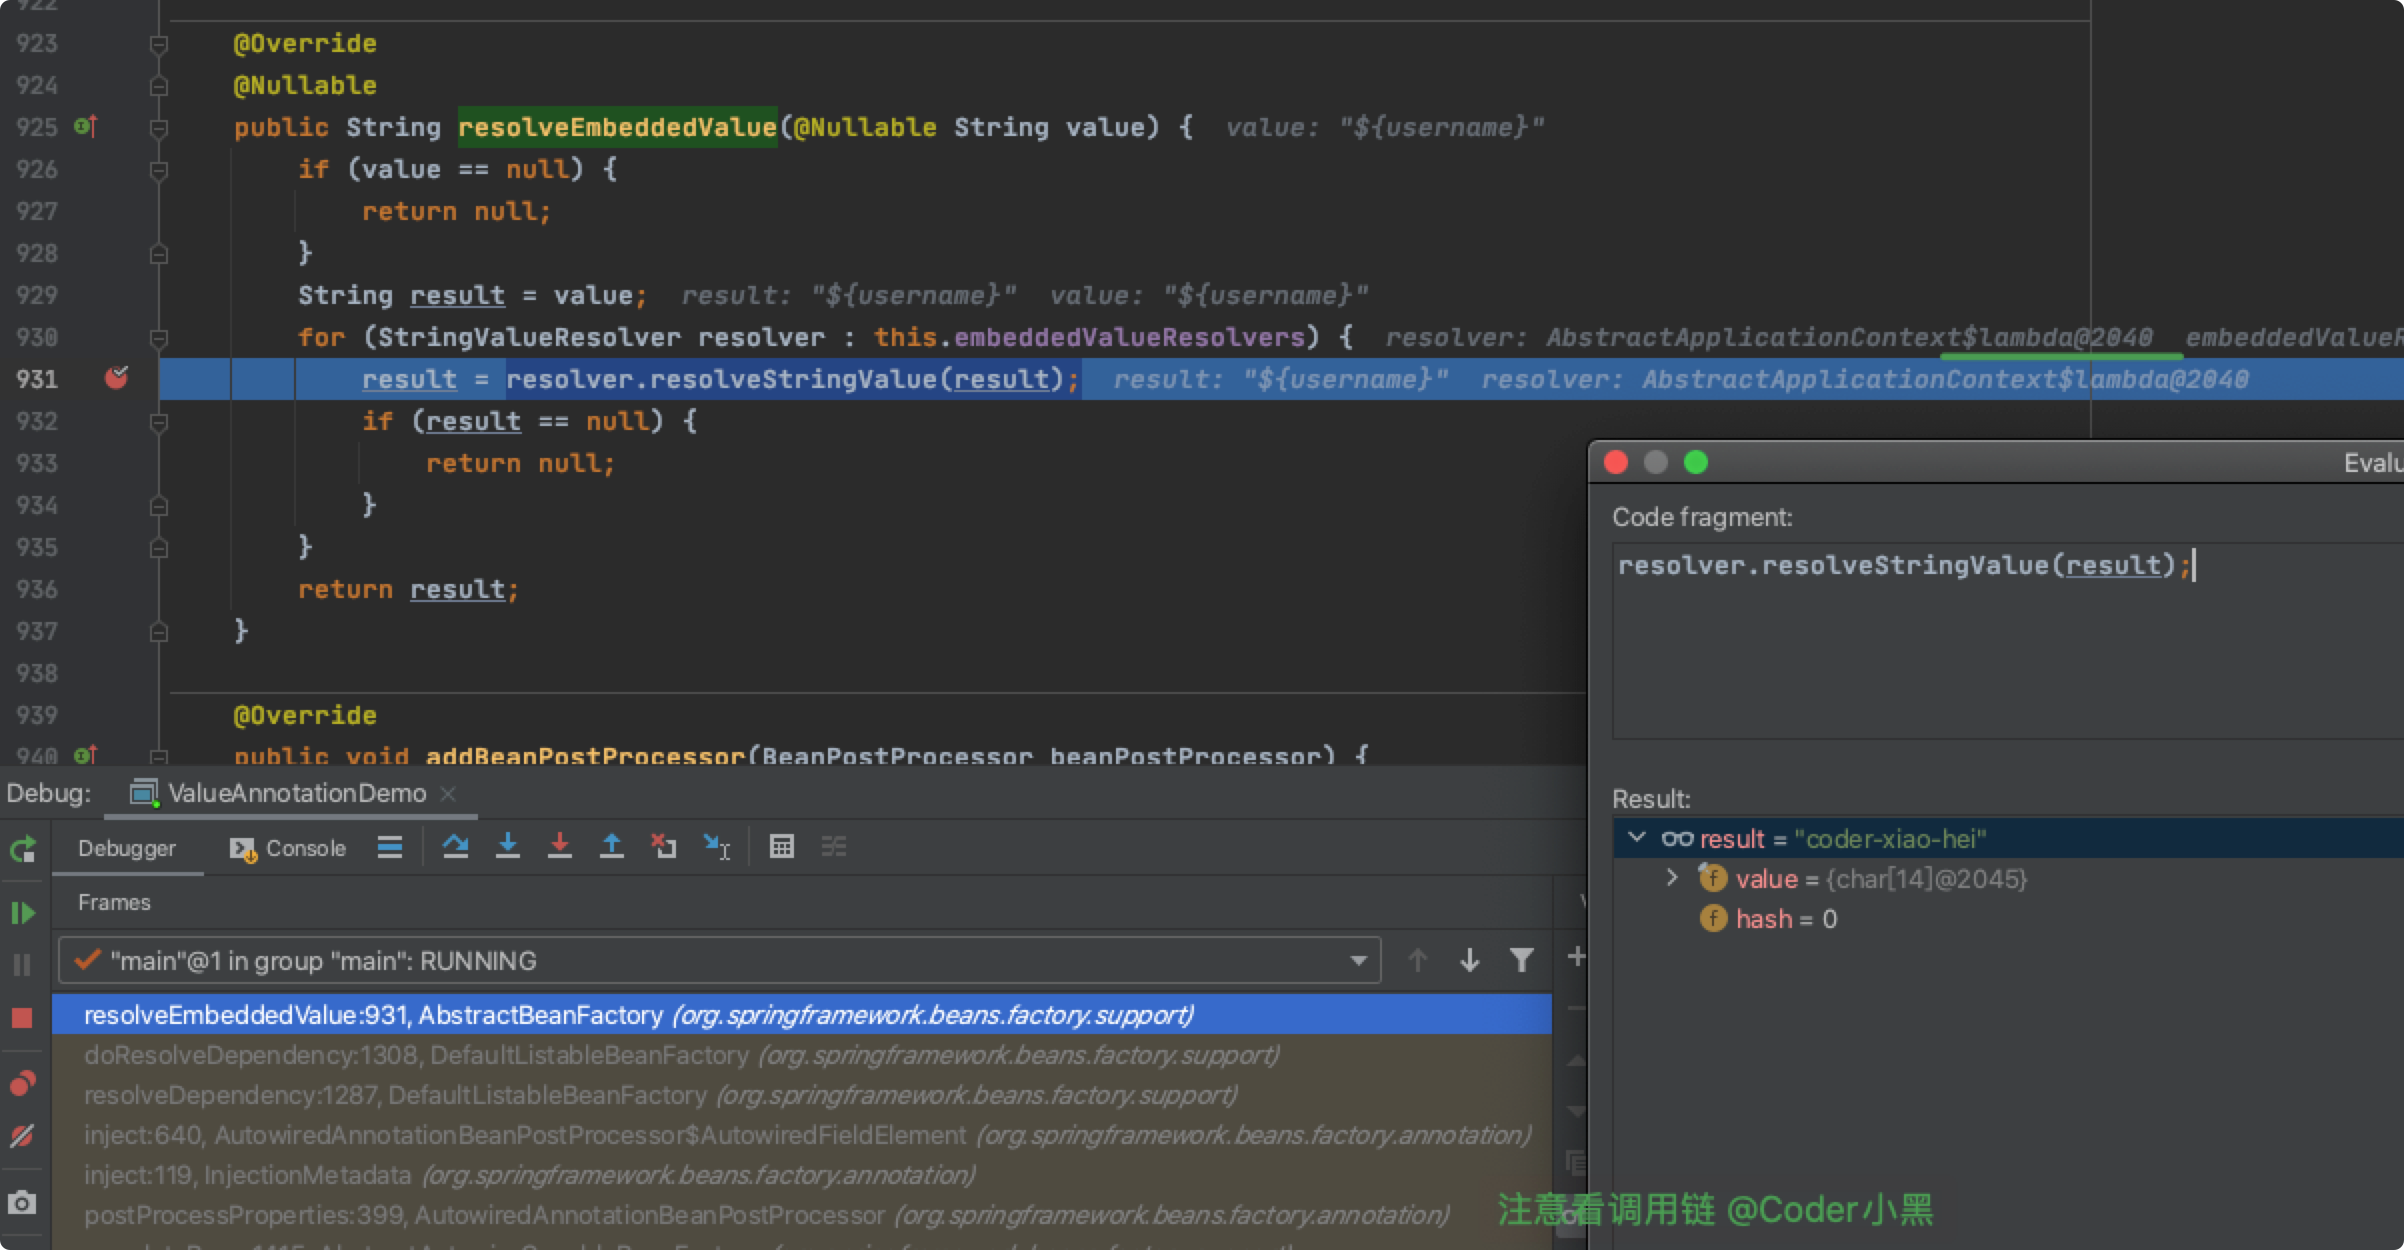
这里的 resolver 是一个 lambda表达式,继续 debug 我们可以找到具体的执行方法:

到此,我们简单总结下:
@Value 的注入由 AutowiredAnnotationBeanPostProcessor 来提供支持AutowiredAnnotationBeanPostProcessor 中通过调用 ConfigurableBeanFactory#resolveEmbeddedValue 来获取占位符具体的值ConfigurableBeanFactory#resolveEmbeddedValue 其实是委托给了 ConfigurableEnvironment 来实现https://docs.spring.io/spring-framework/docs/current/reference/html/core.html#beans-environment
The Environment interface is an abstraction integrated in the container that models two key aspects of the application environment: profiles and properties.
A profile is a named, logical group of bean definitions to be registered with the container only if the given profile is active. Beans may be assigned to a profile whether defined in XML or with annotations. The role of the Environment object with relation to profiles is in determining which profiles (if any) are currently active, and which profiles (if any) should be active by default.
Properties play an important role in almost all applications and may originate from a variety of sources: properties files, JVM system properties, system environment variables, JNDI, servlet context parameters, ad-hoc Properties objects, Map objects, and so on. The role of the Environment object with relation to properties is to provide the user with a convenient service interface for configuring property sources and resolving properties from them.
Environment 是对 profiles 和 properties 的抽象:
现在我们主要来关注 Environment 对 properties 的支持。
下面,我们就来具体看一下 AbstractApplicationContext#finishBeanFactoryInitialization 中的这个 lambda 表达式。
strVal -> getEnvironment().resolvePlaceholders(strVal)
首先,通过 AbstractApplicationContext#getEnvironment 获取到了 ConfigurableEnvironment 的实例对象,这里创建的其实是 StandardEnvironment 实例对象。
在 StandardEnvironment 中,默认添加了两个自定义的属性源,分别是:systemEnvironment 和 systemProperties。
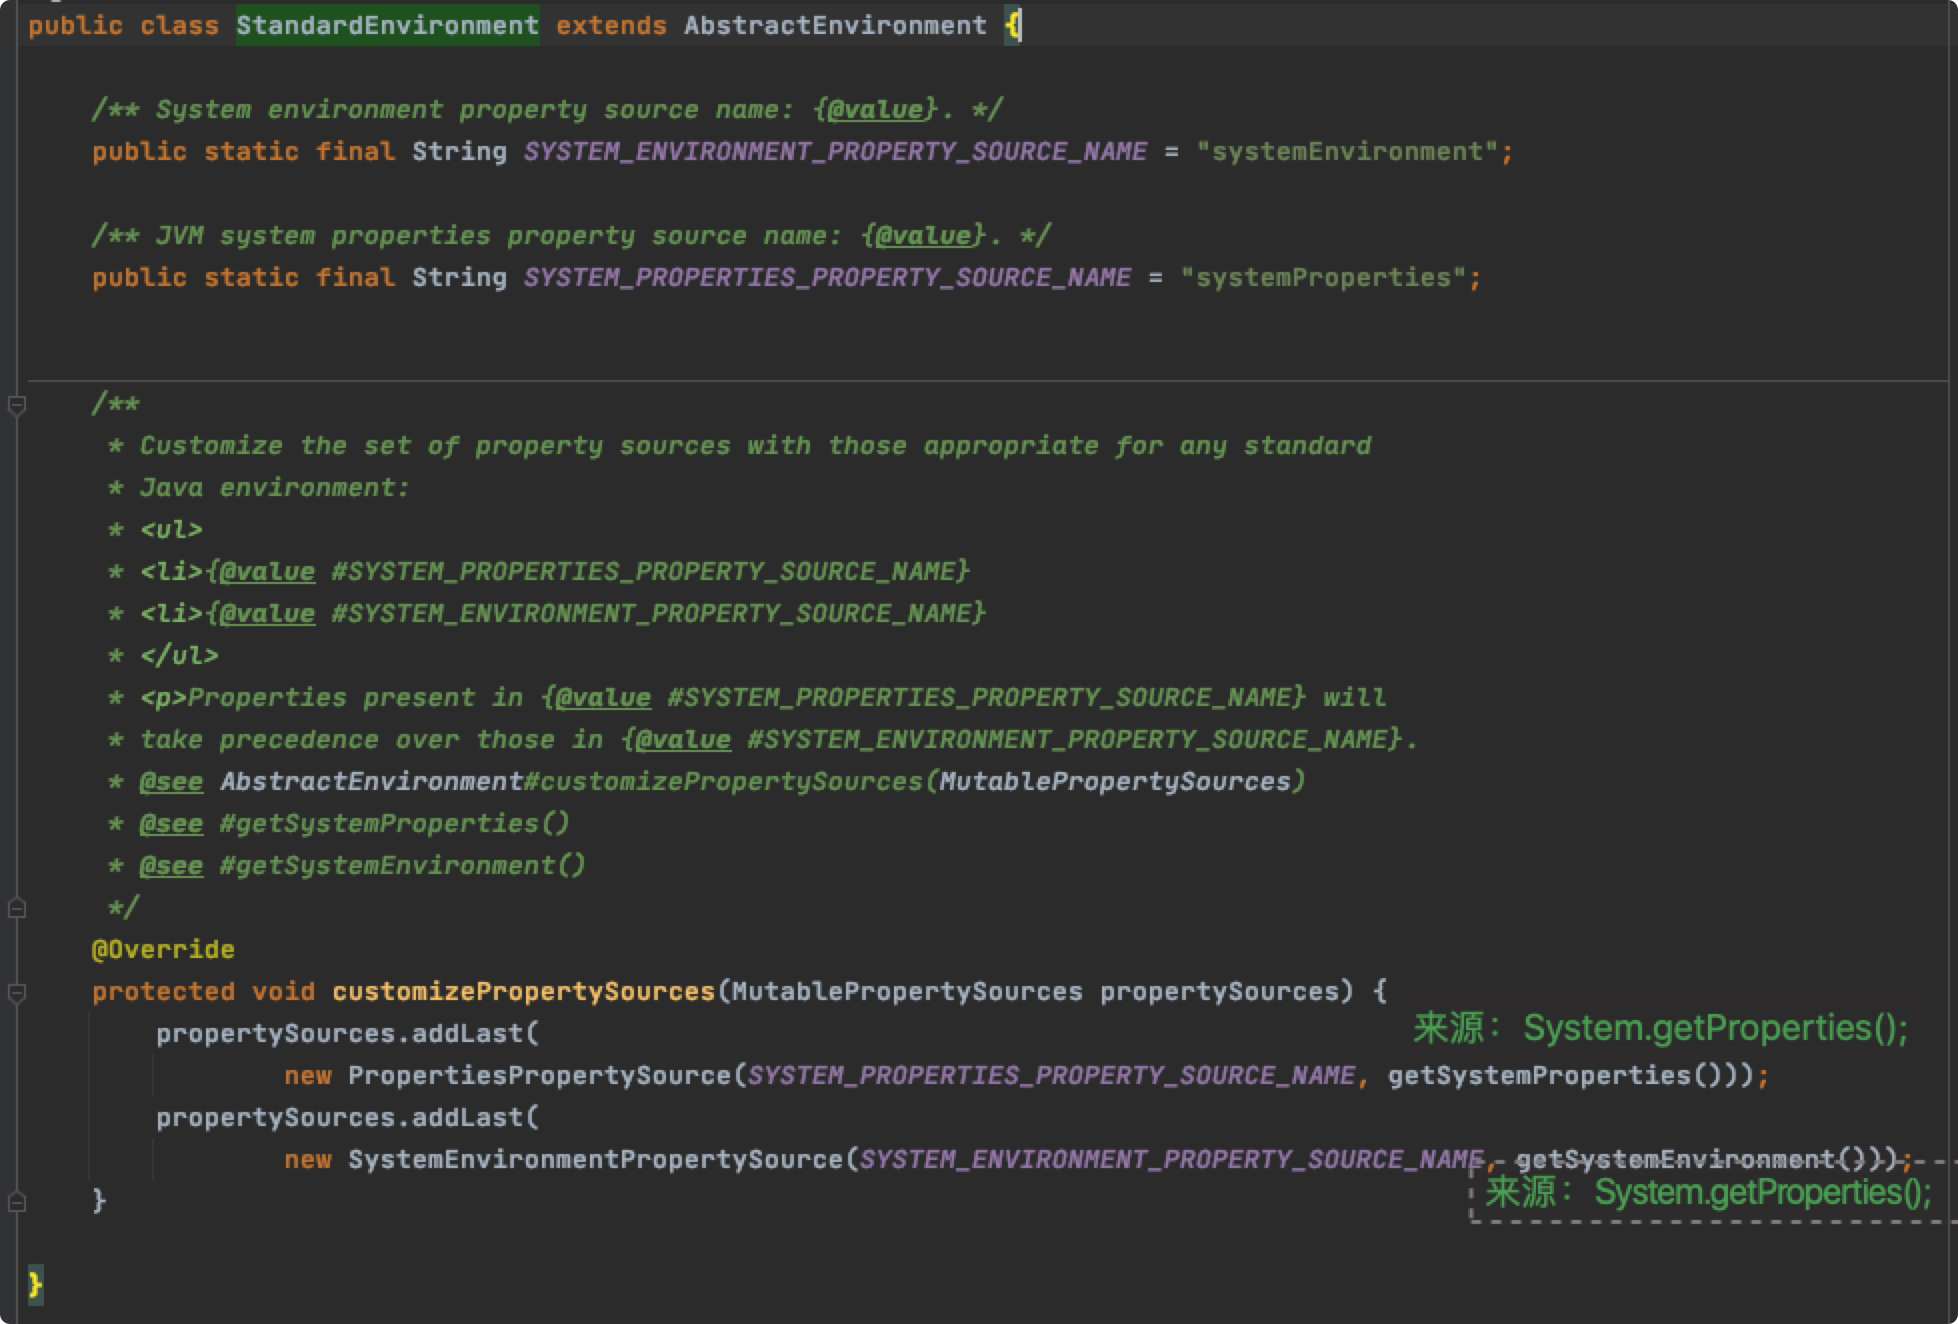
也就是说,@Value 默认是可以注入 system properties 和 system environment 的。
StandardEnvironment 继承了 AbstractEnvironment 。
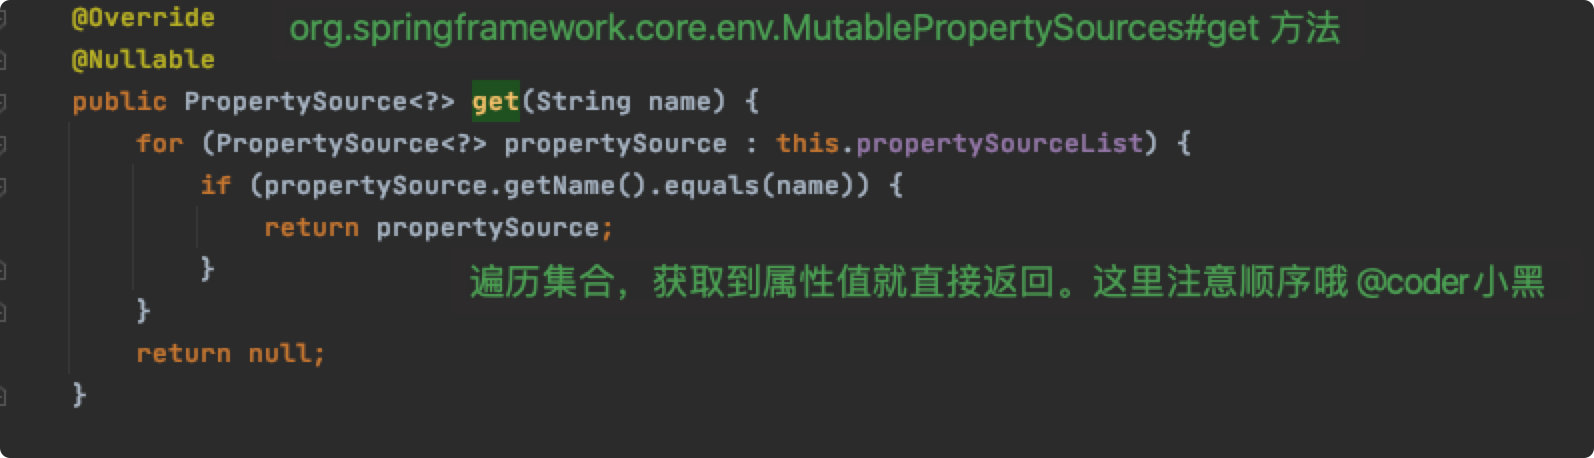
在 AbstractEnvironment 中的属性配置被存放在 MutablePropertySources 中。同时,属性占位符的数据也来自于此。

MutablePropertySources 中存放了多个 PropertySource ,并且这些 PropertySource 是有顺序的。
PropertySource 是 Spring 对配置属性源的抽象。
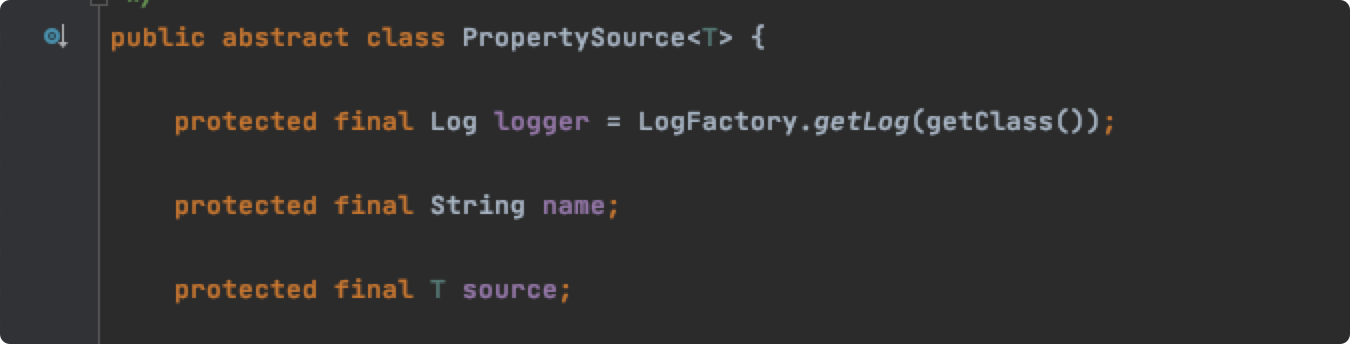
name 表示当前属性源的名称。source 存放了当前的属性。
读者可以自行查看一下最简单的基于 Map 的实现:MapPropertySource 。
有两种方式可以进行属性源配置:使用 @PropertySource 注解,或者通过 MutablePropertySources 的 API。例如:
@Configuration
@PropertySource("classpath:application.properties")
public class ValueAnnotationDemo {

    @Value("${username}")
    private String username;

    public static void main(String[] args) {
        AnnotationConfigApplicationContext context = new AnnotationConfigApplicationContext(ValueAnnotationDemo.class);

        Map<String, Object> map = new HashMap<>();
        map.put("my.name", "coder小黑");
        context.getEnvironment()
                .getPropertySources()
                .addFirst(new MapPropertySource("coder-xiaohei-test", map));
    }
}
PropertySource 来抽象配置属性源, PropertySource 允许有多个。MutablePropertySourcesStandardEnvironment#customizePropertySources@PropertySource 注解或者 MutablePropertySources API 来添加自定义配置属性源Environment 是 Spring 对 profiles 和 properties 的抽象,默认实现是 StandardEnvironment@Value 的注入由 AutowiredAnnotationBeanPostProcessor 来提供支持,数据源来自于 PropertySourcepublic class Demo {
@Value("${os.name}") // 来自 system properties
private String osName;
@Value("${user.name}") // 通过 MutablePropertySources API 来注册
private String username;
@Value("${os.version}") // 测试先后顺序
private String osVersion;
public static void main(String[] args) {
AnnotationConfigApplicationContext context = new AnnotationConfigApplicationContext();
context.register(Demo.class);
ConfigurableEnvironment environment = context.getEnvironment();
MutablePropertySources propertySources = environment.getPropertySources();
Map<String, Object> source = new HashMap<>();
source.put("user.name", "xiaohei");
source.put("os.version", "version-for-xiaohei");
// 添加自定义 MapPropertySource,且放在第一位
propertySources.addFirst(new MapPropertySource("coder-xiao-hei-test", source));
// 启动容器
context.refresh();
Demo bean = context.getBean(Demo.class);
// Mac OS X
System.out.println(bean.osName);
// xiaohei
System.out.println(bean.username);
// version-for-xiaohei
System.out.println(bean.osVersion);
// Mac OS X
System.out.println(System.getProperty("os.name"));
// 10.15.7
System.out.println(System.getProperty("os.version"));
// xiaohei
System.out.println(environment.getProperty("user.name"));
//xiaohei
System.out.println(environment.resolvePlaceholders("${user.name}"));
context.close();
}
}
@Value 的值都来源于 PropertySource ,而我们可以通过 API 的方式来向 Spring Environment 中添加自定义的 PropertySource。
在此处,我们选择通过监听 ApplicationEnvironmentPreparedEvent 事件来实现。
@Slf4j
public class CentralConfigPropertySourceListener implements ApplicationListener<ApplicationEnvironmentPreparedEvent> {

    private final CentralConfig centralConfig = new CentralConfig();

    @Override
    public void onApplicationEvent(ApplicationEnvironmentPreparedEvent event) {
        centralConfig.loadCentralConfig();
        event.getEnvironment().getPropertySources().addFirst(new CentralConfigPropertySource(centralConfig));
    }


    static class CentralConfig {
        private volatile Map<String, Object> config = new HashMap<>();

        private void loadCentralConfig() {
            // 模拟从配置中心获取数据
            config.put("coder.name", "xiaohei");
            config.put("coder.language", "java");

            new Thread(() -> {
                try {
                    TimeUnit.SECONDS.sleep(10);
                } catch (InterruptedException e) {
                    e.printStackTrace();
                }
                // 模拟配置更新
                config.put("coder.language", "java222");
                System.out.println("update ‘coder.language‘ success");
            }).start();

        }
    }

    static class CentralConfigPropertySource extends EnumerablePropertySource<CentralConfig> {

        private static final String PROPERTY_SOURCE_NAME = "centralConfigPropertySource";

        public CentralConfigPropertySource(CentralConfig source) {
            super(PROPERTY_SOURCE_NAME, source);
        }

        @Override
        @Nullable
        public Object getProperty(String name) {
            return this.source.config.get(name);
        }

        @Override
        public boolean containsProperty(String name) {
            return this.source.config.containsKey(name);
        }

        @Override
        public String[] getPropertyNames() {
            return StringUtils.toStringArray(this.source.config.keySet());
        }
    }
}
通过 META-INF/spring.factories 文件来注册:
org.springframework.context.ApplicationListener=com.example.config.CentralConfigPropertySourceListener
一般来说有两种方案:
客户端拉模式:客户端长轮询服务端,如果服务端数据发生修改,则立即返回给客户端
服务端推模式:发布更新配置之后,由配置中心主动通知各客户端
Spring 的 @Value 注入是在 Bean 初始化阶段执行的。在程序运行过程当中,配置项发生了变更, @Value 并不会重新注入。
我们可以通过增强 @Value 或者自定义新的注解来支持动态更新配置。这里小黑选择的是第二种方案,自定义新的注解。
@Target(ElementType.FIELD)
@Retention(RetentionPolicy.RUNTIME)
@Documented
public @interface ConfigValue {
    String value();
}
@Component
public class ConfigValueAnnotationBeanPostProcessor implements BeanPostProcessor, EnvironmentAware {

    private static final PropertyPlaceholderHelper PROPERTY_PLACEHOLDER_HELPER =
            new PropertyPlaceholderHelper(
                    SystemPropertyUtils.PLACEHOLDER_PREFIX,
                    SystemPropertyUtils.PLACEHOLDER_SUFFIX,
                    SystemPropertyUtils.VALUE_SEPARATOR,
                    false);

    private MultiValueMap<String, ConfigValueHolder> keyHolder = new LinkedMultiValueMap<>();

    private Environment environment;

    @Override
    public Object postProcessBeforeInitialization(Object bean, String beanName) throws BeansException {

        ReflectionUtils.doWithFields(bean.getClass(),
                field -> {
                    ConfigValue annotation = AnnotationUtils.findAnnotation(field, ConfigValue.class);
                    if (annotation == null) {
                        return;
                    }
                    String value = environment.resolvePlaceholders(annotation.value());
                    ReflectionUtils.makeAccessible(field);
                    ReflectionUtils.setField(field, bean, value);
                    String key = PROPERTY_PLACEHOLDER_HELPER.replacePlaceholders(annotation.value(), placeholderName -> placeholderName);
                    ConfigValueHolder configValueHolder = new ConfigValueHolder(bean, beanName, field, key);
                    keyHolder.add(key, configValueHolder);
                });

        return bean;
    }

    /**
     * 当配置发生了修改
     *
     * @param key 配置项
     */
    public void update(String key) {
        List<ConfigValueHolder> configValueHolders = keyHolder.get(key);
        if (CollectionUtils.isEmpty(configValueHolders)) {
            return;
        }
        String property = environment.getProperty(key);
        configValueHolders.forEach(holder -> ReflectionUtils.setField(holder.field, holder.bean, property));
    }

    @Override
    public void setEnvironment(Environment environment) {
        this.environment = environment;
    }

    @AllArgsConstructor
    static class ConfigValueHolder {
        final Object bean;
        final String beanName;
        final Field field;
        final String key;
    }
}
主测试代码:
@SpringBootApplication
public class ConfigApplication {

    @Value("${coder.name}")
    String coderName;

    @ConfigValue("${coder.language}")
    String language;

    public static void main(String[] args) throws InterruptedException {
        ConfigurableApplicationContext context = SpringApplication.run(ConfigApplication.class, args);
        ConfigApplication bean = context.getBean(ConfigApplication.class);
        // xiaohei
        System.out.println(bean.coderName);
        // java
        System.out.println(bean.language);

        ConfigValueAnnotationBeanPostProcessor processor = context.getBean(ConfigValueAnnotationBeanPostProcessor.class);

        // 模拟配置发生了更新
        TimeUnit.SECONDS.sleep(10);

        processor.update("coder.language");

        // java222
        System.out.println(bean.language);
    }
}
原文:https://www.cnblogs.com/coderxiaohei/p/14026219.html