5.5.1 Git介绍
Git是由linux之父Linux Torvalds使用C语言开发的一款开源分布式版本控制软件,一经推出受到了世界开发爱好者的喜爱,并逐渐成为版本控制的主流。它简单高效,支持并行开发分支,完全分布式管理,相比集中式管理的svn更强大更安全。svn是集中式管理,git是分布式管理。svn集中式管理有中央服务器,要求必须联网,外网环境中,效率严重依赖带宽大小,中央服务器必须保持稳定可靠。git分布式管理是将代码库完整复制到本地,不用联网不怕丢失和损毁,更快更安全。
5.5.2 Git服务器搭建
1)环境准备
设置好网络和防火墙 网络需要能访问外网,
关闭防火墙
[root@centos7 ~]# setenforce 0
[root@centos7 ~]# systemctl stop firewalld
[root@centos7 ~]# systemctl disable firewalld
[root@centos7 ~]# sed -i ‘s/enforcing/disabled/g‘ /etc/selinux/config
设置yum源
[root@centos7 ~] # cd /etc/yum.repos.d/
[root@centos7 ~] # wget http://mirrors.aliyun.com/repo/Centos-7.repo
[root@centos7 ~] # wget http://mirrors.aliyun.com/repo/epel-7.repo
[root@centos7 ~] # yum -y install epel-release
配置ssh,启用rsa认证
修改配置文件,增加下面内容
[root@centos7 ~]# vi /etc/ssh/sshd_config
RSAAuthentication yes
PubkeyAuthentication yes
GSSAPICleanupCredentials no
StrictModes no
然后重启sshd
[root@centos7 ~]# systemctl restart sshd
2)搭建git服务端
ssh免密码验证连接
创建git用户
[root@centos7 ~]# useradd git
[root@centos7 ~]# passwd git #设置一个密码 (git@123)
[root@centos7 ~]# su git
[git@centos7 ~]# cd /home/git/
[git@centos7 ~]# ssh-keygen -t rsa #生成rsa密钥,一路回车
默认生成密钥id_rsa文件
.ssh
├── id_rsa
└── id_rsa.pub #公钥 服务端里验证连接着身份
[git@centos7 ~]# cd .ssh/
[git@centos7 .ssh]# touch authorized_keys
[git@centos7 .ssh]# cat id_rsa.pub >> authorized_keys
[git@centos7 .ssh]# chmod 600 authorized_keys
[git@centos7 .ssh]# chmod 700 id_rsa*
[root@centos7 ~]# systemctl restart sshd #root用户再次重启sshd
安装git服务端
[root@centos7 ~]# yum install git -y
[root@centos7 ~]# cd /home/git/
[root@centos7 git]# mkdir repositories #创建仓库目录
[root@centos7 git]# cd repositories/
[root@centos7 repositories]# mkdir test #创建库
[root@centos7 repositories]# cd test/
[root@centos7 test]# git --bare init #初始化项目库
配置全局用户邮箱
[root@centos7 test]# git config --global user.name "git"
[root@centos7 test]# git config --global user.email "123456789@qq.com"
在本机的tmp目录测试
[root@centos7 ~]# cd /tmp/
[root@centos7 tmp]# git clone git@192.168.142.133:/home/git/repositories/test #克隆test库到当前目录
[root@centos7 tmp]# cd test/ #进入库目录
[root@centos7 test]# mkdir game #新建目录
[root@centos7 test]# touch opp.txt nginx.log cc.txt game/read.txt #新建文件
[root@centos7 test]# git add . #增加库文件
[root@centos7 test]# git commit -m "第一次提交" #提交文件到本地
[root@centos7 test]# git push origin master push代码到服务端master分支上
5.5.3 Git客户端(windows)
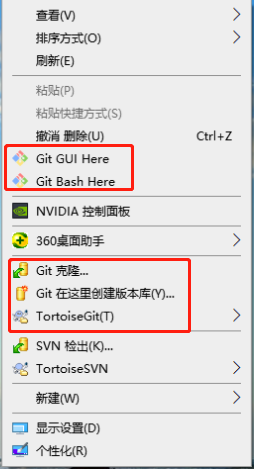
由于官网下载安装包速度太慢,这里直接使用360软件管家安装Git或者TortoiseGit软件及语言包。
安装完成后就可以使用git管理版本库了,右键查看如下图
原生Git设置免密连接git库
在windows机器上,进入C盘--->用户--->当前用户目录---右键Git Bash Here--->执行用户及邮箱配置---->ssh-keygen生产密钥文件--->将公钥内容复制加入到git服务器端git用户下的.ssh/authorized_keys ,到此即可免密连接git服务端。下面是具体操作步骤。
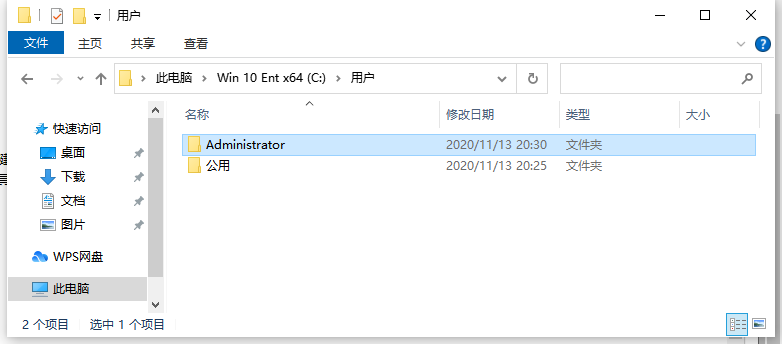
1 打开windows用户目录
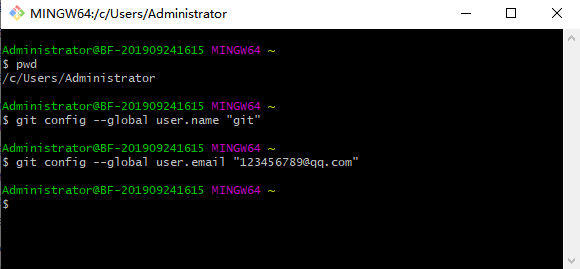
2 目录上右键Git Bash Here--->执行用户及邮箱全局配置
git config --global user.name "git"
git config --global user.email "123456789@qq.com"
3 执行ssh-keygen -t rsa 一路回车,生成密钥文件
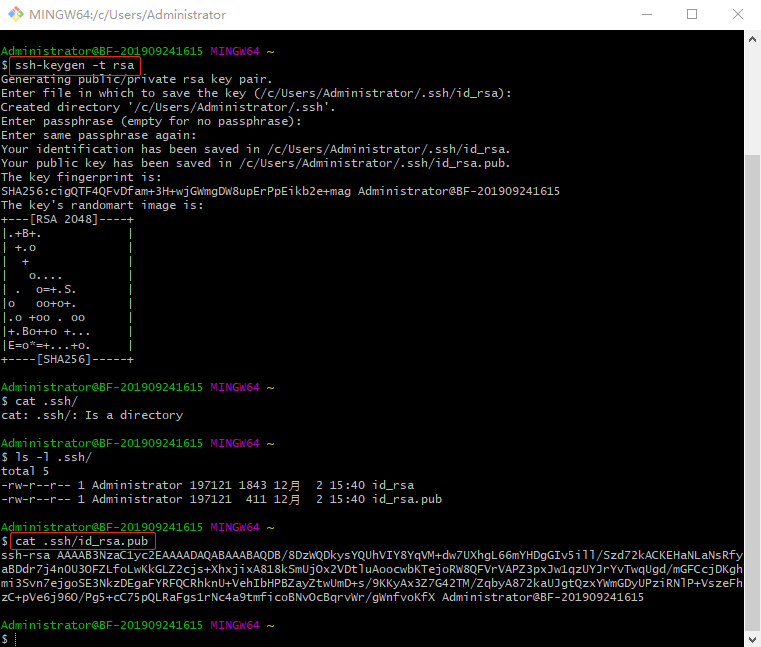
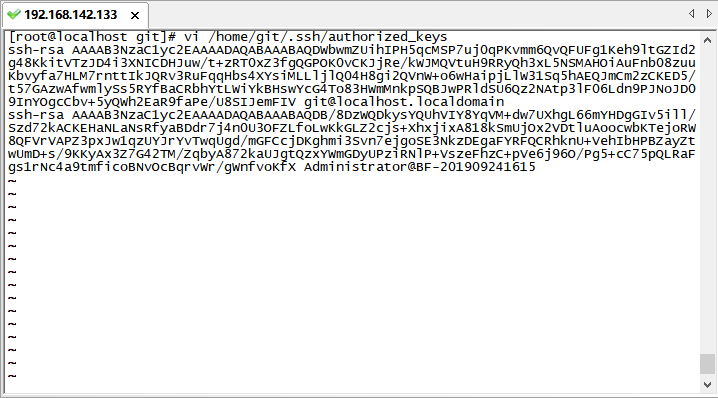
4 将公钥内容复制加入到服务器端git用户家目录下的.ssh/authorized_keys文件中。
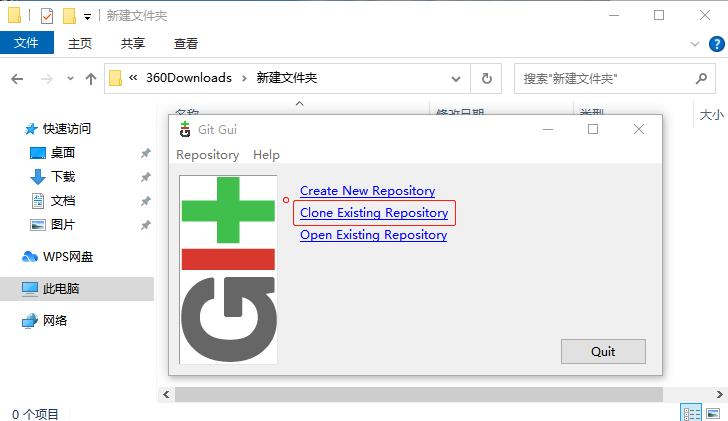
5 使用Git GUI 管理版本库
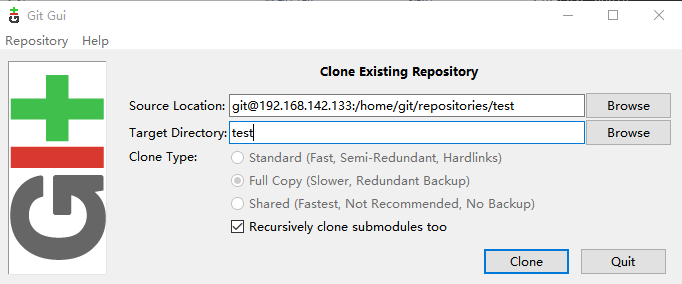
克隆版本库,设置免密后可以直接下载 git@192.168.142.133:/home/git/repositories/test
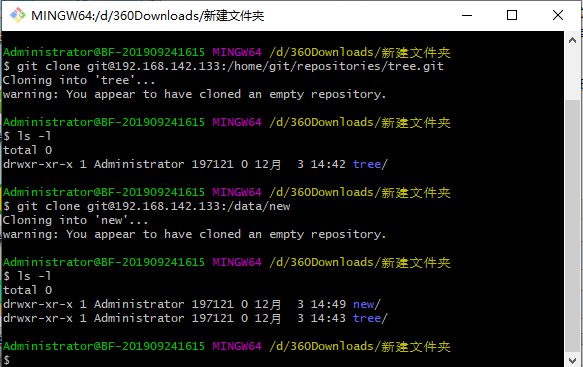
当本地公钥设置正确,克隆代码仍要求输入密码等异常,大多是由于ssh配置不准确以及git用户的.ssh目录文件权限问题。.ssh目录设置700,authorized_keys设置600,id_rsa设置700,id_rsa.pub设置700,库目录属主权限可以设置777。经过调整后,一般都能实现免密git。注意,一般把库目录与用户目录应该分开,容易引起权限混乱,可以把库目录设置到单独的/data/下。
注意:原生的Git GUI 使用中常常出现无法下载或上传合并的情况,建议使用Git Bash控制管理,直接使用命令,更方便更有效(如下图)。
5.5.4 git命令
全局设置
[root@centos7 ~]# git config --global user.name git #设置git为用户
[root@centos7 ~]# git config --global user.email 123456@qq.com #设置邮箱
[root@centos7 ~]# git config --list #检查配置信息
创建新版本库
[root@centos7 ~]# git init --bare /data/new.git #初始化创建new版本库
[root@centos7 ~]# chown git.git /data/new.git/ -R #授权git用户push写入权限
[root@centos7 ~]# chmod 777 /data/new.git/ -R #其他用户也可push推送到远程
克隆远程版本库
[root@centos7 ~]# git clone git@192.168.142.133:/data/new.git #克隆远程版本库
修改提交文件
[root@centos7 ~]# git add . #添加所有新增或修改的文件
[root@centos7 ~]# git add app.txt #添加指定app.txt文件
[root@centos7 ~]# git mv app.txt pp.txt #文件重命名
[root@centos7 ~]# git rm vivo.txt #删除txt文件
[root@centos7 ~]# git commit -m app.txt #提交指定app.txt文件
[root@centos7 ~]# git commit -m "提交注释" #提交所有变更文件
查看提交历史
[root@centos7 ~]# git log #查看提交历史
[root@centos7 ~]# git log -p app.txt #查看文件的提交历史
[root@centos7 ~]# git blame app.txt #列表方式查看文件的提交历史
分支操作
[root@centos7 ~]# git branch #显示所有本地分支
[root@centos7 ~]# git branch dev #创建dev分支
[root@centos7 ~]# git checkout dev #切换到dev分支
[root@centos7 ~]# git branch -d dev #删除本地分支
合并分支
[root@centos7 ~]# git merge master #合并master分支到当前分支
[root@centos7 ~]# git merge dev #合并dev分支到当前分支
远程操作
[root@centos7 ~]# git remote -v #查看远程库信息
[root@centos7 ~]# git remote show git@192.168.142.133:/data/new.git #查看指定远程库信息
[root@centos7 ~]# git remote add origin git@192.168.142.133:/data/new.git #关联到远程版本库
[root@centos7 ~]# git fetch git@192.168.142.133:/data/new.git #从远程库获取最新代码
[root@centos7 ~]# git pull #下载最新代码并快速合并
[root@centos7 ~]# git push origin master #上传代码到master分支
5.5.5 gitlab服务器搭建
关闭防火墙
[root@centos7 ~]# setenforce 0
[root@centos7 ~]# systemctl stop firewalld
[root@centos7 ~]# systemctl disable firewalld
[root@centos7 ~]# sed -i ‘s/enforcing/disabled/g‘ /etc/selinux/config
安装依赖包
[root@centos7 ~]# yum install curl policycoreutils openssh-server openssh-clients
添加gitlab-YUM源
[root@centos7 ~]# vi /etc/yum.repos.d/gitlab-ce.repo
[gitlab-ce]
name=Gitlab CE Repository
baseurl=https://mirrors.tuna.tsinghua.edu.cn/gitlab-ce/yum/el$releasever/
gpgcheck=0
enabled=1
安装gitlab
[root@centos7 ~]# yum install gitlab-ce -y
配置gitlab
[root@centos7 ~]# vi /etc/gitlab/gitlab.rb
external_url ‘http://192.168.142.133:1800‘
加载配置并启动
[root@centos7 ~]# gitlab-ctl reconfigure
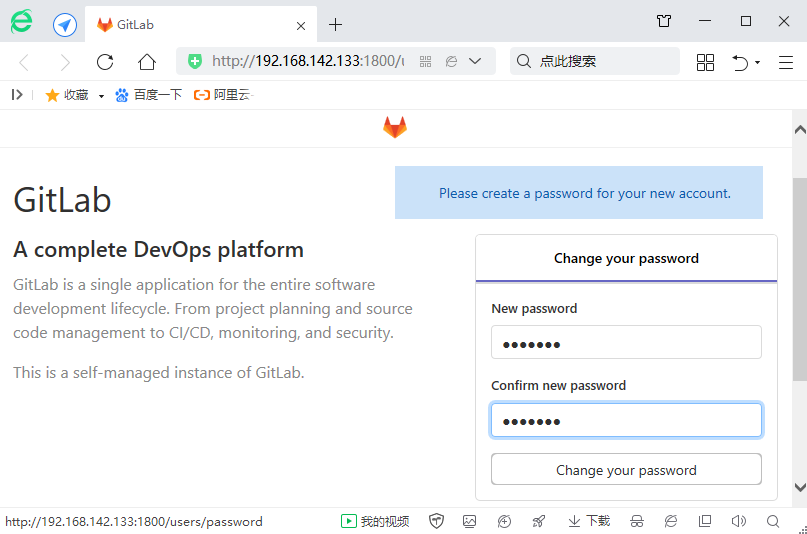
浏览器访问
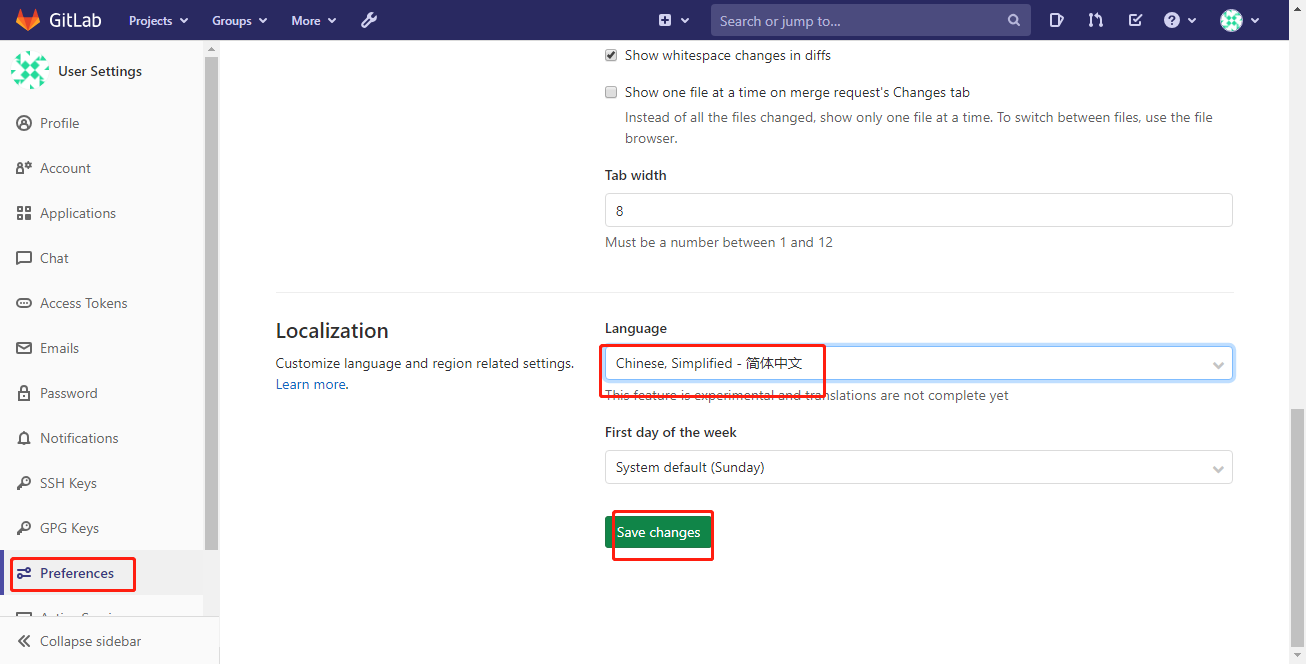
浏览器第一次访问,进入root用户密码设置页面,设置后即可进入管理页面使用,首先设置为简体中文,剩下就是页面上操作了。
使用yum安装gitlab的一些默认路径
默认安装路径:/opt/gitlab/
程序数据路径:/var/opt/gitlab
gitlab配置文件:/etc/gitlab/gitlab.rb
代码仓库保存路径:/var/opt/gitlab/git-data/repositories/
代码仓库备份路径:/var/opt/gitlab/backups/
postgresql数据目录:/var/opt/gitlab/postgresql/data/
redis配置目录:/var/opt/gitlab/redis
gitlab常用命令
gitlab-ctl start #启动所有gitlab组件
gitlab-ctl stop #停止所有gitlab组件
gitlab-ctl restart #重启所有gitlab组件
gitlab-ctl status #查看服务状态
gitlab-ctl reconfigure #加载配置并启动服务
gitlab-ctl tail #查看gitlab日志
原文:https://www.cnblogs.com/superleedo/p/13964378.html