Spring Data 是一个非常大的伞形项目,由多个子项目组成,其中大多数子项目都关注对不同的数据库类型进行数据持久化。比较流行的几个 Spring Data 项目包括:
Spring Data 为所有项目提供了一项最有趣且最有用的特性,就是基于 repository 规范接口自动生成 repository 的功能。
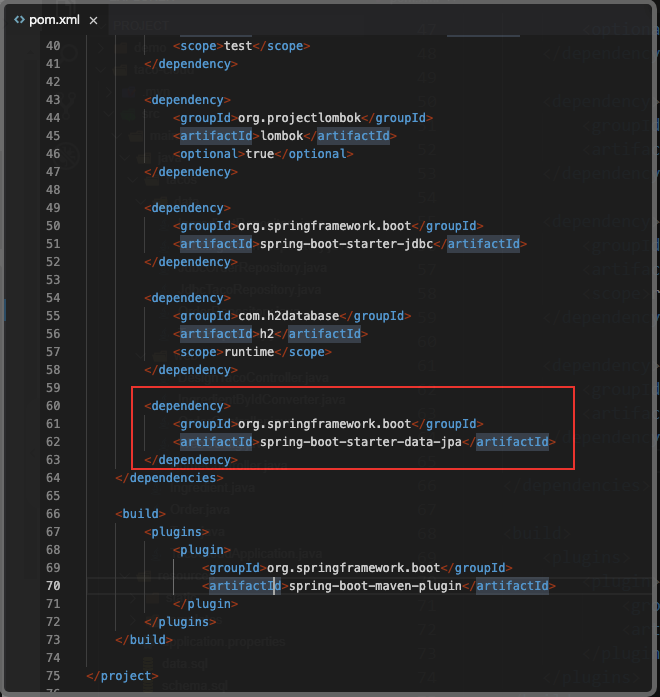
要了解 Spring Data 是如何运行的,我们需要重新开始,将本章前文基于 JDBC 的 repository 替换为使用 Spring Data JPA 的 repository。首先,我们需要将 Spring Data JPA 添加到项目的构建文件中。
Spring Boot 应用可以通过 JPA starter 来添加 Spring Data JPA。这个 starter 依赖不仅会引入 Spring Data JPA,还会传递性地将 Hibernate 作为 JPA 实现引入进来:
<dependency>
  <groupId>org.springframework.boot</groupId>
  <artifactId>spring-boot-starter-data-jpa</artifactId>
</dependency>

如果你想要使用不同的 JPA 实现,那么至少需要将 Hibernate 依赖排除出去并将你所选择的 JPA 库包含进来。举例来说,如果想要使用 EclipseLink 来替代 Hibernate,就需要像这样修改构建文件:
<dependency>
  <groupId>org.springframework.boot</groupId>
  <artifactId>spring-boot-starter-data-jpa</artifactId>
  <exclusions>
    <exclusion>
      <artifactId>hibernate-entitymanager</artifactId>
      <groupId>org.hibernate</groupId>
    </exclusion>
  </exclusions>
</dependency>
<dependency>
  <groupId>org.eclipse.persistence</groupId>
  <artifactId>eclipselink</artifactId>
  <version>2.5.2</version>
</dependency>
需要注意,根据你所选择的 JPA 实现,这里可能还需要其他的变更。你可以参考所选择的 JPA 实现文档以了解更多细节。现在,我们重新看一下领域对象,并为它们添加注解,使其支持 JPA 持久化。
你马上将会看到,在创建 repository 方面,Spring Data 为我们做了很多非常棒的事情。但是,在使用 JPA 映射注解标注领域对象方面,它却没有提供太多的助益。我们需要打开 Ingredient、Taco 和 Order 类,并为其添加一些注解,首先是 Ingredient 类,修改后的代码如下所示。
package tacos;

import javax.persistence.Entity;
import javax.persistence.Id;

import lombok.AccessLevel;
import lombok.Data;
import lombok.NoArgsConstructor;
import lombok.RequiredArgsConstructor;

@Data
@RequiredArgsConstructor
@NoArgsConstructor(access=AccessLevel.PRIVATE, force=true)
@Entity
public class Ingredient {

  @Id
  private final String id;
  private final String name;
  private final Type type;

  public static enum Type {
    WRAP, PROTEIN, VEGGIES, CHEESE, SAUCE
  }

}
为了将 Ingredient 声明为 JPA 实体,它必须添加 @Entity 注解。它的 id 属性需要使用 @Id 注解,以便于将其指定为数据库中唯一标识该实体的属性。
除了 JPA 特定的注解,你可能会发现我们在类级别添加了 @NoArgsConstructor 注解。JPA 需要实体有一个无参的构造器,Lombok 的 @NoArgsConstructor 注解能够帮助我们实现这一点。但是,我们不想直接使用它,因此通过将 access 属性设置为 AccessLevel.PRIVATE 使其变成私有的。因为这里有必须要设置的 final 属性,所以我们将 force 设置为 true,这样 Lombok 生成的构造器就会将它们设置为 null。
我们还添加了一个 @RequiredArgsConstructor 注解。@Data 注解会为我们添加一个有参构造器,但是使用 @NoArgsConstructor 注解之后,这个构造器就会被移除掉。现在,我们显式添加 @RequiredArgsConstructor 注解,以确保除了 private 的无参构造器之外,我们还会有一个有参构造器。
接下来,我们看一下下面代码所示的 Taco 类,看看它是如何标注为 JPA 实体的。
修改后的 Taco.java 代码如下所示。
package tacos;
import java.util.ArrayList;
import java.util.Date;
import java.util.List;

import javax.persistence.Entity;
import javax.persistence.GeneratedValue;
import javax.persistence.GenerationType;
import javax.persistence.Id;
import javax.persistence.ManyToMany;
import javax.persistence.PrePersist;
import javax.validation.constraints.NotNull;
import javax.validation.constraints.Size;

import lombok.Data;

@Data
@Entity
public class Taco {

  @Id
  @GeneratedValue(strategy=GenerationType.AUTO)
  private Long id;

  @NotNull
  @Size(min=5, message="Name must be at least 5 characters long")
  private String name;

  private Date createdAt;

  @ManyToMany(targetEntity=Ingredient.class)
  @Size(min=1, message="You must choose at least 1 ingredient")
  private List<Ingredient> ingredients = new ArrayList<>();

  @PrePersist
  void createdAt() {
    this.createdAt = new Date();
  }
}
与 Ingredient 类似,Taco 类现在添加了 @Entity 注解,并为其 id 属性添加了 @Id 注解。因为我们要依赖数据库自动生成 ID 值,所以在这里还为 id 属性设置了 @GeneratedValue,将它的 strategy 设置为 AUTO。
为了声明 Taco 与其关联的 Ingredient 列表之间的关系,我们为 ingredients 添加了 @ManyToMany 注解。每个 Taco 可以有多个 Ingredient,而每个 Ingredient 可以是多个 Taco 的组成部分。
*你会看到,在这里有一个新的方法 createdAt(),并使用了 @PrePersist 注解。在 Taco 持久化之前,我们会使用这个方法将 createdAt 设置为当前的日期和时间。**最后,我们要将 Order 对象标注为实体。下面代码展示了新的 Order 类。
package tacos;
import java.io.Serializable;
import java.util.ArrayList;
import java.util.Date;
import java.util.List;

import javax.persistence.Entity;
import javax.persistence.GeneratedValue;
import javax.persistence.GenerationType;
import javax.persistence.Id;
import javax.persistence.ManyToMany;
import javax.persistence.PrePersist;
import javax.persistence.Table;
import javax.validation.constraints.Digits;
import javax.validation.constraints.NotBlank;
import javax.validation.constraints.Pattern;

import org.hibernate.validator.constraints.CreditCardNumber;

import lombok.Data;

@Data
@Entity
@Table(name="Taco_Order")
public class Order implements Serializable {

  private static final long serialVersionUID = 1L;

  @Id
  @GeneratedValue(strategy=GenerationType.AUTO)
  private Long id;

  private Date placedAt;

  @ManyToMany(targetEntity=Taco.class)
  private List<Taco> tacos = new ArrayList<>();

  public void addDesign(Taco design) {
    this.tacos.add(design);
  }

  @PrePersist
  void placedAt() {
    this.placedAt = new Date();
  }

  @NotBlank(message="Delivery name is required")
  private String deliveryName;

  @NotBlank(message="Street is required")
  private String deliveryStreet;

  @NotBlank(message="City is required")
  private String deliveryCity;

  @NotBlank(message="State is required")
  private String deliveryState;

  @NotBlank(message="Zip code is required")
  private String deliveryZip;

  @CreditCardNumber(message="Not a valid credit card number")
  private String ccNumber;

  @Pattern(regexp="^(0[1-9]|1[0-2])([\\/])([1-9][0-9])$",
           message="Must be formatted MM/YY")
  private String ccExpiration;

  @Digits(integer=3, fraction=0, message="Invalid CVV")
  private String ccCVV;

}
我们可以看到,Order 所需的变更就是 Taco 的翻版。但是,在类级别这里有了一个新的注解,即 @Table。它表明 Order 实体应该持久化到数据库中名为 Taco_Order 的表中。
我们可以将这个注解用到所有的实体上,但是只有 Order 有必要这样做。如果没有它,JPA 默认会将实体持久化到名为 Order 的表中,但是 order 是 SQL 的保留字,这样做的话会产生问题。实体都已经标注好了,现在我们该编写 repository 了。
在 JDBC 版本的 repository 中,我们显式声明想要 repository 提供的方法。但是,借助 Spring Data,我们可以扩展 CrudRepository 接口。举例来说,如下是新的 IngredientRepository 接口。
修改 IngredientRepository.java 代码如下:
package tacos.data;

import org.springframework.data.repository.CrudRepository;

import tacos.Ingredient;

public interface IngredientRepository
         extends CrudRepository<Ingredient, String> {

}
CrudRepository 定义了很多用于 CRUD(创建、读取、更新、删除)操作的方法。注意,它是参数化的,第一个参数是 repository 要持久化的实体类型,第二个参数是实体 ID 属性的类型。对于 IngredientRepository 来说,参数应该是 Ingredient 和 String。
同时也要修改 IngredientByIdConverter.java 文件,修改后代码如下。
package tacos.web;

import java.util.Optional;

import org.springframework.beans.factory.annotation.Autowired;
import org.springframework.core.convert.converter.Converter;
import org.springframework.stereotype.Component;

import tacos.Ingredient;
import tacos.data.IngredientRepository;

@Component
public class IngredientByIdConverter implements Converter<String, Ingredient> {

  private IngredientRepository ingredientRepo;

  @Autowired
  public IngredientByIdConverter(IngredientRepository ingredientRepo) {
    this.ingredientRepo = ingredientRepo;
  }

  @Override
  public Ingredient convert(String id) {
    Optional<Ingredient> optionalIngredient = ingredientRepo.findById(id);
    return optionalIngredient.isPresent() ?
           optionalIngredient.get() : null;
  }

}
我们可以非常简单地定义 TacoRepository,修改 TacoRepository.java 代码如下:
package tacos.data;

import org.springframework.data.repository.CrudRepository;

import tacos.Taco;

public interface TacoRepository
         extends CrudRepository<Taco, Long> {

}
IngredientRepository 和 TacoRepository 之间唯一比较明显的区别就是 CrudRepository 的参数。在这里,我们将其设置为 Taco 和 Long,从而指定 Taco 实体(及其 ID 类型)是该 repository 接口的持久化单元。最后,相同的变更可以用到 OrderRepository 上,修改 OrderRepository.java 代码如下:
package tacos.data;

import org.springframework.data.repository.CrudRepository;

import tacos.Order;

public interface OrderRepository
         extends CrudRepository<Order, Long> {

}
现在,我们有了 3 个 repository。你可能会想,我们应该需要编写它们的实现类,包括每个实现类所需的十多个方法。但是,Spring Data JPA 带来的好消息是,我们根本就不用编写实现类!当应用启动的时候,Spring Data JPA 会在运行期自动生成实现类。这意味着,我们现在就可以使用这些 repository 了。我们只需要像使用基于 JDBC 的实现那样将它们注入控制器中就可以了。
CrudRepository 所提供的方法对于实体的通用持久化是非常有用的。但是,如果我们的需求并不局限于基本持久化,那又该怎么办呢?接下来,我们看一下如何自定义 repository 来执行特定领域的查询。
假设除了 CrudRepository 提供的基本 CRUD 操作之外,我们还需要获取投递到指定邮编(Zip)的订单。实际上,我们只需要添加如下的方法声明到 OrderRepository 中,这个问题就解决了:
List<Order> findByDeliveryZip(String deliveryZip);
当创建 repository 实现的时候,Spring Data 会检查 repository 接口的所有方法,解析方法的名称,并基于被持久化的对象来试图推测方法的目的。本质上,Spring Data 定义了一组小型的领域特定语言(Domain-Specific Language,DSL),在这里持久化的细节都是通过 repository 方法的签名来描述的。
Spring Data 能够知道这个方法是要查找 Order 的,因为我们使用 Order 对 CrudRepository 进行了参数化。方法名 findByDeliveryZip() 确定该方法需要根据 deliveryZip 属性相匹配来查找 Order,而 deliveryZip 的值是作为参数传递到方法中来的。``
findByDeliveryZip() 方法非常简单,但是Spring Data 也能处理更加有意思的方法名称。repository 方法是由一个动词、一个可选的主题(Subject)、关键词 By 以及一个断言所组成的。在 findByDeliveryZip() 这个样例中,动词是 find,断言是 DeliveryZip,主题并没有指定,暗含的主题是 Order。
我们考虑另外一个更复杂的样例。假设我们想要查找投递到指定邮编且在一定时间范围内的订单。在这种情况下,我们可以将如下的方法添加到 OrderRepository 中,它就能达到我们的目的。
List<Order> readOrdersByDeliveryZipAndPlacedAtBetween(
      String deliveryZip, Date startDate, Date endDate);
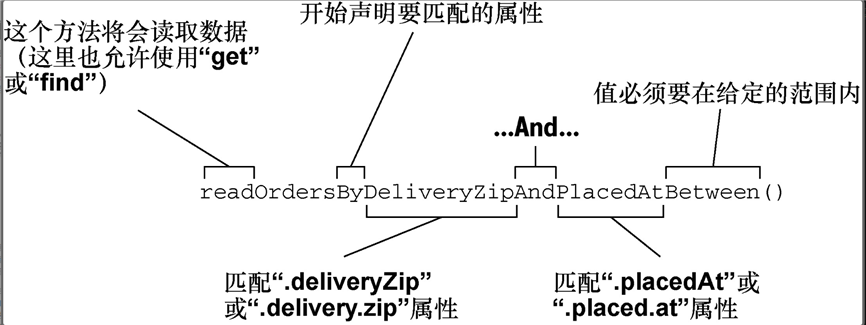
下图展现了 Spring Data 在生成 repository 实现的时候是如何解析和理解 readOrdersByDeliveryZipAndPlacedAtBetween() 方法的。我们可以看到,在 readOrdersByDeliveryZipAndPlacedAtBetween() 中,动词是 read。Spring Data 会将 get、read 和 find 视为同义词,它们都是用来获取一个或多个实体的。另外,我们还可以使用 count 作为动词,它会返回一个 int 值,代表匹配实体的数量。

尽管方法的主题是可选的,但是这里要查找的就是 Order。Spring Data 会忽略主题中大部分的单词,所以你尽可以将方法命名为 readPuppiesBy...,它依然会去查找 Order 实体,因为 CrudRepository 的类型是参数化的。
单词 By 后面的断言是方法签名中最为有意思的一部分。在本例中,断言指定了 Order 的两个属性:deliveryZip 和 placedAt。deliveryZip 属性的值必须要等于方法第一个参数传入的值。关键字 Between 表明 placedAt 属性的值必须要位于方法最后两个参数的值之间。
除了 Equals 和 Between 操作之外,Spring Data 方法签名还能包括如下的操作符:
作为 IgnoringCase/IgnoresCase 的替代方案,我们还可以在方法上添加 AllIgnoringCase 或 AllIgnoresCase,这样它就会忽略所有 String 对比的大小写。例如,请看如下方法:
List<Order> findByDeliveryToAndDeliveryCityAllIgnoresCase(
        String deliveryTo, String deliveryCity);
最后,我们还可以在方法名称的结尾处添加 OrderBy,实现结果集根据某个列排序。例如,我们可以按照 deliveryTo 属性排序:
List<Order> findByDeliveryCityOrderByDeliveryTo(String city);
尽管方法名称约定对于相对简单的查询非常有用,但是,不难想象,对于更为复杂的查询,方法名可能会面临失控的风险。在这种情况下,可以将方法定义为任何你想要的名称,并为其添加 @Query 注解,从而明确指明方法调用时要执行的查询,如下面的样例所示:
@Query("Order o where o.deliveryCity=‘Seattle‘")
List<Order> readOrdersDeliveredInSeattle();
在本例中,通过使用 @Query,我们声明只查询所有投递到 Seattle 的订单。但是,我们可以使用 @Query 执行任何想要的查询,有些查询是通过方法命名约定很难甚至根本无法实现的。
如果要使用 JPA,需要移除 JdbcIngredientRepository、JdbcTacoRepository 与 JdbcOrderRepository 这 3 个类(可以将代码全部注释)。
此外,因为更换为了 JPA,data.sql 中的 SQL 语句不再生效,所以修改 TacoCloudApplication.java 代码来在应用启动后向数据库添加 Ingredient 的数据。修改后的代码如下所示。
package tacos;

import org.springframework.boot.CommandLineRunner;
import org.springframework.boot.SpringApplication;
import org.springframework.boot.autoconfigure.SpringBootApplication;
import org.springframework.context.annotation.Bean;

import tacos.Ingredient.Type;
import tacos.data.IngredientRepository;

@SpringBootApplication
public class TacoCloudApplication {

  public static void main(String[] args) {
    SpringApplication.run(TacoCloudApplication.class, args);
  }

  @Bean
  public CommandLineRunner dataLoader(IngredientRepository repo) {
    return new CommandLineRunner() {
      @Override
      public void run(String... args) throws Exception {
        repo.save(new Ingredient("FLTO", "Flour Tortilla", Type.WRAP));
        repo.save(new Ingredient("COTO", "Corn Tortilla", Type.WRAP));
        repo.save(new Ingredient("GRBF", "Ground Beef", Type.PROTEIN));
        repo.save(new Ingredient("CARN", "Carnitas", Type.PROTEIN));
        repo.save(new Ingredient("TMTO", "Diced Tomatoes", Type.VEGGIES));
        repo.save(new Ingredient("LETC", "Lettuce", Type.VEGGIES));
        repo.save(new Ingredient("CHED", "Cheddar", Type.CHEESE));
        repo.save(new Ingredient("JACK", "Monterrey Jack", Type.CHEESE));
        repo.save(new Ingredient("SLSA", "Salsa", Type.SAUCE));
        repo.save(new Ingredient("SRCR", "Sour Cream", Type.SAUCE));
      }
    };
  }

}
然后在实验楼 WebIDE 中执行以下命令即可运行程序。
mvn clean spring-boot:run
相关资料
本节实验的源码下载地址如下。
wget https://labfile.oss.aliyuncs.com/courses/1517/chap03.zip
原文:https://www.cnblogs.com/sakura579/p/14094975.html