官网下载地址:http://mirrors.163.com/centos

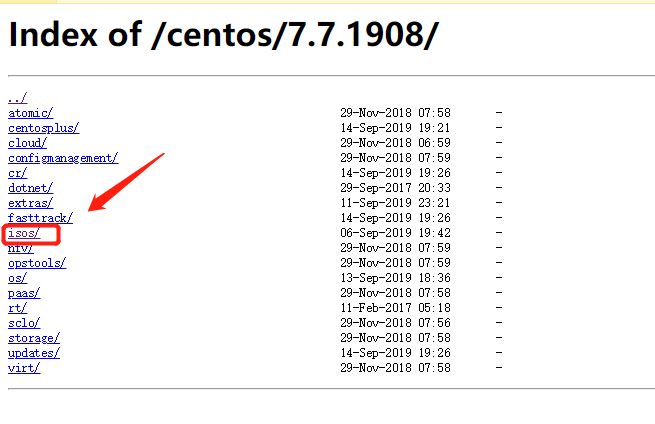
3、进入页面后,可以看到x86_64

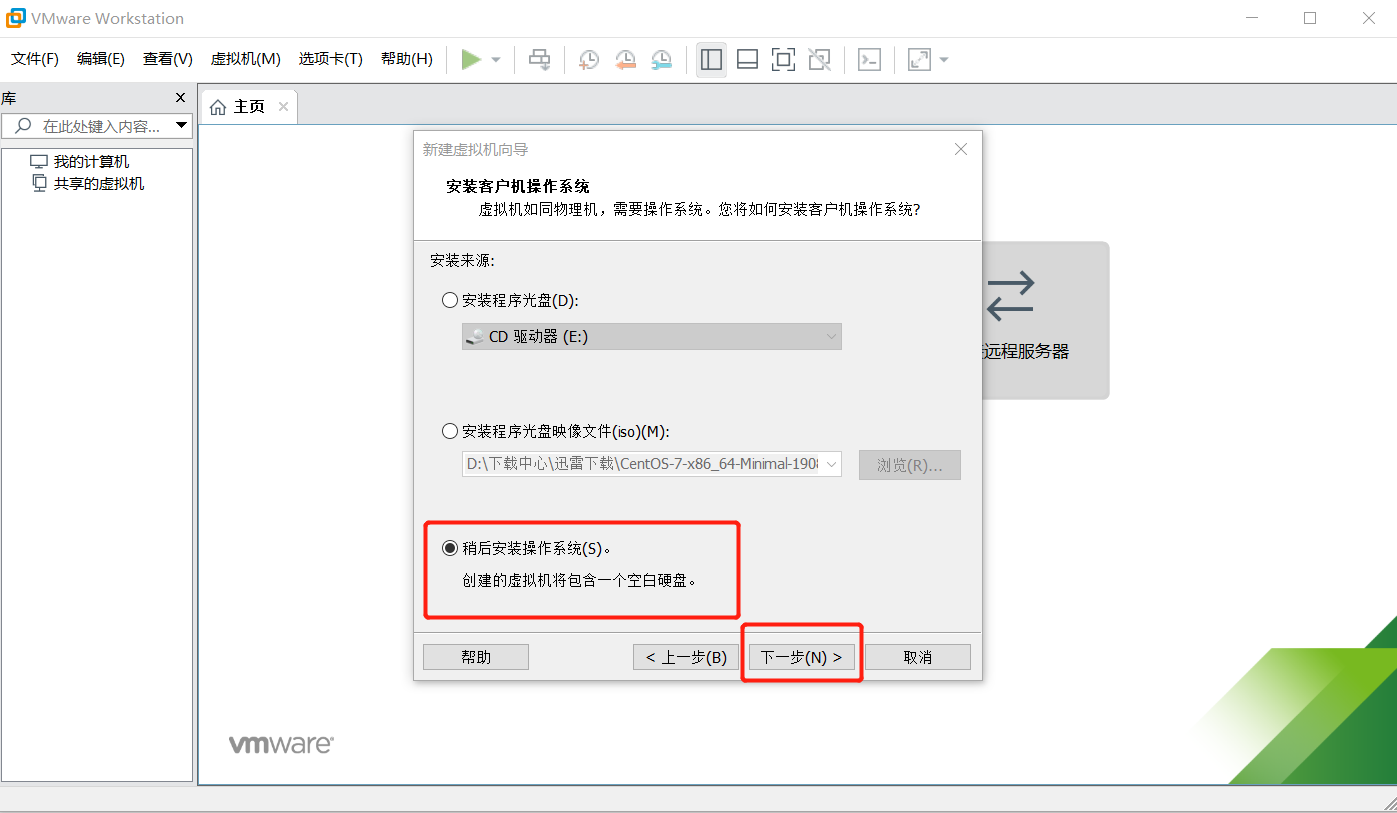
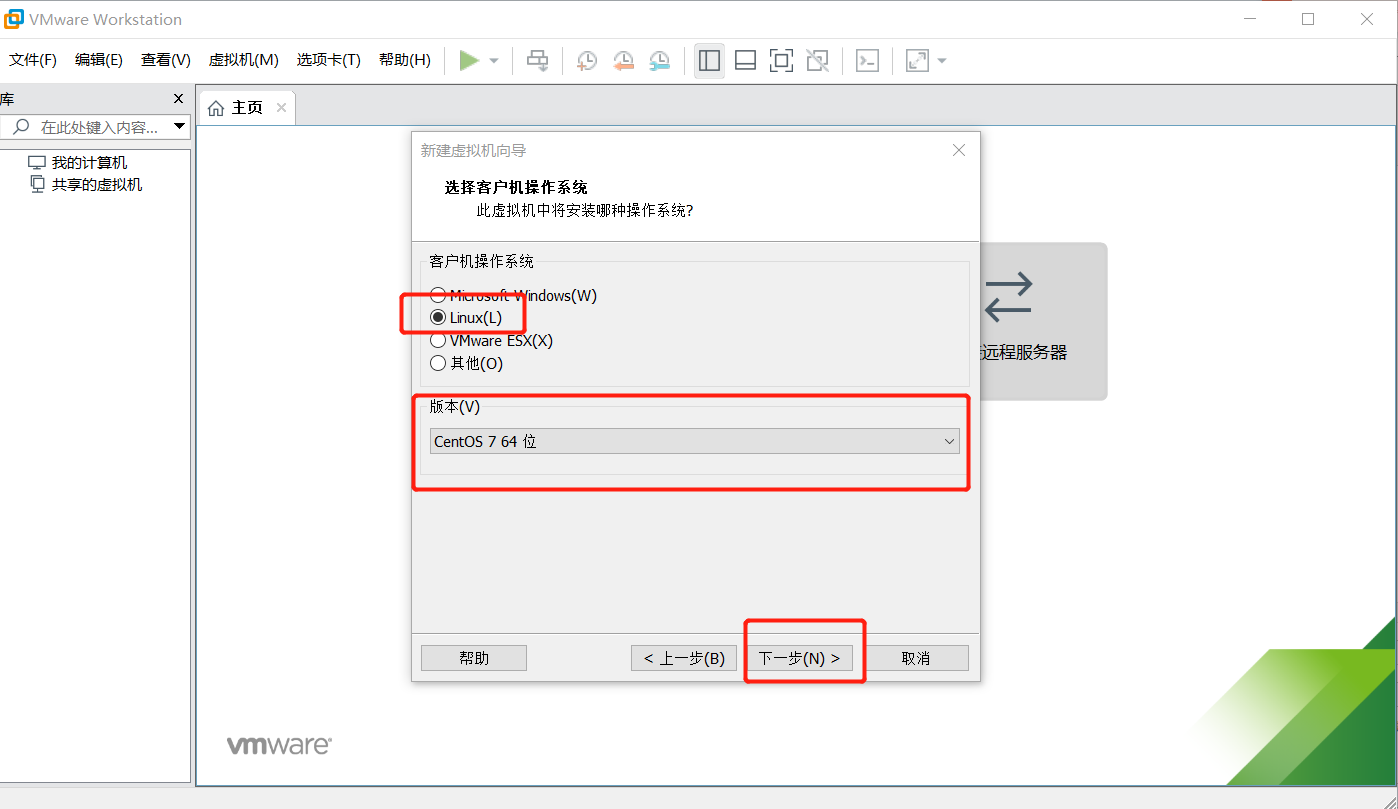
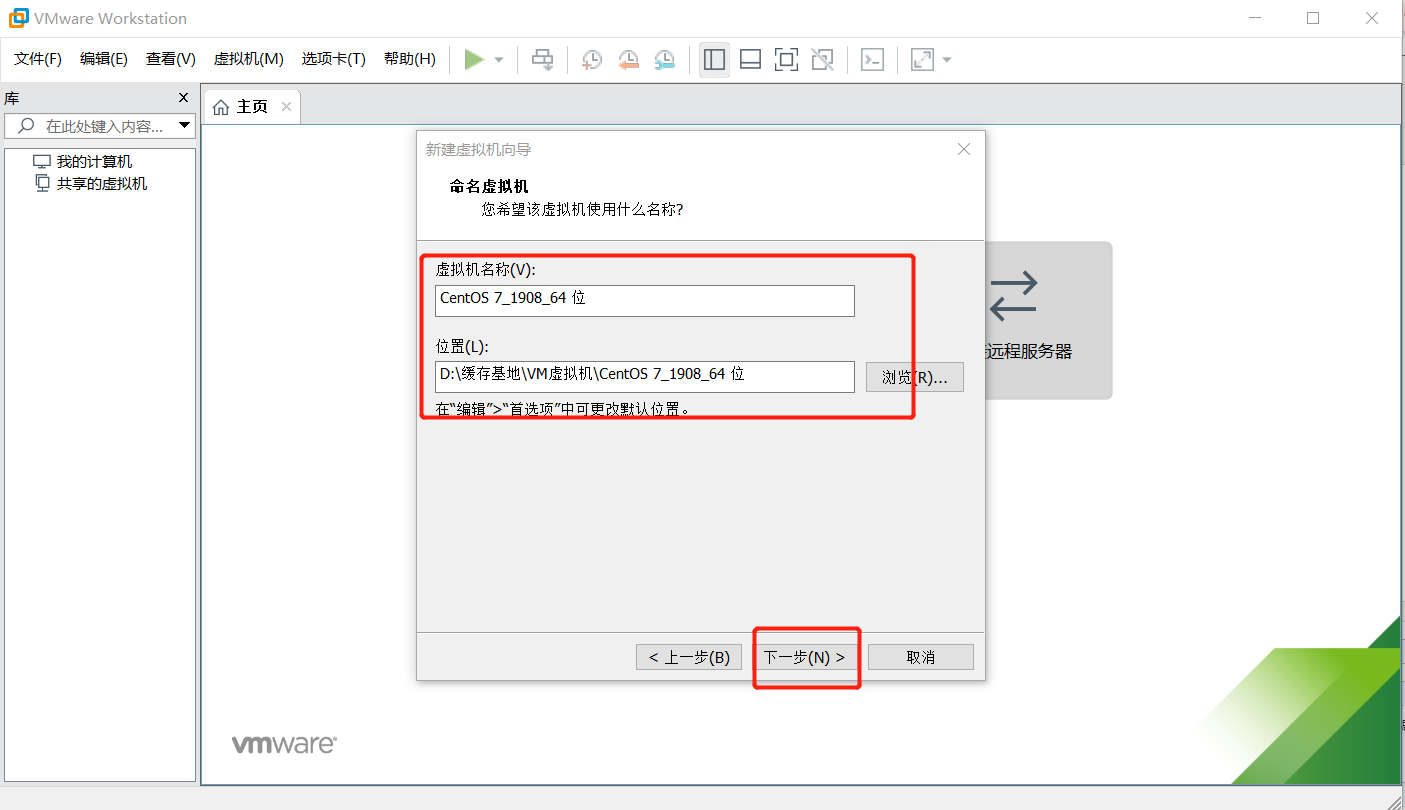
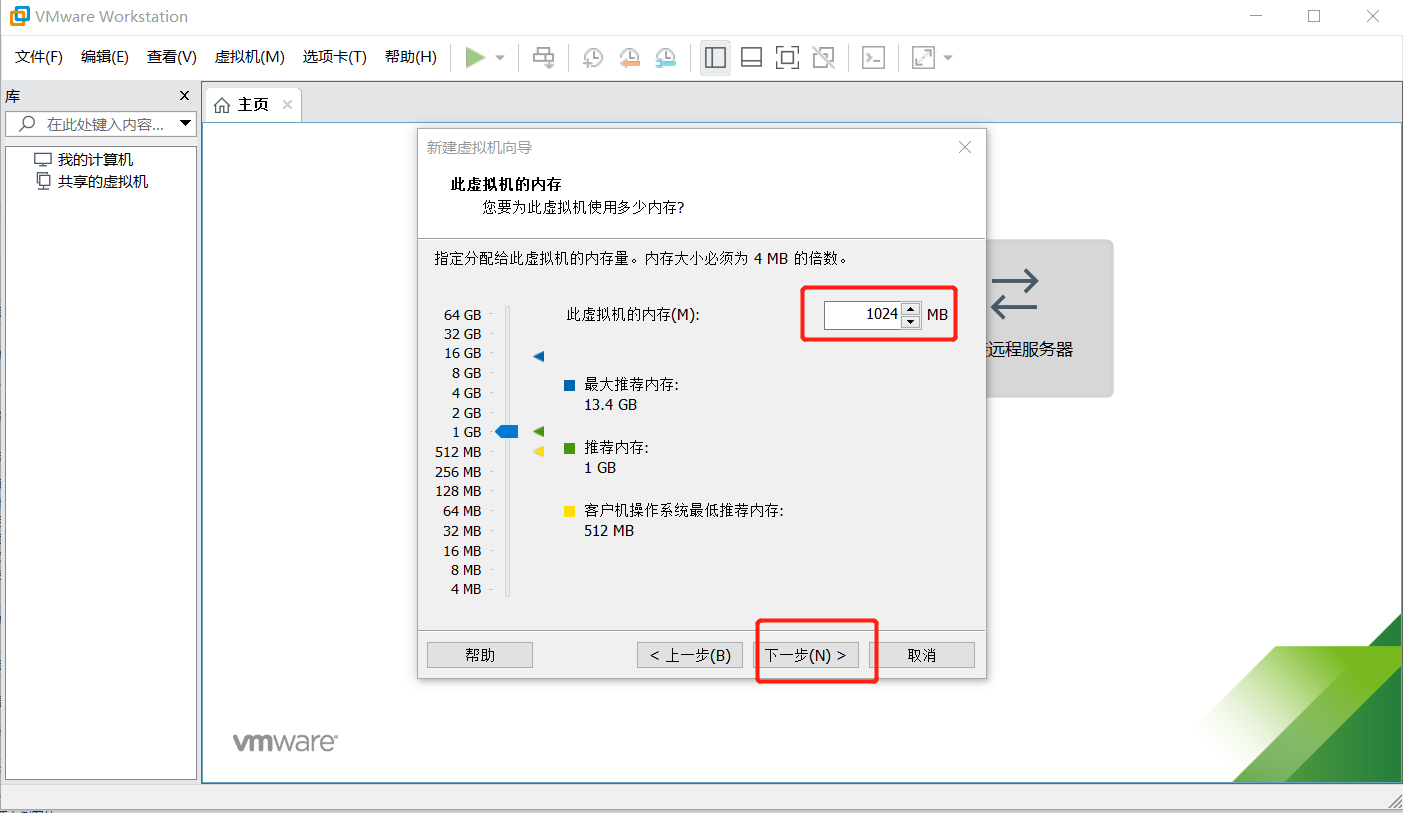
(我们以CentOS-7-x86_64-Minimal-1908.iso为安装案例)


教程:https://www.cnblogs.com/mr-xiong/p/12469412.html
安装教程:https://www.cnblogs.com/mr-xiong/p/12468280.html


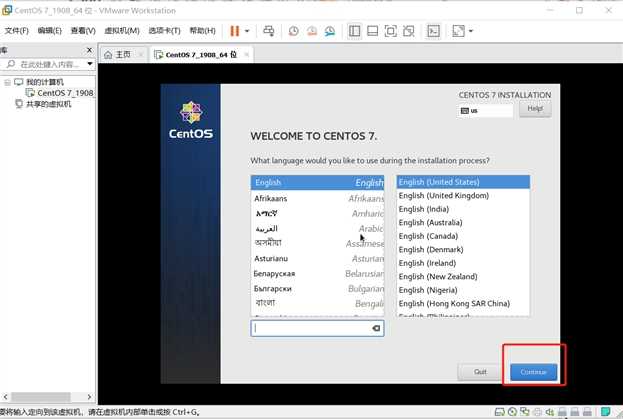
提示: 鼠标移动到虚拟机内部单击或者按下Ctrl + G,鼠标即可移入到虚拟机中
按下Ctrl + Alt,鼠标即可移出虚拟机
注意: 在虚拟机中的操作,鼠标必须要移入到虚拟机中,否则虚拟机感应不到,无法对其进行操作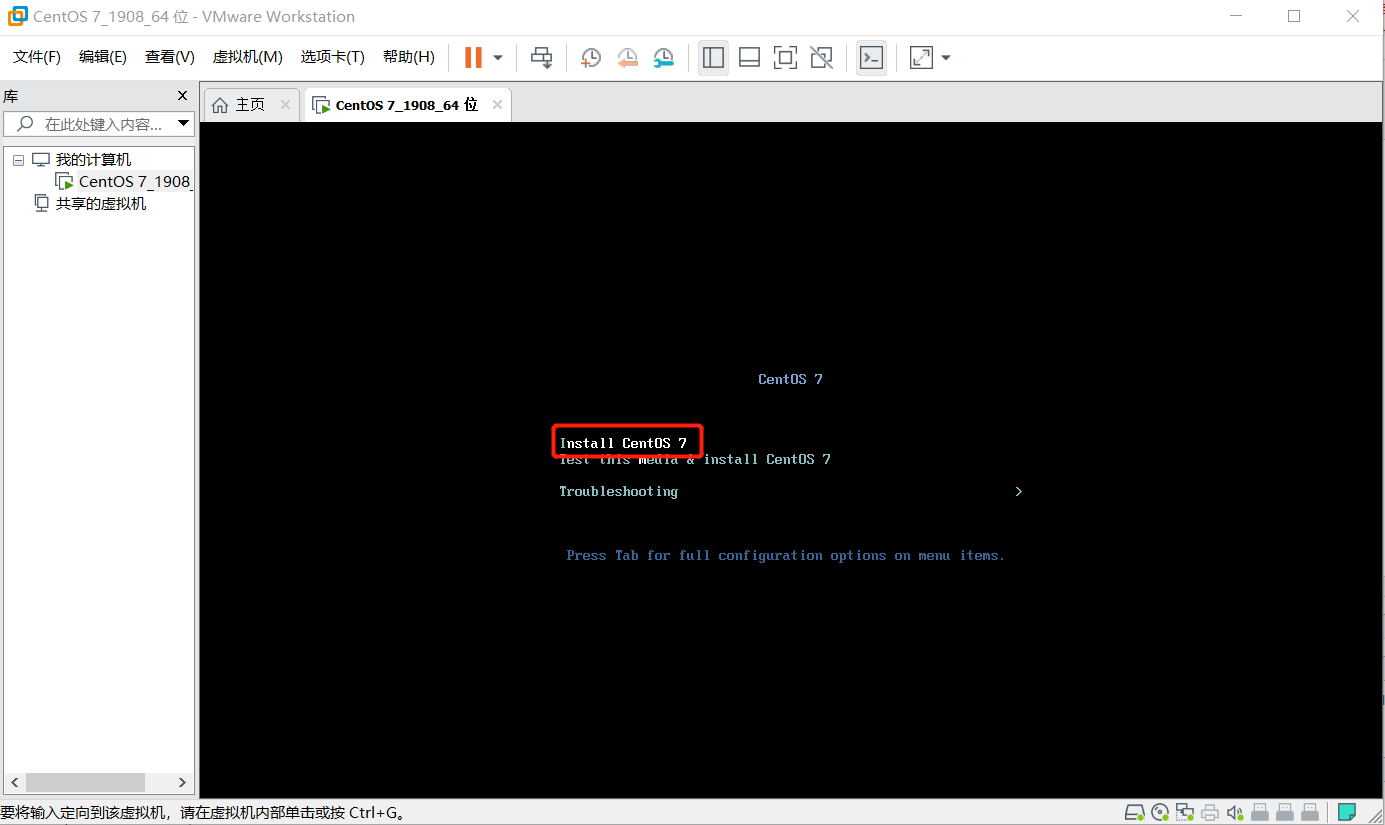
界面说明:
Install CentOS 7 安装CentOS 7
Test this media & install CentOS 7 测试安装文件并安装CentOS 7
Troubleshooting 修复故障
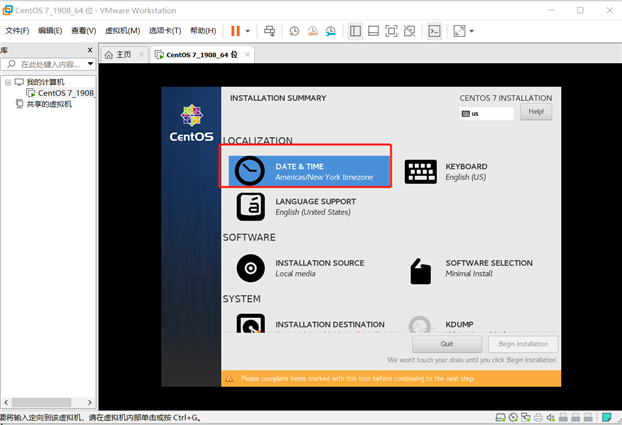
(1)选择DATE & TIME
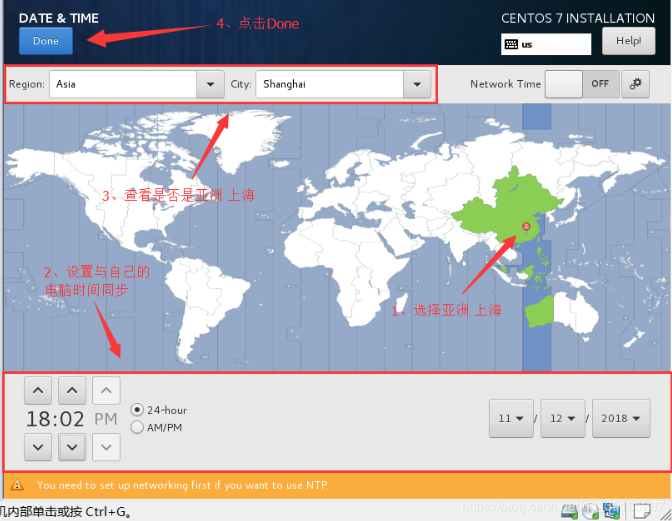
(2)时区设置为 Region:Asia City:Shanghai
日期和时间 设置与自己的电脑时间同步,最后点击“Done”
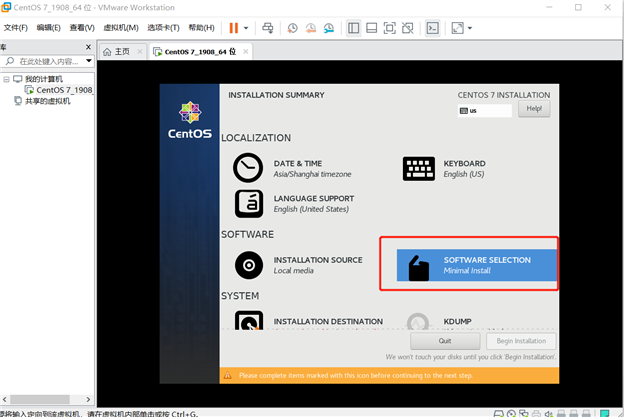
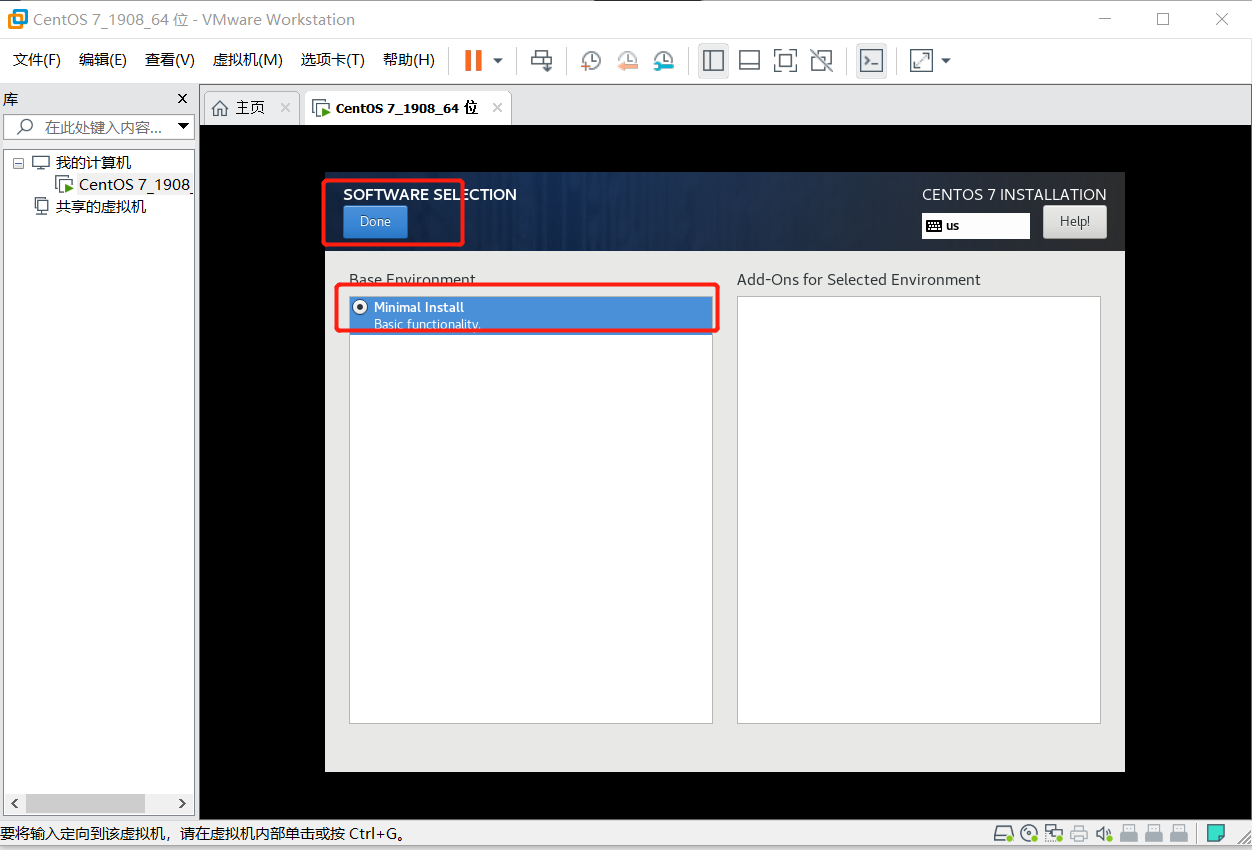
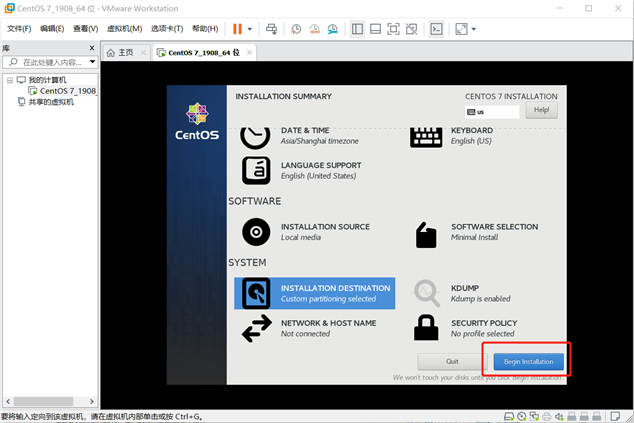
(1)选择SOFTWARE SELECTION
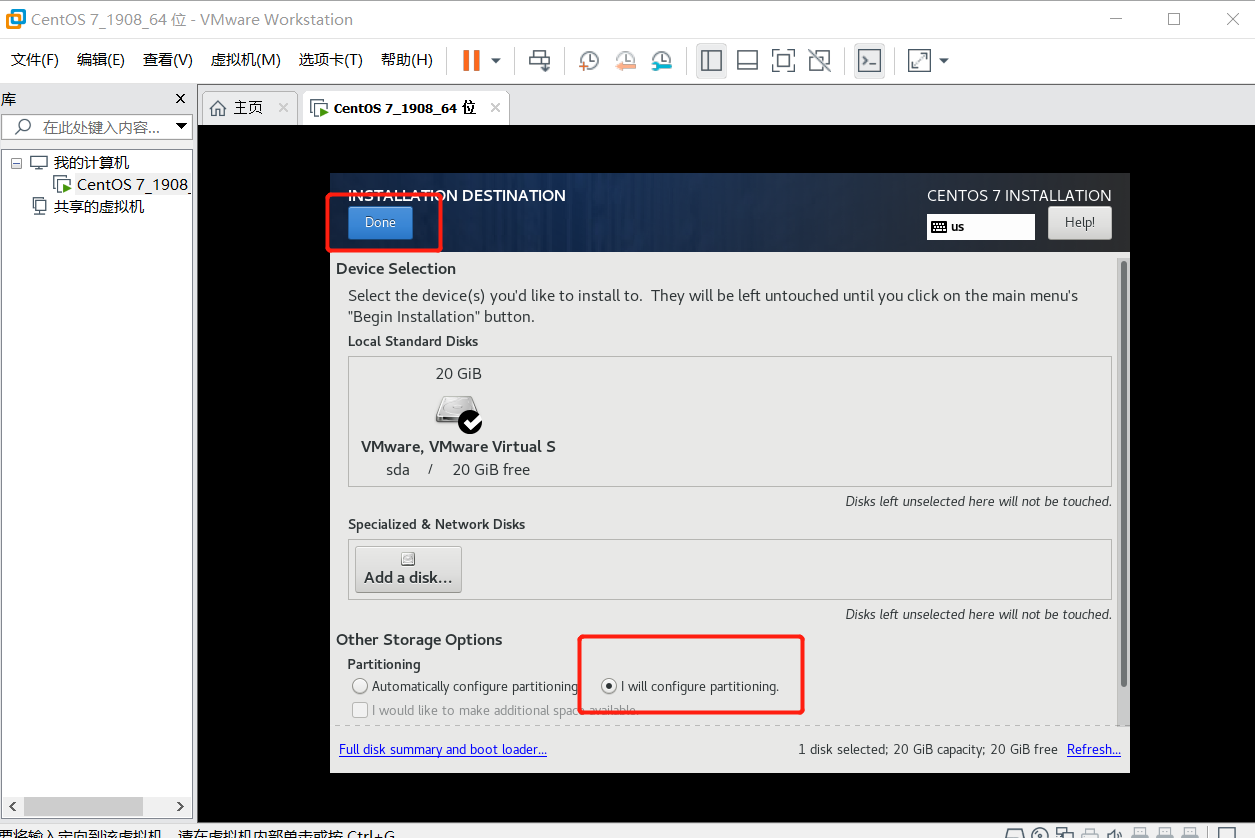
(1)选择INSTALLATION DESTINATION

(2)点选 I will configuire parttioning,然后再点击“Done”
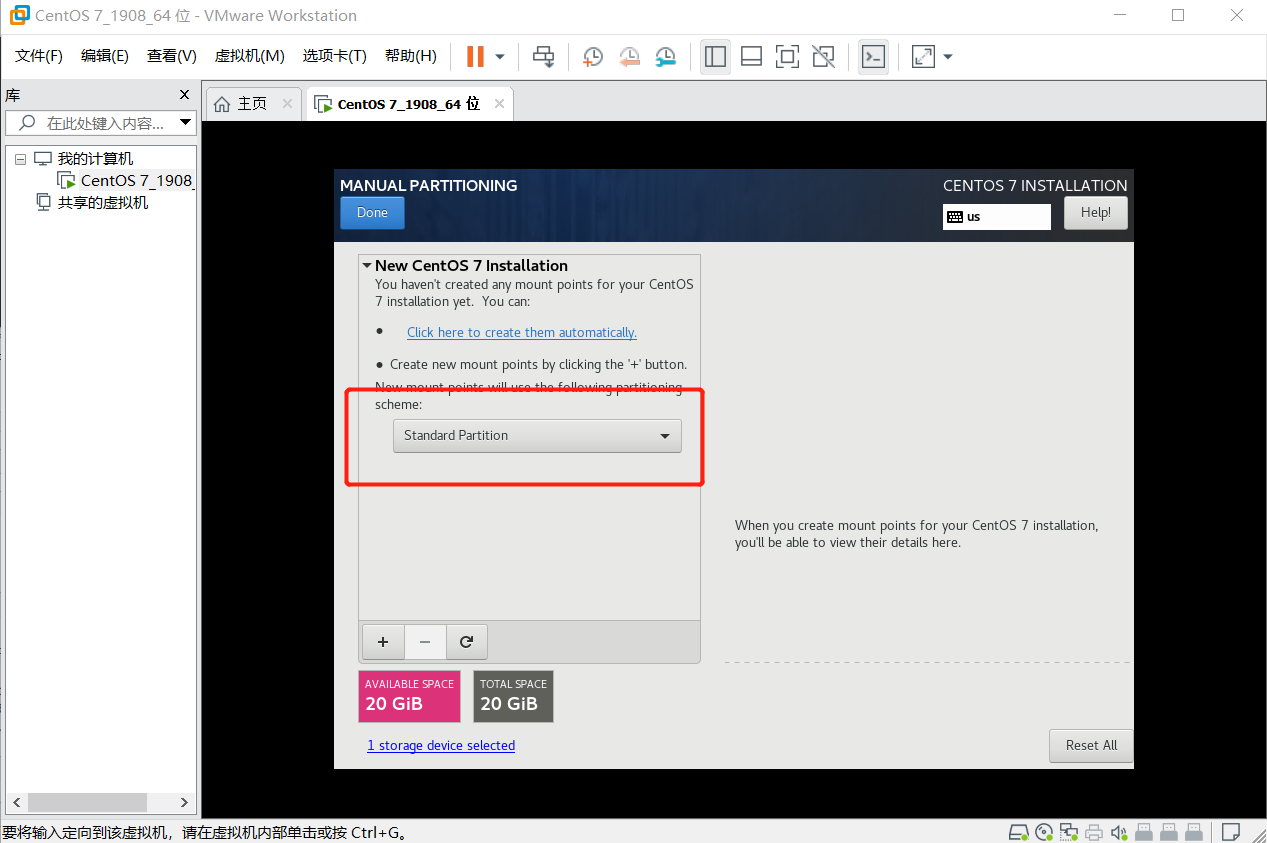
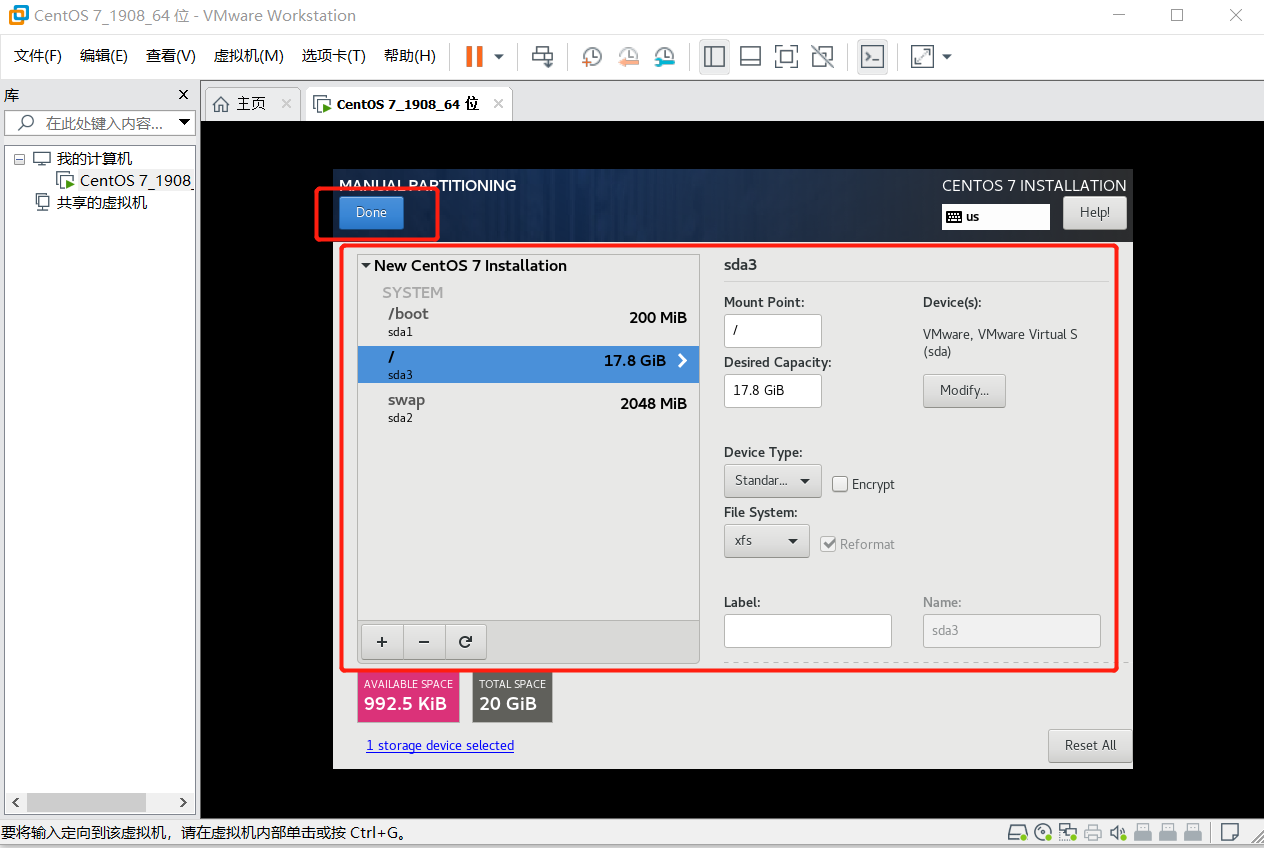
(3)更改模式,标准分区Standard Partition,点击“+”按钮添加分
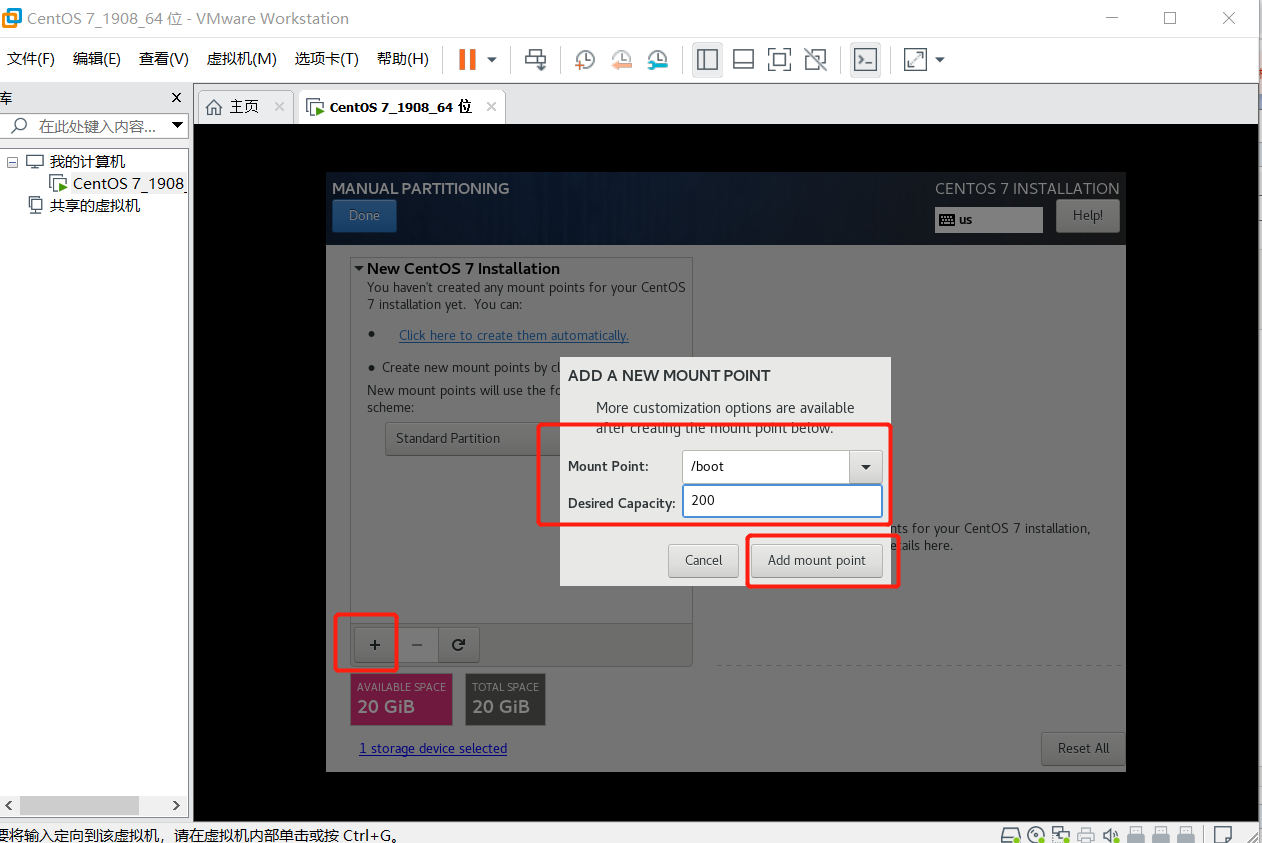
(4)添加分区,Add mount point
分区前先规划好
boot #分区,一般为200M
swap #交换分区,一般设置为内存的2倍
/ #根目录,所有空间给/(根分区)
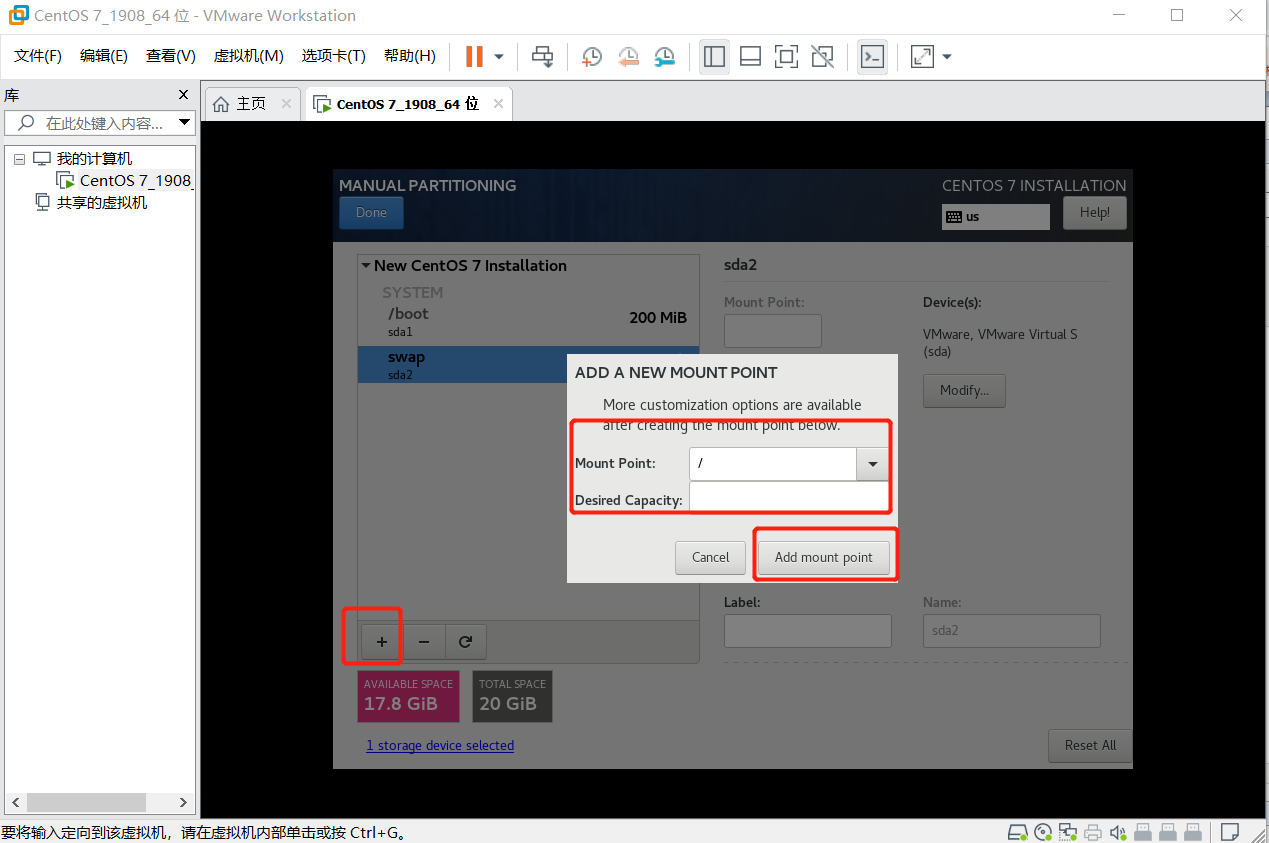
分完区如下:确认分区有没有错误,如果没问题点击”Done“

(1)选择ROOT PASSWORD
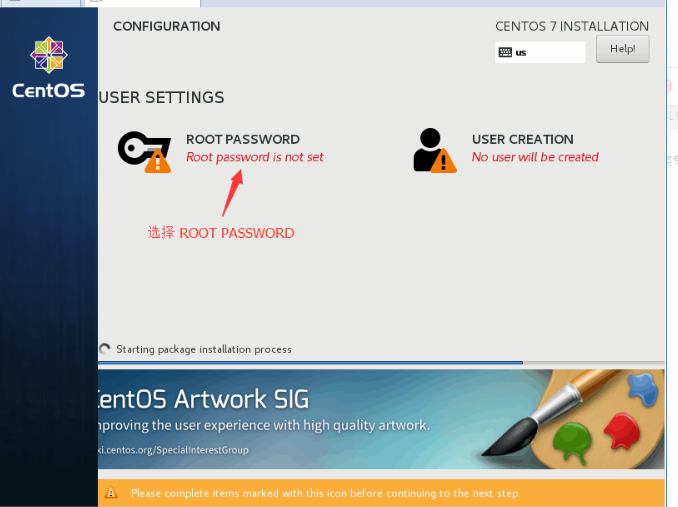
(2)为root设置密码 (密码长度最好不要小于6位数),然后点击“Done”
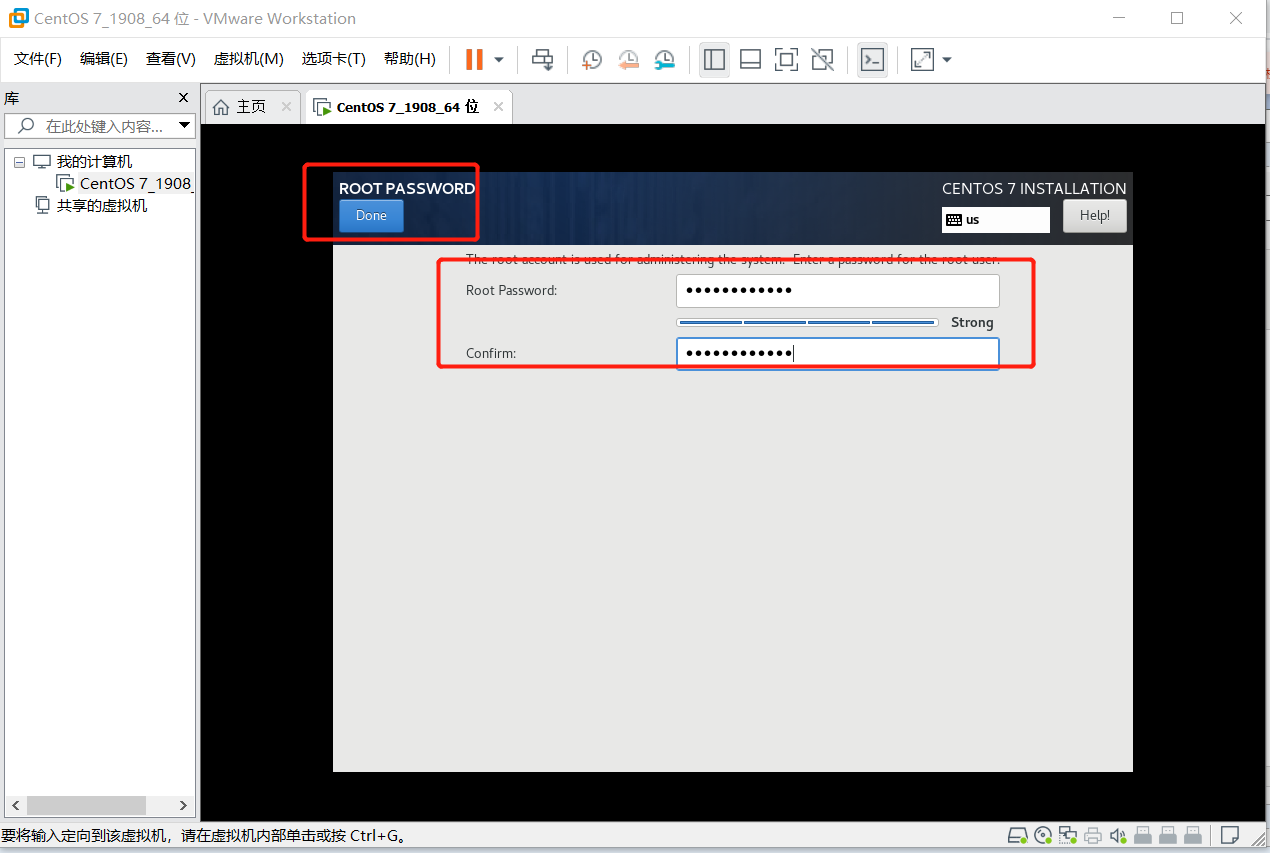
提示:在输入密码时,linux为了安全起见,是看不到你输入的密码。同时,如果是使用的是键盘右边的数字键盘输入密码的话,建议查看一下,数字键盘是否开启 (建议使用字母按键上面一排的 数字键输入密码)
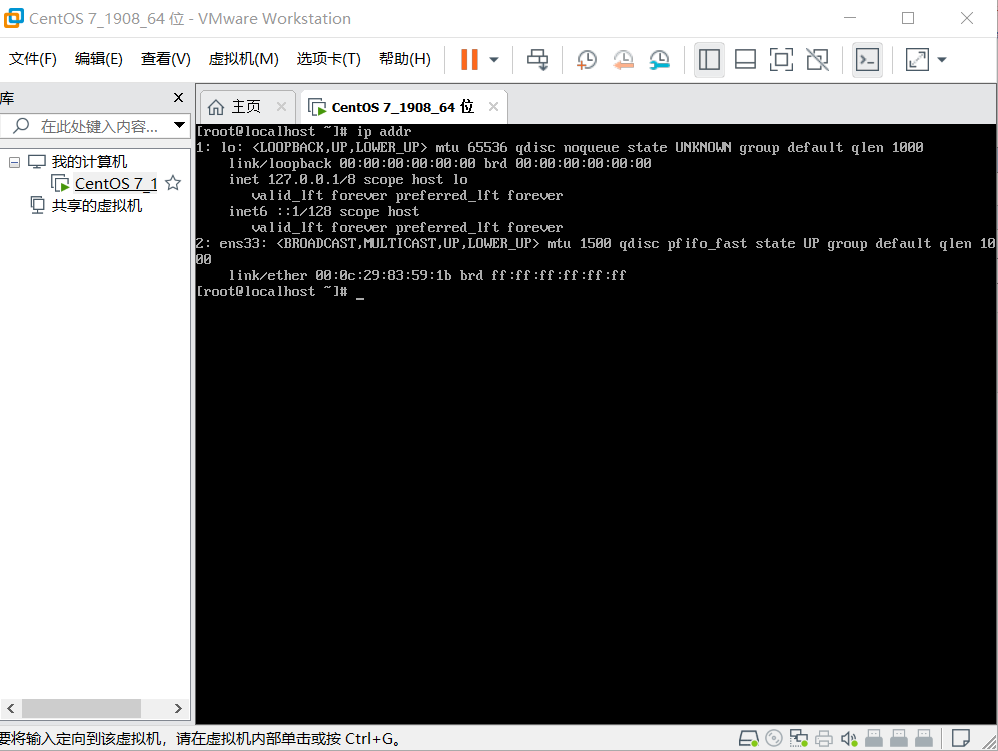
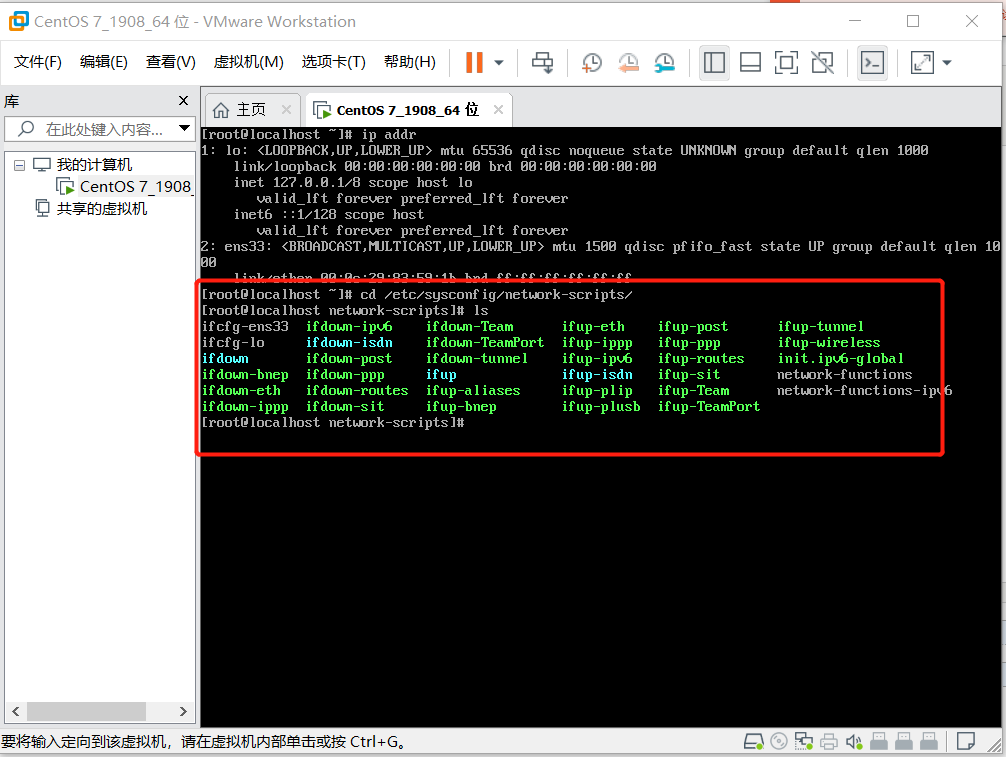
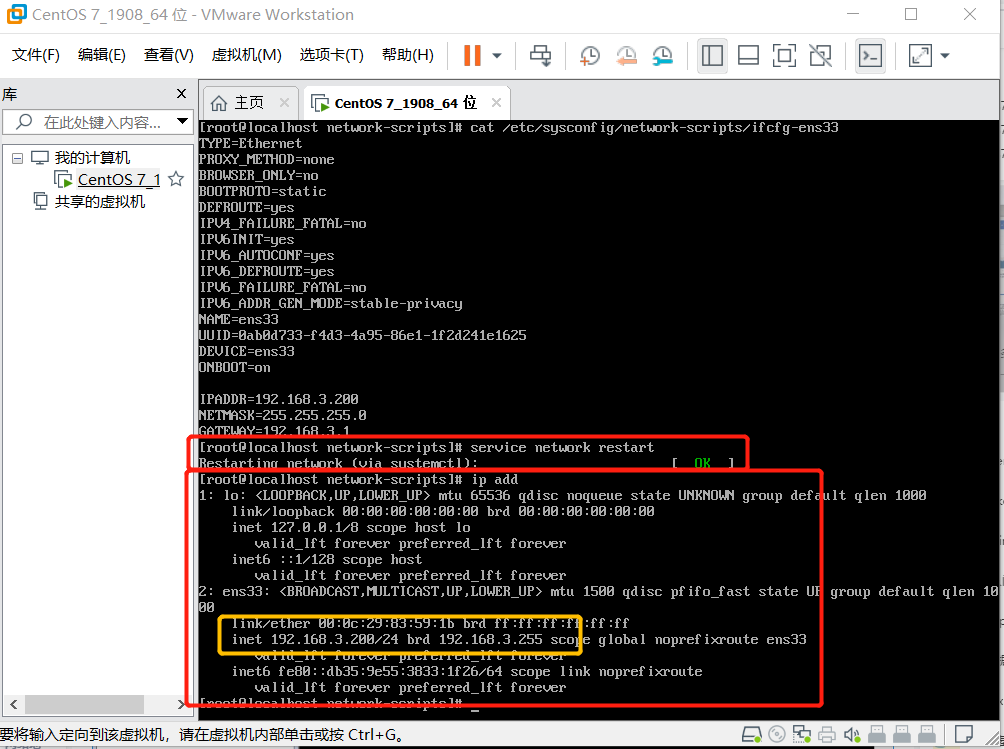
(1)输入ip addr 查看当前ip信息,可以看到网卡名称为ens33
(2)进入网卡配置目录 cd /etc/sysconfig/network-scripts ,查看当前目录文件 ls ,现在可看到该目录下有可以看到网卡名称为ifcfg-ens33网卡文件
(3)通过vi命令对网卡ifcfg-ens33进行配置
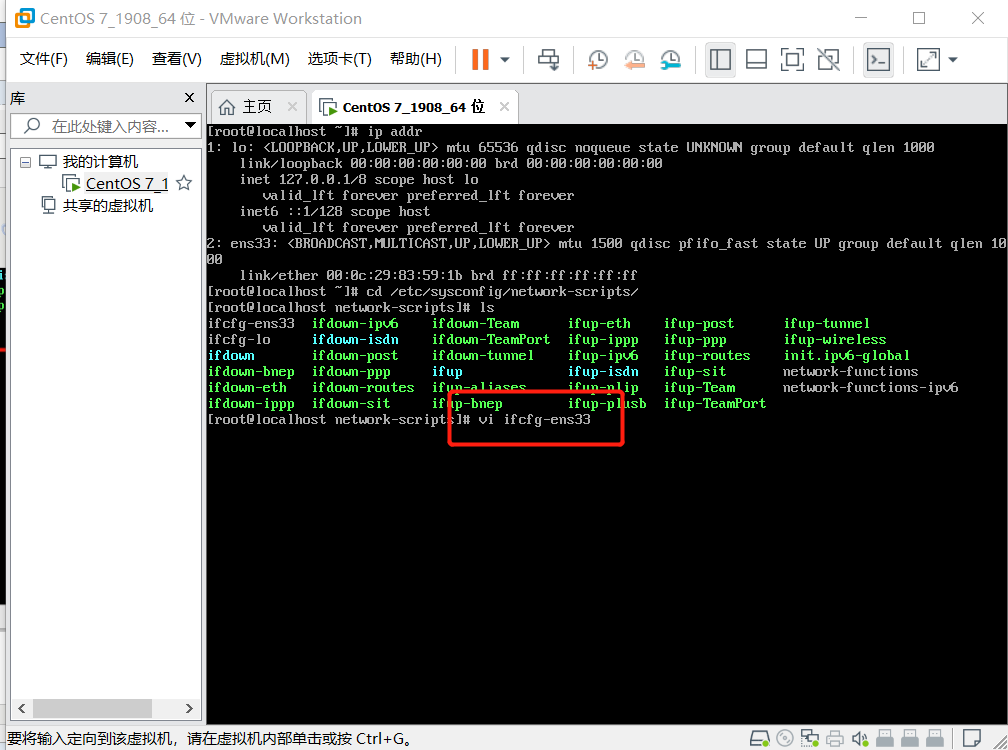
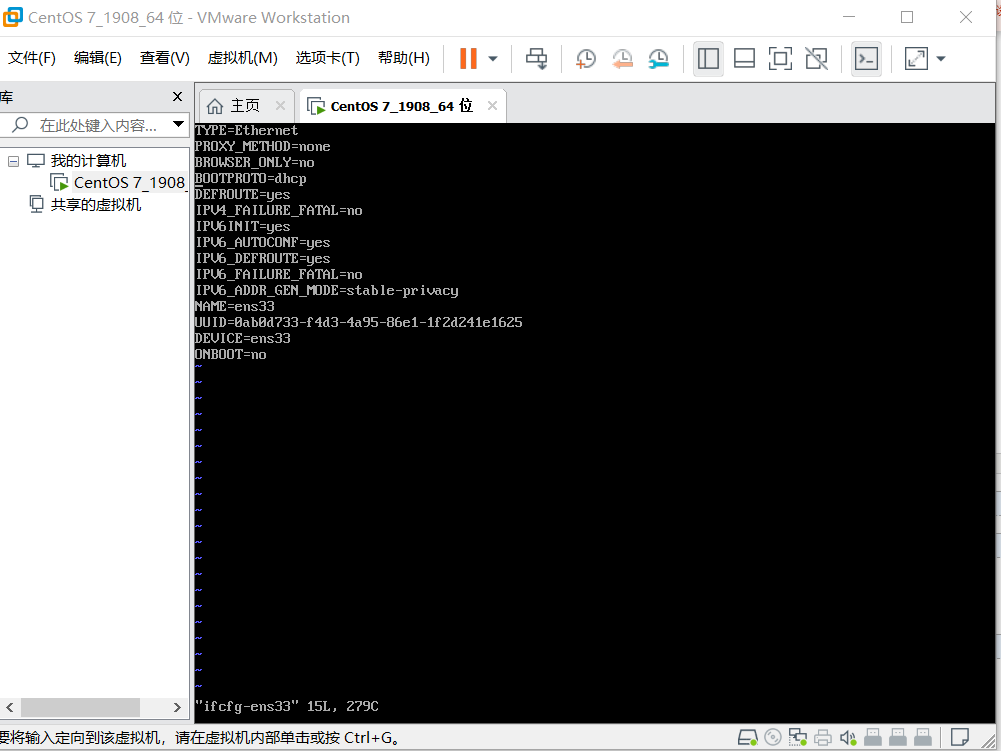
修改以下配置,可按键盘小写a进入编辑模式进行修改,修改完如下图:
修改完按键盘:ESC键, 再输入:wq 回车,进行保存并退出
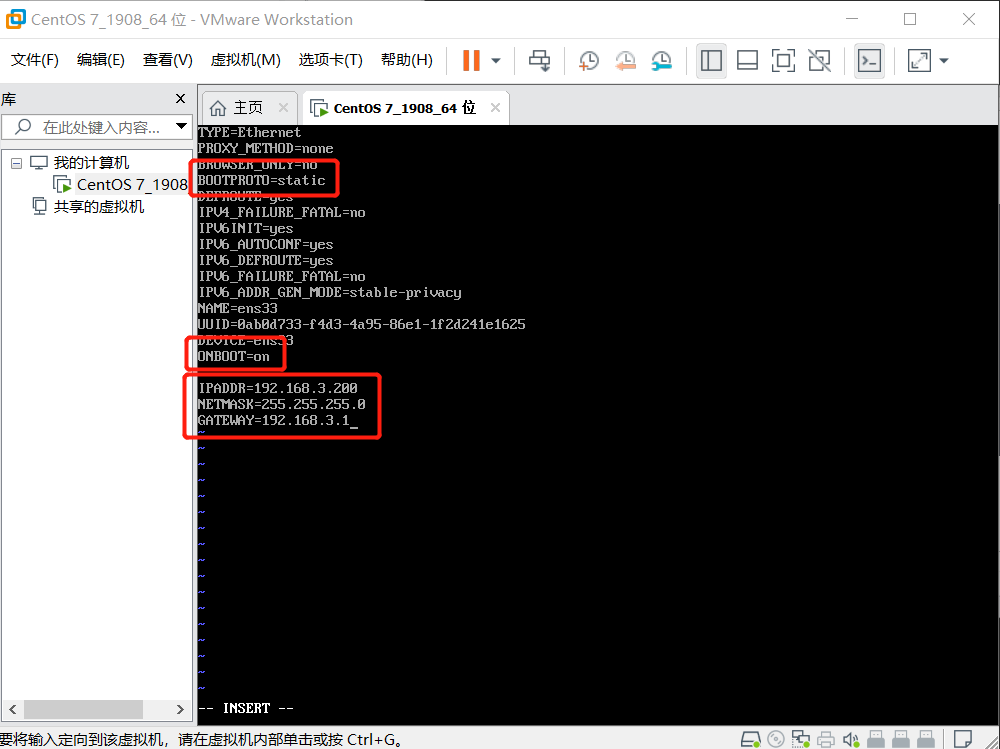
cd /etc/sysconfig/network-scripts/    //进入到network-scripts目录下

vi ifcfg-ens32  //编辑配置文件

//修改以下内容
BOOTPROTO=static  //启用静态IP地址
ONBOOT=yes      //开启自动启用网络连接

//添加以下内容
IPADDR=192.168.30.1      //设置IP地址
NETMASK=255.255.255.0   //子网掩码
(4)重启网络服务
service network restart
ip addr
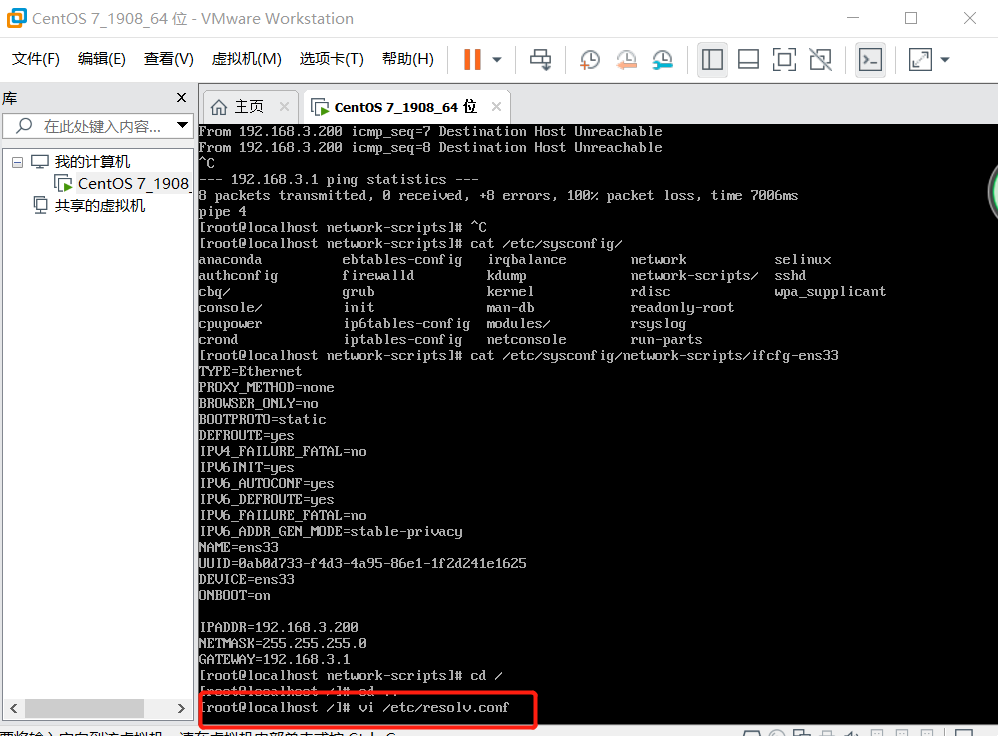
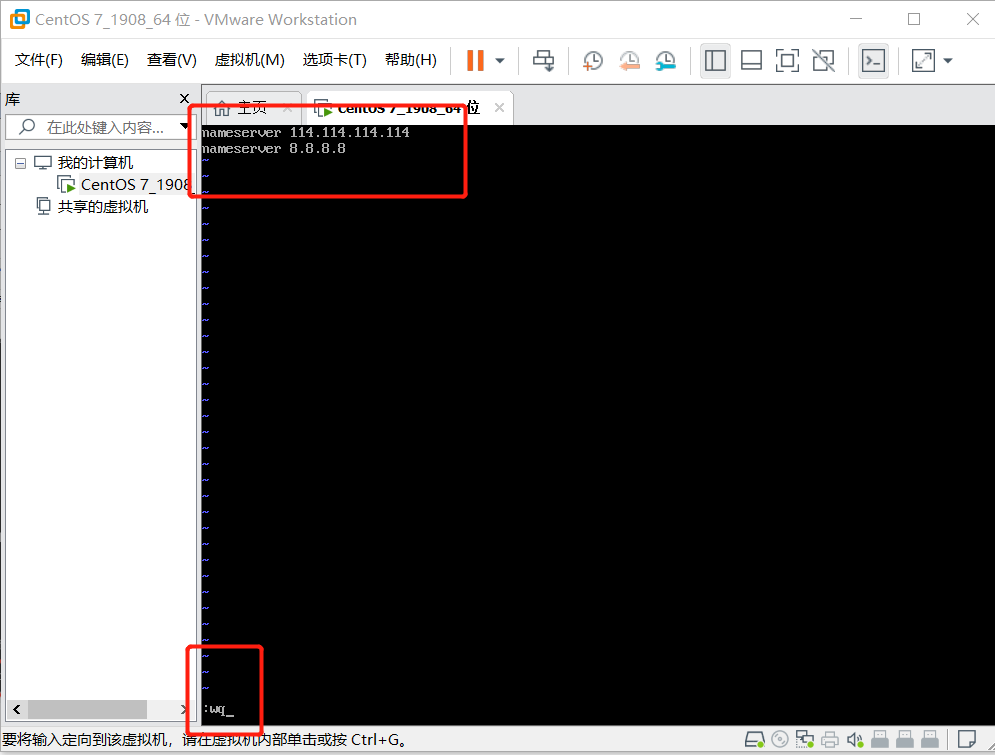
vi /etc/resolv.conf    //编辑 resolv.conf文件

nameserver 114.114.114.114   //添加DNS地址

可以添加多个DNS地址,格式为:
nameserver xxx1.xxx1.xxx1.xxx1
nameserver xxx2.xxx2.xxx2.xxx2

常用的DNS地址:

  阿里  223.5.5.5  或者  223.6.6.6

  谷歌  8.8.8.8

  国内移动、电信和联通通用的DNS  114.114.114.114
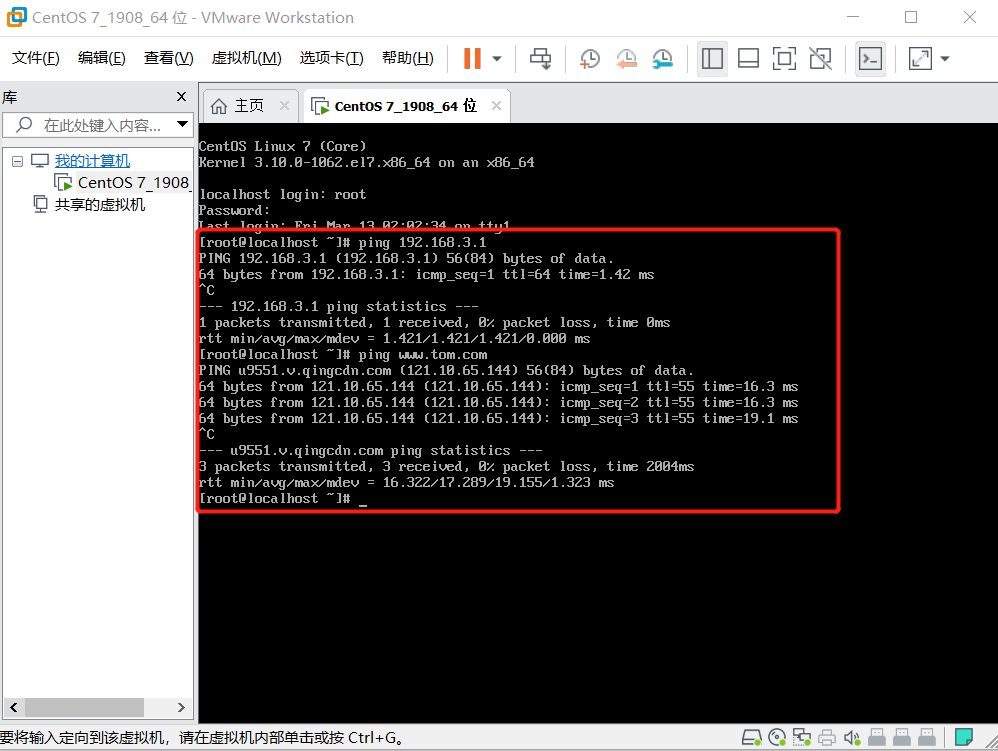
使用reboot重启服务器
再使用ping命令测试网络
包括防火墙和selinux,在内网环境下,这两项都可以关闭,防止影响配置使用;
外网环境开启防火墙,关闭slinux,具体操作如下,以内网环境为例;永久关闭 firewalld防火墙(centos7默认的防火墙是firewalld防火墙,不是使用iptables,因此需要关闭firewalld服务)
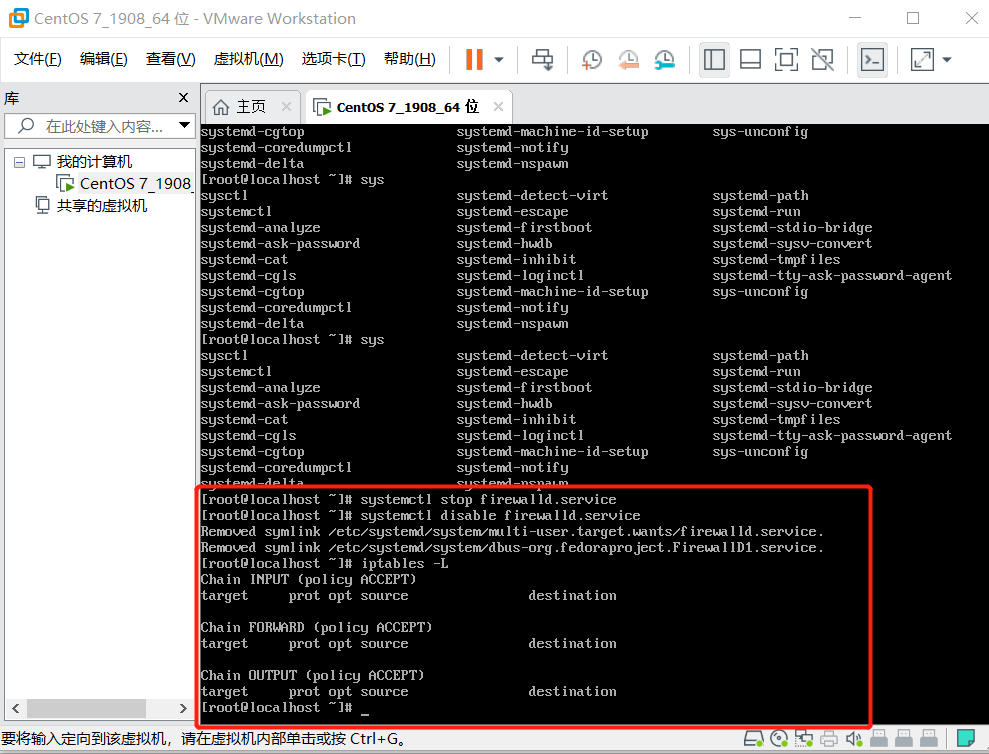
首先关闭防火墙;
systemctl stop firewalld.service  // 停止firewalld服务

systemctl disable firewalld.service // 开机禁用firewalld服务

iptables -L   //列出所有iptables规则
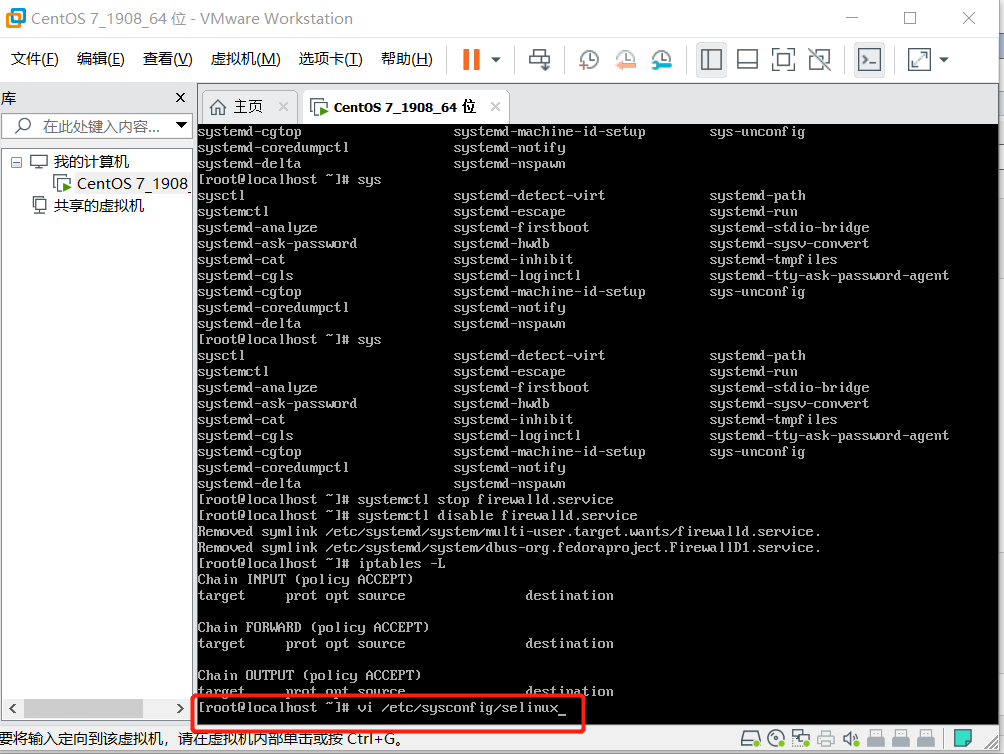
永久关闭SELinux防火墙
vi /etc/sysconfig/selinux       //编辑selinux文件

SELINUX=disabled         //把文件中的SELINUX=enforcing 改成 SELINUX=disabled 即可

sestatus    //查看SELinux状态
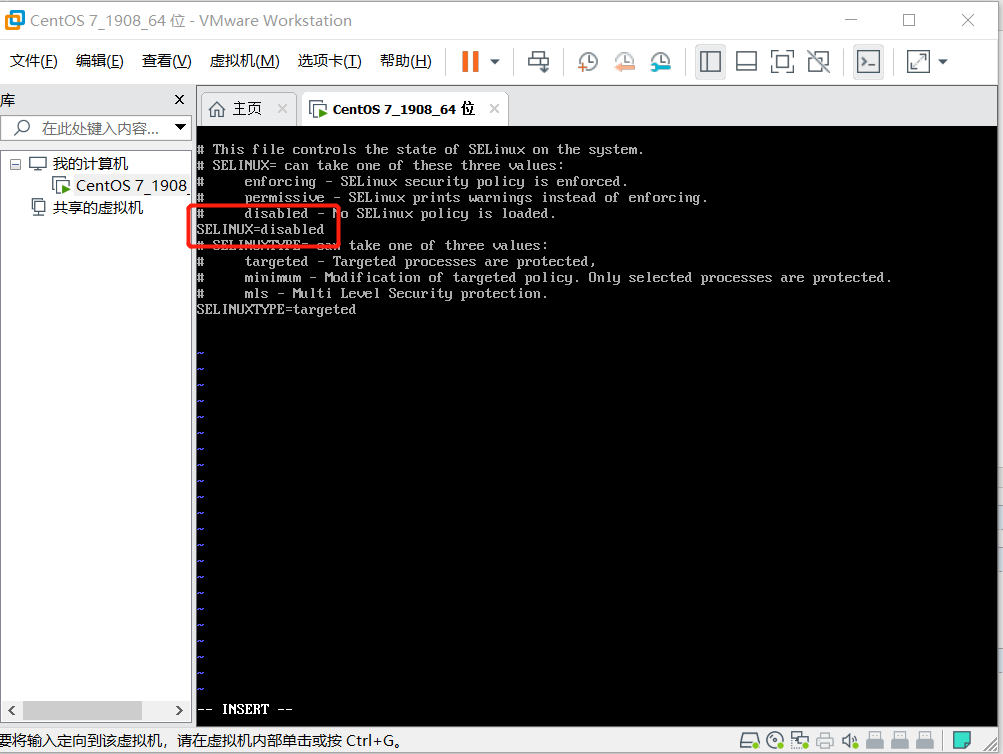
把SELINUX=enforcing 改为 SELINUX=disabled 然后保存并退出
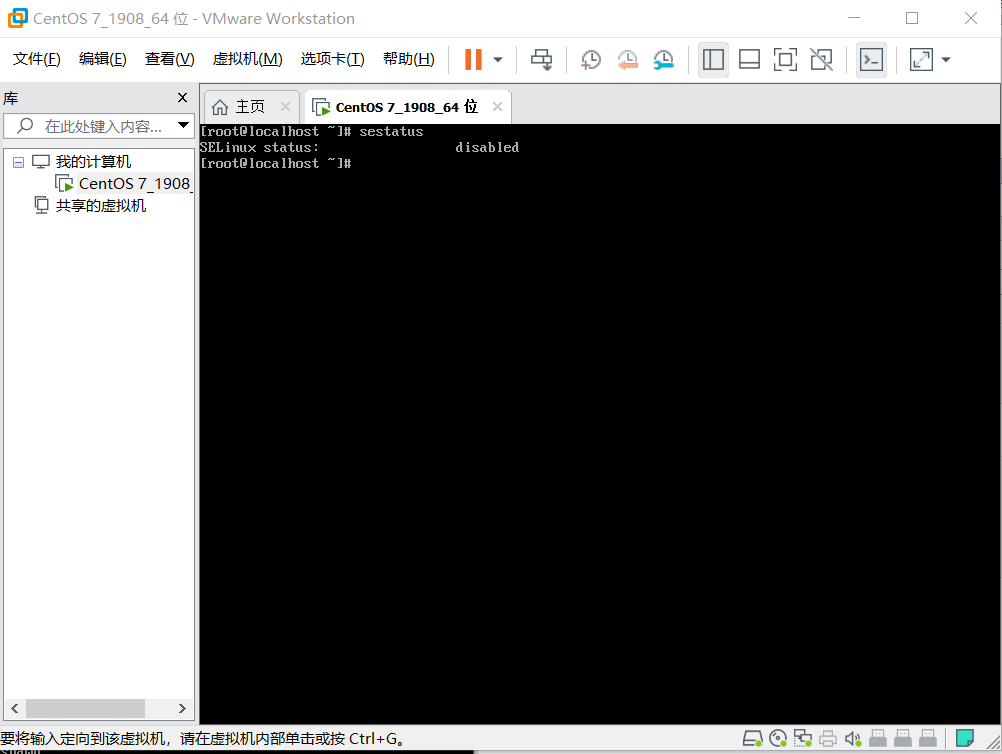
SELINIUX修改完需要重启centos系统 reboot
使用sestatus 命令查看SELINUX状态,如果是disabled关闭成功,如下图:
查看当前主机名的情况 hostnamectl
[root@localhost ~]# hostnamectl
Static hostname: localhost.localdomain
Icon name: computer-vm
Chassis: vm
Machine ID: 2c080819c8c64aee8c2a9ed4373b82b5
Boot ID: 1ca5d2bb89ea42c2af71ab772abf7967
Virtualization: vmware
Operating System: CentOS Linux 7 (Core)
CPE OS Name: cpe:/o:centos:centos:7
Kernel: Linux 3.10.0-1062.el7.x86_64
Architecture: x86-64
hostname mrxiong 临时修改主机名
[root@localhost ~]# hostname mrxiong
[root@localhost ~]# hostnamectl
   Static hostname: localhost.localdomain
Transient hostname: mrxiong
         Icon name: computer-vm
           Chassis: vm
        Machine ID: 2c080819c8c64aee8c2a9ed4373b82b5
           Boot ID: 1ca5d2bb89ea42c2af71ab772abf7967
    Virtualization: vmware
  Operating System: CentOS Linux 7 (Core)
       CPE OS Name: cpe:/o:centos:centos:7
            Kernel: Linux 3.10.0-1062.el7.x86_64
      Architecture: x86-64
vi /etc/sysconfig/network 输入HOSTNAME=Mrxiong 修改主机名永久生效
[root@localhost ~]# hostnamectl set-hostname Mrxiong
[root@localhost ~]# hostnamectl
   Static hostname: mrxiong
   Pretty hostname: Mrxiong
         Icon name: computer-vm
           Chassis: vm
        Machine ID: 2c080819c8c64aee8c2a9ed4373b82b5
           Boot ID: 1ca5d2bb89ea42c2af71ab772abf7967
    Virtualization: vmware
  Operating System: CentOS Linux 7 (Core)
       CPE OS Name: cpe:/o:centos:centos:7
            Kernel: Linux 3.10.0-1062.el7.x86_64
      Architecture: x86-64
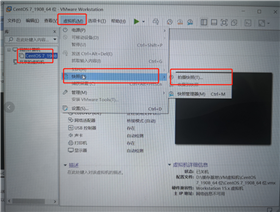
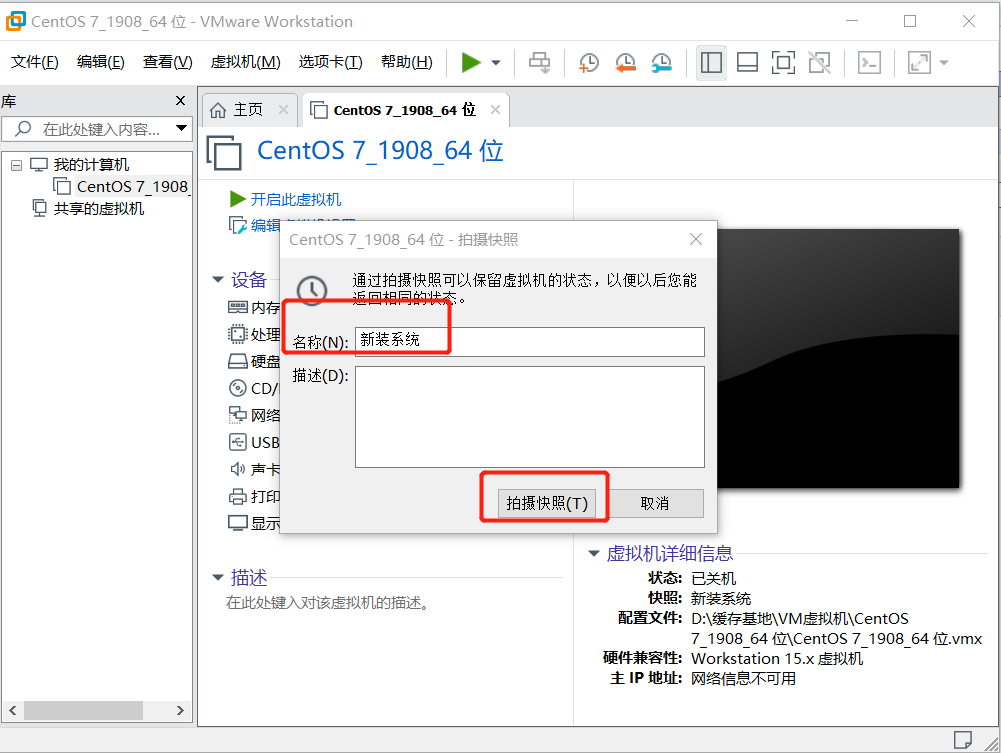
当在我们练习过程中造成系统崩馈和其它解决不了的问题,可以通过快照恢复系统
原文:https://www.cnblogs.com/createwell/p/14157971.html