创建一个flask实例,使用route构建路由,app.run开启服务
from flask import Flask
app = Flask(__name__)

@app.route(‘/‘)
def hello_world():
    return ‘Hello, World!‘
if __name__ == ‘__main__‘:
    app.run()
使用装饰器把URL映射到视图函数
@app.route(‘/‘)
def index():
    return ‘Index Page‘

@app.route(‘/hello‘)
def hello():
    return ‘Hello, World‘
可以在URL中添加变量,变量会作为关键字参数传递给函数。使用<converter:variable_name>
@app.route(‘/post/<int:post_id>‘)
def show_post(post_id):
    # show the post with the given id, the id is an integer
    return ‘Post %d‘ % post_id
使用url_for()函数用于构建指定函数的URL。函数名是第一个参数。
没把URL写死在模板中,使用url_for()动态构建的好处:
描述性更好,直观,避免相对路径
from flask import Flask, escape, url_for

app = Flask(__name__)

@app.route(‘/‘)
def index():
    return ‘index‘

@app.route(‘/login‘)
def login():
    return ‘login‘

@app.route(‘/user/<username>‘)
def profile(username):
    return ‘{}\‘s profile‘.format(escape(username))

with app.test_request_context():
    print(url_for(‘index‘))
    print(url_for(‘login‘))
    print(url_for(‘login‘, next=‘/‘))
    print(url_for(‘profile‘, username=‘John Doe‘))
利用Jinja2模板引擎,使用render_template()方法渲染模板,只需要提供模板名称和参数变量即可。模板统一放在template文件夹里面。

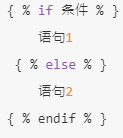
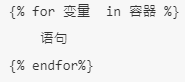
Jinjia2模板语法:
if语句:
for循环:
注释:

from flask import render_template

@app.route(‘/hello/‘)
@app.route(‘/hello/<name>‘)
def hello(name=None):
    return render_template(‘hello.html‘, name=name)
客户端网页向服务器传送的数据通过request对象来处理。在视图函数中直接使用可以取到当前本次请求。
通过Method属性可以操作当前请求方法,通过使用form属性处理表单数据,使用file处理文件数据。
@app.route(‘/login‘, methods=[‘POST‘, ‘GET‘])
def login():
    error = None
    if request.method == ‘POST‘:
        if valid_login(request.form[‘username‘],
                       request.form[‘password‘]):
            return log_the_user_in(request.form[‘username‘])
        else:
            error = ‘Invalid username/password‘
    return render_template(‘login.html‘, error=error)
@app.route("/upload",methods = [‘POST‘, ‘GET‘])
def upload():
    if request.method == "POST":
        f = request.files[‘file‘]
        basepath = os.path.dirname(__file__)
        f.save(basepath )
处理文件的时候需要在你的 HTML 表单中设置 enctype="multipart/form-data" 属性。通过files属性访问上传的文件,文件有一个保存的方法即save,可以保存到服务器。
使用redirect()进行重定向
from flask import abort, redirect, url_for

@app.route(‘/‘)
def index():
    return redirect(url_for(‘login‘))
客户端进行操作后,可以使用flash来闪现一个消息。
服务器代码中使用flash("消息“),html中使用get_flashed_messages() 来操作消息
使用Flask_SQLAlchemy进行对数据库的抽象,不用直接写SQL语句,使用python对象来操作数据库。
# 数据库链接地址
app.config[‘SQLALCHEMY_DATABASE_URI‘] = ‘mysql://root:密码@127.0.0.1:3306/test‘
# 动态追踪修改设置,如未设置只会提示警告
app.config[‘SQLALCHEMY_TRACK_MODIFICATIONS‘] = True
create database test charset utf8;
db = SQLAlchemy(app)
#定义模型类即数据库的一个表,模型要继承自db.Model
class Authors(db.Model):
    __tablename__ = ‘authors‘
    id = db.Column(db.Integer,primary_key=True)
    name = db.Column(db.String(64),unique=True)
    #关系,使用relationship描述两个属性的关系
    books = db.relationship(‘Books‘,backref = ‘Authors‘)

class Books(db.Model):
    __tablename__ = ‘books‘
    id = db.Column(db.Integer, primary_key=True)
    name = db.Column(db.String(64), unique=True, index=True)

    author_id = db.Column(db.Integer, db.ForeignKey(‘authors.id‘))
表之间的关系使用realtionship描述,例如上例Authors与Books的关系,realtionship中第一个参数为对应参照的类,
第二个参数backref为反向引用属性。可以使用author.books来调用。
使用Flask-SQLAlchemy时,插入、修改、删除操作,均由数据库会话管理。
会话即db.session。常用的操作如下:
db.session.add(obj) 添加对象
db.session.add_all([obj1,obj2,..]) 添加多个对象
db.session.delete(obj) 删除对象
db.session.commit() 提交会话
db.session.rollback() 回滚
db.session.remove() 移除会话
#添加示例,首先创建所有与db相关联的表
db.create_all()
au1 = Authors(name=‘张三‘)
au2 = Authors(name=‘李四‘)
db.session.add_all([au1, au2])
db.session.commit()

bk1 = Books(name=‘linux‘, author_id=au1.id)
bk2 = Books(name=‘python‘, author_id=au1.id)
db.session.add_all([bk1, bk2])
db.session.commit()


from flask import Flask, render_template, redirect, url_for, flash, request
from flask_sqlalchemy import SQLAlchemy
from flask_wtf.csrf import CSRFProtect
from flask_wtf import FlaskForm
from wtforms import StringField,SubmitField
from wtforms.validators import DataRequired


app = Flask(__name__)
app.config[‘SQLALCHEMY_DATABASE_URI‘] = ‘mysql+pymysql://root:878698@localhost:3306/flask_books‘
app.config[‘SQLALCHEMY_TRACK_MODIFICATIONS‘] = False
CSRFProtect(app)
app.config[‘SECRET_KEY‘] = "jfkdjfkdkjf"


db = SQLAlchemy(app)

class Authors(db.Model):
    __tablename__ = ‘authors‘
    id = db.Column(db.Integer,primary_key=True)
    name = db.Column(db.String(64),unique=True)

    books = db.relationship(‘Books‘,backref = ‘Authors‘)

class Books(db.Model):
    __tablename__ = ‘books‘
    id = db.Column(db.Integer, primary_key=True)
    name = db.Column(db.String(64), unique=True, index=True)

    author_id = db.Column(db.Integer, db.ForeignKey(‘authors.id‘))

class Authorform(FlaskForm):
    author = StringField(‘作者‘,validators = [DataRequired()])
    book = StringField(‘书名‘,validators = [DataRequired()])
    submit = SubmitField(‘提交‘)


@app.route(‘/‘)
def view():
    authors = Authors.query.all()
    author_form = Authorform()
    return render_template(‘index.html‘,authors=authors,form = author_form)


@app.route(‘/add_book‘,methods=[‘POST‘])
def add_book():
    author_form = Authorform()
    author_name = author_form.author.data
    book_name = author_form.book.data
    # 校验参数
    if not all([author_name,book_name]):
        return "作者或者书籍为空"

    author = Authors.query.filter_by(name = author_name).first()
    if author:
        book = Books.query.filter_by(name = book_name).first()
        if book:
            flash("已存在该书籍")

        else:
            bk = Books(name = book_name,author_id=author.id)
            db.session.add(bk)
            db.session.commit()
    else:
        at = Authors(name = author_name)
        db.session.add(at)
        db.session.commit()

        bk = Books(name=book_name, author_id=at.id)
        db.session.add(bk)
        db.session.commit()
    return redirect(url_for(‘view‘))


@app.route(‘/delete_book/<int:book_id>‘)
def delete_book(book_id):
    book = Books.query.get(book_id)
    db.session.delete(book)
    db.session.commit()
    return redirect(url_for(‘view‘))


@app.route(‘/delete_author/<int:author_id>‘)
def delete_author(author_id):
    author = Authors.query.get(author_id)
    for bk in author.books:
        db.session.delete(bk)
    db.session.delete(author)
    db.session.commit()
    return redirect(url_for(‘view‘))


db.drop_all()
db.create_all()
au1 = Authors(name=‘李**‘)
au2 = Authors(name=‘张**‘)
db.session.add_all([au1, au2])
db.session.commit()

bk1 = Books(name=‘linux‘, author_id=au1.id)
bk2 = Books(name=‘python‘, author_id=au1.id)
bk3 = Books(name=‘c++‘, author_id=au2.id)
db.session.add_all([bk1, bk2, bk3])
db.session.commit()

if __name__ == ‘__main__‘:
    app.run(debug=True)
<!DOCTYPE html>
<html lang="en">
<head>
    <meta charset="UTF-8">
    <title>book</title>
</head>
<body>
    <h2>添加</h2>
    <form  action=‘/add_book‘ method="post">
        {{ form.csrf_token() }}
        {{ form.author.label }}{{ form.author }}<br>
        {{ form.book.label }}{{ form.book }}<br>
        {{ form.submit }}<br>
        {% for message in get_flashed_messages() %}
            <span style="color: red">{{ message }}</span>
        {% endfor %}
    </form>
    <h2>书籍展示</h2>
    <ul>

        {% for author in authors %}
            <li>作者:{{ author.name }}<a href="{{ url_for(‘delete_author‘,author_id=author.id) }}">删除</a></li><br>
            <ul>
                {% for book in author.books %}
                    <li>书名:{{ book.name }} <a href="{{ url_for(‘delete_book‘,book_id=book.id) }}">删除</a></li><br>
                {% endfor %}
            </ul>

        {% endfor %}

    </ul>
</body>
</html>
from flask import Flask, request
from werkzeug.utils import secure_filename
import uuid
from PIL import Image
import os
import torch
from torchvision.models import resnet18
from torchvision.transforms import ToTensor

app = Flask(__name__)
net = resnet18(pretrained=True)
net.eval()

@app.route("/",methods=["GET"])
def show():
    return "classifier api"

@app.route("/run",methods = ["GET","POST"])
def run():
    file = request.files[‘file‘]
    base_path = os.path.dirname(__file__)
    if not os.path.exists(os.path.join(base_path, "temp")):
        os.makedirs(os.path.join(base_path, "temp"))
    file_name = uuid.uuid4().hex
    upload_path = os.path.join(base_path, "temp", file_name)
    file.save(upload_path)

    img = Image.open(upload_path)
    img_tensor = ToTensor()(img).unsqueeze(0)
    out = net(img_tensor)
    print(‘out_shape‘,out.shape)
    pred = torch.argmax(out,dim = 1)
    print(pred)
    return "result_cls : {}".format(pred)

if __name__ == "__main__":
    app.run(host="0.0.0.0",port=5555,debug=True)
from flask import request, Flask
import base64
import cv2
import numpy as np
app = Flask(__name__)
@app.route("/", methods=[‘POST‘,‘GET‘])
def get_frame():
    # base64编码转为图片并保存
    # 传输的base64编码为转换后整个值中data:image/jpg;base64,后的值
    img = base64.b64decode(str(request.form[‘image‘]).split(‘base64,‘)[-1])
    image_data = np.fromstring(img, np.uint8)
    image_data = cv2.imdecode(image_data, cv2.IMREAD_COLOR)
    cv2.imwrite(‘base64_2_img_01.png‘, image_data)
    print(image_data)

    return ‘koukou‘
if __name__ == "__main__":
    app.run("0.0.0.0", port=5005)
from flask import Flask, render_template, request, redirect, url_for, make_response, jsonify
from werkzeug.utils import secure_filename
import os,time
from datetime import timedelta
from main_demo import detect_cv2
ALLOWED_EXTENSIONS = set(["png","jpg","JPG","PNG", "bmp"])

def is_allowed_file(filename):
    return ‘.‘ in filename and filename.rsplit(‘.‘, 1)[1] in ALLOWED_EXTENSIONS

app = Flask(__name__)

# 静态文件缓存过期时间
app.send_file_max_age_default = timedelta(seconds=1)

@app.route("/upload",methods = [‘POST‘, ‘GET‘])
def upload():
    if request.method == "POST":
        f = request.files[‘file‘]
        if not ( f and is_allowed_file(f.filename)):
            return jsonify({
                "error":1001, "msg":"请检查上传的图片类型,仅限于png、PNG、jpg、JPG、bmp"
            })
        basepath = os.path.dirname(__file__)
        upload_path = os.path.join(basepath, "static/images",secure_filename(f.filename))
        f.save(upload_path)

        #config
        cfg_file = ‘pytorch-YOLOv4-master/cfg/yolov4.cfg‘
        weightfile = ‘pytorch-YOLOv4-master/checkpoints/yolov4.pth‘
        imgfile = upload_path
        detected_path = os.path.join(basepath, "static/images", "output" + secure_filename(f.filename))

        #run & save
        detect_cv2(cfg_file, weightfile, imgfile, detected_path)
        # run(upload_path, conf, detected_path)

        # return render_template("upload_ok.html", userinput = user_input, val1=time.time(), path = detected_path)
        path = "./images/" + "output" + secure_filename(f.filename)
        return render_template("upload_ok.html", path = path, val1 = time.time())
    return render_template("upload.html")


if __name__ == "__main__":
    app.run(host=‘0.0.0.0‘, port=5555, debug=True)
<!DOCTYPE html>
<html lang="en">
<head>
    <meta charset="UTF-8">
    <title>Flask上传图片演示</title>
</head>
<body>
    <h1>使用Flask上传本地图片</h1>
    <form action="" enctype=‘multipart/form-data‘ method=‘POST‘>
        <input type="file" name="file" style="margin-top:20px;"/>
        <br>
        <input type="submit" value="上传" class="button-new" style="margin-top:15px;"/>
    </form>

</body>
</html>
<!DOCTYPE html>
<html lang="en">
<head>
    <meta charset="UTF-8">
    <title>Flask上传图片演示</title>
</head>
<body>
    <h1>使用Flask上传本地图片</h1>
    <form action="" enctype=‘multipart/form-data‘ method=‘POST‘>
        <input type="file" name="file" style="margin-top:20px;"/>
        <br>
        <input type="submit" value="上传" class="button-new" style="margin-top:15px;"/>
    </form>
    <img src="{{ url_for(‘static‘, filename= path,_t=val1) }}" width="400" height="400" alt="图片识别失败"/>
</body>
</html>
原文:https://www.cnblogs.com/ywheunji/p/14309360.html